
6.7.12 Packet Tracer - Configure Cisco Devices for Syslog, NTP, and SSH Operations Answers Version
Topology
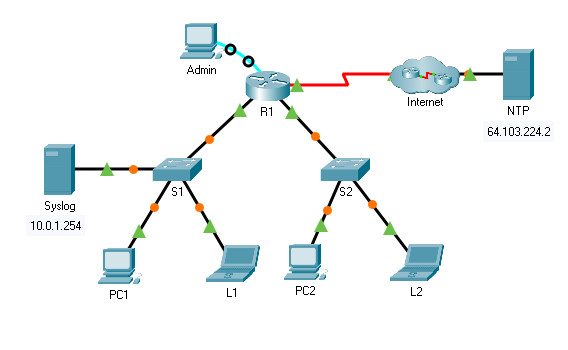
6.7.12 Packet Tracer – Configure Cisco Devices for Syslog, NTP, and SSH Operations
Table Address
| Device | Interface | IP Address | Subnet Mask |
|---|---|---|---|
| R1 | G0/1 | 10.0.1.1 | 255.255.255.0 |
| G0/2 | 10.0.2.1 | 255.255.255.0 | |
| S0/0/0 | 209.165.14.2 | 255.255.255.0 | |
| S1 | VLAN 1 | 10.0.1.2 | 255.255.255.0 |
| S2 | VLAN 1 | 10.0.2.2 | 255.255.255.0 |
| NTP Server | NIC | 64.103.224.2 | 255.255.255.252 |
| Syslog Sever | NIC | 10.0.1.254 | 255.255.255.0 |
Objectives
- Part 1: Configure Syslog Service
- Part 2: Generate Logged Events
- Part 3: Manually Set Switch Clocks
- Part 4: Configure NTP Service
- Part 5: Verify Timestamped Logs
Scenario
In this activity, you will configure secure remote access for the router. You will remote access the devices to enable and use the Syslog service and the NTP service so that the network administrator is able to monitor the network more effectively.
Instructions
Part 1: Configure Remote Access
In this part, you will access the router R1 via the console port to configure secure remote access SSH. The privileged EXEC password for all the network devices is cisco12345.
Step 1: Configure SSH on R1.
a. From the Admin PC, click Terminal within the Desktop tab. Click OK to access router R1.
b. Set a domain name of your choice on R1.
c. Create a user of your choice with a strong encrypted password.
d. Generate 1024-bit RSA keys.
e. Configure all vty lines for SSH access and use the local user profiles for authentication.
f. Set the EXEC mode timeout to 5 minutes on the vty lines.
g. Block anyone for five minutes who fails to log in after four attempts within a two-minute period.
R1(config)# login block-for 600 attempts 4 within 120
Step 2: Verify SSH access.
In this step, you will establish an SSH session to the network devices.
a. From the command prompt of another laptop or PC, access S1 via SSH using the username SSHuser and password SSHuserpass.
C:/> ssh -l SSHuser 10.0.1.2
b. Repeat and access S2 (10.0.2.2) via SSH using the credentials SSHuser / SSHuserpass.
c. From the command prompt of a laptop or PC, access R1 via SSH using the user account configured in the previous step.
d. Leave all the established SSH sessions open for NTP and Syslog configurations.
Part 2: Configure Syslog Service
Step 1: Enable the Syslog service.
a. Click Syslog, then Services tab.
b. Turn the Syslog service on and move the window so you can monitor activity.
Step 2: Configure the intermediary devices to use the Syslog service.
a. From the remote SSH session, configure R1 to send log events to the Syslog server.
R1(config)# logging 10.0.1.254
b. From the remote SSH session, configure S1 to send log events to the Syslog server.
S1(config)# logging 10.0.1.254
c. From the remote SSH session, configure S2 to send log events to the Syslog server.
S2(config)# logging 10.0.1.254
Part 3: Generate Logged Events
Step 1: Change the status of interfaces to create event logs.
a. Within the established SSH session, configure a Loopback 0 interface on R1 then disable it.
R1(config)# interface loopback 0

R1(config-if)# shutdown
b. Turn off PC1 and PC2. Turn them on again.
Step 2: Examine the Syslog events.
a. Look at the Syslog events.
Note: All the events have been recorded; however, the time stamps are incorrect. You may need to click inside the cells to see the messages.
b. Clear the log before proceeding to the next part.
Part 4: Manually Set Switch Clocks
The clocks can be set manually on the routers and switches. In this part, you will set the clocks on the switches manually and configure the switches to send the timestamps with logs to the syslog server.
Step 1: View the date and time on the switches.
a. After the PCs have finished reloading, establish the SSH sessions to the network devices again as necessary.
b. View the current time set on the clock.
S1# show clock
Step 2: Manually set the clocks on the switches.
From the established SSH session, manually set the clock on S1 and S2 to the current date and approximate time. An example is provided.
S1# clock set 11:47:00 July 10 2013
Step 3: Enable the logging timestamp service on the switches.
Configure S1 and S2 to send its timestamp with logs it sends to the Syslog server via the established SSH session.
S1(config)# service timestamps log datetime msec
S2(config)# service timestamps log datetime msec
Part 5: Configure NTP Service
Step 1: Enable the NTP service.
In this activity, we are assuming that the NTP service is being hosted on a public internet server. If the NTP server was private, authentication could also be used.
a. Open the Services tab of the NTP server.
b. Turn the NTP service on and note the date and time that is displayed.
Step 2: Automatically set the clock on the router.
Set the clock on R1 to the date and time according to the NTP server.
R1(config)# ntp server 64.103.224.2
Step 3: Enable the logging timestamp service of the router.
Configure R1 to send its timestamp with the logs that it sends to the Syslog server.
R1(config)# service timestamps log datetime msec
Part 6: Verify Timestamped Logs
Step 1: Change the status of interfaces to create event logs.
a. Re-enable and then disable the Loopback 0 interface on R1.
R1(config)# interface loopback 0

R1(config-if)# no shutdown

R1(config-if)# shutdown
b. Turn off laptops L1 and L2. Turn them on again.
Step 2: Examine the Syslog events.
Look at the Syslog events.
Note: All the events have been recorded and the time stamps are correct as configured.
Note: R1 uses the clock settings from the NTP server, and S1 and S2 use the clock settings configured in an earlier part of this activity.
Device Configs - Final
ROUTER R1
! ==============================================================
!--- 6.7.12 Packet Tracer - Configure Cisco Devices for Syslog, NTP, and SSH Operations
!--- ANSWER SCRIPT FOR ROUTER R1
!--- Usage: copy this whole file and paste it into the R1 terminal (start at the R1> prompt). Every line beginning with "!" is a comment; IOS ignores it, so pasting a comment by accident is harmless.
! ==============================================================

enable
configure terminal

! --------------------------------------------------------------
!--- Part 1: Domain Name, Local User, and RSA Key Generation.
! --------------------------------------------------------------

!--- Set a domain name of your choosing; required before RSA keys can be generated.
ip domain-name anyname.com

!--- Create a user of your choosing with a strong encrypted password.
username anyusername secret anyusernamepassword

!--- Generate 1024-bit RSA keys (paste-safe single-line form; hostname/domain-name are already set above).
crypto key generate rsa general-keys modulus 1024

! --------------------------------------------------------------
!--- Part 2: Login Protection and VTY/SSH Access.
! --------------------------------------------------------------

!--- Block anyone for 600 seconds (10 minutes) who fails to log in after four attempts within a two-minute (120s) period. (The lab's prose says "five minutes," but both its own code sample and the Answers Script use 600s — followed here since that's what the PKA auto-grader checks.)
login block-for 600 attempts 4 within 120

!--- Configure all VTY lines for SSH access and use the local user profiles for authentication.
line vty 0 4
 transport input ssh
 login local

!--- Set the EXEC mode timeout to 5 minutes on the VTY lines.
 exec-timeout 5 0
 exit

! --------------------------------------------------------------
!--- Part 3: Configure the Syslog Service.
! --------------------------------------------------------------

!--- Send log events to the Syslog server.
logging 10.0.1.254

! --------------------------------------------------------------
!--- Part 4: Configure the NTP Service.
! --------------------------------------------------------------

!--- Synchronize R1's clock to the NTP server reachable over the Internet link.
ntp server 64.103.224.2

! --------------------------------------------------------------
!--- Part 5: Enable the Logging Timestamp Service.
! --------------------------------------------------------------

!--- Send a millisecond-precision timestamp with every log message forwarded to the Syslog server.
service timestamps log datetime msec

! --------------------------------------------------------------
!--- Part 6 (optional): Generate a Test Log Event.
! --------------------------------------------------------------

!--- Create Loopback0 and immediately shut it down to trigger an interface-state Syslog event for testing the pipeline end to end.
interface loopback 0
 shutdown
 exit

end

! --------------------------------------------------------------
!--- Save the configuration to NVRAM. (Press Enter when prompted for the destination filename.)
! --------------------------------------------------------------
copy running-config startup-config


! ==============================================================
!--- Verification:
!---   show running-config | section line vty -> confirms transport input ssh, login local, exec-timeout 5 0
!---   show crypto key mypubkey rsa            -> confirms a 1024-bit RSA key pair named R1.anyname.com exists
!---   show logging                            -> confirms "10.0.1.254" is a logging host and timestamps are enabled
!---   show ntp status                         -> confirms "Clock is synchronized ... reference is 64.103.224.2"
!---   ssh -l anyusername 209.165.14.2 (from an outside host) -> confirms end-to-end SSH login works
!--- Note: this Answers Script fixes two real omissions found in the lab's own Answers Script section —
!--- see the discrepancy summary delivered alongside these files.
! ==============================================================
SWITCH S1
! ==============================================================
!--- 6.7.12 Packet Tracer - Configure Cisco Devices for Syslog, NTP, and SSH Operations
!--- ANSWER SCRIPT FOR SWITCH S1
!--- Usage: copy this whole file and paste it into the S1 terminal (start at the S1> prompt). Every line beginning with "!" is a comment; IOS ignores it, so pasting a comment by accident is harmless.
! ==============================================================

enable

! --------------------------------------------------------------
!--- Part 1: Manually Set the Switch Clock.
! --------------------------------------------------------------

!--- Set the clock to the current date and approximate time (example value; substitute the actual current date/time).
clock set 13:20:00 Feb 12 2021

configure terminal

! --------------------------------------------------------------
!--- Part 2: Configure the Syslog Service.
! --------------------------------------------------------------

!--- Send log events to the Syslog server.
logging 10.0.1.254

! --------------------------------------------------------------
!--- Part 3: Enable the Logging Timestamp Service.
! --------------------------------------------------------------

!--- Send a millisecond-precision timestamp with every log message forwarded to the Syslog server.
service timestamps log datetime msec

end

! --------------------------------------------------------------
!--- Save the configuration to NVRAM. (Press Enter when prompted for the destination filename.)
! --------------------------------------------------------------
copy running-config startup-config


! ==============================================================
!--- Verification:
!---   show clock detail   -> confirms the manually-set time and "Time source is user configuration"
!---   show logging        -> confirms "10.0.1.254" is a logging host and timestamps are enabled
!--- Note: S1's clock is set manually here (not via NTP) and will drift over time — only R1 stays
!--- synchronized automatically, via the NTP server configured on R1.
! ==============================================================
SWITCH S2
! ==============================================================
!--- 6.7.12 Packet Tracer - Configure Cisco Devices for Syslog, NTP, and SSH Operations
!--- ANSWER SCRIPT FOR SWITCH S2
!--- Usage: copy this whole file and paste it into the S2 terminal (start at the S2> prompt). Every line beginning with "!" is a comment; IOS ignores it, so pasting a comment by accident is harmless.
! ==============================================================

enable

! --------------------------------------------------------------
!--- Part 1: Manually Set the Switch Clock.
! --------------------------------------------------------------

!--- Set the clock to the current date and approximate time (example value; substitute the actual current date/time).
clock set 13:20:00 Feb 12 2021

configure terminal

! --------------------------------------------------------------
!--- Part 2: Configure the Syslog Service.
! --------------------------------------------------------------

!--- Send log events to the Syslog server.
logging 10.0.1.254

! --------------------------------------------------------------
!--- Part 3: Enable the Logging Timestamp Service.
! --------------------------------------------------------------

!--- Send a millisecond-precision timestamp with every log message forwarded to the Syslog server.
service timestamps log datetime msec

end

! --------------------------------------------------------------
!--- Save the configuration to NVRAM. (Press Enter when prompted for the destination filename.)
! --------------------------------------------------------------
copy running-config startup-config


! ==============================================================
!--- Verification:
!---   show clock detail   -> confirms the manually-set time and "Time source is user configuration"
!---   show logging        -> confirms "10.0.1.254" is a logging host and timestamps are enabled
!--- Note: S2's clock is set manually here (not via NTP) and will drift over time — only R1 stays
!--- synchronized automatically, via the NTP server configured on R1.
! ==============================================================
Download Packet Tracer (.pka) file:


