
8.5.12 Packet Tracer - Configure Extended ACLs - Scenario 1 Answers Version
Topology
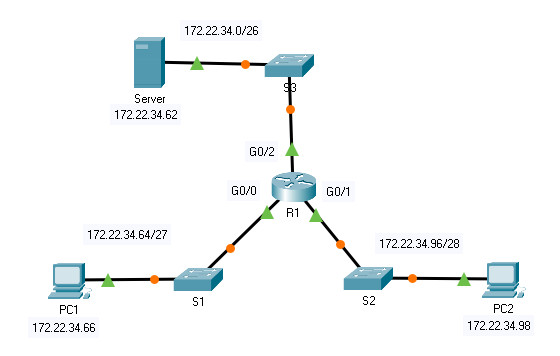
8.5.12 Packet Tracer – Configure Extended ACLs – Scenario 1
Addressing Table
| Device | Interface | IP Address | Subnet Mask | Default Gateway |
|---|---|---|---|---|
| R1 | G0/0 | 172.22.34.65 | 255.255.255.224 | N/A |
| G0/1 | 172.22.34.97 | 255.255.255.240 | ||
| G0/2 | 172.22.34.1 | 255.255.255.192 | ||
| Server | NIC | 172.22.34.62 | 255.255.255.192 | 172.22.34.1 |
| PC1 | NIC | 172.22.34.66 | 255.255.255.224 | 172.22.34.65 |
| PC2 | NIC | 172.22.34.98 | 255.255.255.240 | 172.22.34.97 |
Objectives
- Part 1: Configure, Apply and Verify an Extended Numbered ACL
- Part 2: Configure, Apply and Verify an Extended Named ACL
Background / Scenario
Two employees need access to services provided by the server. PC1 only needs FTP access while PC2 only needs web access. Both computers need to be able to ping the server, but not each other.
Instructions
Part 1: Configure, Apply and Verify an Extended Numbered ACL
Step 1: Configure an ACL to permit FTP and ICMP from PC1 LAN.
a. From global configuration mode on R1, enter the following command to determine the first valid number for an extended access list.
R1(config)# access-list ?
 <1-99>     IP standard access list
 <100-199>  IP extended access list
b. Add 100 to the command, followed by a question mark.
R1(config)# access-list 100 ?
  deny    Specify packets to reject
  permit  Specify packets to forward
  remark  Access list entry comment
c. To permit FTP traffic, enter permit, followed by a question mark.
R1(config)# access-list 100 permit ?
 ahp    Authentication Header Protocol
 eigrp  Cisco's EIGRP routing protocol
 esp    Encapsulation Security Payload
 gre    Cisco's GRE tunneling
 icmp   Internet Control Message Protocol
 ip     Any Internet Protocol
 ospf   OSPF routing protocol
 tcp    Transmission Control Protocol
 udp    User Datagram Protocol
d. When configured and applied, this ACL should permit FTP and ICMP. ICMP is listed above, but FTP is not. This is because FTP is an application layer protocol that uses TCP at the transport layer. Enter TCP to further refine the ACL help.
R1(config)# access-list 100 permit tcp ?
 A.B.C.D  Source address
 any      Any source host
 host     A single source host
e. The source address can represent a single device, such as PC1, by using the host keyword and then the IP address of PC1. Using the keyword any permits any host on any network. Filtering can also be done by a network address. In this case, it is any host that has an address belonging to the 172.22.34.64/27 network. Enter this network address, followed by a question mark.
R1(config)# access-list 100 permit tcp 172.22.34.64 ?
 A.B.C.D Source wildcard bits
f. Calculate the wildcard mask by determining the binary opposite of the /27 subnet mask.
11111111.11111111.11111111.11100000 = 255.255.255.224
00000000.00000000.00000000.00011111 = 0.0.0.31
g. Enter the wildcard mask, followed by a question mark.
R1(config)# access-list 100 permit tcp 172.22.34.64 0.0.0.31 ?
 A.B.C.D  Destination address
 any      Any destination host
 eq       Match only packets on a given port number
 gt       Match only packets with a greater port number
 host     A single destination host
 lt       Match only packets with a lower port number
 neq      Match only packets not on a given port number
 range    Match only packets in the range of port numbers
h. Configure the destination address. In this scenario, we are filtering traffic for a single destination, which is the server. Enter the host keyword followed by the server’s IP address.
R1(config)# access-list 100 permit tcp 172.22.34.64 0.0.0.31 host 172.22.34.62 ?
  dscp         Match packets with given dscp value
  eq           Match only packets on a given port number
  established  established
  gt           Match only packets with a greater port number
  lt           Match only packets with a lower port number
  neq          Match only packets not on a given port number
  precedence   Match packets with given precedence value
  range        Match only packets in the range of port numbers
  <cr>
i. Notice that one of the options is <cr> (carriage return). In other words, you can press Enter and the statement would permit all TCP traffic. However, we are only permitting FTP traffic; therefore, enter the eq keyword, followed by a question mark to display the available options. Then, enter ftp and press Enter.
R1(config)# access-list 100 permit tcp 172.22.34.64 0.0.0.31 host 172.22.34.62 eq ?
 <0-65535>  Port number
 ftp        File Transfer Protocol (21)
 pop3       Post Office Protocol v3 (110)
 smtp       Simple Mail Transport Protocol (25)
 telnet     Telnet (23)
 www        World Wide Web (HTTP, 80)
R1(config)# access-list 100 permit tcp 172.22.34.64 0.0.0.31 host 172.22.34.62 eq ftp
j. Create a second access list statement to permit ICMP (ping, etc.) traffic from PC1 to Server. Note that the access list number remains the same and a specific type of ICMP traffic does not need to be specified.
R1(config)# access-list 100 permit icmp 172.22.34.64 0.0.0.31 host 172.22.34.62
k. All other traffic is denied, by default.
l. Execute the show access-list command and verify that access list 100 contains the correct statements. Notice that the statement deny any any does not appear at the end of the access list. The default execution of an access list is that if a packet does not match a statement in the access list, it is not permitted through the interface.
R1#show access-lists
Extended IP access list 100
    10 permit tcp 172.22.34.64 0.0.0.31 host 172.22.34.62 eq ftp
    20 permit icmp 172.22.34.64 0.0.0.31 host 172.22.34.62
Step 2: Apply the ACL on the correct interface to filter traffic.
From R1’s perspective, the traffic that ACL 100 applies to is inbound from the network connected to the Gigabit Ethernet 0/0 interface. Enter interface configuration mode and apply the ACL.
Note: On an actual operational network, it is not a good practice to apply an untested access list to an active interface.
R1(config)# interface gigabitEthernet 0/0
R1(config-if)# ip access-group 100 in
Step 3: Verify the ACL implementation.
a. Ping from PC1 to Server. If the pings are unsuccessful, verify the IP addresses before continuing.
b. FTP from PC1 to Server. The username and password are both cisco.
PC> ftp 172.22.34.62
c. Exit the FTP service.
ftp> quit
d. Ping from PC1 to PC2. The destination host should be unreachable, because the ACL did not explicitly permit the traffic.
Part 2: Configure, Apply and Verify an Extended Named ACL
Step 1: Configure an ACL to permit HTTP access and ICMP from PC2 LAN.
a. Named ACLs start with the ip keyword. From global configuration mode of R1, enter the following command, followed by a question mark.
R1(config)# ip access-list ?
 extended   Extended Access List
 standard   Standard Access List
b. You can configure named standard and extended ACLs. This access list filters both source and destination IP addresses; therefore, it must be extended. Enter HTTP_ONLY as the name. (For Packet Tracer scoring, the name is case-sensitive and the access list statements must be the correct order.)
R1(config)# ip access-list extended HTTP_ONLY
c. The prompt changes. You are now in extended named ACL configuration mode. All devices on the PC2 LAN need TCP access. Enter the network address, followed by a question mark.
R1(config-ext-nacl)# permit tcp 172.22.34.96 ?
  A.B.C.D Source wildcard bits
d. An alternative way to calculate a wildcard is to subtract the subnet mask from 255.255.255.255.
  255.255.255.255
- 255.255.255.240
-----------------
=   0.  0.  0. 15
R1(config-ext-nacl)# permit tcp 172.22.34.96 0.0.0.15
e. Finish the statement by specifying the server address as you did in Part 1 and filtering www traffic.
R1(config-ext-nacl)# permit tcp 172.22.34.96 0.0.0.15 host 172.22.34.62 eq www
f. Create a second access list statement to permit ICMP (ping, etc.) traffic from PC2 to Server. Note: The prompt remains the same and a specific type of ICMP traffic does not need to be specified.
R1(config-ext-nacl)# permit icmp 172.22.34.96 0.0.0.15 host 172.22.34.62
g. All other traffic is denied, by default. Exit extended named ACL configuration mode.
h. Execute the show access-list command and verify that access list HTTP_ONLY contains the correct statements.
R1# show access-lists
Extended IP access list 100
10 permit tcp 172.22.34.64 0.0.0.31 host 172.22.34.62 eq ftp
20 permit icmp 172.22.34.64 0.0.0.31 host 172.22.34.62
Extended IP access list HTTP_ONLY
10 permit tcp 172.22.34.96 0.0.0.15 host 172.22.34.62 eq www
20 permit icmp 172.22.34.96 0.0.0.15 host 172.22.34.62
Step 2: Apply the ACL on the correct interface to filter traffic.
From R1’s perspective, the traffic that access list HTTP_ONLY applies to is inbound from the network connected to the Gigabit Ethernet 0/1 interface. Enter interface configuration mode and apply the ACL.
Note: On an actual operational network, it is not a good practice to apply an untested access list to an active interface. It should be avoided if possible.
R1(config)# interface gigabitEthernet 0/1
R1(config-if)# ip access-group HTTP_ONLY in
Step 3: Verify the ACL implementation.
a. Ping from PC2 to Server. If the ping is unsuccessful, verify the IP addresses before continuing.
b. From PC2 open a web browser and enter the IP address of the Server. The web page of the Server should be displayed.
c. FTP from PC2 to Server. The connection should fail. If not, troubleshoot the access list statements and the access-group configurations on the interfaces.
Device Configs - Final
Router R1
! ==============================================================
!--- 8.5.12 Packet Tracer - Configure Extended IPv4 ACLs - Scenario 1
!--- ANSWER SCRIPT FOR ROUTER R1
!--- Usage: from the console (or CLI tab) on R1, enter privileged EXEC mode with "enable",
!--- then paste this whole file. Every line beginning with "!" is a comment; IOS ignores it.
!--- Policy: PC1 (172.22.34.64/27) gets FTP + ping to the Server only; PC2 (172.22.34.96/28)
!--- gets web (HTTP) + ping to the Server only; neither PC can reach the other. Unlike
!--- standard ACLs, extended ACLs can match on destination too, so best practice flips: place
!--- each ACL inbound, as close to its SOURCE network as possible - that's why ACL 100 goes
!--- on G0/0 (PC1's own interface) and HTTP_ONLY goes on G0/1 (PC2's own interface), both "in".
! --------------------------------------------------------------

enable
configure terminal

! --------------------------------------------------------------
!--- Part 1, Step 1: Extended numbered ACL 100 for PC1 - FTP (TCP/21) and ICMP to the
!--- Server only. No explicit "deny any any" needed - the lab is explicit that this line
!--- is intentionally left out here, relying on the implicit deny at the end of every ACL.
! --------------------------------------------------------------
access-list 100 permit tcp 172.22.34.64 0.0.0.31 host 172.22.34.62 eq ftp
access-list 100 permit icmp 172.22.34.64 0.0.0.31 host 172.22.34.62

! --------------------------------------------------------------
!--- Part 1, Step 2: Apply inbound on G0/0 - PC1's own LAN-facing interface.
! --------------------------------------------------------------
interface GigabitEthernet0/0
 ip access-group 100 in
exit

! --------------------------------------------------------------
!--- Part 2, Step 1: Extended named ACL HTTP_ONLY for PC2 - web (TCP/80) and ICMP to the
!--- Server only. For Packet Tracer scoring, the name is case-sensitive and the two
!--- statements must be entered in this exact order.
!--- NEEDS CORRECTION: this lab's own printed "Answer Script" also includes a bare
!--- "permit tcp 172.22.34.96 0.0.0.15" line (with no destination/port) BEFORE the complete
!--- www-specific line below. That line only appears in the Instructions as an illustrative,
!--- not-yet-finished mid-step (the wildcard-mask calculation demo, Part 2 Step 1d) - it was
!--- never meant to be entered as its own command; Step 1e immediately finishes that same
!--- line into the complete statement shown here. Pasting it as a real ACE would insert an
!--- extra rule permitting ALL TCP traffic from PC2's entire network to ANY destination and
!--- port - which directly contradicts the stated policy that PC2 should only get web access,
!--- and isn't reflected anywhere in this lab's own verification steps (which never test PC2
!--- reaching any destination besides the Server on the two intended protocols). Omit that
!--- line.
! --------------------------------------------------------------
ip access-list extended HTTP_ONLY
 permit tcp 172.22.34.96 0.0.0.15 host 172.22.34.62 eq www
 permit icmp 172.22.34.96 0.0.0.15 host 172.22.34.62

! --------------------------------------------------------------
!--- Part 2, Step 2: Apply inbound on G0/1 - PC2's own LAN-facing interface.
! --------------------------------------------------------------
interface GigabitEthernet0/1
 ip access-group HTTP_ONLY in

end

! --------------------------------------------------------------
!--- Operational habit (not explicitly required by this lab): save to NVRAM.
! --------------------------------------------------------------
copy running-config startup-config

! ==============================================================
!--- Verification (from R1 and the PCs):
!---   R1# show access-lists -> Extended IP access list 100:
!---   10 permit tcp 172.22.34.64 0.0.0.31 host 172.22.34.62 eq ftp
!---   20 permit icmp 172.22.34.64 0.0.0.31 host 172.22.34.62
!---   Extended IP access list HTTP_ONLY:
!---   10 permit tcp 172.22.34.96 0.0.0.15 host 172.22.34.62 eq www
!---   20 permit icmp 172.22.34.96 0.0.0.15 host 172.22.34.62
!---   (if the stray line above was pasted by mistake, this section would instead show three
!---   lines under HTTP_ONLY, with an extra broad "permit tcp 172.22.34.96 0.0.0.15" first -
!---   that's the signal something needs to be removed)
!---
!---   PC1 > ping 172.22.34.62 (Server) -> succeeds
!---   PC1 > ftp 172.22.34.62           -> succeeds (username/password: cisco / cisco)
!---   PC1 > ping [PC2's address]       -> fails, destination host unreachable
!---   PC2 > ping 172.22.34.62 (Server) -> succeeds
!---   PC2 > browse to http://172.22.34.62 -> Server's web page loads
!---   PC2 > ftp 172.22.34.62           -> fails (no ftp permit rule for PC2)
! ==============================================================


