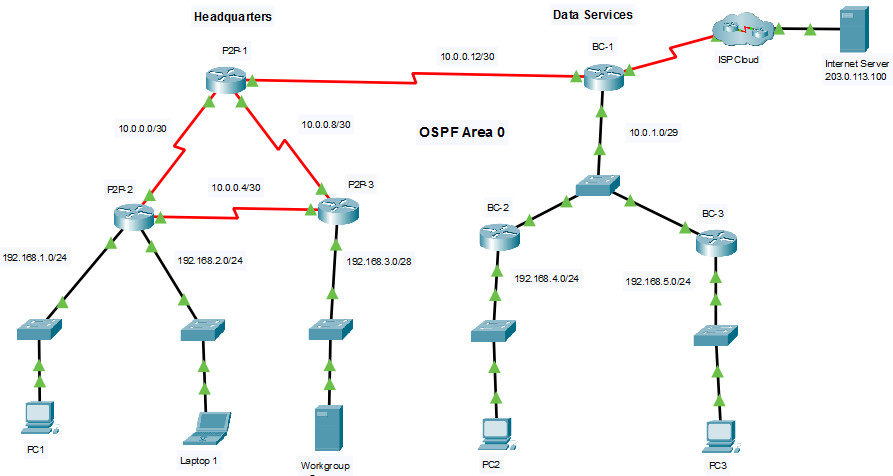
2.7.1 Packet Tracer – Single-Area OSPFv2 Configuration (Instructor Version)

2.7.1 Packet Tracer – Single-Area OSPFv2 Configuration
Instructor Note: Red font color or gray highlights indicate text that appears in the instructor copy only.
Addressing Table
| Device | Interface | IP Address / Prefix |
|---|---|---|
| P2P-1 | S0/1/0 | 10.0.0.1/30 |
| S0/1/1 | 10.0.0.9/30 | |
| S0/2/0 | 10.0.0.13/30 | |
| P2P-2 | S0/1/0 | 10.0.0.2/30 |
| S0/1/1 | 10.0.0.5/30 | |
| G0/0/0 | 192.168.1.1/24 | |
| G0/0/1 | 192.168.2.1/24 | |
| P2P-3 | S0/1/0 | 10.0.0.6/30 |
| S0/1/1 | 10.0.0.10/30 | |
| G0/0/0 | 192.168.3.1/28 | |
| BC-1 | S0/1/0 | 10.0.0.14/30 |
| S0/1/1 | 64.0.100.2/30 | |
| G0/0/0 | 10.0.1.1/29 | |
| BC-2 | G0/0/0 | 192.168.4.1/30 |
| G0/0/1 | 10.0.1.2/29 | |
| BC-3 | G0/0/0 | 192.168.5.1/24 |
| G0/0/1 | 10.0.1.3/29 | |
| Internet Server | NIC | 203.0.113.100/24 |
| PC 1 | NIC | 192.168.1.10/24 |
| Laptop 1 | NIC | 192.168.2.20/24 |
| Workgroup Server | NIC | 192.168.3.14/28 |
| PC 2 | NIC | 192.168.4.40/24 |
| PC 3 | NIC | 192.168.5.50/24 |
Objectives
Implement single-area OSPFv2 in both point-to-point and broadcast multiaccess networks.
Background
You are helping a network engineer test an OSPF set up by building the network in the lab where you work. You have interconnected the devices and configured the interfaces and have connectivity within the local LANs. Your job is to complete the OSPF configuration according to the requirements left by the engineer.
Use the information provided and the list of requirements to configure the test network. When the task has been successfully completed, all hosts should be able to ping the internet server.
Instructions
Configure the network to meet the requirements.
Requirements
Use process ID 10 for OSPF activation on all routers.
• Activate OSPF using network statements and inverse masks on the routers in the Headquarters network.
• Activate OSPF by configuring the interfaces of the network devices in the Data Service network, where required.
• Configure router IDs on the multiaccess network routers as follows:
- BC-1: 6.6.6.6
- BC-2: 5.5.5.5
- BC-3: 4.4.4.4
• Configure OSPF so that routing updates are not sent into networks where they are not required.
• Configure router BC-1 with the highest OSPF interface priority so that it will always be the designated router of the multiaccess network.
BC-1(config)#interface GigabitEthernet0/0/0
BC-1(config-if)#ip ospf priority 255
• Configure a default route to the ISP cloud using the exit interface command argument.
BC-1(config)#ip route 0.0.0.0 0.0.0.0 Serial0/1/1
• Automatically distribute the default route to all routers in the network.
BC-1(config)#router ospf 10
BC-1(config-router)#default-information originate
• Configure the OSPF routers so that the Gigabit Ethernet interface cost will be 10 and the Fast Ethernet cost will be 100.
• Configure the OSPF cost value of P2P-1 interface Serial0/1/1 to 50.
P2P-1(config)#interface Serial0/1/1
P2P-1(config-if)#ip ospf cost 50
• Configure the hello and dead timer values on the interfaces that connect P2P-1 and BC-1 to be twice the default values.
Answers Configurations
P2P-1
enable configure terminal interface Serial0/1/1 ip ospf cost 50 interface Serial0/2/0 ip ospf hello-interval 20 ip ospf dead-interval 80 router ospf 10 auto-cost reference-bandwidth 1000 network 10.0.0.0 0.0.0.3 area 0 network 10.0.0.8 0.0.0.3 area 0 network 10.0.0.12 0.0.0.3 area 0 end
P2P-2
enable configure terminal router ospf 10 log-adjacency-changes passive-interface GigabitEthernet0/0/0 passive-interface GigabitEthernet0/0/1 auto-cost reference-bandwidth 1000 network 10.0.0.0 0.0.0.3 area 0 network 10.0.0.4 0.0.0.3 area 0 network 192.168.1.0 0.0.0.255 area 0 network 192.168.2.0 0.0.0.255 area 0 end
P2P-3
enable configure terminal ! router ospf 10 log-adjacency-changes passive-interface GigabitEthernet0/0/0 auto-cost reference-bandwidth 1000 network 10.0.0.4 0.0.0.3 area 0 network 10.0.0.8 0.0.0.3 area 0 network 192.168.3.0 0.0.0.15 area 0 end
BC-1
enable configure terminal interface GigabitEthernet0/0/0 ip ospf priority 255 ip ospf 10 area 0 interface Serial0/1/0 ip ospf hello-interval 20 ip ospf dead-interval 80 ip ospf 10 area 0 router ospf 10 router-id 6.6.6.6 passive-interface Serial0/1/1 auto-cost reference-bandwidth 1000 default-information originate ip route 0.0.0.0 0.0.0.0 Serial0/1/1 end
BC-2
enable configure terminal interface GigabitEthernet0/0/0 ip ospf 10 area 0 interface GigabitEthernet0/0/1 ip ospf 10 area 0 router ospf 10 router-id 5.5.5.5 passive-interface GigabitEthernet0/0/0 auto-cost reference-bandwidth 1000 end
BC-3
enable configure terminal interface GigabitEthernet0/0/0 ip ospf 10 area 0 interface GigabitEthernet0/0/1 ip ospf 10 area 0 router ospf 10 router-id 4.4.4.4 passive-interface GigabitEthernet0/0/0 auto-cost reference-bandwidth 1000 end

What will be the effect of auto-cost re bw 1000
P2P-1(config)#router ospf 10 P2P-1(config-router)#auto-cost reference-bandwidth 10000 It should not be like that? 10000?
that’s for a 10 gigabit ethernet
yes but the instruction says we need a cost of 10.
Setting it to 1000 will give a cost of 1, you can confirm this by “show ip ospf int interface”. So the solution that scores you points is actually wrong.
This lab deals with Gigabit Ethernet interfaces, not 10 Gigabit ethernet. A Gigabit Ethernet interface runs at 1 Gigabit per second. 1 Gigabit/s is equal to 1000 megabits/s. The command “auto-cost reference-bandwidth” setting is represented by mbps. Therefore, use 1000 to set the reference bandwidth to that of a gigabit interface. Use a setting of 10000 mbps if utilizing interfaces that operate at 10 Gigabit speeds.
that’s not an adequate explanation. the costs are calculated as reference-bandwidth divided by interface-bandwidth. so a reference of 1000 would give the cost of a gigabit interface equal to 1.
1000 / 1000 = 1
how would the formula change for different lab environments?
For some reason when i use the 10000 the
‘check result’ changes frm 94% to 100%
i can confirm your statement. changing the value to 10000 gets us a score in this exercise.