
12.5.13 Packet Tracer - Troubleshoot Enterprise Networks (Instructor Version)
Instructor Note: Red font color or gray highlights indicate text that appears in the instructor copy only.
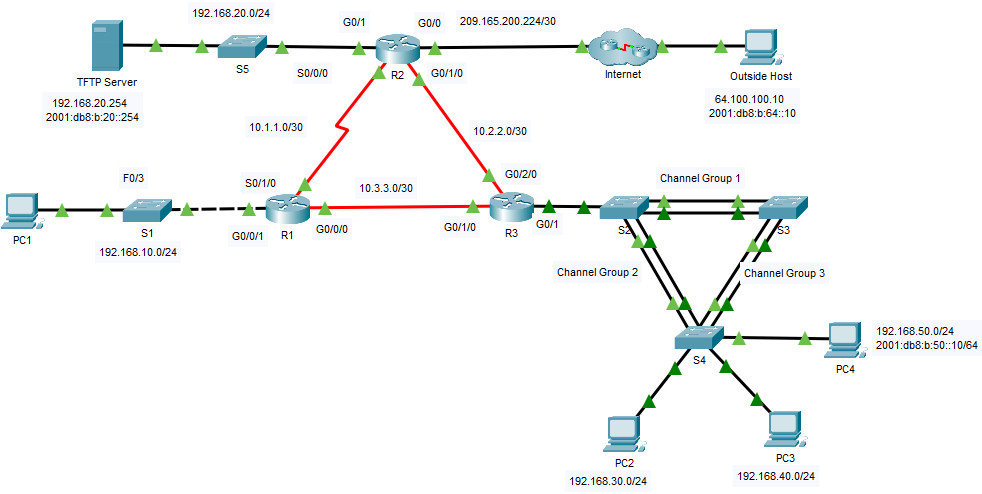
12.5.13 Packet Tracer - Troubleshoot Enterprise Networks
Objectives
- Part 1: Verify Switching Technologies
- Part 2: Verify DHCP
- Part 3: Verify Routing
- Part 4: Verify WAN Technologies
- Part 5: Verify Connectivity
Scenario
This activity uses a variety of technologies that you have encountered during your CCNA studies, including IPv4 routing, IPv6 routing, port security, EtherChannel, DHCP, and NAT. Your task is to review the requirements, isolate and resolve any problems, and then document the steps you took to verify the requirements.
The company replaced routers R1 and R3 to accommodate a fiber connection between the locations. Configurations from the previous routers with serial connections were modified and applied as a starting configuration. IPv6 is being tested on a small portion of the network and needs to be verified.
Note: Passwords have been removed for ease of troubleshooting in this exercise. The typical password protections should be reapplied; however, the activity will not grade those items.
Addressing Table
| Device | Interface | IP Address / Prefix | Default Gateway |
|---|---|---|---|
| R1 | G0/0/1 | 192.168.10.1 /24 | N/A |
| S0/1/0 | 10.1.1.1 /30 | N/A | |
| G0/0/0 | 10.3.3.1 /30 | N/A | |
| R2 | G0/0 | 209.165.200.225 /30 | N/A |
| 2001:db8:b:209::1/64 | |||
| G0/1 | 192.168.20.1 /24 | N/A | |
| 2001:db8:b:20::1/64 | |||
| S0/0/0 | 10.1.1.2 /30 | N/A | |
| G0/1/0 | 10.2.2.1 /30 | N/A | |
| 2001:db8:b:10:2::1/64 | |||
| R3 | G0/1.30 | 192.168.30.1 /24 | N/A |
| G0/1.40 | 192.168.40.1 /24 | N/A | |
| G0/1.50 | 192.168.50.1 /24 | N/A | |
| 2001:db8:b:50::1/64 | |||
| G0/1.99 | N/A | N/A | |
| G0/1/0 | 10.3.3.2 /30 | N/A | |
| G0/2/0 | 10.2.2.2 /30 | N/A | |
| 2001:db8:b:10:2::2/64 | |||
| S1 | VLAN10 | 192.168.10.2 /24 | 192.168.10.1 |
| S2 | VLAN11 | 192.168.99.2 /24 | N/A |
| S3 | VLAN30 | 192.168.99.3 /24 | N/A |
| S4 | VLAN30 | 192.168.99.4 /24 | N/A |
| PC1 | NIC | IPv4 DHCP assigned | IPv4 DHCP assigned |
| PC2 | NIC | IPv4 DHCP assigned | IPv4 DHCP assigned |
| PC3 | NIC | IPv4 DHCP assigned | IPv4 DHCP assigned |
| PC4 | NIC | IPv4 DHCP assigned | IPv4 DHCP assigned |
| 2001:db8:b:50::10/64 | fe80::3 | ||
| TFTP Server | NIC | 192.168.20.254 /24 | 192.168.20.1 |
| 2001:db8:b:20::254/64 | fe80::2 |
Instructions
Part 1: Verify Switching Technologies
a. Port security is configured to only allow PC1 to access S1's F0/3 interface. All violations should disable the interface.
Issue the command on S1 to display the current port security status.
S1# show port-security
b. Enter interface configuration mode for interface F0/3 and set up port security.
S1(config)# interface f0/3
S1(config-if)# switchport port-security
S1(config-if)# switchport port-security mac-address sticky
c. Devices in the LAN on S1 should be in VLAN 10. Display the current state of VLAN configuration.
S1#show vlan

VLAN Name                             Status    Ports
---- -------------------------------- --------- -------------------------------
1    default                          active    Fa0/1, Fa0/2, Fa0/5, Fa0/6
                                                Fa0/7, Fa0/8, Fa0/9, Fa0/10
                                                Fa0/11, Fa0/12, Fa0/13, Fa0/14
                                                Fa0/15, Fa0/16, Fa0/17, Fa0/18
                                                Fa0/19, Fa0/20, Fa0/21, Fa0/22
                                                Fa0/23, Fa0/24, Gig0/1, Gig0/2
10   V10                              active    Fa0/3, Fa0/4
1002 fddi-default                     active
1003 token-ring-default               active
1004 fddinet-default                  active
1005 trnet-default                    active
What ports are currently assigned to VLAN 10?
d. PC1 should be receiving an IP address from the router R1.
Does the PC currently have an IP address assigned?
e. Notice the G0/1 interface on R1 is not in the same VLAN as PC1. Change the G0/1 interface to be a member of VLAN 10 and set portfast on the interface.
S1(config-if)# int G0/1
S1(config-if)# switchport access vlan 10
S1(config-if)# spanning-tree portfast
f. Reset the interface address on PC1 from the GUI or by using the command prompt and the ipconfig /renew command. Does PC1 have an address? Yes, IP is 192.168.10.10 If not, recheck your steps. Test connectivity to the TFTP Server. The ping should be successful.
g. The LAN connected to R3 had an additional switch added to the topology. Link aggregation using EtherChannel is configured on S2, S3, and S4. The EtherChannel links should be set to trunk. The EtherChannel links should be set to form a channel without using a negotiation protocol. Issue the command on each switch to determine if the channel is working correctly.
S2# show etherchannel summary
<output omitted>
1      Po1(SU)        -      Fa0/1(P) Fa0/2(P)
2      Po2(SU)        -      Fa0/3(P) Fa0/4(P)
Were there any problems with EtherChannel?
h. Modify S3 to include ports F0/1 and F0/2 as port channel 1.
S3(config)# interface range f0/1-2
S3(config-if-range)# channel-group 1 mode on
Check the status of the EtherChannel on S3. It should be stable now. If it is not, check the previous steps.
i. Verify the trunk status on all switches.
S3# show int trunk
Were there any issues with trunking?
j. Correct the trunk issues on S2.
S2(config)# int g0/1
S2(config-if)# switchport trunk native vlan 99
k. Spanning Tree should be set to PVST+ on S2, S3, and S4. S2 should be configured to be the root bridge for all VLANs. Issue the command to display the spanning-tree status on S2.
S2# show spanning-tree summary totals
Switch is in pvst mode
Root bridge for:
l. The command output shows that S2 is not the root bridge for any VLANs. Correct the spanning-tree status on S2.
S2(config)# spanning-tree vlan 1-1005 root primary
m. Check the spanning-tree status on S2 to verify the changes.
S2# show spanning-tree summary totals
Switch is in pvst mode
Root bridge for: default V30 V40 V50 Native
Part 2: Verify DHCP
- R1 is the DHCP server for the R1 LAN.
- R3 is the DHCP server for all 3 LANs attached to R3.
a. Check the addressing of the PCs.
Do they all have correct addressing?
b. Check the DHCP settings on R3. Filter the output from the show run command to start with the DHCP configuration.
R3# sh run | begin dhcp
ip dhcp excluded-address 192.168.30.1 192.168.30.9
ip dhcp excluded-address 192.168.40.1 192.168.40.9
ip dhcp excluded-address 192.168.50.1 192.168.50.9
!
ip dhcp pool LAN30
 network 192.168.30.0 255.255.255.0
 default-router 192.168.30.1
ip dhcp pool LAN40
 network 192.168.40.0 255.255.255.0
 default-router 192.168.30.1
ip dhcp pool LAN50
 network 192.168.50.0 255.255.255.0
 default-router 192.168.30.1
Are there any issues with the DHCP configurations?
c. Make any necessary corrections and reset the IP addresses on the PCs. Check connectivity to all devices.
R3(config)#ip dhcp pool LAN40
R3(dhcp-config)#network 192.168.40.0 255.255.255.0
R3(dhcp-config)#default-router 192.168.40.1
R3(dhcp-config)#ip dhcp pool LAN50
R3(dhcp-config)#network 192.168.50.0 255.255.255.0
R3(dhcp-config)#default-router 192.168.50.1Were you able to ping all IPv4 addresses?
Part 3: Verify Routing
Verify that the following requirements have been met. If not, complete the configurations.
-
- All routers are configured with OSPF process ID 1 and no routing updates should be sent across interfaces that do not have routers connected.
R3(config)#router ospf 1
R3(config-router)#passive-interface g0/1.30
R3(config-router)#passive-interface g0/1.40
R3(config-router)#passive-interface g0/1.50- R2 is configured with an IPv4 default route pointing to the ISP and redistributes the default route in the OSPFv2 domain.
- R2 is configured with a default IPv6 fully qualified default route point to the ISP and redistributes the default route in the OSPFv3 domain.
- NAT is configured on R2 and no untranslated addresses are permitted to cross the internet.
a. Check the routing tables on all routers.
R3# show ip route ospf
<output omitted>
     10.0.0.0/8 is variably subnetted, 5 subnets, 2 masks
O       10.1.1.0 [110/649] via 10.2.2.1, 01:15:53, GigabitEthernet0/2/0
O    192.168.10.0 [110/649] via 10.3.3.1, 01:15:53, GigabitEthernet0/1/0
192.168.20.0 [110/2] via 10.2.2.1, 01:15:53, GigabitEthernet0/2/0
<output omitted>
Do all of the networks appear on all routers?
b. Ping the Outside Host from R2.
Was the ping successful?
c. Correct the default route propagation.
R2(config)# router ospf 1
R2(config-router)# default-information originate
d. Check the routing tables on R1 and R3 to make certain the default route is present.
e. Test IPv6 connectivity from R2 to Outside Host and TFTP Server. The pings should be successful. Troubleshoot if they are not.
f. Test IPv6 connectivity from R2 to PC4. If the ping fails be sure to check that the IPv6 addressing matches the Addressing Table.
g. Test IPv6 connectivity from R3 to Outside Host. If the ping fails, check the IPv6 routes on R3. Be sure to validate the default route originating from R2. If the route does not appear, modify the IPv6 OSPF configuration on R2.
R2(config)# ipv6 router ospf 1
R2(config-rtr)# default-information originate
h. Check connectivity from R2 to Outside Host. The ping should be successful.
Part 4: Verify WAN Technologies
- The serial link between R1 and R2 is used as a backup link in case of failure and should only carry traffic if the fiber link is unavailable.
- The Ethernet link between R2 and R3 is a fiber connection.
- The Ethernet link between R1 and R3 is a fiber connection and should be used to forward traffic from R1.
a. Take a close look at the routing table on R1.
Are there any routes using the serial link?
Use the traceroute command to verify any suspicious paths.
R1# traceroute 192.168.20.254
Type escape sequence to abort.
Tracing the route to 192.168.20.254

  1   10.1.1.2        1 msec    1 msec    1 msec
  2   192.168.20.254  1 msec    9 msec    0 msec
Notice the traffic is being sent via the S0/1/0 interface as opposed to the G0/0/0 interface.
b. The original configurations that came from the previous serial WAN connections were transferred to the new devices. Compare the G0/0/0 interface and Serial0/1/0 interface settings. Notice they both have an OSPF cost value set. Remove the OSPF cost setting from the G0/0/0 interface. It will also be necessary to remove the setting on the link on R3 that connects to R1.
R1(config)# int g0/0/0
R1(config-if)# no ip ospf cost 648
R3(config)# int g0/1/0
R3(config-if)# no ip ospf cost 648
c. Reissue the traceroute command from R1 to verify that the path has changed.
d. The change has been made to direct traffic over the faster link, however the backup route needs to be tested. Shut down the G0/2/0 interface on R3 and test connectivity to the TFTP Server and Outside Host.
Were the pings successful?
e. R2 is required to perform NAT for all internal networks. Check the NAT translations on R2.
R2# show ip nat translations
f. Notice that the list is empty if you have only attempted to ping from R1. Attempt a ping from R3 to Outside Host and recheck the NAT translations on R2. Issue the command to display the current NAT statistics which will also provide the interfaces involved in NAT.
R2# show ip nat statistics
<output will vary>
Total translations: 0 (0 static, 0 dynamic, 0 extended)
Outside Interfaces: GigabitEthernet0/0
Inside Interfaces: GigabitEthernet0/1 , GigabitEthernet0/1/0
Hits: 17 Misses: 27
Expired translations: 17
Dynamic mappings:
g. Set the Serial 0/0/0 interface as an inside interface to translate addresses.
R2(config)# int s0/0/0
R2(config-if)# ip nat inside
h. Test connectivity to Outside Host from R1. The ping should now be successful. Re-enable the G0/2/0 interface on R3.
Part 5: Verify Connectivity
- Devices should be configured according to the Addressing Table.
- Every device should be able to ping every other device internally. The internal PCs should be able to ping the Outside Host.
- PC4 should be able to ping the TFTP Server and the Outside Host using IPv6.
Device Configs - Final
SWITCH S1
! ==============================================================
!--- 12.5.13 Packet Tracer - Troubleshoot Enterprise Networks
!--- ANSWER SCRIPT FOR SWITCH S1
!--- Usage: from the console (or CLI tab) on S1, enter privileged EXEC mode with "enable",
!--- then paste this whole file. Every line beginning with "!" is a comment; IOS ignores it.
!--- This is a TROUBLESHOOTING lab - most of the network is already configured; each fix
!--- below corresponds to a specific problem found via a "show" command during Part 1.
! ==============================================================

enable
configure terminal

! --------------------------------------------------------------
!--- Part 1b: lock F0/3 (PC1's port) down to only the first MAC address seen, learned
!--- automatically ("sticky") rather than typed in manually. Default max (1 address) and
!--- default violation action (shutdown) already satisfy "all violations should disable the
!--- interface" - no extra lines needed for those. F0/3 is assumed already in access mode
!--- from the starting config (confirmed by Part 1c's "show vlan" already listing it active
!--- under VLAN 10).
! --------------------------------------------------------------
interface FastEthernet0/3
 switchport port-security
 switchport port-security mac-address sticky
exit

! --------------------------------------------------------------
!--- Part 1e: R1's G0/0/1 (physically connected to this switch) was left in the default
!--- VLAN 1 instead of VLAN 10, which is why PC1 couldn't reach R1 for DHCP - move that port
!--- into VLAN 10, and enable portfast since it connects to a router, not another switch.
! --------------------------------------------------------------
interface GigabitEthernet0/1
 switchport access vlan 10
 spanning-tree portfast

end

! ==============================================================
!--- Verification:
!---   S1# show port-security -> F0/3 shows Secure-up, 1 address learned (sticky)
!---   S1# show vlan -> G0/1 now listed under VLAN 10 alongside F0/3
!---   PC1 > ipconfig /renew -> now receives 192.168.10.10 from R1's DHCP pool
!---   PC1 > ping 192.168.20.254 (TFTP Server) -> succeeds
! ==============================================================
SWITCH S2
! ==============================================================
!--- 12.5.13 Packet Tracer - Troubleshoot Enterprise Networks
!--- ANSWER SCRIPT FOR SWITCH S2
!--- Usage: from the console (or CLI tab) on S2, enter privileged EXEC mode with "enable",
!--- then paste this whole file. Every line beginning with "!" is a comment; IOS ignores it.
! ==============================================================

enable
configure terminal

! --------------------------------------------------------------
!--- Part 1j: S2's uplink trunk to R3 (carrying R3's G0/1 sub-interfaces .30/.40/.50/.99)
!--- was left on the default native VLAN 1, instead of matching VLAN 99 (the native/
!--- management VLAN used by R3's G0/1.99 and the rest of this LAN) - found via
!--- "show interfaces trunk" in Part 1i.
! --------------------------------------------------------------
interface GigabitEthernet0/1
 switchport trunk native vlan 99
exit

! --------------------------------------------------------------
!--- Part 1l: S2 wasn't winning root bridge election for any VLAN - force it to be root
!--- primary for every VLAN, per this network's design requirement.
! --------------------------------------------------------------
spanning-tree vlan 1-1005 root primary

end

! ==============================================================
!--- Verification:
!---   S2# show interfaces trunk -> G0/1 now shows native VLAN 99, matching S3/S4/R3
!---   S2# show spanning-tree summary totals -> "Root bridge for: default V30 V40 V50
!---   Native" (was blank before)
! ==============================================================
SWITCH S3
! ==============================================================
!--- 12.5.13 Packet Tracer - Troubleshoot Enterprise Networks
!--- ANSWER SCRIPT FOR SWITCH S3
!--- Usage: from the console (or CLI tab) on S3, enter privileged EXEC mode with "enable",
!--- then paste this whole file. Every line beginning with "!" is a comment; IOS ignores it.
! ==============================================================

enable
configure terminal

! --------------------------------------------------------------
!--- Part 1g-h: "show etherchannel summary" revealed S3's Port-channel 1 (the link to S2)
!--- as down (SD) - S3's own F0/1/F0/2 were never actually assigned to channel-group 1.
!--- "mode on" forms a static EtherChannel with no negotiation protocol (no PAgP/LACP),
!--- per this network's requirement.
! --------------------------------------------------------------
interface range FastEthernet0/1-2
 channel-group 1 mode on

end

! ==============================================================
!--- Verification:
!---   S3# show etherchannel summary -> Po1 now shows (SU) instead of (SD), with both
!---   Fa0/1(P) and Fa0/2(P) bundled
! ==============================================================
ROUTER R1
! ==============================================================
!--- 12.5.13 Packet Tracer - Troubleshoot Enterprise Networks
!--- ANSWER SCRIPT FOR ROUTER R1
!--- Usage: from the console (or CLI tab) on R1, enter privileged EXEC mode with "enable",
!--- then paste this whole file. Every line beginning with "!" is a comment; IOS ignores it.
!--- R1 and R3 both replaced older serial-connected routers with new fiber-capable ones, but
!--- the migrated config left a leftover OSPF cost setting from the old serial link's
!--- interface, now incorrectly applied to the new Gigabit interface instead.
! ==============================================================

enable
configure terminal

! --------------------------------------------------------------
!--- Part 4b: G0/0/0 (the new fiber link to R3) had an inherited OSPF cost of 648 - a value
!--- that made sense for the old, slower serial link, but on a Gigabit link it makes OSPF
!--- prefer the genuinely slower Serial0/1/0 backup path to R2 instead. Removing it lets
!--- OSPF calculate a normal (lower) cost for this faster path, restoring the intended
!--- fiber-primary / serial-backup design.
! --------------------------------------------------------------
interface GigabitEthernet0/0/0
 no ip ospf cost 648

end

! ==============================================================
!--- Verification:
!---   R1# traceroute 192.168.20.254 -> now goes via G0/0/0 (through R3) instead of
!---   S0/1/0 (through R2 directly)
!---   R1# show ip route -> traffic to 192.168.20.0/24 and the default route now prefer the
!---   G0/0/0 path
! ==============================================================
ROUTER R2
! ==============================================================
!--- 12.5.13 Packet Tracer - Troubleshoot Enterprise Networks
!--- ANSWER SCRIPT FOR ROUTER R2
!--- Usage: from the console (or CLI tab) on R2, enter privileged EXEC mode with "enable",
!--- then paste this whole file. Every line beginning with "!" is a comment; IOS ignores it.
!--- R2 is the only router facing the ISP, so it alone needs to inject the default route
!--- into both OSPFv2 and OSPFv3, and it alone performs NAT for the whole company.
! ==============================================================

enable
configure terminal

! --------------------------------------------------------------
!--- Part 3c: without this, R1 and R3 have every internal route but no way to reach the
!--- internet - only R2 itself could ping the Outside Host beforehand.
! --------------------------------------------------------------
router ospf 1
 default-information originate
exit

! --------------------------------------------------------------
!--- Part 3g: same fix, for the IPv6/OSPFv3 side - needed before R3 can reach the Outside
!--- Host over IPv6.
! --------------------------------------------------------------
ipv6 router ospf 1
 default-information originate
exit

! --------------------------------------------------------------
!--- Part 4g: R2's G0/1 (LAN) and G0/1/0 (to R3) were already correctly marked "ip nat
!--- inside", but Serial0/0/0 (the backup link to R1) was missed - this is why NAT
!--- translations only ever appeared when traffic came from R3, never from R1, until this
!--- was added.
! --------------------------------------------------------------
interface Serial0/0/0
 ip nat inside

end

! ==============================================================
!--- Verification:
!---   R1# show ip route -> now shows a default route via R2
!---   R3# show ip route -> same, plus IPv6 default route once OSPFv3 redistribution is fixed
!---   R2# show ip nat statistics -> Inside Interfaces now lists Serial0/0/0 alongside
!---   GigabitEthernet0/1 and GigabitEthernet0/1/0
!---   R1 > ping Outside Host (with G0/2/0 shut down on R3, forcing the backup path) ->
!---   succeeds now that both the default route and NAT are fixed on the serial path
! ==============================================================
ROUTER R3
! ==============================================================
!--- 12.5.13 Packet Tracer - Troubleshoot Enterprise Networks
!--- ANSWER SCRIPT FOR ROUTER R3
!--- Usage: from the console (or CLI tab) on R3, enter privileged EXEC mode with "enable",
!--- then paste this whole file. Every line beginning with "!" is a comment; IOS ignores it.
!--- R3 is the DHCP server for all three of its own sub-interface LANs (VLAN 30/40/50) -
!--- two of its three DHCP pools were misconfigured, plus OSPF and interface-cost fixes.
! ==============================================================

enable
configure terminal

! --------------------------------------------------------------
!--- Part 3 (routing requirement): OSPF process 1, with the three end-user sub-interfaces
!--- marked passive - no routers live on those LANs, so there's no reason to send hello
!--- traffic out of them.
! --------------------------------------------------------------
router ospf 1
 passive-interface GigabitEthernet0/1.30
 passive-interface GigabitEthernet0/1.40
 passive-interface GigabitEthernet0/1.50
exit

! --------------------------------------------------------------
!--- Part 2b-c: found via "show run | begin dhcp" - the LAN40 and LAN50 DHCP pools both had
!--- default-router set to 192.168.30.1 (LAN30's own gateway) instead of each pool's own
!--- correct gateway. This is why PC3 and PC4 were getting DHCP addresses but the wrong
!--- default gateway.
! --------------------------------------------------------------
ip dhcp pool LAN40
 network 192.168.40.0 255.255.255.0
 default-router 192.168.40.1
exit

ip dhcp pool LAN50
 network 192.168.50.0 255.255.255.0
 default-router 192.168.50.1
exit

! --------------------------------------------------------------
!--- Part 4b: same leftover-serial-cost issue as R1's G0/0/0 (see R1's script) - this is the
!--- OTHER end of the R1<->R3 fiber link, and needs the same fix so OSPF picks it as the
!--- preferred path in both directions, not just one.
! --------------------------------------------------------------
interface GigabitEthernet0/1/0
 no ip ospf cost 648

end

! ==============================================================
!--- Verification:
!---   R3# show run | begin dhcp -> LAN40 and LAN50 pools now show the correct
!---   default-router for each
!---   PC3, PC4 > ipconfig /renew -> both now receive the correct default gateway
!---   R3# show ip route ospf -> default route now present once R2's redistribution is
!---   fixed (see R2's script)
!--- Part 4d test (temporary, not part of this script): shutting down R3's G0/2/0 forces
!--- traffic over the R1<->R2 serial backup - re-enable G0/2/0 afterward once that test is
!--- done.
! ==============================================================


