
8.6.5 Packet Tracer - Configure IP ACLs to Mitigate Attacks Answers Version
Topology
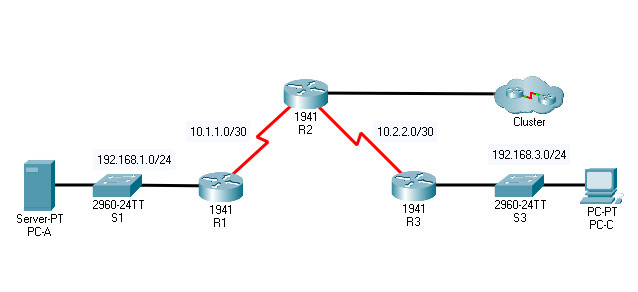
8.6.5 Packet Tracer – Configure IP ACLs to Mitigate Attacks
Addressing Table
| Device | Interface | IP Address | Subnet Mask | Default Gateway | Switch Port |
|---|---|---|---|---|---|
| R1 | G0/1 | 192.168.1.1 | 255.255.255.0 | N/A | S1 F0/5 |
| S0/0/0 (DCE) | 10.1.1.1 | 255.255.255.252 | N/A | ||
| R2 | S0/0/0 | 10.1.1.2 | 255.255.255.252 | N/A | N/A |
| S0/0/1 (DCE) | 10.2.2.2 | 255.255.255.252 | |||
| G0/0 | 209.165.200.225 | 255.255.255.224 | |||
| Lo0 | 192.168.2.1 | 255.255.255.0 | |||
| R3 | G0/1 | 192.168.3.1 | 255.255.255.0 | N/A | S3 F0/5 |
| S0/0/1 | 10.2.2.1 | 255.255.255.252 | N/A | ||
| PC-A | NIC | 192.168.1.3 | 255.255.255.0 | 192.168.1.1 | S1 F0/6 |
| PC-C | NIC | 192.168.3.3 | 255.255.255.0 | 192.168.3.1 | S3 F0/18 |
Objectives
- Verify connectivity among devices before firewall configuration.
- Use ACLs to ensure remote access to the routers is available only from management station PC-C.
- Configure ACLs on R1 and R3 to mitigate attacks.
- Verify ACL functionality.
Background/Scenario
Access to routers R1, R2, and R3 should only be permitted from PC-C, the management station. PC-C is also used for connectivity testing to PC-A, which is a server providing DNS, SMTP, FTP, and HTTPS services.
Standard operating procedure is to apply ACLs on edge routers to mitigate common threats based on source and destination IP address. In this activity, you will create ACLs on edge routers R1 and R3 to achieve this goal. You will then verify ACL functionality from internal and external hosts.
The routers have been pre-configured with the following:
- Enable password: ciscoenpa55
- Password for console: ciscoconpa55
- SSH logon username and password: SSHadmin/ciscosshpa55
- IP addressing
- Static routing
Intructions
Part 1: Verify Basic Network Connectivity
Verify network connectivity prior to configuring the IP ACLs.
Step 1: From PC-A, verify connectivity to PC-C and R2.
a. From the command prompt, ping PC-C (192.168.3.3).
b. From the command prompt, establish an SSH session to R2 Lo0 interface (192.168.2.1) using username SSHadmin and password ciscosshpa55. When finished, exit the SSH session.
SERVER> ssh -l SSHadmin 192.168.2.1
Step 2: From PC-C, verify connectivity to PC-A and R2.
a. From the command prompt, ping PC-A (192.168.1.3).
b. From the command prompt, establish an SSH session to R2 Lo0 interface (192.168.2.1) using username SSHadmin and password ciscosshpa55. Close the SSH session when finished.
PC> ssh -l SSHadmin 192.168.2.1
c. Establish another SSH session to R2 G0/0 interface (209.165.200.225) using username SSHadmin and password ciscosshpa55. When finished, exit the SSH session.
d. Open a web browser to the PC-A server (192.168.1.3) to display the web page. Close the browser when done.
Part 2: Secure Access to Routers
Step 1: Configure ACL 10 to block all remote access to the routers except from PC-C.
a. Use the access-list command to create a numbered IP ACL on R1, R2, and R3.
R1(config)# access-list 10 permit host 192.168.3.3

R2(config)# access-list 10 permit host 192.168.3.3

R3(config)# access-list 10 permit host 192.168.3.3
Step 2: Apply ACL 10 to ingress traffic on the VTY lines.
Use the access-class command to apply the access list to incoming traffic on the VTY lines.
R1(config-line)# access-class 10 in

R2(config-line)# access-class 10 in

R3(config-line)# access-class 10 in
Step 3: Verify exclusive access from management station PC-C.
a. Establish an SSH session to 192.168.2.1 from PC-C (should be successful).
PC> ssh –l SSHadmin 192.168.2.1
b. Establish an SSH session to 209.165.200.225 from PC-C (should be successful).
c. Establish an SSH session to 192.168.2.1 from PC-A (should fail).
Part 3: Create a Numbered IP ACL 120 on R1
Create an IP ACL numbered 120 with the following rules:
- Permit any outside host to access DNS, SMTP, and FTP services on server PC-A.
- Deny any outside host access to HTTPS services on PC-A.
- Permit PC-C to access R1 via SSH.
Note: Check Results will not show a correct configuration for ACL 120 until you modify it in Part 4.
Step 1: Verify that PC-C can access the PC-A via HTTPS using the web browser.
Be sure to disable HTTP and enable HTTPS on server PC-A.
Step 2: Configure ACL 120 to specifically permit and deny the specified traffic.
Use the access-list command to create a numbered IP ACL.
R1(config)# access-list 120 permit udp any host 192.168.1.3 eq domain

R1(config)# access-list 120 permit tcp any host 192.168.1.3 eq smtp

R1(config)# access-list 120 permit tcp any host 192.168.1.3 eq ftp

R1(config)# access-list 120 deny tcp any host 192.168.1.3 eq 443

R1(config)# access-list 120 permit tcp host 192.168.3.3 host 10.1.1.1 eq 22
Step 3: Apply the ACL to interface S0/0/0.
Use the ip access-group command to apply the access list to incoming traffic on interface S0/0/0.
R1(config)# interface s0/0/0

R1(config-if)# ip access-group 120 in
Step 4: Verify that PC-C cannot access PC-A via HTTPS using the web browser.
Part 4: Modify an Existing ACL on R1
Permit ICMP echo replies and destination unreachable messages from the outside network (relative to R1). Deny all other incoming ICMP packets.
Step 1: Verify that PC-A cannot successfully ping the loopback interface on R2.
Step 2: Make any necessary changes to ACL 120 to permit and deny the specified traffic.
Use the access-list command to create a numbered IP ACL.
R1(config)# access-list 120 permit icmp any any echo-reply

R1(config)# access-list 120 permit icmp any any unreachable

R1(config)# access-list 120 deny icmp any any

R1(config)# access-list 120 permit ip any any
Step 3: Verify that PC-A can successfully ping the loopback interface on R2.
Part 5: Create a Numbered IP ACL 110 on R3
Deny all outbound packets with source address outside the range of internal IP addresses on R3.
Step 1: Configure ACL 110 to permit only traffic from the inside network.
Use the access-list command to create a numbered IP ACL.
R3(config)# access-list 110 permit ip 192.168.3.0 0.0.0.255 any
Step 2: Apply the ACL to interface G0/1.
Use the ip access-group command to apply the access list to incoming traffic on interface G0/1.
R3(config)# interface g0/1

R3(config-if)# ip access-group 110 in
Part 6: Create a Numbered IP ACL 100 on R3
On R3, block all packets containing the source IP address from the following pool of addresses: any RFC 1918 private addresses, 127.0.0.0/8, and any IP multicast address. Because PC-C is being used for remote administration, permit SSH traffic from the 10.0.0.0/8 network to return to the host PC-C.
Step 1: Configure ACL 100 to block all specified traffic from the outside network.
You should also block traffic sourced from your own internal address space if it is not an RFC 1918 address. In this activity, your internal address space is part of the private address space specified in RFC 1918.
Use the access-list command to create a numbered IP ACL.
R3(config)# access-list 100 permit tcp 10.0.0.0 0.255.255.255 eq 22 host 192.168.3.3

R3(config)# access-list 100 deny ip 10.0.0.0 0.255.255.255 any

R3(config)# access-list 100 deny ip 172.16.0.0 0.15.255.255 any

R3(config)# access-list 100 deny ip 192.168.0.0 0.0.255.255 any

R3(config)# access-list 100 deny ip 127.0.0.0 0.255.255.255 any

R3(config)# access-list 100 deny ip 224.0.0.0 15.255.255.255 any

R3(config)# access-list 100 permit ip any any
Step 2: Apply the ACL to interface Serial 0/0/1.
Use the ip access-group command to apply the access list to incoming traffic on interface Serial 0/0/1.
R3(config)# interface s0/0/1

R3(config-if)# ip access-group 100 in
Step 3: Confirm that the specified traffic entering interface Serial 0/0/1 is handled correctly.
a. From the PC-C command prompt, ping the PC-A server. The ICMP echo replies are blocked by the ACL because they are sourced from the 192.168.0.0/16 address space.
b. Establish an SSH session to 192.168.2.1 from PC-C. (should fail)
c. Establish an SSH session to 209.165.200.225. (should be successful).
Step 4: Check results.
Your completion percentage should be 100%. Click Check Results to see feedback and verification of which required components have been completed.
Device Configs - Final
Router R1
! ==============================================================
!--- 8.6.5 Packet Tracer - Configure IP ACLs to Mitigate Attacks
!--- ANSWER SCRIPT FOR ROUTER R1
!--- Usage: from the console (or CLI tab) on R1, enter privileged EXEC mode with "enable",
!--- then paste this whole file. Every line beginning with "!" is a comment; IOS ignores it.
!--- R1 is already pre-configured (enable secret ciscoenpa55, console ciscoconpa55, SSH
!--- SSHadmin/ciscosshpa55, addressing, static routing) - this lab only adds ACLs on top.
!--- Confirmed against this lab's own "Device Configs - Final" section.
! ==============================================================

enable
configure terminal

! --------------------------------------------------------------
!--- Part 2, Step 1-2: ACL 10 restricts VTY (Telnet/SSH) access to R1 down to the
!--- management station PC-C only.
! --------------------------------------------------------------
access-list 10 permit host 192.168.3.3

line vty 0 4
 access-class 10 in
exit

! --------------------------------------------------------------
!--- Part 3, Step 2: ACL 120 - edge filtering for PC-A's exposed services. Permit DNS/SMTP/
!--- FTP inbound to PC-A, explicitly deny HTTPS to PC-A, and let PC-C specifically SSH to
!--- R1's own S0/0/0 address (10.1.1.1 - the near side of the R1<->R2 link, which is what
!--- PC-C's SSH traffic actually arrives at once it enters R1 from the WAN side).
! --------------------------------------------------------------
access-list 120 permit udp any host 192.168.1.3 eq domain
access-list 120 permit tcp any host 192.168.1.3 eq smtp
access-list 120 permit tcp any host 192.168.1.3 eq ftp
access-list 120 deny tcp any host 192.168.1.3 eq 443
access-list 120 permit tcp host 192.168.3.3 host 10.1.1.1 eq 22

! --------------------------------------------------------------
!--- Part 3, Step 3: apply inbound on S0/0/0 - this is the WAN-facing link (to R2), so
!--- "inbound" here means traffic arriving FROM the rest of the network toward PC-A/R1.
! --------------------------------------------------------------
interface Serial0/0/0
 ip access-group 120 in
exit

! --------------------------------------------------------------
!--- Part 4, Step 2: extend ACL 120 (appended via auto-numbering, landing after the 5 lines
!--- above) - allow diagnostic ICMP replies back in, block everything else ICMP-related
!--- (e.g. inbound ping floods), then explicitly re-permit all other IP traffic so the ACL's
!--- earlier lines remain the only real restrictions (without this line, the implicit deny
!--- at the very end of the ACL would silently block everything not already matched above).
! --------------------------------------------------------------
access-list 120 permit icmp any any echo-reply
access-list 120 permit icmp any any unreachable
access-list 120 deny icmp any any
access-list 120 permit ip any any

end

! --------------------------------------------------------------
!--- Operational habit (not explicitly required by this lab): save to NVRAM.
! --------------------------------------------------------------
copy running-config startup-config

! ==============================================================
!--- Verification (from R1, PC-A, and PC-C):
!---   PC-C > ssh -l SSHadmin 192.168.2.1 (R2's Lo0) -> succeeds
!---   PC-A > ssh -l SSHadmin 192.168.2.1             -> fails (blocked by ACL 10 on R2's VTY)
!---   PC-C > browse https://192.168.1.3 (PC-A)       -> fails (blocked by ACL 120's deny 443)
!---   PC-A > ping 192.168.2.1 (R2's Lo0)              -> succeeds (echo-reply permitted back)
!---   R1# show access-lists -> ACL 10 (1 line) and ACL 120 (9 lines total, in the exact
!---   order both parts added them)
! ==============================================================
Router R2
! ==============================================================
!--- 8.6.5 Packet Tracer - Configure IP ACLs to Mitigate Attacks
!--- ANSWER SCRIPT FOR ROUTER R2
!--- Usage: from the console (or CLI tab) on R2, enter privileged EXEC mode with "enable",
!--- then paste this whole file. Every line beginning with "!" is a comment; IOS ignores it.
!--- R2 is the middle router (between R1 and R3) and hosts the Cluster Cloud link plus its
!--- own Loopback0 - it only needs the same VTY-restriction ACL as the other two routers,
!--- no traffic-filtering ACLs of its own in this lab.
! ==============================================================

enable
configure terminal

! --------------------------------------------------------------
!--- Part 2, Step 1-2: ACL 10 restricts VTY (Telnet/SSH) access to R2 down to the
!--- management station PC-C only.
! --------------------------------------------------------------
access-list 10 permit host 192.168.3.3

line vty 0 4
 access-class 10 in

end

! --------------------------------------------------------------
!--- Operational habit (not explicitly required by this lab): save to NVRAM.
! --------------------------------------------------------------
copy running-config startup-config

! ==============================================================
!--- Verification:
!---   PC-C > ssh -l SSHadmin 192.168.2.1 (Lo0) and 209.165.200.225 (G0/0) -> both succeed
!---   PC-A > ssh -l SSHadmin 192.168.2.1 -> fails
! ==============================================================
Router R3
! ==============================================================
!--- 8.6.5 Packet Tracer - Configure IP ACLs to Mitigate Attacks
!--- ANSWER SCRIPT FOR ROUTER R3
!--- Usage: from the console (or CLI tab) on R3, enter privileged EXEC mode with "enable",
!--- then paste this whole file. Every line beginning with "!" is a comment; IOS ignores it.
!--- R3 is the edge router closest to PC-C (the management station) - it gets both an
!--- egress anti-spoofing filter (only PC-C's own LAN may leave via R3) and an ingress
!--- anti-spoofing filter (block obviously-fake source addresses arriving from the WAN).
!--- Confirmed against this lab's own "Device Configs - Final" section.
! ==============================================================

enable
configure terminal

! --------------------------------------------------------------
!--- Part 2, Step 1-2: ACL 10 restricts VTY (Telnet/SSH) access to R3 down to PC-C itself.
! --------------------------------------------------------------
access-list 10 permit host 192.168.3.3

line vty 0 4
 access-class 10 in
exit

! --------------------------------------------------------------
!--- Part 6, Step 1: ACL 100 - ingress anti-spoofing on the WAN-facing link. Explicitly
!--- permit SSH RETURN traffic first (source port 22, i.e. replies from an SSH server R2 or
!--- R1 out on the 10.0.0.0/8 WAN addressing) back to PC-C - this ACL has no "established"
!--- keyword, so without this line the deny lines right after would also catch legitimate
!--- SSH session replies. Then deny any inbound traffic falsely claiming to originate from
!--- RFC 1918 private space, the loopback block, or multicast - addresses that should never
!--- legitimately arrive FROM the outside network.
! --------------------------------------------------------------
access-list 100 permit tcp 10.0.0.0 0.255.255.255 eq 22 host 192.168.3.3
access-list 100 deny ip 10.0.0.0 0.255.255.255 any
access-list 100 deny ip 172.16.0.0 0.15.255.255 any
access-list 100 deny ip 192.168.0.0 0.0.255.255 any
access-list 100 deny ip 127.0.0.0 0.255.255.255 any
access-list 100 deny ip 224.0.0.0 15.255.255.255 any
access-list 100 permit ip any any

interface Serial0/0/1
 ip access-group 100 in
exit

! --------------------------------------------------------------
!--- Part 5, Step 1: ACL 110 - egress anti-spoofing on the LAN-facing link. Only traffic
!--- genuinely sourced from R3's own internal network (192.168.3.0/24) may leave toward the
!--- WAN - blocks any spoofed-source traffic originating from inside this network.
! --------------------------------------------------------------
access-list 110 permit ip 192.168.3.0 0.0.0.255 any

interface GigabitEthernet0/1
 ip access-group 110 in

end

! --------------------------------------------------------------
!--- Operational habit (not explicitly required by this lab): save to NVRAM.
! --------------------------------------------------------------
copy running-config startup-config

! ==============================================================
!--- Verification (from PC-C):
!---   PC-C > ping 192.168.1.3 (PC-A)     -> echo replies are blocked by ACL 100 (they'd be
!---   sourced from the 192.168.0.0/16 space, which the deny-192.168.0.0/16 line catches)
!---   PC-C > ssh -l SSHadmin 192.168.2.1 (R2's Lo0, 192.168.2.x)  -> fails (same reasoning -
!---   the reply would come from 192.168.2.1, not the explicitly-permitted 10.0.0.0/8 range)
!---   PC-C > ssh -l SSHadmin 209.165.200.225 (R2's G0/0)          -> succeeds (this reply
!---   path uses R2's WAN-side 10.x addressing, matching the explicit permit line)
!---   R3# show access-lists -> ACL 10 (1 line), ACL 100 (7 lines), ACL 110 (1 line)
! ==============================================================
Download Completed Packet Tracer (.pka) File (100%)


