6.1.3.4 Lab – Install a Virtual Machine on a Personal Computer (Instructor Version)
Objectives
- Part 1: Download and Install VirtualBox
- Part 2: Download the Virtual Machine Image File
- Part 3: Create the Virtual Machine
- Part 4: Install the Operating System
- Part 5: Guest-Host Network Communication
- Part 6: Challenge: Install a Second Virtual Machine (Optional)
Background / Scenario
Computing power and resources have increased tremendously over the last 10 years. A benefit of having multicore processors and large amounts of RAM is the ability to use virtualization. With virtualization, one or more virtual computers operate inside one physical computer. Virtual computers that run within physical computers are called virtual machines (VMs). VMs are often called guests, and physical computers are often called hosts. Anyone with a modern computer and operating system can run VMs.
A virtual machine image file has been created for you to install on your computer. In this lab, you will download and import this image file using a desktop virtualization application, such as VirtualBox.
Note: A VM is also known as a guest system while the computer that runs it is known as the host system. In the scope of this lab, your computer is the host system and the VM to be deployed is the guest system.
Required Resources
- Computer with a minimum of 2 GB of RAM and 8 GB of free disk space
- High speed Internet access to download Oracle VirtualBox and the virtual machine image file
- The lubuntu-16.04.2-desktop-i386.iso image file
Note: The image file is about 1 GB, and can grow up to 5.5 GB after the VM is in operation. While you can delete the image file after the VM is deployed, the free disk space requirement is for users who decide to keep the image file.
Note: To complete the Challenge Section of this lab, you will need at least 16GB of free disk space and 4GB of RAM. You will also need another image file of your choice. If you do not have a preference, download and use the lxle-eclectica-16.04.1.iso image file.
Part 1: Download and Install VirtualBox
a. VMware Player and Oracle VirtualBox are two virtualization programs that you can download and install to support the image file. In this lab, you will use VirtualBox.
b. Navigate to http://www.oracle.com/technetwork/server-storage/virtualbox/downloads/index.html.
c. Choose and download the appropriate installation file based on your operating system.
d. After you have downloaded the VirtualBox installation file, run the installer and accept the default installation settings.
Part 2: Download the Virtual Machine Image File
Similar to physical computers, VMs need an operating system. Therefore, the first step in deploying a new VM is to acquire the operating system. While the choice of operating system is intimately related to the application for which the VM will be used; an administrator may choose one OS over another based on the software tools it includes or supports. Independent of the operating system chosen for the VM, the deployment is essentially the same.
Step 1: Download the Operating System Installation Image.
a. Locate the previously downloaded Lubuntu image file (lubuntu-16.04.2-desktop-i386.iso). This file contains a complete image of Lubuntu’s installation CD and will be used to install the Lubuntu operating system in the new VM.
Note: Lubuntu is a lightweight Linux distribution based on Ubuntu Linux. The L stands for lightweight.
Part 3: Create the Virtual Machine
Step 1: Creating a New VM with VirtualBox
a. Launch VirtualBox and click New.

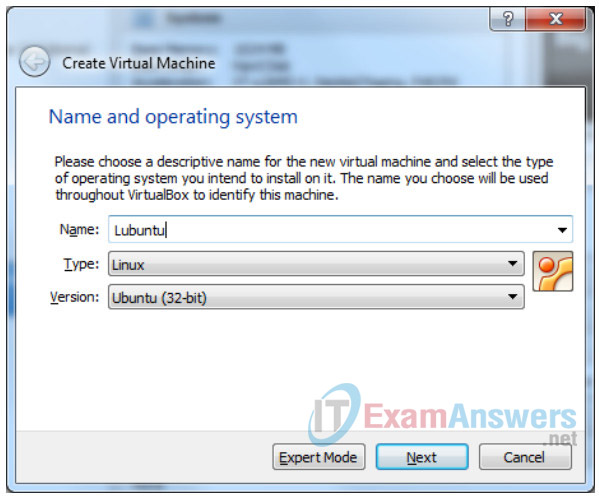
b. Give the VM a name. This is the name that will be displayed on the VirtualBox Inventory.
c. Select Linux for the Type, Ubuntu (32-bit) for Version and click Next.
d. Give the VM 1024MB (1GB) of RAM by dragging the slider. Alternatively, you can type 1024 in the dialog box to the right. Click Next.
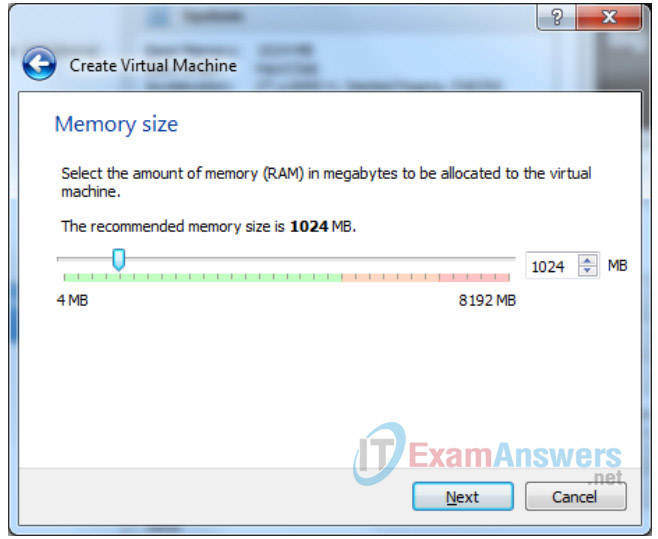
e. Note: The amount of memory available to the VM depends on the total memory installed in your computer. Because this is a lightweight VM that will not be used to perform CPU-intensive or memoryintensive work, you may be able to select less than 1024MB if your computer doesn’t have much memory installed.
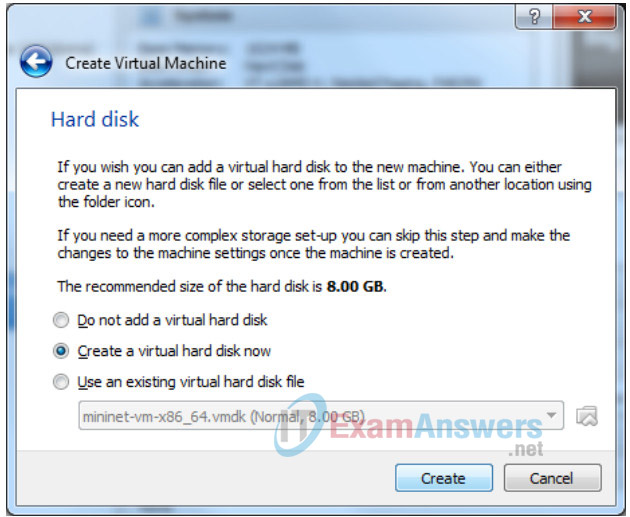
f. Create a virtual disk. A virtual disk is a big file on your computer’s drive that will store all VM related files. Select Create a virtual hard disk now and click Create.
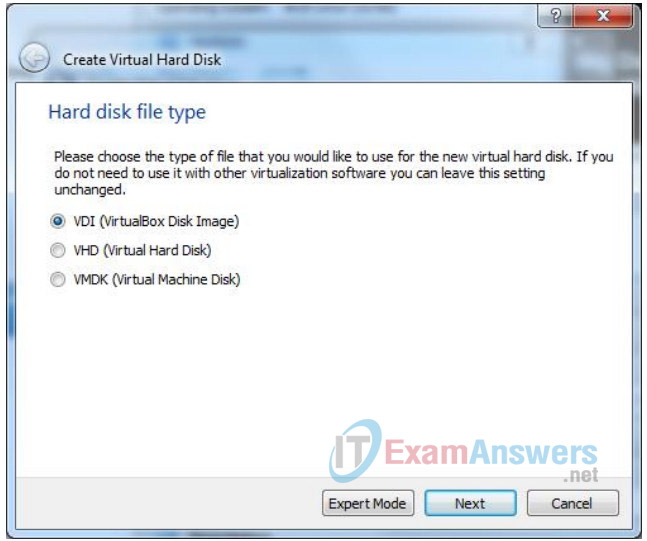
g. Select VDI (VirtualBox Disk Image) for the virtual disk type and click Next.
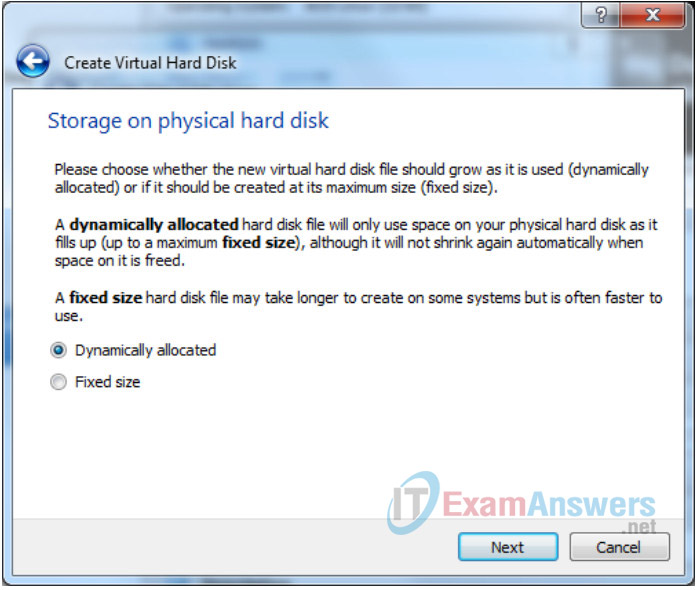
h. Select Dynamically Allocated and click Next. Dynamically allocated virtual disks grow on demand until the maximum size is reached.
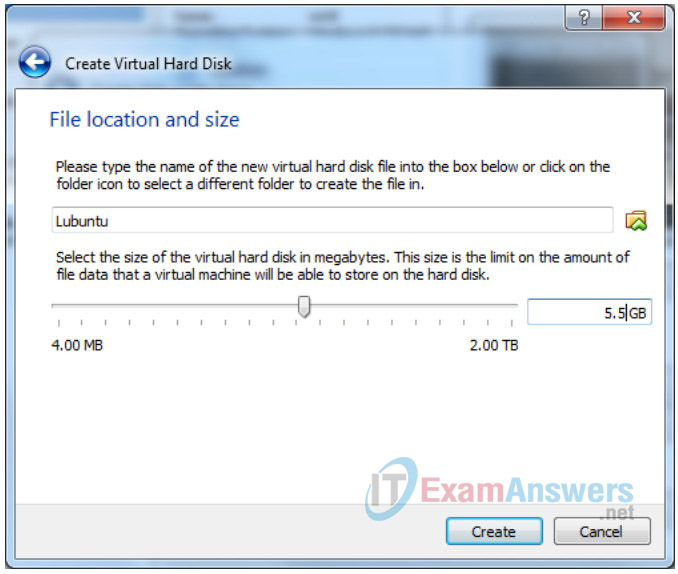
i. Use the slider to specify the maximum size of the virtual disk. Lubuntu needs at least 5.1GB of free disk space. Select 5.5GB and click Create.
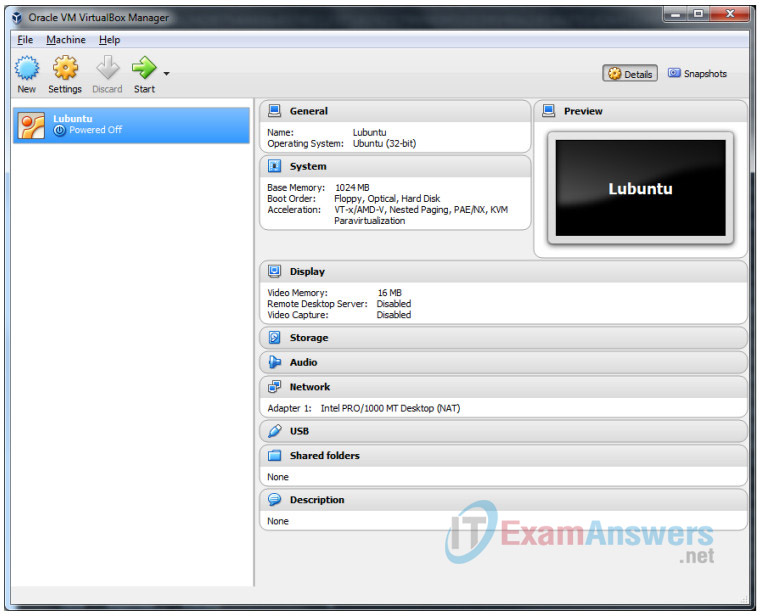
j. The new VM is now created and visible in the VirtualBox Manager.
Part 4: Install the Operating System
Now that the VM is created, it is time to install an operating system. Often, when installing a new operating system on a physical computer, the installation is started from an optical disk such as a DVD or CD. The optical disk is inserted in the optical drive and the computer is instructed to start the boot process from that optical drive.
A similar process will be performed in the VirtualBox Manager. The image file downloaded in Part 2 represents an installation CD and must be mounted in the VM’s virtual optical drive. When the VM starts the boot process from its optical drive, it will read the contents of the image file.
Step 1: Insert the Installation Disk Image in the Virtual Optical Drive
a. Locate the virtual optical drive by selecting Lubuntu, the VM just created in Part 3, from the VirtualBox Manager and clicking Settings.

b. Select Storage and then select the VM’s optical drive. The optical drive is displayed in the Storage Tree under Controller: IDE and represented by a CD icon.
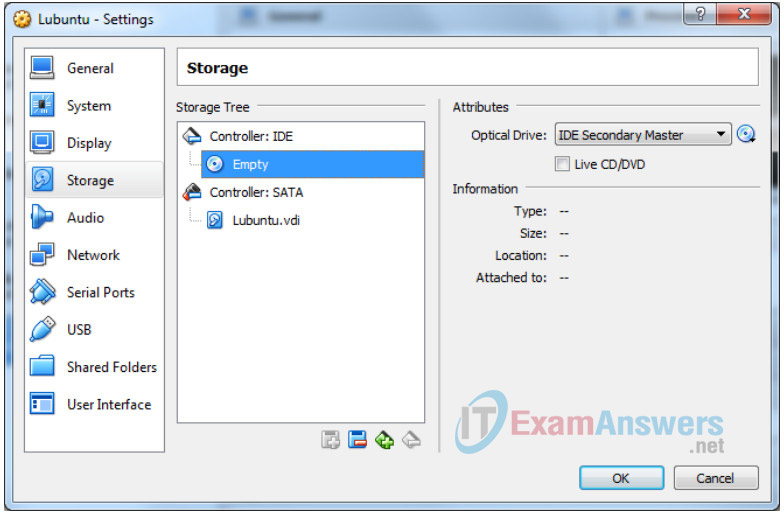
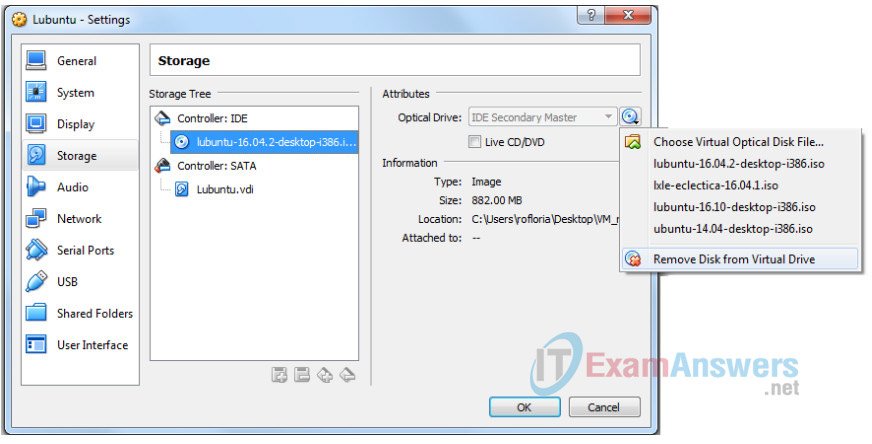
c. Under Attributes (on the right side of the window), click the CD icon next to the drop-down menu and select Choose Virtual Optical Disk File…
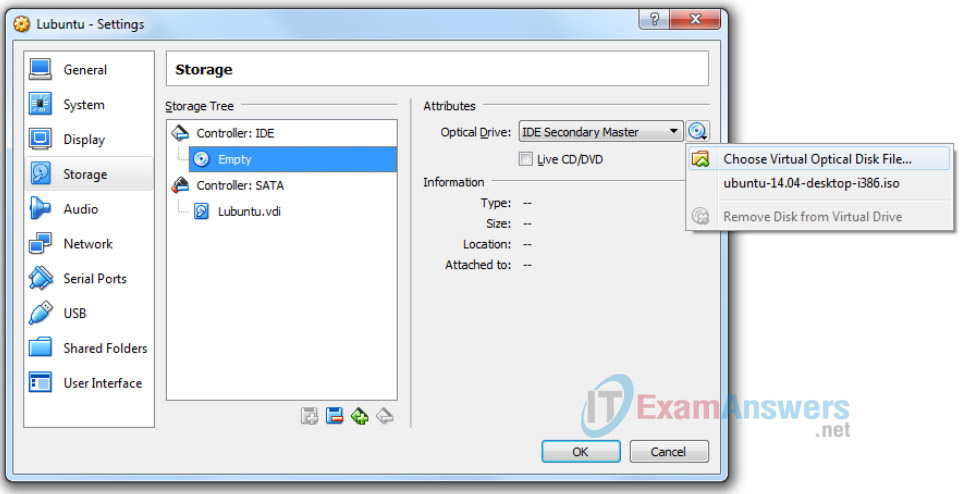
d. Locate the image file downloaded in Part 2, item a, select it, and click Open. The image filename will now be displayed instead of the word Empty.
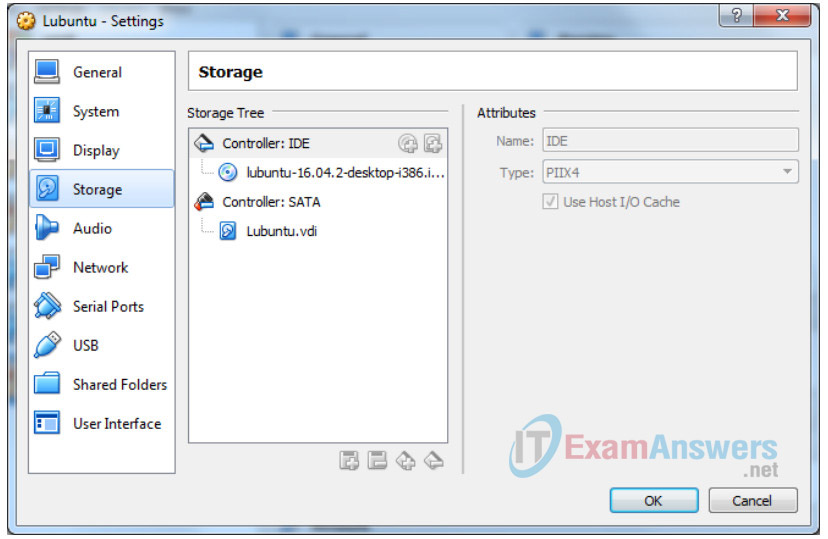
e. Click OK.
Step 2: Start the Virtual Machine and Install the System
a. Now that the VM is ready and the optical disk image is mounted on the virtual optical disk, click the Start button to start the VM.

b. VirtualBox will open a new window which is the VM console
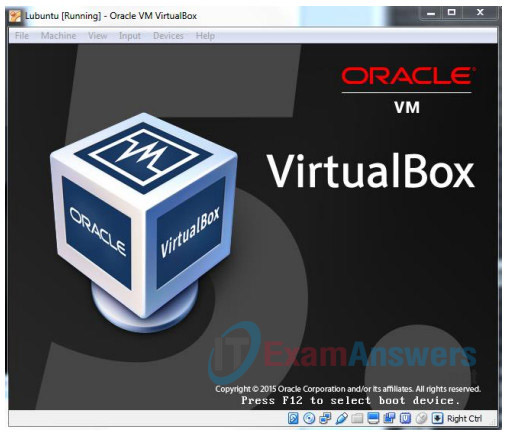
c. After a few seconds, the VM will boot from the virtual optical drive and display the first screen of the installation process, the boot manager language configuration. Use the keyboard arrow keys to choose English and press <ENTER>.
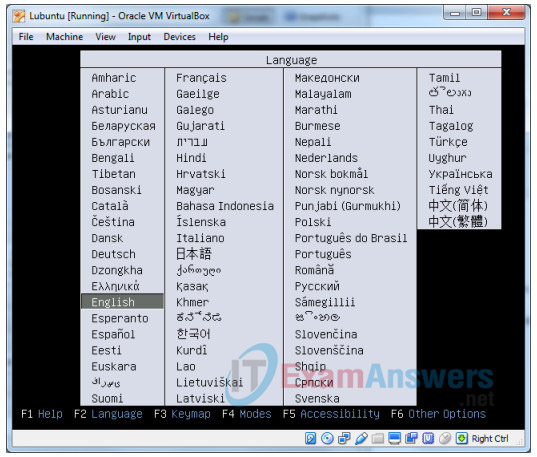
Note: the mouse will not work inside the VM just yet. Remember, this window is essentially a second computer, independent from your computer. Because the VM just booted, the mouse drivers are not loaded inside the VM yet.
Note: In some situations, the keyboard and mouse may be captured by the VM. The <ALT+TAB> will not work to switch window focus between the VM back and your computer. To release the keyboard and return to your computer, press the right control key. The right control key is the <CONTROL> key located on the right side of your keyboard and is called Host Key by VirtualBox.
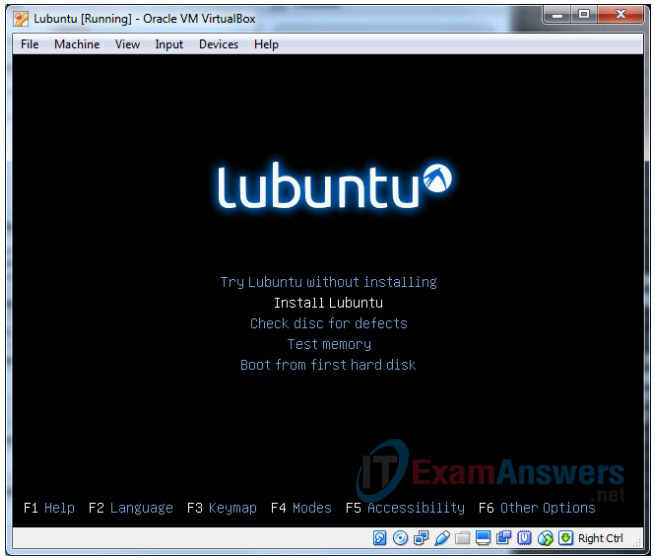
d. Using the keyboard arrow keys, select Install Lubuntu and press <ENTER>.
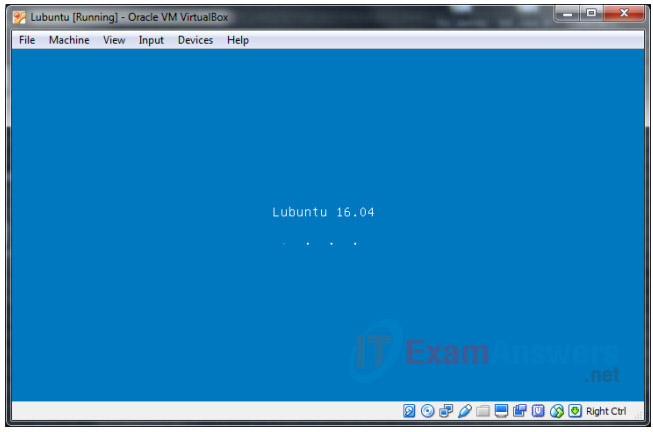
e. The video mode will change and the installer will load.
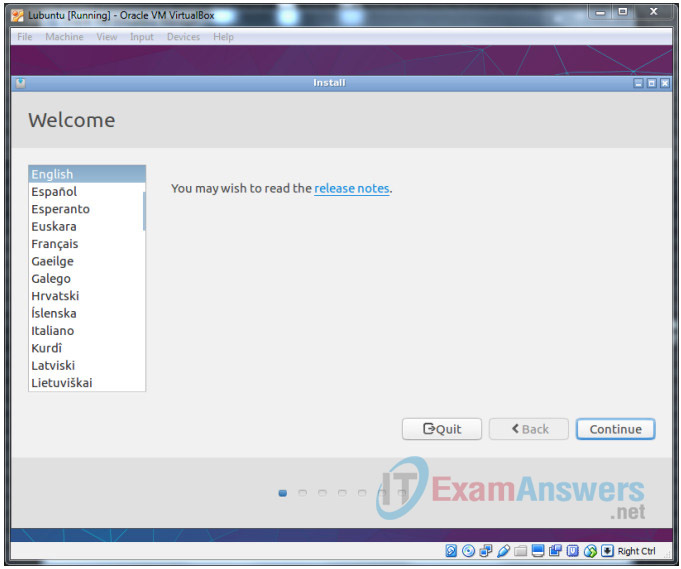
f. Because the installer also brings up the mouse drivers, your mouse will now work. Select English as the system language and click Continue.
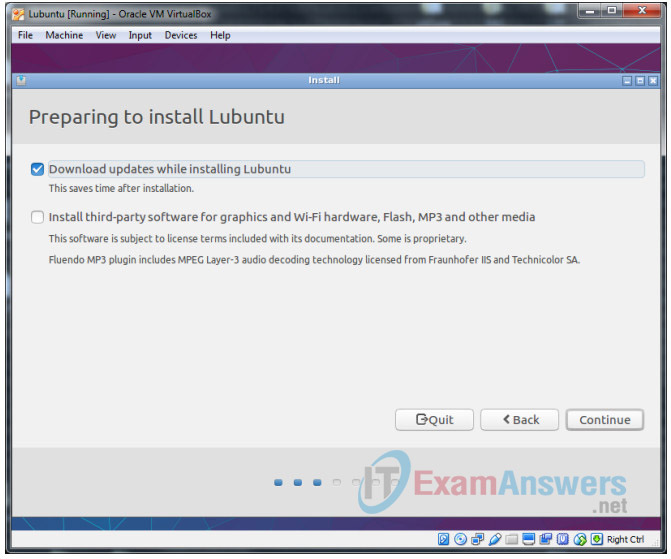
g. Select Download updates while installing Lubuntu to download and install updates while the system is installed. Click Continue.
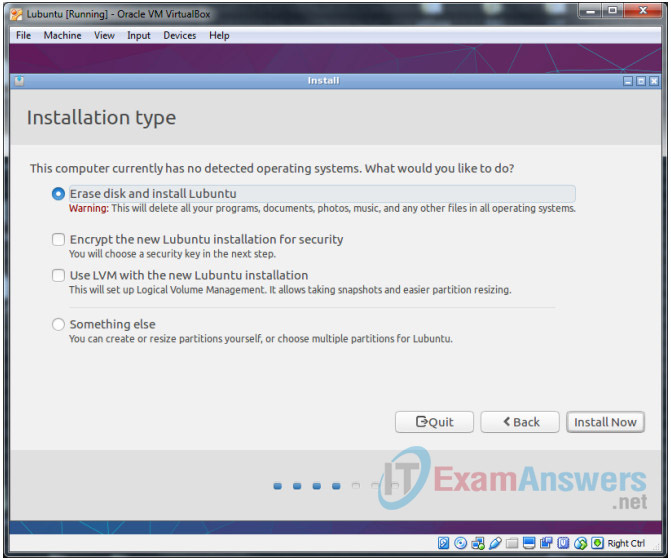
h. Select Erase disk and install Lubuntu, and click Install Now. Notice that this is a VM and therefore, the disk refers to the virtual disk created earlier. All changes will happen only inside that virtual disk. Also note that this option allows the installer to automatically partition the virtual disk.
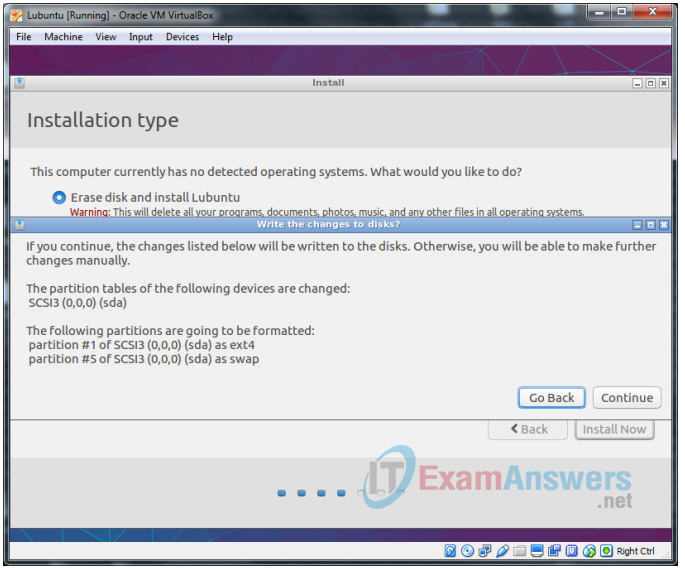
i. Click Continue to confirm the automatic partitioning.
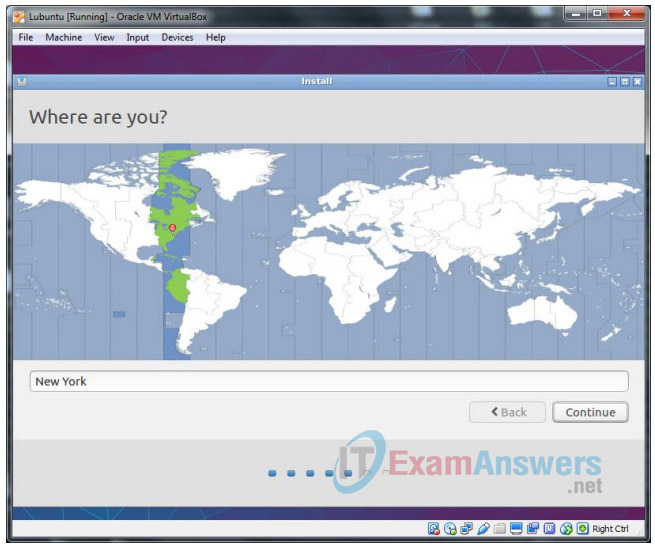
j. Select your time zone and click Continue.
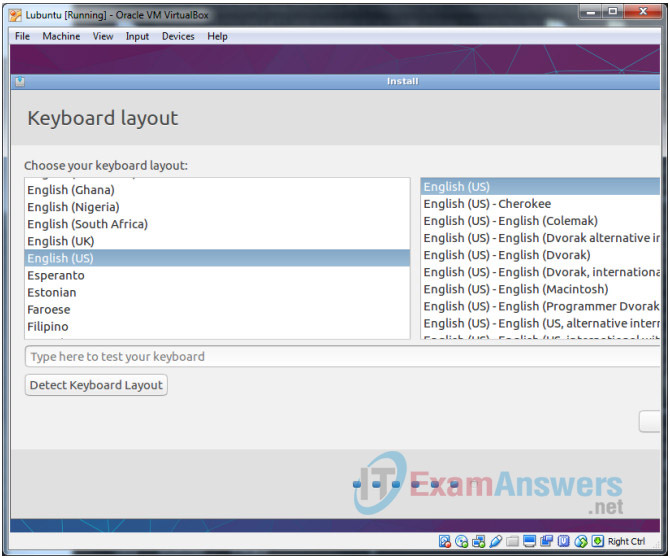
k. Select your keyboard layout and click Continue.
Note: Some installer windows are not correctly sized and may escape the VM console boundaries (see below). If this happens, drag the window to the left or to the right as needed. To drag the window, simply click its blue header and drag it.
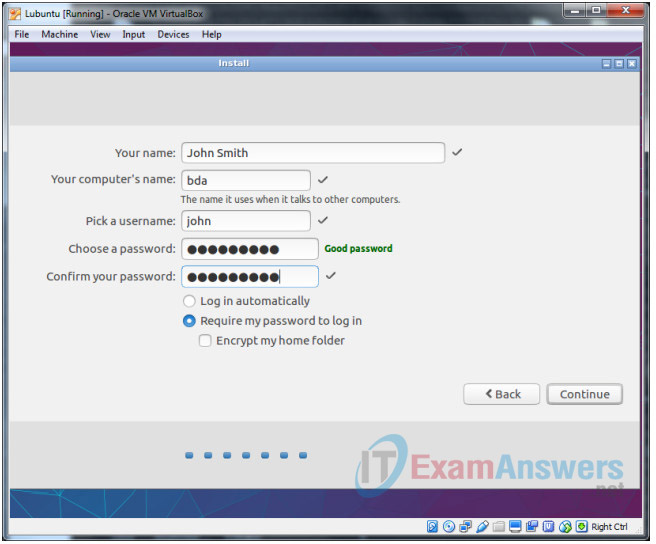
l. Provide your name, a name for the virtual computer, and your account information. Take note of your username and password as you will need it to log into the VM. Select Require my password to log in, but leave Encrypt my home folder unchecked and click Continue.
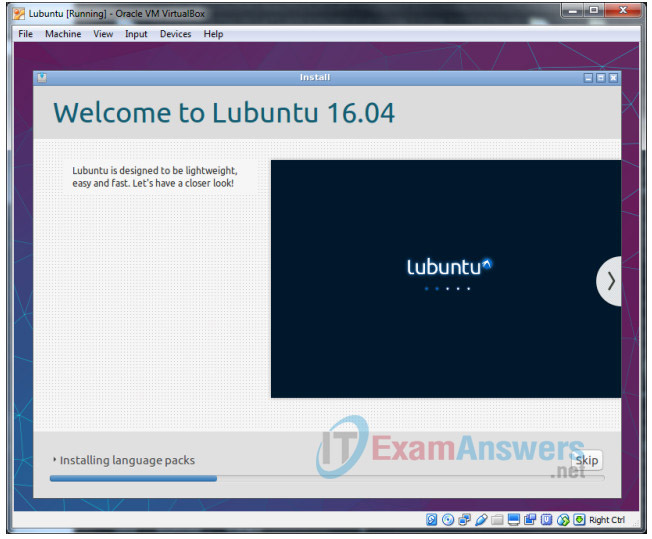
m. The installation will begin and may last a few minutes depending on the CPU installed in your computer and how much memory was allocated to the VM. Wait until the installation process is finished.
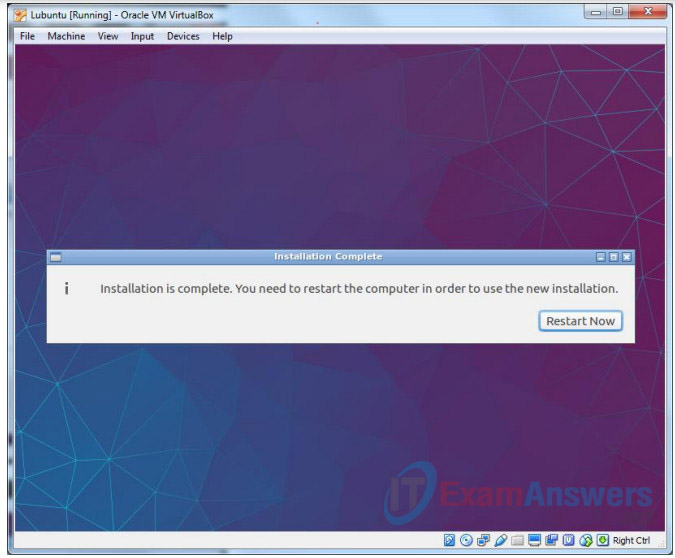
n. Once the installation is completed, the installer will present the screen below. Click Restart Now.
o. Before restarting the VM, the installer reminds you to check the optical drive.
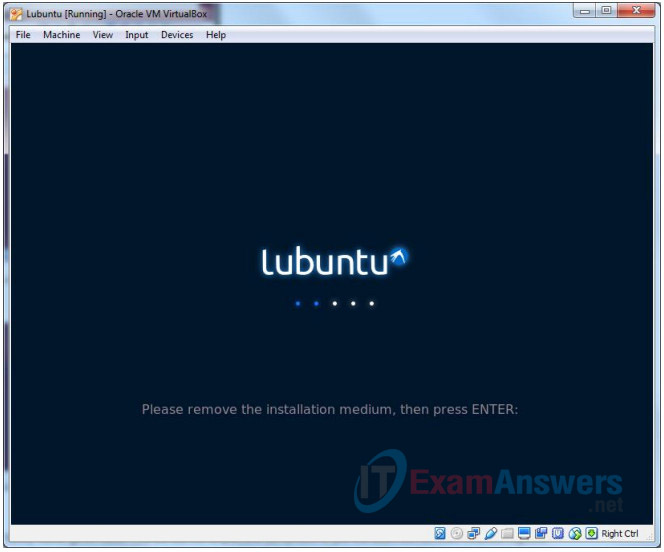
p. Make sure the optical drive is empty. If the optical drive is not empty, unmount the optical disk image from the virtual optical drive by navigating to Machine > Settings > Storage, click the CD icon on the right size of the Settings window and select Remove Disk from Virtual Drive. When the drive is empty, close the Settings window and press ENTER to restart the VM.
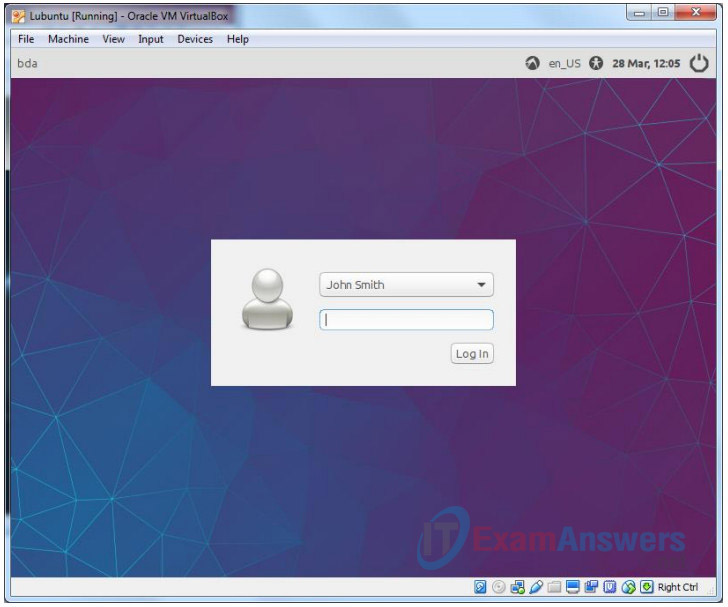
q. The boot process will take place again, but this time from the virtual disk. When the boot process is complete, the login screen will be presented. Enter the login information provided earlier and click Login.
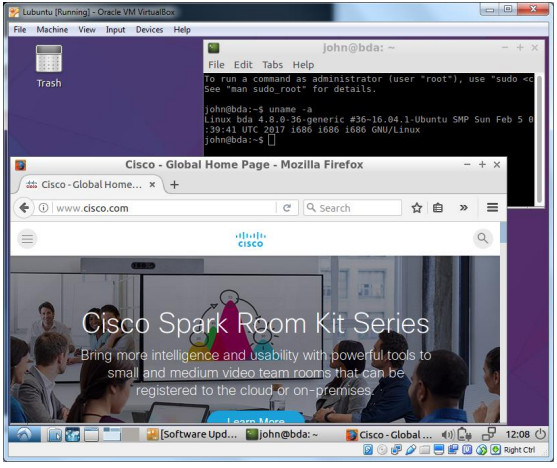
r. Your VM is ready for use. It should have network connectivity through your computer.
Part 5: Guest-Host Network Communication
In Part 5, you will create a virtual network between the host and guest systems and send packets through it.
Step 1: Prepare the Guest Network
VirtualBox supports many network types. The default is NAT and while it allows the guest to reach the Internet, it does not support network traffic between the host and the guests. Follow the steps below to change the guest’s network type to Bridged, a network type that supports host to guest communication.
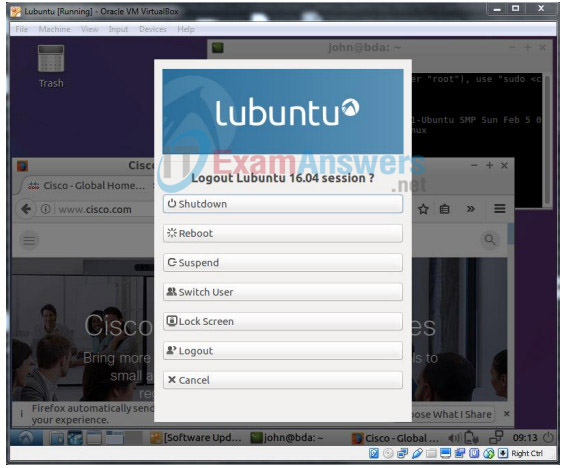
a. Shut down the VM if it is running. From inside the VM, click the power icon on the bottom right of the VM’s desktop and select Shutdown.
b. In VirtualBox’s manager screen, select the Lubuntu VM, click Settings, and select Network.
c. Under the Adapter 1 tab, change the value of the Attached To: drop-down menu to Bridged Adapter. Click OK.
d. Click Start to start the Lubuntu VM again. The VM will now request an IP address from the DHCP server, allowing the host (along with any other device on the local network) to reach it.
e. Log on to Lubuntu with your credentials and open a terminal window by navigating to System Tools > LXTerminal from the Lubuntu application menu.
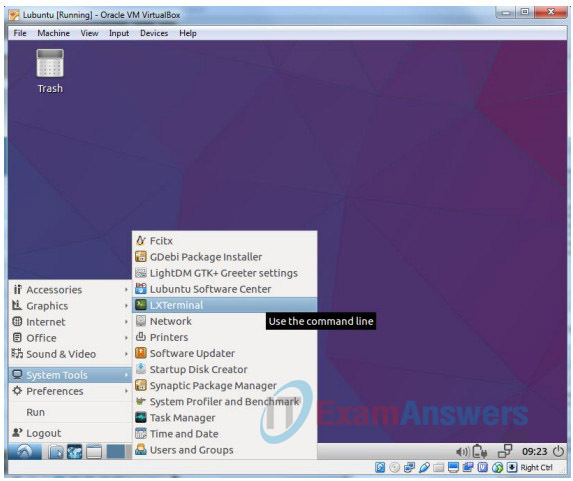
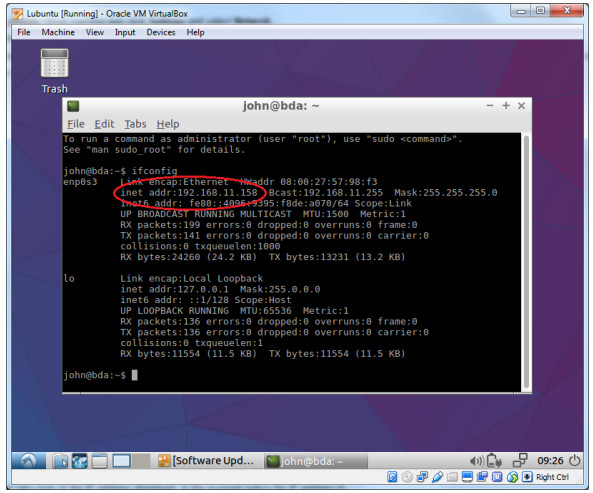
f. In the terminal window, type ifconfig. This command displays information about network connections in Linux systems. In the case of our Lubuntu VM, ifconfig displays two network cards: enp0s3 and l0. Take note of the IP address displayed under enp0s3. In the example below, the IP address is 192.168.11.158 but the address of your Lubuntu will be different.
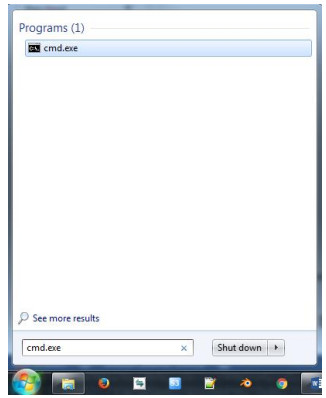
g. From your host computer, open a command prompt window by clicking the Start Menu, typing cmd.exe on the search box and pressing <ENTER>.
h. In the command prompt window, use the ping command to send packets to the VM over the virtual network. Remember to replace the IP address with the address of your Lubuntu VM.
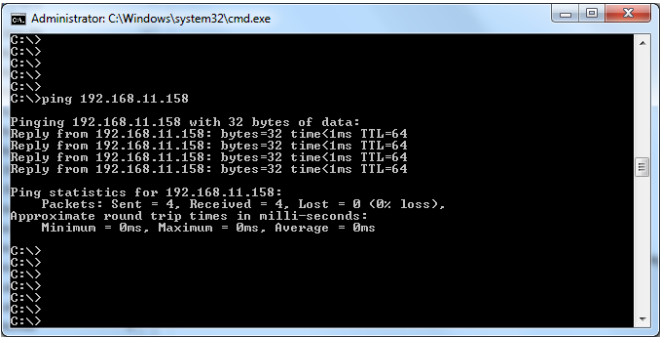
The ping command sends echo requests to the specified IP address. The destination computer knows that, upon receipt of echo requests, it should respond with echo replies. The output above shows how long it took for the packets to reach the VM and for the response to reach the host. The ping command is a great tool for network testing and troubleshooting.
Congratulations! You have deployed a VM, created a virtual network and sent packets over the virtual network.
Part 6: Challenge: Install a Second Virtual Machine (Optional)
Step 1: Deploying a second VM
Now that you have deployed a fully operational VM, can you deploy a second one on your own? Below are the major steps:
a. Select an operating system to use. Any operating system can be used, Windows, Linux (Ubuntu, RedHat, etc) as long as your computer has the physical resources to support it (compatible CPU, enough free memory and disk space).
If you don’t have a preference, this lab recommends LXLE. LXLE is a Linux-based system, also designed to be lightweight. Download the LXLE image file (lxle-eclectica-16.04.1.iso) and take note of its location on your computer. Similar to the Lubuntu image file, this file contains a complete image of LXLE’s installation CD and can be used to install the LXLE operating system in a VM.
b. Create the VM within VirtualBox.
c. Add the image to the virtual optical drive.
d. Boot the VM from the optical drive.
e. Select the option to install LXLE and follow the prompts and complete the installation. Because this is a different system, the installer will be different.
f. When the installation is complete, remove the image file from the optical drive and reboot the VM.
g. Log on to the machine.
Step 2: Send Packets from Virtual Machine 1 to Virtual Machine 2 over Your Virtual Network
a. Make sure the second VM has the correct network type (Bridged).
b. Make sure to reboot the second VM after changing the network type.
c. Log on to the second VM to learn its IP address.
d. From VM 1, issue a ping command towards the VM 2.
e. From the host computer, open a command prompt window and use the ping command to send packets to VM 2.
Part 7: Reflection
The use of VMs allows for a number of benefits:
- A guest system can run inside the host system. This is a great way to test a new OS or use tools that are only available on a specific OS while keeping the host OS fully operational.
- It is much easier to deploy or re-deploy VMs. Since they are files, VMs are very flexible and extremely popular in data centers environments. They can be copied, backed up, and even distributed to multiple computers.
- If needed, a number of VMs can be created in the same host, allowing for the creation of a virtual network within the host. This a great way to test network applications without the need of multiple physical computers.
