6.4.1.2 Lab – Install and Test the Raspberry Pi Camera (Instructor Version)
Objectives
- Part 1: Setup the Raspberry Pi camera.
- Part 2: Test the Raspberry Pi camera.
- Part 3: Capture images with Python.
Scenario/Background
Raspberry Pi versions 2 and higher come with a dedicated camera port. The Raspberry Pi Foundation offers an “official” camera. The camera has an 8-megapixel sensor and is supported by a versatile software library for use with Python applications. In this lab, you will physically install the camera module and software and use Python to control the camera to capture and display images.
Required Resources
- 1 PC with Internet access
- Raspberry Pi version 2 or higher
- Camera V2 module
- Python libraries: matplotlib.pyplot, IPython.display, picamera, time
Part 1: Setup the Raspberry Pi Camera
Step 1: Connect the RPi Camera module
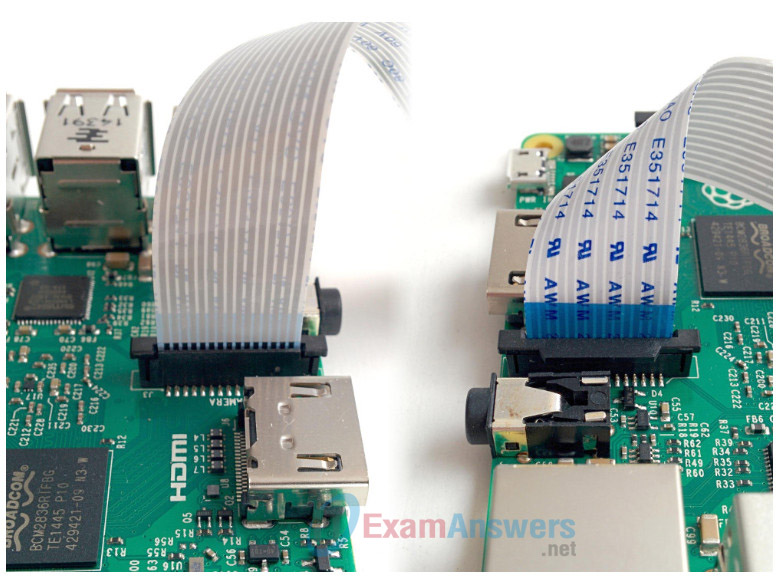
Connect the Rapsberry Pi camera module to the Raspberry Pi as shown in the figure below. The camera port location depends on the version of the RaPi you are using, as shown in the figure.

a) Locate the camera port.
The port is labelled “camera.”
b) Open the port.
Lift the black latch that is part of the camera port connector. The latch lifts from each end.
c) Insert the ribbon cable in the camera port.
The ribbon cable is attached by carefully inserting the cable with the metal contacts facing the direction of the “Camera” label on the Raspberry Pi board. Gently insert the cable as far as it will go into the port.
d) Secure the cable in place.
Push the latch down into the port to secure the cable in place.
Part 2: Test the Camera
In this part of the lab, you will test the camera hardware using the raspistill shell utility. This will create an external graphics file that we will display in the notebook.
Step 1: Load the required libraries.
Import the necessary iPython modules.
#code cell 1
# import the display module to enable viewing external graphics in the notebook
from IPython.display import Image
import time
Step 2: Capture an image using the Camera module
a) Grab an image, and display it.
We will use the Raspberry Pi command line to capture an image. The rapistill command -o parameter outputs the image to the filename that follows it. We then view the file with iPython Image function. This code will take a little while to run.
#code cell 2
!raspistill -t 1 -o test.jpg
Image(filename = "test.jpg")
b) Experiment with the camera.
The raspistill command accepts a number of parameters.
| Parameter | Usage |
|---|---|
| -t | Time (in ms) before takes picture and shuts down (if not specified, set to 5s). |
| -w | Change image width in pixels. |
| -h | Change image height in pixels. |
| -hf | Flip image horizontally. Use if the image is backwards. |
| -vf | Flip image vertically. Use if the image is upside down. |
| -o | Output to specified filename. |
| -ifx | Apply an image effect. Some available effects are negative, solarise, sketch, oilpaint. |
The example below will capture a 400 x 300 pixel image with a solarise effect to the text.jpg file.
!raspistill -w 400 -h 300 -ifx solarise -o test.jpg
There are many other settings available. They can be seen by opening a terminal and typing raspistill with no parameters. Try some different parameters to see the effects.
# code cell 3
# use the raspistill shell command with "!" to control the camera.
Part 3: Capture images with Python
In this part of the lab, you will use the picamera Python library to capture images.
Step 1: Load Python modules.
a) Load the modules required for displaying camera images.
Run the code below to import the modules and settings that will enable visualization of images from the camera directly in the notebook.
#code cell 4
#import the Raspberry Pi camera modules.
from picamera.array import PiRGBArray
from picamera import PiCamera

# Configure the environment to display matplotlib images in this notebook
%matplotlib inline
#import the matplotlib pyplot module. Refer to it as plt.
import matplotlib.pyplot as plt
#import the Ipython display module clear_output methods
from IPython.display import clear_output
Step 2: Capture an image.
The code below captures an image and displays it. First, any existing camera is closed to ensure we are starting from the beginning with the camera initialization. Then, the camera image properties are set on the camera object. Then, the image is captured with the camera.capture() method. Finally, the graphic is displayed with matplotlib.pyplot.
#code cell 5
# sanity check, to be sure that no other processes are using the camera
try:
   camera.close()
   del camera
except:
   print('ok')

#initialize the camera by creating a camera object from the PiCamera() method.
camera = PiCamera()

# set the resolution of the picture to be taken
camera.resolution = (256, 256)
# set the frame rate
camera.framerate = 1
# create an object for the captured image
rawCapture = PiRGBArray(camera)

# allow the camera to warmup
time.sleep(0.1)

try:
# Capture a frame from the camera by using the capture() method of the camera object.
camera.capture(rawCapture, format="rgb")

# Create an array from the captured image
image = rawCapture.array

# The plt.show() method is used as if the image were a graph.
# Turn off the axis
plt.axis('off')
# Title of the picture
plt.title("Hello world")
# show the frame
plt.imshow(image)
plt.show()
# release the camera
camera.close()
except:
# Release the Video Device
camera.close()
print('Something went wrong')
If all went well, the captured image should appear as the output of the code cell above. Now your camera is ready to use in the labs that follow.
