17.2.7 Lab – Certificate Authority Stores Answers version
Objectives
- Part 1: Certificates Trusted by Your Browser
- Part 2: Checking for Man-In-Middle
Background / Scenario
As the web evolved, so did the need for security. HTTPS (where the ‘S’ stands for security) along with the concept of a Certificate Authority was introduced by Netscape back in 1994 and is still used today. In this lab, you will:
- List all the certificates trusted by your browser (completed on your computer)
- Use hashes to detect if your internet connection is being intercepted (completed in the Security Workstation virtual machine)
Required Resources
- Security Workstation virtual machine
- Internet access
Instructions
Part 1: Certificates Trusted by Your Browser
HTTPS relies on a third-party entity for validation. Known as Certification Authority (CA), this third-party entity verifies if a domain name really belongs to the organization claiming its ownership. If the verification checks, the CA creates a digitally signed certificate containing an information about the organization, including its public key.
The entire system is based on the fact that web browsers and operating systems ship with a list of CAs they trust. Any certificates signed by any of the CAs in the list will be seen by the browser as legitimate and be automatically trusted. To make the system more secure and more scalable, CAs often spread the task of creating and signing certificates among many child CAs. The parent CA is known as the Root CA. If a browser trusts a Root CA, it also trusts all its children CAs.
Note: While the certificate stores are similar across browsers, this lab focuses on Chrome 88 and Firefox 75. The menu and graphics may be different for other versions of the web browser.
Follow the steps to display the CA store in your browser:
Step 1: Display the Root Certificates in Chrome.
You can do this step on your local machine or use FireFox in the Security Workstation VM. If you use Firefox, proceed to Step 2. If you use a browser other than Chrome or Firefox, search the internet for the steps to display your root certificates.
Note: The menu and graphics may be different for other versions of the Chrome browser.
a. Open the Chrome web browser on your PC.
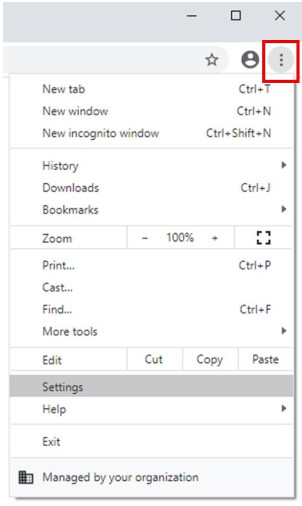
b. Click the three-dot icon on the far right of the address bar to display Chrome’s options. Click Settings.

c. Scroll down to Privacy and security and click Security. Click the arrow to expand the list.
d. Scroll down and select Manage certificates.
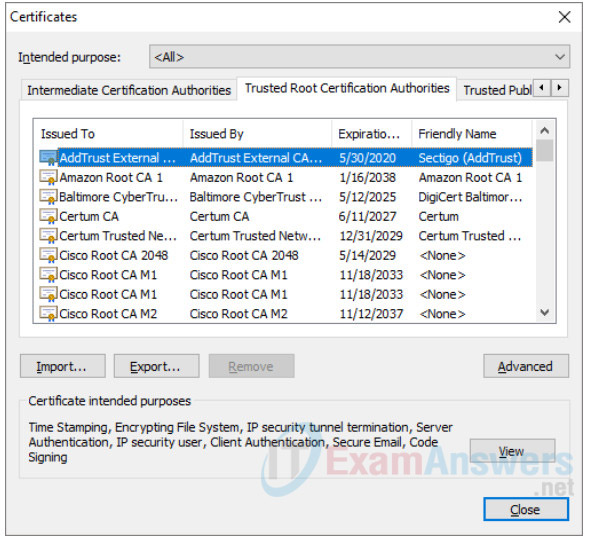
e. In the Certificate window, select Trusted Root Certification Authorities tab to show all certificates and certificate authorities trusted by Chrome.

Step 2: Display the Certificates in the CA Store in Firefox.
Note: The menu and graphics may be different for other versions of the Firefox browser and between different operating systems. Firefox 75 on the Security Workstation VM is shown in this step.
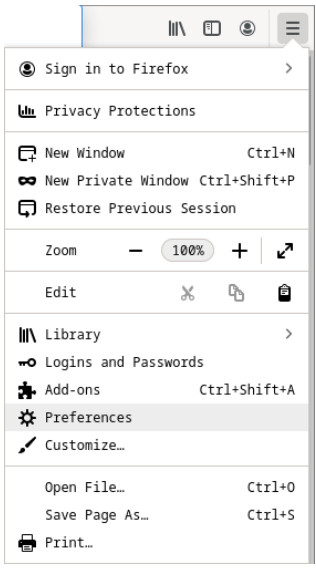
a. Open Firefox and click the Menu icon. The Menu icon is located on the far right of the Firefox window, next to the address bar. Click Preferences. (It may also be Options.)

b. Click Privacy & Security in the left panel.
c. Scroll down to the Security section and click View Certificates.
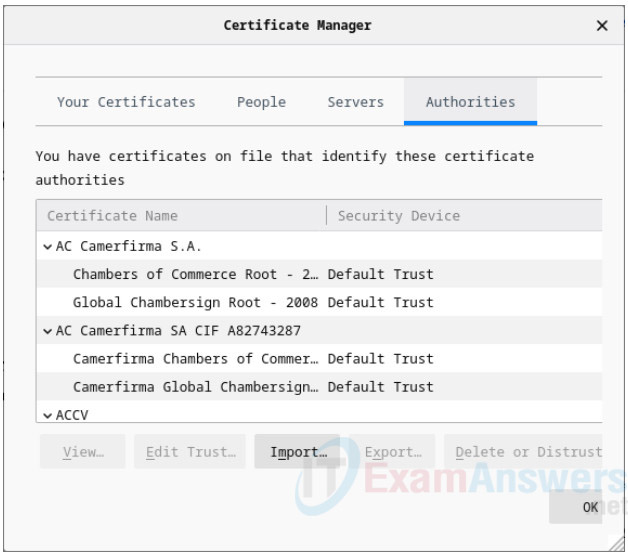
d. A window opens that shows the certificates and certification authorities trusted by Firefox.

Part 2: Checking for Man-In-Middle
This part is completed using the Security Workstation VM.
A common use for hashes is to verify data integrity, but they can also be used to detect HTTPS man-in-the-middle attacks.
To protect user data, more and more websites are switching to encrypted traffic. Known as HTTPS, sites use protocols such as TLS/SSL to encrypt user traffic from end to end. After the traffic is properly encrypted, it is very difficult for any party other than the user and the site in question to see the contents of the encrypted message. This is good for the users, but it creates a problem for organizations that want to look into that traffic. Companies and organizations often choose to peek into employee-generated traffic for monitoring purposes. They needed to be able to look into TLS/SSL-encrypted traffic. This is done by using an HTTPS proxy.
Web browsers trust the identity of a visited web site if the certificate presented by that web site is signed by one of the CAs installed in the browser’s certificate store. To be able to peek into its users’ TLS/SSLencrypted traffic, a company or organization simply adds another CA into the user’s browser list of installed CA.
Consider the following scenario: Company X hires a new employee and provides him with a new company laptop. Before handing over the laptop, the company IT department installs all the software necessary for the work. Among the software and packages that are installed, the IT department also includes one extra CA to the list of trusted CAs. This extra CA points to a company-controlled computer known as the HTTPS proxy. Because the company controls traffic patterns, the HTTPS proxy can be placed in the middle of any connection. It works like this:
1) The user attempts to establish a secure connection to HTTPS web site H, hosted on the internet. H can be any HTTPS site: a bank, online store, email server, etc.
2) Because the company controls traffic patterns, it makes it so that all user traffic must traverse the HTTPS proxy. The HTTPS proxy then impersonates web site H and presents a self-signed certificate to prove it is H. The HTTPS proxy essentially says “Hi there, I am HTTPS site H. Here’s my certificate. It’s has been signed by… myself.”
3) Because the presented certificate is signed by one of the CAs included in the laptop’s CA store (remember, it was added by IT), the web browser mistakenly believes it is indeed communicating with H. Notice that, had the extra CA not been added to the CA store, the laptop would not trust the certificate and immediately realize that someone else was trying to impersonate H.
4) The laptop trusts the connection and establishes a secure channel with the HTTPS proxy, mistakenly believing it is communicating securely with H.
5) The HTTPS proxy now establishes a second secure connection to H, the web site the user was trying to access from the beginning.
6) The HTTPS proxy is now the end point of two separate secure connections; one established with the user and another established with H. Because the HTTPS is the end point of both connections, it can now decrypt traffic from both connections.
7) The HTTPS proxy can now receive TLS/SSL-encrypted user traffic destined to H, decrypt it, inspect it, re-encrypt it using TLS/SSL and send it to H. When H responds, the HTTPS proxy reverses the process before forwarding the traffic to the user.
Notice that process is mostly transparent to the user, who sees the connection as TLS/SSL-encrypted (green marks on the browser). While the connection is secure (TLS/SSL-encrypted), it has been established to a spurious web site.
Even though their presence is mostly transparent to the user, TLS proxies can be easily detected with the help of hashes. Considering the example above, because the HTTPS proxy has no access to the site H private keys, the certificate it presents to the user is different than the certificate presented by H. Included in every certificate is a value known as a fingerprint. Essentially a hash calculated and signed by the certificate issuer, the fingerprint acts as a unique summary of all the contents of the certificate. If as much as one letter of the certificate is modified, the fingerprint will yield a completely different value when calculated. Because of this property, fingerprints are used to quickly compare certificates. Returning to the example above, the user can request H’s certificate and compare the fingerprint included in it with the one provided when the connection to the web site H was established. If the fingerprints match, the connection is indeed established to H. If the fingerprints do not match, the connection has been established to some other end point.
Follow the steps below to assess if there’s a HTTPS proxy in your connection.
Step 2: Gathering the correct and unmodified certificate fingerprint.
The first step is to gather a few site fingerprints. This is important because these will be used for comparison later. The table below contains a few site certificate fingerprints from popular sites.
Note: The SHA-1 fingerprints shown in Table 1 may no longer be valid as organizations regularly renew their certificates. A fingerprint is also called a thumbprint in Windows-based machines.
Table 1 – Popular Sites and Their SHA-1 Certificate Fingerprints
| Site | Domains Covered By Certificate | Certificate SHA-1 Fingerprint (as of May 2020) |
|---|---|---|
| www.cisco.com | www.cisco.com | E2:BD:0B:58:C6:B4:FF:91:D6:23:AB:44:0D:8F:64:76:29:4E:30:0B |
| www.facebook.com | *.facebook.com | BB:E7:A0:97:C7:92:B2:2D:00:38:12:69:E4:64:E9:04:96:4B:C7:41 |
| www.wikipedia.org | *.wikipedia.org | A8:F9:F7:79:BE:DB:3E:EB:59:F0:1D:A6:34:08:A1:64:5D:28:48:44 |
| twitter.com | twitter.com | 73:33:BB:96:1D:DB:9C:0C:4F:E5:1C:FF:68:26:CF:5E:3F:50:AB:96 |
| www.linkedin.com | www.linkedin.com | 04:BC:C5:09:DD:AE:99:40:7E:99:A5:65:32:68:EC:5D:2D:D7:5A:19 |
What are the fingerprints? Why are they important?
A certificate fingerprint is a hash calculated against the certificate. It is important because it allows for a quick way to verify if any information inside the certificate has been tampered with.
Who calculates fingerprints? How to find them?
The certificate fingerprint is usually calculated by the CA that signs the certificate. After it has been computed, the CA includes it in the certificate itself. The fingerprint can be easily displayed when viewing the certificate.
Step 3: Gather the certificate fingerprint in use by the Security Workstation VM.
Now that we have the actual fingerprints, it is time to fetch fingerprints from a local host and compare the values. If the fingerprints do not match, the certificate in use does NOT belong to the HTTPS site being verified, which means there’s an HTTPS proxy in between the host computer and the HTTPS site being verified. Matching fingerprints means no HTTPS proxy is in place.
a. Start the Security Workstation VM and log in with username sec_admin and password net_secPW.
b. Use the three piped commands below to fetch the fingerprint for Cisco.com. The line below uses OpenSSL to connect to cisco.com on port 443 (HTTPS), request the certificate and store it on a text file named cisco.pem. The output is also shown for context.
[sec_admin@secOps ~]$ echo -n | openssl s_client -connect cisco.com:443 | sed
-ne '/-BEGIN CERTIFICATE-/,/-END CERTIFICATE-/p' > ./cisco.pem
depth=2 C = BM, O = QuoVadis Limited, CN = QuoVadis Root CA 2
verify return:1
depth=1 C = US, O = HydrantID (Avalanche Cloud Corporation), CN = HydrantID SSL ICA G2
verify return:1
depth=0 C = US, ST = CA, L = San Jose, O = "Cisco Systems, Inc.", CN = www.cisco.com
verify return:1
DONE
c. Optionally, use the cat command to list the contents of the fetched certificate and stored in the cisco.pem text file:
[sec_admin@secOps ~]$ cat cisco.pem
-----BEGIN CERTIFICATE-----
MIIG1zCCBL+gAwIBAgIUKBO9xTQoMemc9zFHNkdMW+SgFO4wDQYJKoZIhvcNAQEL
BQAwXjELMAkGA1UEBhMCVVMxMDAuBgNVBAoTJ0h5ZHJhbnRJRCAoQXZhbGFuY2hl
IENsb3VkIENvcnBvcmF0aW9uKTEdMBsGA1UEAxMUSHlkcmFudElEIFNTTCBJQ0Eg
RzIwHhcNMTcxMjA3MjIxODU1WhcNMTkxMjA3MjIyODAwWjBjMQswCQYDVQQGEwJV
UzELMAkGA1UECAwCQ0ExETAPBgNVBAcMCFNhbiBKb3NlMRwwGgYDVQQKDBNDaXNj
byBTeXN0ZW1zLCBJbmMuMRYwFAYDVQQDDA13d3cuY2lzY28uY29tMIIBIjANBgkq
yvo6dWpJdSircYy8HG0nz4+936+2waIVf1BBQXZUjNVuws74Z/eLIpl2c6tANmE0
q1i7fiWgItjDQ8rfjeX0oto6rvp8AXPjPY6X7PT1ulfhkLYnxqXHPETRwr8l5COO
MDEh95cRxATXNAlWAwLcBT7lDmrGron6rW6hDtuUPPG/rjZeZbNww5p/nT3EXX2L
Rh+m0R4j/tuvy/77YRWyp/VZhmSLrvZEYiVjM2MgCXBvqR+aQ9zWJkw+CAm5Z414
Eiv5RLctegYuBUMGTH1al9r5cuzfwEg2mNkxl4I/mtDro2kDAv7bcTm8T1LsZAO/
1bWvudsrTA8jksw+1WGAEd9bHi3ZpJPYedlL
-----END CERTIFICATE-----
[sec_admin@secOps ~]$
d. Now that the certificate is saved in the cisco.pem text file, use the command below to extract and display its fingerprint:
[sec_admin@secOps ~]$ openssl x509 -noout -in cisco.pem -fingerprint -sha1
SHA1 Fingerprint=64:19:CA:40:E2:1B:3F:92:29:21:A9:CE:60:7D:C9:0C:39:B5:71:3E
[sec_admin@secOps ~]$
Note: Your fingerprint value may be different for two reasons. First, you may be using a different operating system than the Security Workstation VM. Second, certificates are regularly refreshed changing the fingerprint value.
What hash algorithm was used by OpenSSL to calculate the fingerprint?
SHA-1
Why was that specific algorithm chosen? Does it matter?
The fingerprints acquired and shown in the table are all SHA-1. Any other algorithm used by OpenSSL when computing the fingerprint would yield a different hash and therefore a different fingerprint, invalidating the test.
Step 4: Compare the Fingerprints
Use Table 1 to compare the certificate fingerprint acquired directly from the Cisco HTTPS site with the one acquired from within your network. Recall, fingerprints may change over time.
Do the fingerprints match?
Answers will vary depending on the network in use. If they are using the VM as instructed, the answer is Yes; the VM most likely does not have a false CA installed in its store.
What does it mean?
Answers will vary depending on the network in use. If the fingerprints match, chances are no certificate tampering took place and therefore, no HTTPS proxy is in operation; traffic exchanged between the local machine and the cisco.com site are end-to-end encrypted. Non-matching fingerprints mean that someone else has intercepted the connection, sent its own certificate to the host machine and established a new SSL/TLS connection to cisco.com, placing itself in the middle. Because a new certificate was sent to the local machine, the fingerprint of that new certificate is different than the certificate used by cisco.com. Traffic between the local machine and the cisco.com site can be read by the HTTPS proxy.
Is this method 100% foolproof?
No. While non-matching fingerprints communicates SSL/TLS traffic interception, matching fingerprints should be handled with care. A few exceptions to consider are: 1. The Security Workstation VM will likely NOT have any enterprise-owned CA root certificates installed. In that scenario, the VM may not have its traffic intercepted while other machines in local network do. 2. The enterprise could use dynamic rules to intercept only selected sites.
Part 3: Challenges (Optional)
a. Check the fingerprints for the sites shown in Table-1 but using your web browser’s GUI.
Hints: Find a way to display the fingerprint through the browser’s GUI. Remember: Google is useful in this exercise, and Windows often refers to the Fingerprint as Thumbprint.
b. Use the OpenSSL (Part 2, Steps 1 through 3) to check all the fingerprints listed in Table-1
Reflection Question
What would be necessary for the HTTPS proxy to work?
The local machine would have to trust the HTTPS proxy blindly. Companies and organizations that wish to monitor HTTPS traffic achieve this trust by installing the HTTPS proxy’s certificate into the local machine’s root certificate store. In this scenario, the local machines will trust the HTTPS proxy, allowing it to decrypt the traffic without any warnings.
