
4.4.8 Packet Tracer - Configure Secure Passwords and SSH Answers
Topology
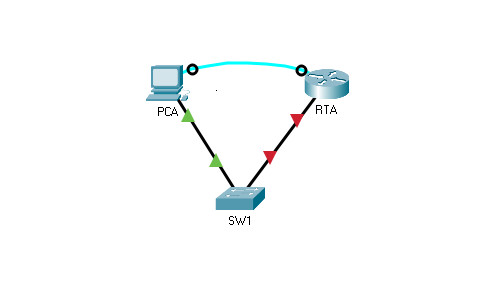
4.4.8 Packet Tracer – Configure Secure Passwords and SSH
Addressing Table
| Device | Interface | IP Address | Subnet Mask | Default Gateway |
|---|---|---|---|---|
| RTA | G0/0/0 | 172.16.1.1 | 255.255.255.0 | N/A |
| PCA | NIC | 172.16.1.10 | 255.255.255.0 | 172.16.1.1 |
| SW1 | VLAN 1 | 172.16.1.2 | 255.255.255.0 | 172.16.1.1 |
Scenario
The network administrator has asked you to prepare RTA and SW1 for deployment. Before they can be connected to the network, security measures must be enabled.
Intructions
Part 1: Configure Basic Security on the Router
a. Configure IP addressing on PCA according to the Addressing Table.
Go to PCA > Desktop tab > IP Configuration
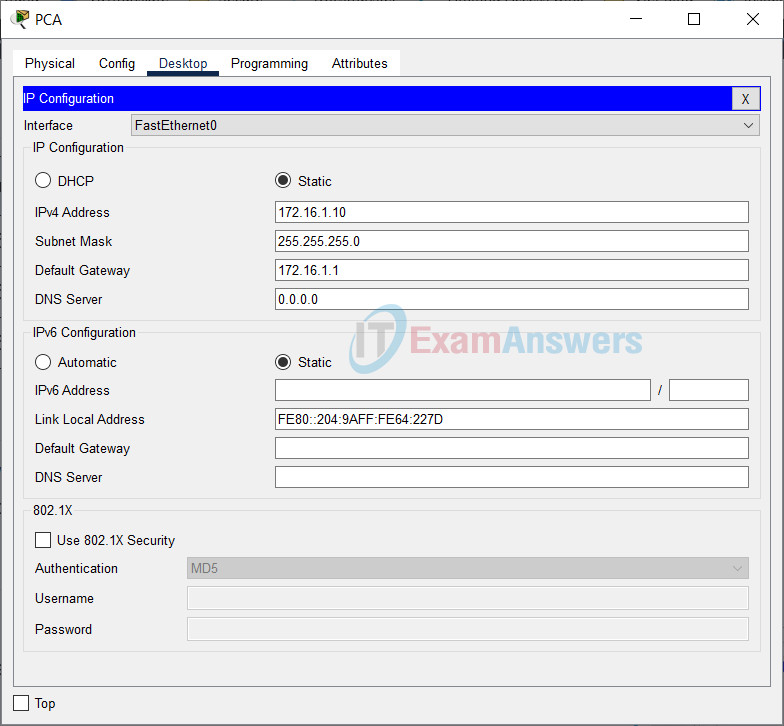
b. Console into RTA from the Terminal on PCA.
Go to PCA > Desktop tab > Terminal > OK
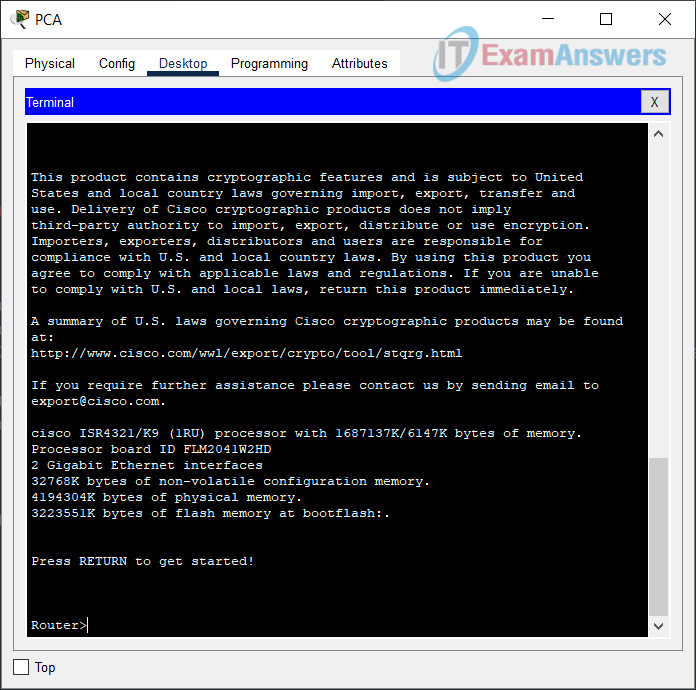
c. Configure the hostname as RTA.
Router(config)#hostname RTA
d. Configure IP addressing on RTA and enable the interface.
RTA(config)#interface GigabitEthernet0/0/0
RTA(config-if)#ip address 172.16.1.1 255.255.255.0
RTA(config-if)#no shutdown
e. Encrypt all plaintext passwords.
RTA(config)# service password-encryption
f. Set the minimum password length to 10.
RTA(config)# security passwords min-length 10
g. Set a strong secret password of your choosing.
RTA(config)#enable secret any_password
Note: Choose a password that you will remember, or you will need to reset the activity if you are locked out of the device.
h. Disable DNS lookup.
RTA(config)# no ip domain-lookup
i. Set the domain name to netsec.com (case-sensitive for scoring in PT).
RTA(config)# ip domain-name netsec.com
j. Create a user of your choosing with a strong encrypted password.
RTA(config)# username any_user secret any_password
k. Generate 1024-bit RSA keys.
Note: In Packet Tracer, enter the crypto key generate rsa command and press Enter to continue.
RTA(config)# crypto key generate rsa
The name for the keys will be: RTA.netsec.com
Choose the size of the key modulus in the range of 360 to 2048 for your
General Purpose Keys. Choosing a key modulus greater than 512 may take
a few minutes.

How many bits in the modulus [512]: 1024
l. Block anyone for three minutes who fails to log in after four attempts within a two-minute period.
RTA(config)# login block-for 180 attempts 4 within 120
m. Configure all VTY lines for SSH access and use the local user profiles for authentication.
RTA(config)# line vty 0 4
RTA(config-line)# transport input ssh
RTA(config-line)# login local
n. Set the EXEC mode timeout to 6 minutes on the VTY lines.
RTA(config-line)# exec-timeout 6
o. Save the configuration to NVRAM.
RTA#copy running-config startup-config
p. Access the command prompt on the desktop of PCA to establish an SSH connection to RTA.
Go to PCA > Desktop tab > Command Prompt
C:\>ssh -l any_user 172.16.1.1

Password: any_password

RTA>
Part 2: Configure Basic Security on the Switch
Configure switch SW1 with corresponding security measures. Refer to the configuration steps on the router if you need additional assistance.
a. Console into SW1 from the Terminal on PCA.
On the RTA side, click the black circle on the Console cable > Click to SW1 > Select Console
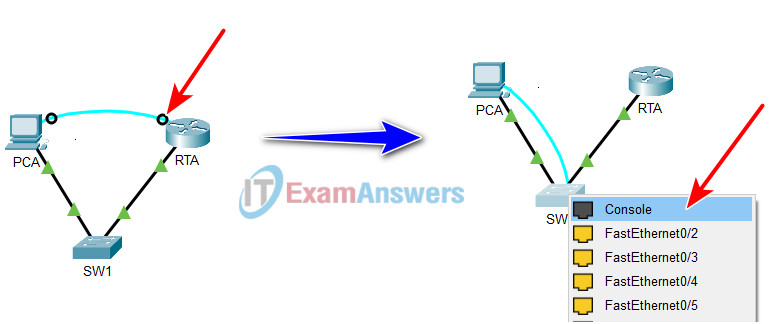
Go to PCA > Desktop tab > Terminal > OK
b. Configure the hostname as SW1.
Switch(config)#hostname SW1
c. Configure IP addressing on SW1 VLAN1 and enable the interface.
SW1(config)#interface Vlan1
SW1(config-if)#ip address 172.16.1.2 255.255.255.0
SW1(config-if)#no shutdown
d. Configure the default gateway address.
SW1(config-if)#ip default-gateway 172.16.1.1
e. Disable all unused switch ports.
Note: On a switch it is a good security practice to disable unused ports. One method of doing this is to simply shut down each port with the ‘shutdown’ command. This would require accessing each port individually. There is a shortcut method for making modifications to several ports at once by using the interface range command. On SW1 all ports except FastEthernet0/1 and GigabitEthernet0/1 can be shutdown with the following command:
SW1(config)# interface range F0/2-24, G0/2
SW1(config-if-range)# shutdown
%LINK-5-CHANGED: Interface FastEthernet0/2, changed state to administratively down

%LINK-5-CHANGED: Interface FastEthernet0/3, changed state to administratively down
<Output omitted>
%LINK-5-CHANGED: Interface FastEthernet0/24, changed state to administratively down

%LINK-5-CHANGED: Interface GigabitEthernet0/2, changed state to administratively down
The command used the port range of 2-24 for the FastEthernet ports and then a single port range of GigabitEthernet0/2.
f. Encrypt all plaintext passwords.
SW1(config)#service password-encryption
g. Set a strong secret password of your choosing.
SW1(config)#enable secret any_password
h. Disable DNS lookup.
SW1(config)#no ip domain-lookup
i. Set the domain name to netsec.com (case-sensitive for scoring in PT).
SW1(config)#ip domain-name netsec.com
j. Create a user of your choosing with a strong encrypted password.
SW1(config)#username my_user secret my_password
k. Generate 1024-bit RSA keys.
SW1(config)#crypto key generate rsa
The name for the keys will be: SW1.netsec.com
Choose the size of the key modulus in the range of 360 to 4096 for your
  General Purpose Keys. Choosing a key modulus greater than 512 may take
  a few minutes.

How many bits in the modulus [512]: 1024
l. Configure all VTY lines for SSH access and use the local user profiles for authentication.
SW1(config)#line vty 0 15
SW1(config-line)#transport input ssh
SW1(config-line)#login local
m. Set the EXEC mode timeout to 6 minutes on all VTY lines.
SW1(config)#line vty 0 15
SW1(config-line)#exec-timeout 6 0
n. Save the configuration to NVRAM.
SW1#copy running-config startup-config
Device Configs - Final
ROUTER RTA
! ==============================================================
!--- 4.4.8 Packet Tracer - Configure Secure Passwords and SSH
!--- ANSWER SCRIPT FOR ROUTER RTA
!--- Usage: copy this whole file and paste it into the RTA terminal (start at the RTA> prompt). Every line beginning with "!" is a comment; IOS ignores it, so pasting a comment by accident is harmless.
! ==============================================================

enable
configure terminal

! --------------------------------------------------------------
!--- Part 1: Basic Device Settings and Addressing.
! --------------------------------------------------------------

!--- Configure the hostname as RTA.
hostname RTA

!--- Configure IP addressing on RTA and enable the interface.
interface gigabitethernet 0/0/0
 ip address 172.16.1.1 255.255.255.0
 no shutdown
 exit

! --------------------------------------------------------------
!--- Part 2: Password Encryption and Local Security Policy.
! --------------------------------------------------------------

!--- Encrypt all plaintext passwords.
service password-encryption

!--- Set the minimum password length to 10.
security passwords min-length 10

!--- Set a strong secret password of your choosing.
enable secret any_password

! --------------------------------------------------------------
!--- Part 3: Domain Name and SSH Key Generation.
! --------------------------------------------------------------

!--- Disable DNS lookup.
no ip domain-lookup

!--- Set the domain name to netsec.com (case-sensitive for scoring in PT).
ip domain-name netsec.com

!--- Create a user of your choosing with a strong encrypted password.
username any_user secret any_password

!--- Generate 1024-bit RSA keys (paste-safe single-line form; hostname and domain-name are already set above, so the key name RTA.netsec.com resolves correctly).
crypto key generate rsa modulus 1024

! --------------------------------------------------------------
!--- Part 4: Login Attack Mitigation and VTY/SSH Access.
! --------------------------------------------------------------

!--- Block anyone for three minutes (180s) who fails to log in after four attempts within a two-minute (120s) period.
login block-for 180 attempts 4 within 120

!--- Configure all VTY lines for SSH access and use the local user profiles for authentication.
line vty 0 4
 transport input ssh
 login local

!--- Set the EXEC mode timeout to 6 minutes on the VTY lines.
 exec-timeout 6
 exit

end

! --------------------------------------------------------------
!--- Save the configuration to NVRAM. (Press Enter when prompted for the destination filename.)
! --------------------------------------------------------------
copy running-config startup-config


! ==============================================================
!--- Verification:
!---   show ip interface brief              -> confirms G0/0/0 is up/up with 172.16.1.1/24
!---   show running-config | section line vty -> confirms transport input ssh, login local, exec-timeout 6
!---   show crypto key mypubkey rsa          -> confirms a 1024-bit RSA key pair named RTA.netsec.com exists
!---   ping 172.16.1.10                      -> confirms Layer 3 reachability to PCA
!---   ssh -l any_user 172.16.1.1 (from PCA) -> confirms end-to-end SSH login using the local user account
!--- Note: login block-for only engages after 4 failed logins within 120s — don't trigger it by accident
!--- while testing the SSH login above, or RTA will lock out all VTY access (including yours) for 180s.
! ==============================================================
SWITCH SW1
! ==============================================================
!--- 4.4.8 Packet Tracer - Configure Secure Passwords and SSH
!--- ANSWER SCRIPT FOR SWITCH SW1
!--- Usage: copy this whole file and paste it into the SW1 terminal (start at the SW1> prompt). Every line beginning with "!" is a comment; IOS ignores it, so pasting a comment by accident is harmless.
! ==============================================================

enable
configure terminal

! --------------------------------------------------------------
!--- Part 1: Basic Device Settings and Addressing.
! --------------------------------------------------------------

!--- Configure the hostname as SW1.
hostname SW1

!--- Configure IP addressing on SW1 VLAN1 and enable the interface.
interface vlan 1
 ip address 172.16.1.2 255.255.255.0
 no shutdown
 exit

!--- Configure the default gateway address.
ip default-gateway 172.16.1.1

! --------------------------------------------------------------
!--- Part 2: Disable Unused Switch Ports.
! --------------------------------------------------------------

!--- Shut down every port except FastEthernet0/1 and GigabitEthernet0/1, which stay up for PCA and the uplink.
interface range fastethernet 0/2 - 24, gigabitethernet 0/2
 shutdown
 exit

! --------------------------------------------------------------
!--- Part 3: Password Encryption and Local Security Policy.
! --------------------------------------------------------------

!--- Encrypt all plaintext passwords.
service password-encryption

!--- Set a strong secret password of your choosing.
enable secret any_password

! --------------------------------------------------------------
!--- Part 4: Domain Name and SSH Key Generation.
! --------------------------------------------------------------

!--- Disable DNS lookup.
no ip domain-lookup

!--- Set the domain name to netsec.com (case-sensitive for scoring in PT).
ip domain-name netsec.com

!--- Create a user of your choosing with a strong encrypted password.
username my_user secret my_password

!--- Generate 1024-bit RSA keys (paste-safe single-line form; hostname and domain-name are already set above, so the key name SW1.netsec.com resolves correctly).
crypto key generate rsa modulus 1024

! --------------------------------------------------------------
!--- Part 5: VTY/SSH Access.
! --------------------------------------------------------------

!--- Configure all VTY lines for SSH access and use the local user profiles for authentication.
line vty 0 15
 transport input ssh
 login local

!--- Set the EXEC mode timeout to 6 minutes on all VTY lines.
 exec-timeout 6 0
 exit

end

! --------------------------------------------------------------
!--- Save the configuration to NVRAM. (Press Enter when prompted for the destination filename.)
! --------------------------------------------------------------
copy running-config startup-config


! ==============================================================
!--- Verification:
!---   show ip interface brief              -> confirms Vlan1 up/up at 172.16.1.2/24, F0/1 and G0/1 still up, F0/2-24 and G0/2 administratively down
!---   show running-config | section line vty -> confirms transport input ssh, login local, exec-timeout 6 0
!---   show crypto key mypubkey rsa          -> confirms a 1024-bit RSA key pair named SW1.netsec.com exists
!---   ping 172.16.1.1                       -> confirms reachability to RTA via the default gateway
!---   ssh -l my_user 172.16.1.2 (from PCA)  -> confirms end-to-end SSH login using the local user account
!--- Note: the shutdown range deliberately excludes F0/1 (PCA's access port) and G0/1 (the uplink) —
!--- double-check the port PCA is actually cabled to before pasting if your topology differs.
! ==============================================================


