
CCNAv7 Enterprise Networking, Security, and Automation v7.0 (ENSA)
ENSA Practice PT Skills Assessment (PTSA)
A few things to keep in mind while completing this activity:
- Do not use the browser Back button or close or reload any exam windows during the exam.
- Do not close Packet Tracer when you are done. It will close automatically.
- Click the Submit Assessment button in the browser window to submit your work.
Topology
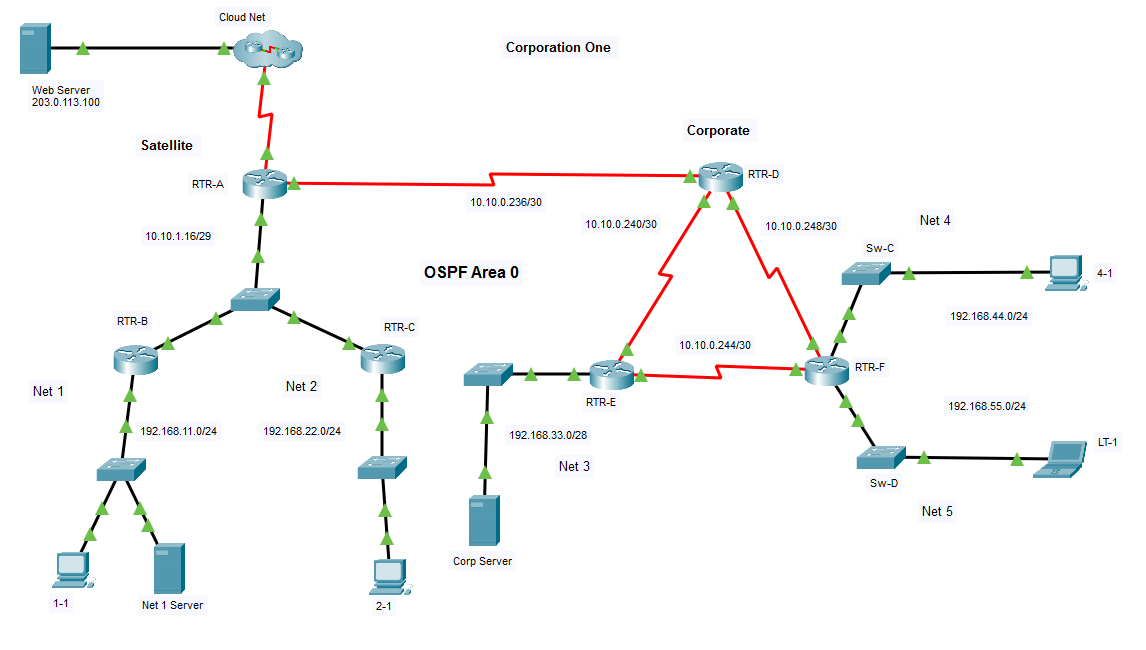
Addressing Table
| Device Name | Interface | IP Address / Prefix |
|---|---|---|
| RTR-A | G0/0/0 | 10.10.1.17/29 |
| S0/1/0 | 10.10.0.237/30 | |
| S0/1/1 | 192.0.2.113/29 | |
| RTR-B | G0/0/0 | 192.168.11.1/24 |
| G0/0/1 | 10.10.1.18/29 | |
| RTR-C | G0/0/0 | 192.168.22.1/24 |
| G0/0/1 | 10.10.1.19/29 | |
| RTR-D | S0/1/0 | 10.10.0.249/30 |
| S0/1/1 | 10.10.0.241/30 | |
| S0/2/0 | 10.10.0.238/30 | |
| RTR-E | G0/0/0 | 192.168.33.1/28 |
| S0/1/0 | 10.10.0.245/30 | |
| S0/1/1 | 10.10.0.242/30 | |
| RTR-F | G0/0/0 | 192.168.44.1/24 |
| G0/0/1 | 192.168.55.1/24 | |
| S0/1/0 | 10.10.0.250/30 | |
| S0/1/1 | 10.10.0.246/30 | |
| 1-1 | NIC | 192.168.11.11 |
| 2-1 | NIC | 192.168.22.22 |
| 4-1 | NIC | 192.168.44.44 |
| Corp Server | NIC | 192.168.33.14 |
| Net 1 Server | NIC | 192.168.11.100 |
| LT-1 | NIC | 192.168.55.55 |
| Web Server | NIC | 203.0.113.100 |
Introduction
You are completing the configuration of the Corporation One network.
You are not required to configure host addressing.
You will practice and be assessed on the following skills:
- Configuration of OSPFv2 routing
- Customization of OSPF.
- Configuration of static NAT.
- Configuration of dynamic NAT with PAT.
- Configuration of various types of ACLs.
- Configuration of a router with NTP as a system time source.
- Backing up an IOS image to a TFTP server.
Instructions
Part 1: Configure OSPF
Step 1: Activate OSPF.
Use process ID 10 for OSPF activation on all routers.
a. Activate OSPF by configuring the interfaces of the network devices in the Satellite network, where required.
RTR-A(config)# interface gigabitethernet 0/0/0
RTR-A(config-if)# ip ospf 10 area 0
RTR-A(config-if)# interface serial 0/1/0
RTR-A(config-if)# ip ospf 10 area 0
RTR-B(config)# interface gigabitethernet 0/0/0
RTR-B(config-if)# ip ospf 10 area 0
RTR-B(config-if)# interface gigabitethernet 0/0/1
RTR-B(config-if)# ip ospf 10 area 0
RTR-C(config)# interface gigabitethernet 0/0/0
RTR-C(config-if)# ip ospf 10 area 0
RTR-C(config-if)# interface gigabitethernet 0/0/1
RTR-C(config-if)# ip ospf 10 area 0
b. Activate OSPF using network statements and inverse masks on the routers in the Corporate network.
Note: For the purposes of this assessment, please enter the network statements in the following order:
- On RTR-D
- the Serial0/1/1 network
- the Serial0/2/0 network
- the Serial0/1/0 network
- On RTR-E
- the Serial0/1/1 network
- the Serial0/1/0 network
- the GigabitEthernet0/0/0 network
- On RTR-F
- the Serial0/1/0 network
- the Serial0/1/1 network
- the GigabitEthernet0/0/0 network
- the GigabitEthernet0/0/1 network
RTR-D(config)# router ospf 10
RTR-D(config-router)# network 10.10.0.240 0.0.0.3 area 0
RTR-D(config-router)# network 10.10.0.236 0.0.0.3 area 0
RTR-D(config-router)# network 10.10.0.248 0.0.0.3 area 0
RTR-E(config)# router ospf 10
RTR-E(config-router)# network 10.10.0.240 0.0.0.3 area 0
RTR-E(config-router)# network 10.10.0.244 0.0.0.3 area 0
RTR-E(config-router)# network 192.168.33.0 0.0.0.15 area 0
RTR-F(config)# router ospf 10
RTR-F(config-router)# network 10.10.0.248 0.0.0.3 area 0
RTR-F(config-router)# network 10.10.0.244 0.0.0.3 area 0
RTR-F(config-router)# network 192.168.44.0 0.0.0.255 area 0
RTR-F(config-router)# network 192.168.55.0 0.0.0.255 area 0
Step 2: Configure router IDs.
Configure router IDs on the multiaccess network routers as follows:
- RTR-A: 9.9.9.9
- RTR-B: 8.8.8.8
- RTR-C: 7.7.7.7
RTR-A(config)# router ospf 10
RTR-A(config-router)# router-id 9.9.9.9
RTR-B(config)# router ospf 10
RTR-B(config-router)# router-id 8.8.8.8
RTR-C(config)# router ospf 10
RTR-C(config-router)# router-id 7.7.7.7
Step 3: Customize OSPF operation.
a. Configure router RTR-A with the highest OSPF interface priority so that it will always be the designated router of the multiaccess network.
RTR-A(config)# interface gigabitethernet 0/0/0
RTR-A(config-if)# ip ospf priority 255
b. On router RTR-A, configure a default route to the ISP cloud using the exit interface command argument.
RTR-A(config)# ip route 0.0.0.0 0.0.0.0 Serial0/1/1
c. Automatically distribute the default route to all routers in the network.
RTR-A(config)# router ospf 10
RTR-A(config-router)# default-information originate
d. Configure the hello and dead timer values on the interfaces that connect RTR-A and RTR-D to be twice the default values.
RTR-A(config)# interface serial 0/1/0
RTR-A(config-if)# ip ospf hello-interval 20
RTR-A(config-if)# ip ospf dead-interval 80
RTR-D(config)# interface serial 0/2/0
RTR-D(config-if)# ip ospf hello-interval 20
RTR-D(config-if)# ip ospf dead-interval 80
e. Configure the OSPF routers so that the default cost value for all Gigabit Ethernet interfaces will be 10 and the cost value for Fast Ethernet will be 100.
RTR-A(config)# router ospf 10
RTR-A(config-router)# auto-cost reference-bandwidth 10000
RTR-B(config)# router ospf 10
RTR-B(config-router)# auto-cost reference-bandwidth 10000
RTR-C(config)# router ospf 10
RTR-C(config-router)# auto-cost reference-bandwidth 10000
RTR-D(config)# router ospf 10
RTR-D(config-router)# auto-cost reference-bandwidth 10000
RTR-E(config)# router ospf 10
RTR-E(config-router)# auto-cost reference-bandwidth 10000
RTR-F(config)# router ospf 10
RTR-F(config-router)# auto-cost reference-bandwidth 10000
f. Configure the OSPF cost value of RTR-D interface Serial0/1/1 to 50.
RTR-D(config)# interface serial 0/1/1
RTR-D(config-if)# ip ospf cost 50
g. Configure OSPF so that routing updates are not sent into networks where OSPF updates are not required.
RTR-A(config)# router ospf 10
RTR-A(config-router)# passive-interface serial 0/1/1
RTR-B(config)# router ospf 10
RTR-B(config-router)# passive-interface gigabitethernet 0/0/0
RTR-C(config)# router ospf 10
RTR-C(config-router)# passive-interface gigabitethernet 0/0/0
RTR-E(config)# router ospf 10
RTR-E(config-router)# passive-interface gigabitethernet 0/0/0
RTR-F(config)# router ospf 10
RTR-F(config-router)# passive-interface gigabitethernet 0/0/0
RTR-F(config-router)# passive-interface gigabitethernet 0/0/1
Part 2: Configure NAT
In this part of the practice skills assessment, you will configure static and dynamic NAT at the network edge.
Step 1: Configure static NAT
Configure static NAT to translate the address of the Net 1 Server on LAN 1 to the public address of 192.0.2.115. Verify that the translations are occurring.
RTR-A(config)# ip nat inside source static 192.168.11.100 192.0.2.115
RTR-A(config)# interface serial 0/1/1
RTR-A(config-if)# ip nat outside
RTR-A(config-if)# interface gigabitethernet 0/0/0
RTR-A(config-if)# ip nat inside
Step 2: Configure dynamic PAT.
a. Create access list 1 to allow all addresses in the 192.168.0.0/16 network to be translated.
RTR-A(config)# access-list 1 permit 192.168.0.0 0.0.255.255
b. Create a NAT pool named POOL-1. It should use address in the range 192.0.2.116 - 192.0.2.118.
RTR-A(config)# ip nat pool POOL-1 192.0.2.116 192.0.2.118 netmask 255.255.255.248
c. Configure NAT to dynamically use the addresses in the pool for all traffic entering and exiting the company network. Remember that it is likely that more than three hosts will be accessing traffic on the Internet.
RTR-A(config)# ip nat inside source list 1 pool POOL-1 overload
RTR-A(config)# interface serial 0/1/0
RTR-A(config-if)# ip nat inside
Part 3: Configure ACLs
Configure access control lists to meet the following requirements.
Note: Use host and any keywords whenever possible. Always explicitly configure the default deny condition when it is to be used as part of the ACL functionality so that it can be logged when the condition is met. You do not need to specify the default deny condition if it is counteracted with permit ip any any for this assessment. All ACLs should be placed in the most efficient location possible according to the guidelines specified in the curriculum.
a. Create a named standard access list to explicitly prevent all external traffic accessing the telnet lines on RTR-A. Name the list VTY-BLOCK. All addresses on the 192.168.0.0/16 network only should be allowed to access the VTY lines. Verify that the list works as specified.
RTR-A(config)# ip access-list standard VTY-BLOCK
RTR-A(config-std-nacl)# permit 192.168.0.0 0.0.255.255
RTR-A(config-std-nacl)# deny any
RTR-A(config)# line vty 0 4
RTR-A(config-line)# access-class VTY-BLOCK in
b. Create a numbered standard ACL to prevent all hosts on Net 1 from accessing Net 2. Use 10 as the number for the list.
RTR-C(config)# access-list 10 deny 192.168.11.0 0.0.0.255
RTR-C(config)# access-list 10 permit any
RTR-C(config)# interface gigabitethernet 0/0/1
RTR-C(config-if)# ip access-group 10 in
c. Create an extended numbered ACL that will prevent traffic from the Net 4 network from accessing the HTTP service that is running on Corp Server. All other traffic from Net 4 hosts should be able to access the network. Number the list 101.
RTR-F(config)# access-list 101 deny tcp any host 192.168.33.14 eq www
RTR-F(config)# access-list 101 permit ip any any
RTR-F(config)# interface gigabitethernet 0/0/0
RTR-F(config-if)# ip access-group 101 in
Part 4: Manage Network Devices
Step 1: Configure NTP
Configure router RTR-E to use Corp Server as its time source.
RTR-E(config)# ntp server 192.168.33.14
Step 2: Backup IOS to Server
Backup the IOS image file on router RTR-E to Corp Server.
RTR-E# show flash:

System flash directory:
File  Length   Name/status
  3   486899872 isr4300-universalk9.03.16.05.S.155-3.S5-ext.SPA.bin
  2   28282    sigdef-category.xml
  1   227537   sigdef-default.xml
[487155691 bytes used, 2761893909 available, 3249049600 total]
3.17338e+06K bytes of processor board System flash (Read/Write)

RTR-E# copy flash: tftp:
Source filename []? isr4300-universalk9.03.16.05.S.155-3.S5-ext.SPA.bin
Address or name of remote host []? 192.168.33.14
Destination filename [isr4300-universalk9.03.16.05.S.155-3.S5-ext.SPA.bin]? [Enter]
Device Configs - Final
ROUTER RTR-A
! ==============================================================
!--- ENSA Practice PT Skills Assessment (PTSA) - ID 2
!--- ANSWER SCRIPT FOR ROUTER RTR-A
!--- Usage: copy this whole file and paste it into the RTR-A console (start at the RTR-A> prompt). Every line beginning with "!" is a comment; IOS ignores it, so pasting a comment by accident is harmless.
! ==============================================================

enable
configure terminal

! --------------------------------------------------------------
!--- Part 1, Step 2 (entered first): Configure router IDs.
! --------------------------------------------------------------

!--- Start OSPF process 10 and set router ID 9.9.9.9 before any interface joins OSPF, so the ID takes effect without clearing the process.
router ospf 10
 router-id 9.9.9.9
 exit

! --------------------------------------------------------------
!--- Part 1, Step 1: Activate OSPF.
! --------------------------------------------------------------

!--- a. Satellite network: activate OSPF on G0/0/0 (10.10.1.16/29) with the interface command.
interface gigabitethernet 0/0/0
 ip ospf 10 area 0
 exit

!--- a. Satellite network: activate OSPF on S0/1/0 (link to RTR-D, 10.10.0.236/30).
interface serial 0/1/0
 ip ospf 10 area 0
 exit

! --------------------------------------------------------------
!--- Part 1, Step 3: Customize OSPF operation.
! --------------------------------------------------------------

!--- a. Highest OSPF priority on G0/0/0 so RTR-A is always the DR of the multiaccess network.
interface gigabitethernet 0/0/0
 ip ospf priority 255
 exit

!--- b. Default route to the ISP cloud using the exit interface argument.
ip route 0.0.0.0 0.0.0.0 Serial0/1/1

!--- c. Automatically distribute the default route to all OSPF routers.
router ospf 10
 default-information originate
 exit

!--- d. Hello and dead timers on the link to RTR-D set to twice the defaults (10/40 -> 20/80).
interface serial 0/1/0
 ip ospf hello-interval 20
 ip ospf dead-interval 80
 exit

!--- e. Reference bandwidth 10000 Mbps: GigabitEthernet cost 10, FastEthernet cost 100.
router ospf 10
 auto-cost reference-bandwidth 10000
 exit

!--- g. No OSPF updates toward the ISP.
router ospf 10
 passive-interface serial 0/1/1
 exit

! --------------------------------------------------------------
!--- Part 2, Step 1: Configure static NAT.
! --------------------------------------------------------------

!--- Translate Net 1 Server (192.168.11.100) to the public address 192.0.2.115.
ip nat inside source static 192.168.11.100 192.0.2.115

!--- S0/1/1 faces the ISP: NAT outside.
interface serial 0/1/1
 ip nat outside
 exit

!--- G0/0/0 faces the Satellite network (Net 1 Server traffic arrives here): NAT inside.
interface gigabitethernet 0/0/0
 ip nat inside
 exit

! --------------------------------------------------------------
!--- Part 2, Step 2: Configure dynamic PAT.
! --------------------------------------------------------------

!--- a. Access list 1 permits the whole 192.168.0.0/16 network for translation.
access-list 1 permit 192.168.0.0 0.0.255.255

!--- b. NAT pool POOL-1 with addresses 192.0.2.116 - 192.0.2.118 (/29 mask of the ISP link).
ip nat pool POOL-1 192.0.2.116 192.0.2.118 netmask 255.255.255.248

!--- c. Bind list 1 to POOL-1 with overload (PAT), because more than three hosts will reach the Internet.
ip nat inside source list 1 pool POOL-1 overload

!--- c. S0/1/0 faces the Corporate network: NAT inside.
interface serial 0/1/0
 ip nat inside
 exit

! --------------------------------------------------------------
!--- Part 3: Configure ACLs.
! --------------------------------------------------------------

!--- a. Named standard ACL VTY-BLOCK: only 192.168.0.0/16 may reach the VTY lines; explicit deny for everything else.
ip access-list standard VTY-BLOCK
 permit 192.168.0.0 0.0.255.255
 deny any
 exit

!--- a. Apply VTY-BLOCK inbound on the telnet (VTY) lines (this router has only VTY 0 4).
line vty 0 4
 access-class VTY-BLOCK in
 exit

end

! --------------------------------------------------------------
!--- Save the configuration to NVRAM. (Press Enter when prompted for the destination filename.)
! --------------------------------------------------------------
copy running-config startup-config


! ==============================================================
!--- Verification:
!---   show ip ospf interface brief  -> G0/0/0 and S0/1/0 in area 0, G0/0/0 state DR, cost 10 on G0/0/0
!---   show ip ospf neighbor         -> RTR-B, RTR-C (DROTHER) and RTR-D (S0/1/0) in FULL state
!---   show ip protocols             -> router ID 9.9.9.9, passive S0/1/1, reference bandwidth 10000
!---   show ip route                 -> S* 0.0.0.0/0 via Serial0/1/1
!---   show ip nat translations      -> static 192.0.2.115 -> 192.168.11.100 plus PAT entries
!---   show access-lists             -> VTY-BLOCK and list 1
!--- Note: paste this script on RTR-A before RTR-B and RTR-C, so RTR-A wins the DR election
!--- (DR election is not preemptive). The hello/dead mismatch on S0/1/0 is temporary until
!--- the RTR-D script sets the same timers.
! ==============================================================
ROUTER RTR-B
! ==============================================================
!--- ENSA Practice PT Skills Assessment (PTSA) - ID 2
!--- ANSWER SCRIPT FOR ROUTER RTR-B
!--- Usage: copy this whole file and paste it into the RTR-B console (start at the RTR-B> prompt). Every line beginning with "!" is a comment; IOS ignores it, so pasting a comment by accident is harmless.
! ==============================================================

enable
configure terminal

! --------------------------------------------------------------
!--- Part 1, Step 2 (entered first): Configure router IDs.
! --------------------------------------------------------------

!--- Start OSPF process 10 and set router ID 8.8.8.8 before any interface joins OSPF.
router ospf 10
 router-id 8.8.8.8
 exit

! --------------------------------------------------------------
!--- Part 1, Step 1: Activate OSPF.
! --------------------------------------------------------------

!--- a. Satellite network: activate OSPF on the LAN interface G0/0/0, 192.168.11.0/24 (Net 1).
interface gigabitethernet 0/0/0
 ip ospf 10 area 0
 exit

!--- a. Satellite network: activate OSPF on G0/0/1 (multiaccess segment 10.10.1.16/29 to RTR-A).
interface gigabitethernet 0/0/1
 ip ospf 10 area 0
 exit

! --------------------------------------------------------------
!--- Part 1, Step 3: Customize OSPF operation.
! --------------------------------------------------------------

!--- e. Reference bandwidth 10000 Mbps: GigabitEthernet cost 10, FastEthernet cost 100.
router ospf 10
 auto-cost reference-bandwidth 10000
 exit

!--- g. No OSPF updates into the host LAN on G0/0/0.
router ospf 10
 passive-interface gigabitethernet 0/0/0
 exit

end

! --------------------------------------------------------------
!--- Save the configuration to NVRAM. (Press Enter when prompted for the destination filename.)
! --------------------------------------------------------------
copy running-config startup-config


! ==============================================================
!--- Verification:
!---   show ip ospf interface brief  -> G0/0/0 and G0/0/1 in area 0, cost 10
!---   show ip ospf neighbor         -> 9.9.9.9 (RTR-A) as DR, 7.7.7.7 (RTR-C) in FULL/2WAY
!---   show ip protocols             -> router ID 8.8.8.8, passive G0/0/0
!---   show ip route ospf            -> O*E2 default route and the Corporate networks
! ==============================================================
ROUTER RTR-C
! ==============================================================
!--- ENSA Practice PT Skills Assessment (PTSA) - ID 2
!--- ANSWER SCRIPT FOR ROUTER RTR-C
!--- Usage: copy this whole file and paste it into the RTR-C console (start at the RTR-C> prompt). Every line beginning with "!" is a comment; IOS ignores it, so pasting a comment by accident is harmless.
! ==============================================================

enable
configure terminal

! --------------------------------------------------------------
!--- Part 1, Step 2 (entered first): Configure router IDs.
! --------------------------------------------------------------

!--- Start OSPF process 10 and set router ID 7.7.7.7 before any interface joins OSPF.
router ospf 10
 router-id 7.7.7.7
 exit

! --------------------------------------------------------------
!--- Part 1, Step 1: Activate OSPF.
! --------------------------------------------------------------

!--- a. Satellite network: activate OSPF on the LAN interface G0/0/0, 192.168.22.0/24 (Net 2).
interface gigabitethernet 0/0/0
 ip ospf 10 area 0
 exit

!--- a. Satellite network: activate OSPF on G0/0/1 (multiaccess segment 10.10.1.16/29 to RTR-A).
interface gigabitethernet 0/0/1
 ip ospf 10 area 0
 exit

! --------------------------------------------------------------
!--- Part 1, Step 3: Customize OSPF operation.
! --------------------------------------------------------------

!--- e. Reference bandwidth 10000 Mbps: GigabitEthernet cost 10, FastEthernet cost 100.
router ospf 10
 auto-cost reference-bandwidth 10000
 exit

!--- g. No OSPF updates into the host LAN on G0/0/0.
router ospf 10
 passive-interface gigabitethernet 0/0/0
 exit

! --------------------------------------------------------------
!--- Part 3: Configure ACLs.
! --------------------------------------------------------------

!--- b. Numbered standard ACL 10: deny Net 1 (192.168.11.0/24), permit everything else.
access-list 10 deny 192.168.11.0 0.0.0.255
access-list 10 permit any

!--- b. Apply ACL 10 inbound on G0/0/1 of RTR-C, the router of the destination network Net 2.
interface gigabitethernet 0/0/1
 ip access-group 10 in
 exit

end

! --------------------------------------------------------------
!--- Save the configuration to NVRAM. (Press Enter when prompted for the destination filename.)
! --------------------------------------------------------------
copy running-config startup-config


! ==============================================================
!--- Verification:
!---   show ip ospf interface brief             -> G0/0/0 and G0/0/1 in area 0, cost 10
!---   show ip protocols                        -> router ID 7.7.7.7, passive G0/0/0
!---   show access-lists 10                     -> deny 192.168.11.0 0.0.0.255, permit any
!---   show ip interface gigabitethernet 0/0/1  -> inbound access list is 10
!--- Note: the curriculum would place a standard ACL outbound on G0/0/0 (toward Net 2), but this
!--- activity grades only G0/0/1 in; G0/0/0 out is not scored.
! ==============================================================
ROUTER RTR-D
! ==============================================================
!--- ENSA Practice PT Skills Assessment (PTSA) - ID 2
!--- ANSWER SCRIPT FOR ROUTER RTR-D
!--- Usage: copy this whole file and paste it into the RTR-D console (start at the RTR-D> prompt). Every line beginning with "!" is a comment; IOS ignores it, so pasting a comment by accident is harmless.
! ==============================================================

enable
configure terminal

! --------------------------------------------------------------
!--- Part 1, Step 1: Activate OSPF.
! --------------------------------------------------------------

!--- b. Corporate network: network statements with wildcard masks, in the order the lab requires: S0/1/1, S0/2/0, S0/1/0.
router ospf 10
 network 10.10.0.240 0.0.0.3 area 0
 network 10.10.0.236 0.0.0.3 area 0
 network 10.10.0.248 0.0.0.3 area 0
 exit

! --------------------------------------------------------------
!--- Part 1, Step 3: Customize OSPF operation.
! --------------------------------------------------------------

!--- d. Hello and dead timers on the link to RTR-A (S0/2/0) set to twice the defaults.
interface serial 0/2/0
 ip ospf hello-interval 20
 ip ospf dead-interval 80
 exit

!--- e. Reference bandwidth 10000 Mbps: GigabitEthernet cost 10, FastEthernet cost 100.
router ospf 10
 auto-cost reference-bandwidth 10000
 exit

!--- f. OSPF cost 50 on Serial0/1/1.
interface serial 0/1/1
 ip ospf cost 50
 exit

end

! --------------------------------------------------------------
!--- Save the configuration to NVRAM. (Press Enter when prompted for the destination filename.)
! --------------------------------------------------------------
copy running-config startup-config


! ==============================================================
!--- Verification:
!---   show ip ospf interface brief         -> S0/1/1 cost 50, S0/2/0 and S0/1/0 in area 0
!---   show ip ospf interface serial 0/2/0  -> Hello 20, Dead 80
!---   show ip ospf neighbor                -> 9.9.9.9 (RTR-A), RTR-E and RTR-F in FULL state
!---   show ip route ospf                   -> O*E2 default route learned from RTR-A
! ==============================================================
ROUTER RTR-E
! ==============================================================
!--- ENSA Practice PT Skills Assessment (PTSA) - ID 2
!--- ANSWER SCRIPT FOR ROUTER RTR-E
!--- Usage: copy this whole file and paste it into the RTR-E console (start at the RTR-E> prompt). Every line beginning with "!" is a comment; IOS ignores it, so pasting a comment by accident is harmless.
! ==============================================================

enable
configure terminal

! --------------------------------------------------------------
!--- Part 1, Step 1: Activate OSPF.
! --------------------------------------------------------------

!--- b. Corporate network: network statements in the required order: S0/1/1, S0/1/0, G0/0/0 (/28 -> wildcard 0.0.0.15).
router ospf 10
 network 10.10.0.240 0.0.0.3 area 0
 network 10.10.0.244 0.0.0.3 area 0
 network 192.168.33.0 0.0.0.15 area 0
 exit

! --------------------------------------------------------------
!--- Part 1, Step 3: Customize OSPF operation.
! --------------------------------------------------------------

!--- e. Reference bandwidth 10000 Mbps: GigabitEthernet cost 10, FastEthernet cost 100.
router ospf 10
 auto-cost reference-bandwidth 10000
 exit

!--- g. No OSPF updates into the Corp Server LAN on G0/0/0.
router ospf 10
 passive-interface gigabitethernet 0/0/0
 exit

! --------------------------------------------------------------
!--- Part 4, Step 1: Configure NTP.
! --------------------------------------------------------------

!--- Use Corp Server (192.168.33.14) as the time source.
ntp server 192.168.33.14

end

! --------------------------------------------------------------
!--- Save the configuration to NVRAM. (Press Enter when prompted for the destination filename.)
! --------------------------------------------------------------
copy running-config startup-config


! ==============================================================
!--- Verification:
!---   show ip ospf interface brief  -> S0/1/1, S0/1/0 and G0/0/0 in area 0
!---   show ip protocols             -> passive G0/0/0, reference bandwidth 10000
!---   show ntp associations         -> 192.168.33.14 listed (synchronization can take a few minutes)
!---   show flash:                   -> IOS image file name for Part 4, Step 2
!--- Note: Part 4, Step 2 (Backup IOS to Corp Server) is interactive, so run it by hand after this script:
!---   RTR-E# copy flash: tftp:
!---   Source filename []? isr4300-universalk9.03.16.05.S.155-3.S5-ext.SPA.bin
!---   Address or name of remote host []? 192.168.33.14
!---   Destination filename [...]? (press Enter)
! ==============================================================
ROUTER RTR-F
! ==============================================================
!--- ENSA Practice PT Skills Assessment (PTSA) - ID 2
!--- ANSWER SCRIPT FOR ROUTER RTR-F
!--- Usage: copy this whole file and paste it into the RTR-F console (start at the RTR-F> prompt). Every line beginning with "!" is a comment; IOS ignores it, so pasting a comment by accident is harmless.
! ==============================================================

enable
configure terminal

! --------------------------------------------------------------
!--- Part 1, Step 1: Activate OSPF.
! --------------------------------------------------------------

!--- b. Corporate network: network statements in the required order: S0/1/0, S0/1/1, G0/0/0, G0/0/1.
router ospf 10
 network 10.10.0.248 0.0.0.3 area 0
 network 10.10.0.244 0.0.0.3 area 0
 network 192.168.44.0 0.0.0.255 area 0
 network 192.168.55.0 0.0.0.255 area 0
 exit

! --------------------------------------------------------------
!--- Part 1, Step 3: Customize OSPF operation.
! --------------------------------------------------------------

!--- e. Reference bandwidth 10000 Mbps: GigabitEthernet cost 10, FastEthernet cost 100.
router ospf 10
 auto-cost reference-bandwidth 10000
 exit

!--- g. No OSPF updates into the host LANs Net 4 (G0/0/0) and the LT-1 LAN (G0/0/1).
router ospf 10
 passive-interface gigabitethernet 0/0/0
 passive-interface gigabitethernet 0/0/1
 exit

! --------------------------------------------------------------
!--- Part 3: Configure ACLs.
! --------------------------------------------------------------

!--- c. Extended ACL 101: block HTTP from Net 4 to Corp Server (192.168.33.14), permit all other traffic.
access-list 101 deny tcp any host 192.168.33.14 eq www
access-list 101 permit ip any any

!--- c. Apply ACL 101 inbound on G0/0/0, closest to the Net 4 source.
interface gigabitethernet 0/0/0
 ip access-group 101 in
 exit

end

! --------------------------------------------------------------
!--- Save the configuration to NVRAM. (Press Enter when prompted for the destination filename.)
! --------------------------------------------------------------
copy running-config startup-config


! ==============================================================
!--- Verification:
!---   show ip ospf interface brief             -> S0/1/0, S0/1/1, G0/0/0 and G0/0/1 in area 0
!---   show ip protocols                        -> passive G0/0/0 and G0/0/1
!---   show access-lists 101                    -> deny tcp any host 192.168.33.14 eq www, permit ip any any
!---   show ip interface gigabitethernet 0/0/0  -> inbound access list is 101
! ==============================================================
Topology
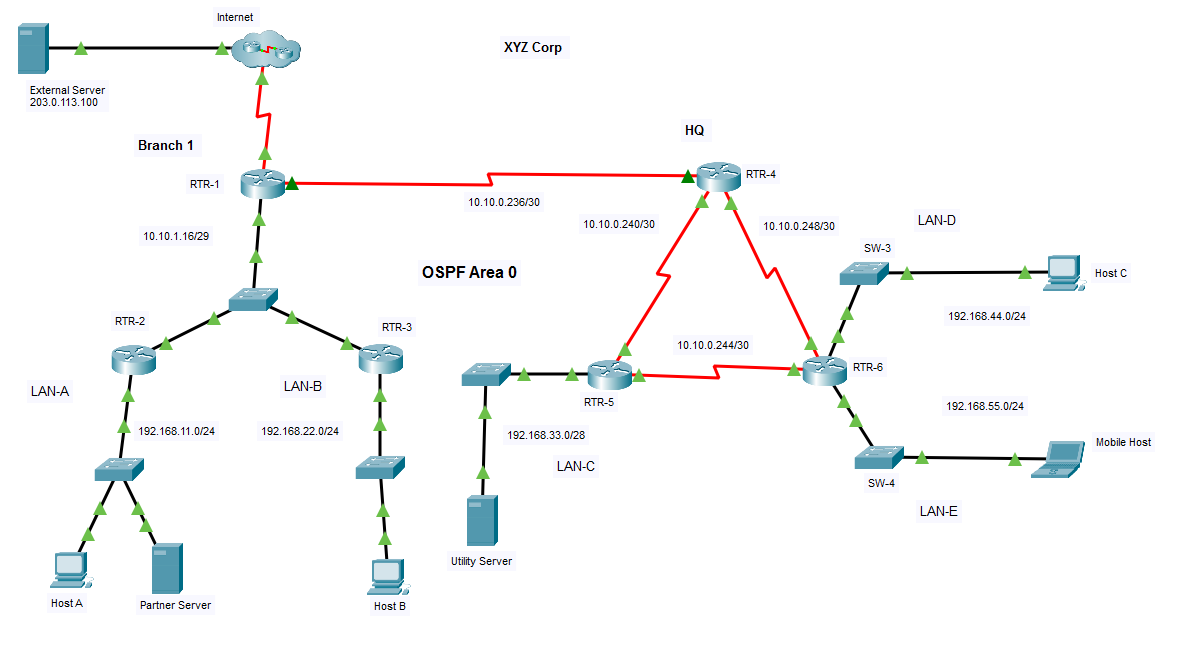
Addressing Table
| Device Name | Interface | IP Address / Prefix |
|---|---|---|
| RTR-1 | G0/0/0 | 10.10.1.17/29 |
| S0/1/0 | 10.10.0.237/30 | |
| S0/1/1 | 192.0.2.113/29 | |
| RTR-2 | G0/0/0 | 192.168.11.1/24 |
| G0/0/1 | 10.10.1.18/29 | |
| RTR-3 | G0/0/0 | 192.168.22.1/24 |
| G0/0/1 | 10.10.1.19/29 | |
| RTR-4 | S0/1/0 | 10.10.0.249/30 |
| S0/1/1 | 10.10.0.241/30 | |
| S0/2/0 | 10.10.0.238/30 | |
| RTR-5 | G0/0/0 | 192.168.33.1/28 |
| S0/1/0 | 10.10.0.245/30 | |
| S0/1/1 | 10.10.0.242/30 | |
| RTR-6 | G0/0/0 | 192.168.44.1/24 |
| G0/0/1 | 192.168.55.1/24 | |
| S0/1/0 | 10.10.0.250/30 | |
| S0/1/1 | 10.10.0.246/30 | |
| Host A | NIC | 192.168.11.11 |
| Host B | NIC | 192.168.22.22 |
| Host C | NIC | 192.168.44.44 |
| Utility Server | NIC | 192.168.33.14 |
| Partner Server | NIC | 192.168.11.100 |
| Mobile Host | NIC | 192.168.55.55 |
| External Server | NIC | 203.0.113.100 |
Introduction
You are completing the configuration of the XYZ Corp network.
You are not required to configure host addressing.
You will practice and be assessed on the following skills:
- Configuration of OSPFv2 routing
- Customization of OSPF.
- Configuration of static NAT.
- Configuration of dynamic NAT with PAT.
- Configuration of various types of ACLs.
- Configuration of a router with NTP as a system time source.
- Backing up an IOS image to a TFTP server.
Instructions
Part 1: Configure OSPF
Step 1: Activate OSPF.
Use process ID 10 for OSPF activation on all routers.
a. Activate OSPF by configuring the interfaces of the network devices in the Branch 1 network, where required.
RTR-1(config)# interface gigabitethernet 0/0/0
RTR-1(config-if)# ip ospf 10 area 0
RTR-1(config-if)# interface serial 0/1/0
RTR-1(config-if)# ip ospf 10 area 0
RTR-2(config)# interface gigabitethernet 0/0/0
RTR-2(config-if)# ip ospf 10 area 0
RTR-2(config-if)# interface gigabitethernet 0/0/1
RTR-2(config-if)# ip ospf 10 area 0
RTR-3(config)# interface gigabitethernet 0/0/0
RTR-3(config-if)# ip ospf 10 area 0
RTR-3(config-if)# interface gigabitethernet 0/0/1
RTR-3(config-if)# ip ospf 10 area 0
b. Activate OSPF using network statements and inverse masks on the routers in the HQ network.
Note: For the purposes of this assessment, please enter the network statements in the following order:
- On RTR-4
- the Serial0/1/1 network
- the Serial0/2/0 network
- the Serial0/1/0 network
- On RTR-5
- the Serial0/1/1 network
- the Serial0/1/0 network
- the GigabitEthernet0/0/0 network
- On RTR-6
- the Serial0/1/0 network
- the Serial0/1/1 network
- the GigabitEthernet0/0/0 network
- the GigabitEthernet0/0/1 network
RTR-4(config)# router ospf 10
RTR-4(config-router)# network 10.10.0.240 0.0.0.3 area 0
RTR-4(config-router)# network 10.10.0.236 0.0.0.3 area 0
RTR-4(config-router)# network 10.10.0.248 0.0.0.3 area 0
RTR-5(config)# router ospf 10
RTR-5(config-router)# network 10.10.0.240 0.0.0.3 area 0
RTR-5(config-router)# network 10.10.0.244 0.0.0.3 area 0
RTR-5(config-router)# network 192.168.33.0 0.0.0.15 area 0
RTR-6(config)# router ospf 10
RTR-6(config-router)# network 10.10.0.248 0.0.0.3 area 0
RTR-6(config-router)# network 10.10.0.244 0.0.0.3 area 0
RTR-6(config-router)# network 192.168.44.0 0.0.0.255 area 0
RTR-6(config-router)# network 192.168.55.0 0.0.0.255 area 0
Step 2: Configure router IDs.
Configure router IDs on the multiaccess network routers as follows:
- RTR-1: 9.9.9.9
- RTR-2: 8.8.8.8
- RTR-3: 7.7.7.7
RTR-1(config)# router ospf 10
RTR-1(config-router)# router-id 9.9.9.9
RTR-2(config)# router ospf 10
RTR-2(config-router)# router-id 8.8.8.8
RTR-3(config)# router ospf 10
RTR-3(config-router)# router-id 7.7.7.7
Step 3: Customize OSPF operation.
a. Configure router RTR-1 with the highest OSPF interface priority so that it will always be the designated router of the multiaccess network.
RTR-1(config)# interface gigabitethernet 0/0/0
RTR-1(config-if)# ip ospf priority 255
b. On router RTR-1, configure a default route to the ISP cloud using the exit interface command argument.
RTR-1(config)# ip route 0.0.0.0 0.0.0.0 Serial0/1/1
c. Automatically distribute the default route to all routers in the network.
RTR-1(config)# router ospf 10
RTR-1(config-router)# default-information originate
d. Configure the hello and dead timer values on the interfaces that connect RTR-1 and RTR-4 to be twice the default values.
RTR-1(config)# interface serial 0/1/0
RTR-1(config-if)# ip ospf hello-interval 20
RTR-1(config-if)# ip ospf dead-interval 80
RTR-4(config)# interface serial 0/2/0
RTR-4(config-if)# ip ospf hello-interval 20
RTR-4(config-if)# ip ospf dead-interval 80
e. Configure the OSPF routers so that the default cost value for all Gigabit Ethernet interfaces will be 10 and the cost value for Fast Ethernet will be 100.
RTR-1(config)# router ospf 10
RTR-1(config-router)# auto-cost reference-bandwidth 10000
RTR-2(config)# router ospf 10
RTR-2(config-router)# auto-cost reference-bandwidth 10000
RTR-3(config)# router ospf 10
RTR-3(config-router)# auto-cost reference-bandwidth 10000
RTR-4(config)# router ospf 10
RTR-4(config-router)# auto-cost reference-bandwidth 10000
RTR-5(config)# router ospf 10
RTR-5(config-router)# auto-cost reference-bandwidth 10000
RTR-6(config)# router ospf 10
RTR-6(config-router)# auto-cost reference-bandwidth 10000
f. Configure the OSPF cost value of RTR-4 interface Serial0/1/1 to 50.
RTR-4(config)# interface serial 0/1/1
RTR-4(config-if)# ip ospf cost 50
g. Configure OSPF so that routing updates are not sent into networks where OSPF updates are not required.
RTR-1(config)# router ospf 10
RTR-1(config-router)# passive-interface serial 0/1/1
RTR-2(config)# router ospf 10
RTR-2(config-router)# passive-interface gigabitethernet 0/0/0
RTR-3(config)# router ospf 10
RTR-3(config-router)# passive-interface gigabitethernet 0/0/0
RTR-5(config)# router ospf 10
RTR-5(config-router)# passive-interface gigabitethernet 0/0/0
RTR-6(config)# router ospf 10
RTR-6(config-router)# passive-interface gigabitethernet 0/0/0
RTR-6(config-router)# passive-interface gigabitethernet 0/0/1
Part 2: Configure NAT
In this part of the practice skills assessment, you will configure static and dynamic NAT at the network edge.
Step 1: Configure static NAT
Configure static NAT to translate the address of the Partner Server on LAN 1 to the public address of 192.0.2.115. Verify that the translations are occurring.
RTR-1(config)# ip nat inside source static 192.168.11.100 192.0.2.115
RTR-1(config)# interface serial 0/1/1
RTR-1(config-if)# ip nat outside
RTR-1(config-if)# interface gigabitethernet 0/0/0
RTR-1(config-if)# ip nat inside
Step 2: Configure dynamic PAT.
a. Create access list 1 to allow all addresses in the 192.168.0.0/16 network to be translated.
RTR-1(config)# access-list 1 permit 192.168.0.0 0.0.255.255
b. Create a NAT pool named POOL-1. It should use address in the range 192.0.2.116 - 192.0.2.118.
RTR-1(config)# ip nat pool POOL-1 192.0.2.116 192.0.2.118 netmask 255.255.255.248
c. Configure NAT to dynamically use the addresses in the pool for all traffic entering and exiting the company network. Remember that it is likely that more than three hosts will be accessing traffic on the Internet.
RTR-1(config)# ip nat inside source list 1 pool POOL-1 overload
RTR-1(config)# interface serial 0/1/0
RTR-1(config-if)# ip nat inside
Part 3: Configure ACLs
Configure access control lists to meet the following requirements.
Note: Use host and any keywords whenever possible. Always explicitly configure the default deny condition when it is to be used as part of the ACL functionality so that it can be logged when the condition is met. You do not need to specify the default deny condition if it is counteracted with permit ip any any for this assessment. All ACLs should be placed in the most efficient location possible according to the guidelines specified in the curriculum.
a. Create a named standard access list to explicitly prevent all external traffic accessing the telnet lines on RTR-1. Name the list VTY-BLOCK. All addresses on the 192.168.0.0/16 network only should be allowed to access the VTY lines. Verify that the list works as specified.
RTR-1(config)# ip access-list standard VTY-BLOCK
RTR-1(config-std-nacl)# permit 192.168.0.0 0.0.255.255
RTR-1(config-std-nacl)# deny any
RTR-1(config)# line vty 0 4
RTR-1(config-line)# access-class VTY-BLOCK in
b. Create a numbered standard ACL to prevent all hosts on LAN-A from accessing LAN-B. Use 10 as the number for the list.
RTR-3(config)# access-list 10 deny 192.168.11.0 0.0.0.255
RTR-3(config)# access-list 10 permit any
RTR-3(config)# interface gigabitethernet 0/0/1
RTR-3(config-if)# ip access-group 10 in
c. Create an extended numbered ACL that will prevent traffic from the LAN-D network from accessing the HTTP service that is running on Utility Server. All other traffic from LAN-D hosts should be able to access the network. Number the list 101.
RTR-6(config)# access-list 101 deny tcp any host 192.168.33.14 eq www
RTR-6(config)# access-list 101 permit ip any any
RTR-6(config)# interface gigabitethernet 0/0/0
RTR-6(config-if)# ip access-group 101 in
Part 4: Manage Network Devices
Step 1: Configure NTP
Configure router RTR-5 to use Utility Server as its time source.
RTR-5(config)# ntp server 192.168.33.14
Step 2: Backup IOS to Server
Backup the IOS image file on router RTR-5 to Utility Server.
RTR-5# show flash:

System flash directory:
File  Length   Name/status
  3   486899872 isr4300-universalk9.03.16.05.S.155-3.S5-ext.SPA.bin
  2   28282    sigdef-category.xml
  1   227537   sigdef-default.xml
[487155691 bytes used, 2761893909 available, 3249049600 total]
3.17338e+06K bytes of processor board System flash (Read/Write)

RTR-5# copy flash: tftp:
Source filename []? isr4300-universalk9.03.16.05.S.155-3.S5-ext.SPA.bin
Address or name of remote host []? 192.168.33.14
Destination filename [isr4300-universalk9.03.16.05.S.155-3.S5-ext.SPA.bin]? [Enter]
Device Configs - Final
ROUTER RTR-1
! ==============================================================
!--- ENSA Practice PT Skills Assessment (PTSA) - ID 1
!--- ANSWER SCRIPT FOR ROUTER RTR-1
!--- Usage: copy this whole file and paste it into the RTR-1 console (start at the RTR-1> prompt). Every line beginning with "!" is a comment; IOS ignores it, so pasting a comment by accident is harmless.
! ==============================================================

enable
configure terminal

! --------------------------------------------------------------
!--- Part 1, Step 2 (entered first): Configure router IDs.
! --------------------------------------------------------------

!--- Start OSPF process 10 and set router ID 9.9.9.9 before any interface joins OSPF, so the ID takes effect without clearing the process.
router ospf 10
 router-id 9.9.9.9
 exit

! --------------------------------------------------------------
!--- Part 1, Step 1: Activate OSPF.
! --------------------------------------------------------------

!--- a. Branch 1 network: activate OSPF on G0/0/0 (10.10.1.16/29) with the interface command.
interface gigabitethernet 0/0/0
 ip ospf 10 area 0
 exit

!--- a. Branch 1 network: activate OSPF on S0/1/0 (link to RTR-4, 10.10.0.236/30).
interface serial 0/1/0
 ip ospf 10 area 0
 exit

! --------------------------------------------------------------
!--- Part 1, Step 3: Customize OSPF operation.
! --------------------------------------------------------------

!--- a. Highest OSPF priority on G0/0/0 so RTR-1 is always the DR of the multiaccess network.
interface gigabitethernet 0/0/0
 ip ospf priority 255
 exit

!--- b. Default route to the ISP cloud using the exit interface argument.
ip route 0.0.0.0 0.0.0.0 Serial0/1/1

!--- c. Automatically distribute the default route to all OSPF routers.
router ospf 10
 default-information originate
 exit

!--- d. Hello and dead timers on the link to RTR-4 set to twice the defaults (10/40 -> 20/80).
interface serial 0/1/0
 ip ospf hello-interval 20
 ip ospf dead-interval 80
 exit

!--- e. Reference bandwidth 10000 Mbps: GigabitEthernet cost 10, FastEthernet cost 100.
router ospf 10
 auto-cost reference-bandwidth 10000
 exit

!--- g. No OSPF updates toward the ISP.
router ospf 10
 passive-interface serial 0/1/1
 exit

! --------------------------------------------------------------
!--- Part 2, Step 1: Configure static NAT.
! --------------------------------------------------------------

!--- Translate Partner Server (192.168.11.100) to the public address 192.0.2.115.
ip nat inside source static 192.168.11.100 192.0.2.115

!--- S0/1/1 faces the ISP: NAT outside.
interface serial 0/1/1
 ip nat outside
 exit

!--- G0/0/0 faces the Branch 1 network (Partner Server traffic arrives here): NAT inside.
interface gigabitethernet 0/0/0
 ip nat inside
 exit

! --------------------------------------------------------------
!--- Part 2, Step 2: Configure dynamic PAT.
! --------------------------------------------------------------

!--- a. Access list 1 permits the whole 192.168.0.0/16 network for translation.
access-list 1 permit 192.168.0.0 0.0.255.255

!--- b. NAT pool POOL-1 with addresses 192.0.2.116 - 192.0.2.118 (/29 mask of the ISP link).
ip nat pool POOL-1 192.0.2.116 192.0.2.118 netmask 255.255.255.248

!--- c. Bind list 1 to POOL-1 with overload (PAT), because more than three hosts will reach the Internet.
ip nat inside source list 1 pool POOL-1 overload

!--- c. S0/1/0 faces the HQ network: NAT inside.
interface serial 0/1/0
 ip nat inside
 exit

! --------------------------------------------------------------
!--- Part 3: Configure ACLs.
! --------------------------------------------------------------

!--- a. Named standard ACL VTY-BLOCK: only 192.168.0.0/16 may reach the VTY lines; explicit deny for everything else.
ip access-list standard VTY-BLOCK
 permit 192.168.0.0 0.0.255.255
 deny any
 exit

!--- a. Apply VTY-BLOCK inbound on the telnet (VTY) lines (this router has only VTY 0 4).
line vty 0 4
 access-class VTY-BLOCK in
 exit

end

! --------------------------------------------------------------
!--- Save the configuration to NVRAM. (Press Enter when prompted for the destination filename.)
! --------------------------------------------------------------
copy running-config startup-config


! ==============================================================
!--- Verification:
!---   show ip ospf interface brief  -> G0/0/0 and S0/1/0 in area 0, G0/0/0 state DR, cost 10 on G0/0/0
!---   show ip ospf neighbor         -> RTR-2, RTR-3 (DROTHER) and RTR-4 (S0/1/0) in FULL state
!---   show ip protocols             -> router ID 9.9.9.9, passive S0/1/1, reference bandwidth 10000
!---   show ip route                 -> S* 0.0.0.0/0 via Serial0/1/1
!---   show ip nat translations      -> static 192.0.2.115 -> 192.168.11.100 plus PAT entries
!---   show access-lists             -> VTY-BLOCK and list 1
!--- Note: paste this script on RTR-1 before RTR-2 and RTR-3, so RTR-1 wins the DR election
!--- (DR election is not preemptive). The hello/dead mismatch on S0/1/0 is temporary until
!--- the RTR-4 script sets the same timers.
! ==============================================================
ROUTER RTR-2
! ==============================================================
!--- ENSA Practice PT Skills Assessment (PTSA) - ID 1
!--- ANSWER SCRIPT FOR ROUTER RTR-2
!--- Usage: copy this whole file and paste it into the RTR-2 console (start at the RTR-2> prompt). Every line beginning with "!" is a comment; IOS ignores it, so pasting a comment by accident is harmless.
! ==============================================================

enable
configure terminal

! --------------------------------------------------------------
!--- Part 1, Step 2 (entered first): Configure router IDs.
! --------------------------------------------------------------

!--- Start OSPF process 10 and set router ID 8.8.8.8 before any interface joins OSPF.
router ospf 10
 router-id 8.8.8.8
 exit

! --------------------------------------------------------------
!--- Part 1, Step 1: Activate OSPF.
! --------------------------------------------------------------

!--- a. Branch 1 network: activate OSPF on the LAN interface G0/0/0, 192.168.11.0/24 (LAN-A).
interface gigabitethernet 0/0/0
 ip ospf 10 area 0
 exit

!--- a. Branch 1 network: activate OSPF on G0/0/1 (multiaccess segment 10.10.1.16/29 to RTR-1).
interface gigabitethernet 0/0/1
 ip ospf 10 area 0
 exit

! --------------------------------------------------------------
!--- Part 1, Step 3: Customize OSPF operation.
! --------------------------------------------------------------

!--- e. Reference bandwidth 10000 Mbps: GigabitEthernet cost 10, FastEthernet cost 100.
router ospf 10
 auto-cost reference-bandwidth 10000
 exit

!--- g. No OSPF updates into the host LAN on G0/0/0.
router ospf 10
 passive-interface gigabitethernet 0/0/0
 exit

end

! --------------------------------------------------------------
!--- Save the configuration to NVRAM. (Press Enter when prompted for the destination filename.)
! --------------------------------------------------------------
copy running-config startup-config


! ==============================================================
!--- Verification:
!---   show ip ospf interface brief  -> G0/0/0 and G0/0/1 in area 0, cost 10
!---   show ip ospf neighbor         -> 9.9.9.9 (RTR-1) as DR, 7.7.7.7 (RTR-3) in FULL/2WAY
!---   show ip protocols             -> router ID 8.8.8.8, passive G0/0/0
!---   show ip route ospf            -> O*E2 default route and the HQ networks
! ==============================================================
ROUTER RTR-3
! ==============================================================
!--- ENSA Practice PT Skills Assessment (PTSA) - ID 1
!--- ANSWER SCRIPT FOR ROUTER RTR-3
!--- Usage: copy this whole file and paste it into the RTR-3 console (start at the RTR-3> prompt). Every line beginning with "!" is a comment; IOS ignores it, so pasting a comment by accident is harmless.
! ==============================================================

enable
configure terminal

! --------------------------------------------------------------
!--- Part 1, Step 2 (entered first): Configure router IDs.
! --------------------------------------------------------------

!--- Start OSPF process 10 and set router ID 7.7.7.7 before any interface joins OSPF.
router ospf 10
 router-id 7.7.7.7
 exit

! --------------------------------------------------------------
!--- Part 1, Step 1: Activate OSPF.
! --------------------------------------------------------------

!--- a. Branch 1 network: activate OSPF on the LAN interface G0/0/0, 192.168.22.0/24 (LAN-B).
interface gigabitethernet 0/0/0
 ip ospf 10 area 0
 exit

!--- a. Branch 1 network: activate OSPF on G0/0/1 (multiaccess segment 10.10.1.16/29 to RTR-1).
interface gigabitethernet 0/0/1
 ip ospf 10 area 0
 exit

! --------------------------------------------------------------
!--- Part 1, Step 3: Customize OSPF operation.
! --------------------------------------------------------------

!--- e. Reference bandwidth 10000 Mbps: GigabitEthernet cost 10, FastEthernet cost 100.
router ospf 10
 auto-cost reference-bandwidth 10000
 exit

!--- g. No OSPF updates into the host LAN on G0/0/0.
router ospf 10
 passive-interface gigabitethernet 0/0/0
 exit

! --------------------------------------------------------------
!--- Part 3: Configure ACLs.
! --------------------------------------------------------------

!--- b. Numbered standard ACL 10: deny LAN-A (192.168.11.0/24), permit everything else.
access-list 10 deny 192.168.11.0 0.0.0.255
access-list 10 permit any

!--- b. Apply ACL 10 inbound on G0/0/1 of RTR-3, the router of the destination network LAN-B.
interface gigabitethernet 0/0/1
 ip access-group 10 in
 exit

end

! --------------------------------------------------------------
!--- Save the configuration to NVRAM. (Press Enter when prompted for the destination filename.)
! --------------------------------------------------------------
copy running-config startup-config


! ==============================================================
!--- Verification:
!---   show ip ospf interface brief             -> G0/0/0 and G0/0/1 in area 0, cost 10
!---   show ip protocols                        -> router ID 7.7.7.7, passive G0/0/0
!---   show access-lists 10                     -> deny 192.168.11.0 0.0.0.255, permit any
!---   show ip interface gigabitethernet 0/0/1  -> inbound access list is 10
!--- Note: the curriculum would place a standard ACL outbound on G0/0/0 (toward LAN-B), but this
!--- activity grades only G0/0/1 in; G0/0/0 out is not scored.
! ==============================================================
ROUTER RTR-4
! ==============================================================
!--- ENSA Practice PT Skills Assessment (PTSA) - ID 1
!--- ANSWER SCRIPT FOR ROUTER RTR-4
!--- Usage: copy this whole file and paste it into the RTR-4 console (start at the RTR-4> prompt). Every line beginning with "!" is a comment; IOS ignores it, so pasting a comment by accident is harmless.
! ==============================================================

enable
configure terminal

! --------------------------------------------------------------
!--- Part 1, Step 1: Activate OSPF.
! --------------------------------------------------------------

!--- b. HQ network: network statements with wildcard masks, in the order the lab requires: S0/1/1, S0/2/0, S0/1/0.
router ospf 10
 network 10.10.0.240 0.0.0.3 area 0
 network 10.10.0.236 0.0.0.3 area 0
 network 10.10.0.248 0.0.0.3 area 0
 exit

! --------------------------------------------------------------
!--- Part 1, Step 3: Customize OSPF operation.
! --------------------------------------------------------------

!--- d. Hello and dead timers on the link to RTR-1 (S0/2/0) set to twice the defaults.
interface serial 0/2/0
 ip ospf hello-interval 20
 ip ospf dead-interval 80
 exit

!--- e. Reference bandwidth 10000 Mbps: GigabitEthernet cost 10, FastEthernet cost 100.
router ospf 10
 auto-cost reference-bandwidth 10000
 exit

!--- f. OSPF cost 50 on Serial0/1/1.
interface serial 0/1/1
 ip ospf cost 50
 exit

end

! --------------------------------------------------------------
!--- Save the configuration to NVRAM. (Press Enter when prompted for the destination filename.)
! --------------------------------------------------------------
copy running-config startup-config


! ==============================================================
!--- Verification:
!---   show ip ospf interface brief         -> S0/1/1 cost 50, S0/2/0 and S0/1/0 in area 0
!---   show ip ospf interface serial 0/2/0  -> Hello 20, Dead 80
!---   show ip ospf neighbor                -> 9.9.9.9 (RTR-1), RTR-5 and RTR-6 in FULL state
!---   show ip route ospf                   -> O*E2 default route learned from RTR-1
! ==============================================================
ROUTER RTR-5
! ==============================================================
!--- ENSA Practice PT Skills Assessment (PTSA) - ID 1
!--- ANSWER SCRIPT FOR ROUTER RTR-5
!--- Usage: copy this whole file and paste it into the RTR-5 console (start at the RTR-5> prompt). Every line beginning with "!" is a comment; IOS ignores it, so pasting a comment by accident is harmless.
! ==============================================================

enable
configure terminal

! --------------------------------------------------------------
!--- Part 1, Step 1: Activate OSPF.
! --------------------------------------------------------------

!--- b. HQ network: network statements in the required order: S0/1/1, S0/1/0, G0/0/0 (/28 -> wildcard 0.0.0.15).
router ospf 10
 network 10.10.0.240 0.0.0.3 area 0
 network 10.10.0.244 0.0.0.3 area 0
 network 192.168.33.0 0.0.0.15 area 0
 exit

! --------------------------------------------------------------
!--- Part 1, Step 3: Customize OSPF operation.
! --------------------------------------------------------------

!--- e. Reference bandwidth 10000 Mbps: GigabitEthernet cost 10, FastEthernet cost 100.
router ospf 10
 auto-cost reference-bandwidth 10000
 exit

!--- g. No OSPF updates into the Utility Server LAN on G0/0/0.
router ospf 10
 passive-interface gigabitethernet 0/0/0
 exit

! --------------------------------------------------------------
!--- Part 4, Step 1: Configure NTP.
! --------------------------------------------------------------

!--- Use Utility Server (192.168.33.14) as the time source.
ntp server 192.168.33.14

end

! --------------------------------------------------------------
!--- Save the configuration to NVRAM. (Press Enter when prompted for the destination filename.)
! --------------------------------------------------------------
copy running-config startup-config


! ==============================================================
!--- Verification:
!---   show ip ospf interface brief  -> S0/1/1, S0/1/0 and G0/0/0 in area 0
!---   show ip protocols             -> passive G0/0/0, reference bandwidth 10000
!---   show ntp associations         -> 192.168.33.14 listed (synchronization can take a few minutes)
!---   show flash:                   -> IOS image file name for Part 4, Step 2
!--- Note: Part 4, Step 2 (Backup IOS to Utility Server) is interactive, so run it by hand after this script:
!---   RTR-5# copy flash: tftp:
!---   Source filename []? isr4300-universalk9.03.16.05.S.155-3.S5-ext.SPA.bin
!---   Address or name of remote host []? 192.168.33.14
!---   Destination filename [...]? (press Enter)
! ==============================================================
ROUTER RTR-6
! ==============================================================
!--- ENSA Practice PT Skills Assessment (PTSA) - ID 1
!--- ANSWER SCRIPT FOR ROUTER RTR-6
!--- Usage: copy this whole file and paste it into the RTR-6 console (start at the RTR-6> prompt). Every line beginning with "!" is a comment; IOS ignores it, so pasting a comment by accident is harmless.
! ==============================================================

enable
configure terminal

! --------------------------------------------------------------
!--- Part 1, Step 1: Activate OSPF.
! --------------------------------------------------------------

!--- b. HQ network: network statements in the required order: S0/1/0, S0/1/1, G0/0/0, G0/0/1.
router ospf 10
 network 10.10.0.248 0.0.0.3 area 0
 network 10.10.0.244 0.0.0.3 area 0
 network 192.168.44.0 0.0.0.255 area 0
 network 192.168.55.0 0.0.0.255 area 0
 exit

! --------------------------------------------------------------
!--- Part 1, Step 3: Customize OSPF operation.
! --------------------------------------------------------------

!--- e. Reference bandwidth 10000 Mbps: GigabitEthernet cost 10, FastEthernet cost 100.
router ospf 10
 auto-cost reference-bandwidth 10000
 exit

!--- g. No OSPF updates into the host LANs LAN-D (G0/0/0) and the Mobile Host LAN (G0/0/1).
router ospf 10
 passive-interface gigabitethernet 0/0/0
 passive-interface gigabitethernet 0/0/1
 exit

! --------------------------------------------------------------
!--- Part 3: Configure ACLs.
! --------------------------------------------------------------

!--- c. Extended ACL 101: block HTTP from LAN-D to Utility Server (192.168.33.14), permit all other traffic.
access-list 101 deny tcp any host 192.168.33.14 eq www
access-list 101 permit ip any any

!--- c. Apply ACL 101 inbound on G0/0/0, closest to the LAN-D source.
interface gigabitethernet 0/0/0
 ip access-group 101 in
 exit

end

! --------------------------------------------------------------
!--- Save the configuration to NVRAM. (Press Enter when prompted for the destination filename.)
! --------------------------------------------------------------
copy running-config startup-config


! ==============================================================
!--- Verification:
!---   show ip ospf interface brief             -> S0/1/0, S0/1/1, G0/0/0 and G0/0/1 in area 0
!---   show ip protocols                        -> passive G0/0/0 and G0/0/1
!---   show access-lists 101                    -> deny tcp any host 192.168.33.14 eq www, permit ip any any
!---   show ip interface gigabitethernet 0/0/0  -> inbound access list is 101
! ==============================================================
Topology
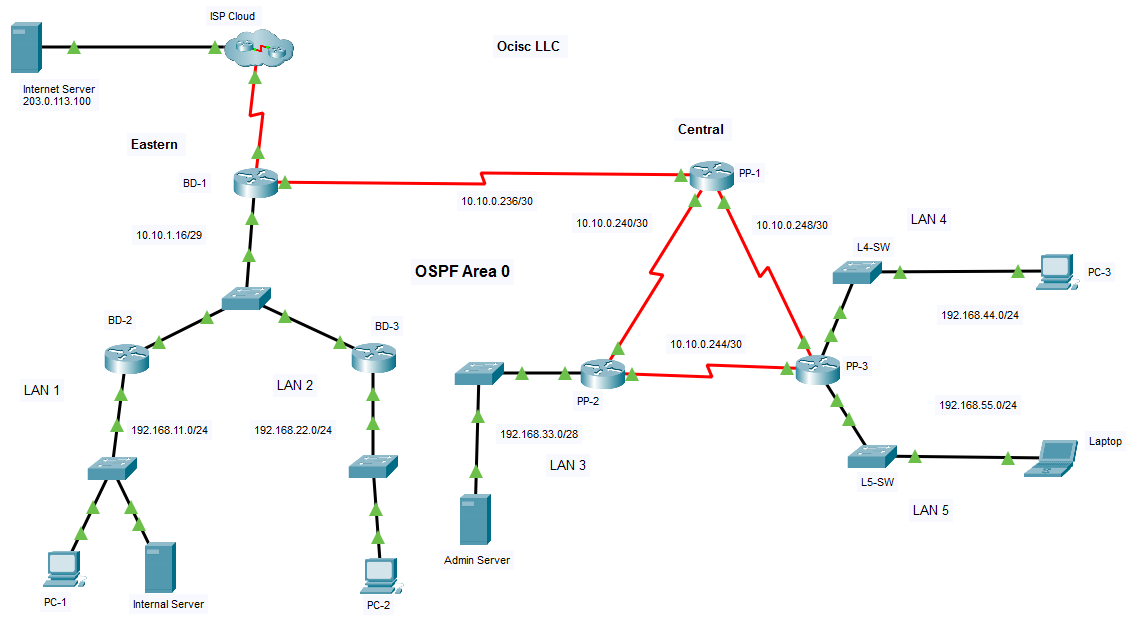
Addressing Table
| Device Name | Interface | IP Address / Prefix |
|---|---|---|
| BD-1 | G0/0/0 | 10.10.1.17/29 |
| S0/1/0 | 10.10.0.237/30 | |
| S0/1/1 | 192.0.2.113/29 | |
| BD-2 | G0/0/0 | 192.168.11.1/24 |
| G0/0/1 | 10.10.1.18/29 | |
| BD-3 | G0/0/0 | 192.168.22.1/24 |
| G0/0/1 | 10.10.1.19/29 | |
| PP-1 | S0/1/0 | 10.10.0.249/30 |
| S0/1/1 | 10.10.0.241/30 | |
| S0/2/0 | 10.10.0.238/30 | |
| PP-2 | G0/0/0 | 192.168.33.1/28 |
| S0/1/0 | 10.10.0.245/30 | |
| S0/1/1 | 10.10.0.242/30 | |
| PP-3 | G0/0/0 | 192.168.44.1/24 |
| G0/0/1 | 192.168.55.1/24 | |
| S0/1/0 | 10.10.0.250/30 | |
| S0/1/1 | 10.10.0.246/30 | |
| PC-1 | NIC | 192.168.11.11 |
| PC-2 | NIC | 192.168.22.22 |
| PC-3 | NIC | 192.168.44.44 |
| Admin Server | NIC | 192.168.33.14 |
| Internal Server | NIC | 192.168.11.100 |
| Laptop | NIC | 192.168.55.55 |
| Internet Server | NIC | 203.0.113.100 |
Introduction
You are completing the configuration of the Ocisc LLC network.
You are not required to configure host addressing.
You will practice and be assessed on the following skills:
- Configuration of OSPFv2 routing
- Customization of OSPF.
- Configuration of static NAT.
- Configuration of dynamic NAT with PAT.
- Configuration of various types of ACLs.
- Configuration of a router with NTP as a system time source.
- Backing up an IOS image to a TFTP server.
Instructions
Part 1: Configure OSPF
Step 1: Activate OSPF.
Use process ID 10 for OSPF activation on all routers.
a. Activate OSPF by configuring the interfaces of the network devices in the Eastern network, where required.
BD-1(config)# interface gigabitethernet 0/0/0
BD-1(config-if)# ip ospf 10 area 0
BD-1(config-if)# interface serial 0/1/0
BD-1(config-if)# ip ospf 10 area 0
BD-2(config)# interface gigabitethernet 0/0/0
BD-2(config-if)# ip ospf 10 area 0
BD-2(config-if)# interface gigabitethernet 0/0/1
BD-2(config-if)# ip ospf 10 area 0
BD-3(config)# interface gigabitethernet 0/0/0
BD-3(config-if)# ip ospf 10 area 0
BD-3(config-if)# interface gigabitethernet 0/0/1
BD-3(config-if)# ip ospf 10 area 0
b. Activate OSPF using network statements and inverse masks on the routers in the Central network.
Note: For the purposes of this assessment, please enter the network statements in the following order:
- On PP-1
- the Serial0/1/1 network
- the Serial0/2/0 network
- the Serial0/1/0 network
- On PP-2
- the Serial0/1/1 network
- the Serial0/1/0 network
- the GigabitEthernet0/0/0 network
- On PP-3
- the Serial0/1/0 network
- the Serial0/1/1 network
- the GigabitEthernet0/0/0 network
- the GigabitEthernet0/0/1 network
PP-1(config)# router ospf 10
PP-1(config-router)# network 10.10.0.240 0.0.0.3 area 0
PP-1(config-router)# network 10.10.0.236 0.0.0.3 area 0
PP-1(config-router)# network 10.10.0.248 0.0.0.3 area 0
PP-2(config)# router ospf 10
PP-2(config-router)# network 10.10.0.240 0.0.0.3 area 0
PP-2(config-router)# network 10.10.0.244 0.0.0.3 area 0
PP-2(config-router)# network 192.168.33.0 0.0.0.15 area 0
PP-3(config)# router ospf 10
PP-3(config-router)# network 10.10.0.248 0.0.0.3 area 0
PP-3(config-router)# network 10.10.0.244 0.0.0.3 area 0
PP-3(config-router)# network 192.168.44.0 0.0.0.255 area 0
PP-3(config-router)# network 192.168.55.0 0.0.0.255 area 0
Step 2: Configure router IDs.
Configure router IDs on the multiaccess network routers as follows:
- BD-1: 9.9.9.9
- BD-2: 8.8.8.8
- BD-3: 7.7.7.7
BD-1(config)# router ospf 10
BD-1(config-router)# router-id 9.9.9.9
BD-2(config)# router ospf 10
BD-2(config-router)# router-id 8.8.8.8
BD-3(config)# router ospf 10
BD-3(config-router)# router-id 7.7.7.7
Step 3: Customize OSPF operation.
a. Configure router BD-1 with the highest OSPF interface priority so that it will always be the designated router of the multiaccess network.
BD-1(config)# interface gigabitethernet 0/0/0
BD-1(config-if)# ip ospf priority 255
b. On router BD-1, configure a default route to the ISP cloud using the exit interface command argument.
BD-1(config)# ip route 0.0.0.0 0.0.0.0 Serial0/1/1
c. Automatically distribute the default route to all routers in the network.
BD-1(config)# router ospf 10
BD-1(config-router)# default-information originate
d. Configure the hello and dead timer values on the interfaces that connect BD-1 and PP-1 to be twice the default values.
BD-1(config)# interface serial 0/1/0
BD-1(config-if)# ip ospf hello-interval 20
BD-1(config-if)# ip ospf dead-interval 80
PP-1(config)# interface serial 0/2/0
PP-1(config-if)# ip ospf hello-interval 20
PP-1(config-if)# ip ospf dead-interval 80
e. Configure the OSPF routers so that the default cost value for all Gigabit Ethernet interfaces will be 10 and the cost value for Fast Ethernet will be 100.
BD-1(config)# router ospf 10
BD-1(config-router)# auto-cost reference-bandwidth 10000
BD-2(config)# router ospf 10
BD-2(config-router)# auto-cost reference-bandwidth 10000
BD-3(config)# router ospf 10
BD-3(config-router)# auto-cost reference-bandwidth 10000
PP-1(config)# router ospf 10
PP-1(config-router)# auto-cost reference-bandwidth 10000
PP-2(config)# router ospf 10
PP-2(config-router)# auto-cost reference-bandwidth 10000
PP-3(config)# router ospf 10
PP-3(config-router)# auto-cost reference-bandwidth 10000
f. Configure the OSPF cost value of PP-1 interface Serial0/1/1 to 50.
PP-1(config)# interface serial 0/1/1
PP-1(config-if)# ip ospf cost 50
g. Configure OSPF so that routing updates are not sent into networks where OSPF updates are not required.
BD-1(config)# router ospf 10
BD-1(config-router)# passive-interface serial 0/1/1
BD-2(config)# router ospf 10
BD-2(config-router)# passive-interface gigabitethernet 0/0/0
BD-3(config)# router ospf 10
BD-3(config-router)# passive-interface gigabitethernet 0/0/0
PP-2(config)# router ospf 10
PP-2(config-router)# passive-interface gigabitethernet 0/0/0
PP-3(config)# router ospf 10
PP-3(config-router)# passive-interface gigabitethernet 0/0/0
PP-3(config-router)# passive-interface gigabitethernet 0/0/1
Part 2: Configure NAT
In this part of the practice skills assessment, you will configure static and dynamic NAT at the network edge.
Step 1: Configure static NAT
Configure static NAT to translate the address of the Internal Server on LAN 1 to the public address of 192.0.2.115. Verify that the translations are occurring.
BD-1(config)# ip nat inside source static 192.168.11.100 192.0.2.115
BD-1(config)# interface serial 0/1/1
BD-1(config-if)# ip nat outside
BD-1(config-if)# interface gigabitethernet 0/0/0
BD-1(config-if)# ip nat inside
Step 2: Configure dynamic PAT.
a. Create access list 1 to allow all addresses in the 192.168.0.0/16 network to be translated.
BD-1(config)# access-list 1 permit 192.168.0.0 0.0.255.255
b. Create a NAT pool named POOL-1. It should use address in the range 192.0.2.116 - 192.0.2.118.
BD-1(config)# ip nat pool POOL-1 192.0.2.116 192.0.2.118 netmask 255.255.255.248
c. Configure NAT to dynamically use the addresses in the pool for all traffic entering and exiting the company network. Remember that it is likely that more than three hosts will be accessing traffic on the Internet.
BD-1(config)# ip nat inside source list 1 pool POOL-1 overload
BD-1(config)# interface serial 0/1/0
BD-1(config-if)# ip nat inside
Part 3: Configure ACLs
Configure access control lists to meet the following requirements.
Note: Use host and any keywords whenever possible. Always explicitly configure the default deny condition when it is to be used as part of the ACL functionality so that it can be logged when the condition is met. You do not need to specify the default deny condition if it is counteracted with permit ip any any for this assessment. All ACLs should be placed in the most efficient location possible according to the guidelines specified in the curriculum.
a. Create a named standard access list to explicitly prevent all external traffic accessing the telnet lines on BD-1. Name the list VTY-BLOCK. All addresses on the 192.168.0.0/16 network only should be allowed to access the VTY lines. Verify that the list works as specified.
BD-1(config)# ip access-list standard VTY-BLOCK
BD-1(config-std-nacl)# permit 192.168.0.0 0.0.255.255
BD-1(config-std-nacl)# deny any
BD-1(config)# line vty 0 4
BD-1(config-line)# access-class VTY-BLOCK in
b. Create a numbered standard ACL to prevent all hosts on LAN 1 from accessing LAN 2. Use 10 as the number for the list.
BD-3(config)# access-list 10 deny 192.168.11.0 0.0.0.255
BD-3(config)# access-list 10 permit any
BD-3(config)# interface gigabitethernet 0/0/1
BD-3(config-if)# ip access-group 10 in
c. Create an extended numbered ACL that will prevent traffic from the LAN 4 network from accessing the HTTP service that is running on Admin Server. All other traffic from LAN 4 hosts should be able to access the network. Number the list 101.
PP-3(config)# access-list 101 deny tcp any host 192.168.33.14 eq www
PP-3(config)# access-list 101 permit ip any any
PP-3(config)# interface gigabitethernet 0/0/0
PP-3(config-if)# ip access-group 101 in
Part 4: Manage Network Devices
Step 1: Configure NTP
Configure router PP-2 to use Admin Server as its time source.
PP-2(config)# ntp server 192.168.33.14
Step 2: Backup IOS to Server
Backup the IOS image file on router PP-2 to Admin Server.
PP-2# show flash:

System flash directory:
File  Length   Name/status
  3   486899872 isr4300-universalk9.03.16.05.S.155-3.S5-ext.SPA.bin
  2   28282    sigdef-category.xml
  1   227537   sigdef-default.xml
[487155691 bytes used, 2761893909 available, 3249049600 total]
3.17338e+06K bytes of processor board System flash (Read/Write)

PP-2# copy flash: tftp:
Source filename []? isr4300-universalk9.03.16.05.S.155-3.S5-ext.SPA.bin
Address or name of remote host []? 192.168.33.14
Destination filename [isr4300-universalk9.03.16.05.S.155-3.S5-ext.SPA.bin]? [Enter]
Device Configs - Final
ROUTER BD-1
! ==============================================================
!--- ENSA Practice PT Skills Assessment (PTSA) - ID 0
!--- ANSWER SCRIPT FOR ROUTER BD-1
!--- Usage: copy this whole file and paste it into the BD-1 console (start at the BD-1> prompt). Every line beginning with "!" is a comment; IOS ignores it, so pasting a comment by accident is harmless.
! ==============================================================

enable
configure terminal

! --------------------------------------------------------------
!--- Part 1, Step 2 (entered first): Configure router IDs.
! --------------------------------------------------------------

!--- Start OSPF process 10 and set router ID 9.9.9.9 before any interface joins OSPF, so the ID takes effect without clearing the process.
router ospf 10
 router-id 9.9.9.9
 exit

! --------------------------------------------------------------
!--- Part 1, Step 1: Activate OSPF.
! --------------------------------------------------------------

!--- a. Eastern network: activate OSPF on G0/0/0 (10.10.1.16/29) with the interface command.
interface gigabitethernet 0/0/0
 ip ospf 10 area 0
 exit

!--- a. Eastern network: activate OSPF on S0/1/0 (link to PP-1, 10.10.0.236/30).
interface serial 0/1/0
 ip ospf 10 area 0
 exit

! --------------------------------------------------------------
!--- Part 1, Step 3: Customize OSPF operation.
! --------------------------------------------------------------

!--- a. Highest OSPF priority on G0/0/0 so BD-1 is always the DR of the multiaccess network.
interface gigabitethernet 0/0/0
 ip ospf priority 255
 exit

!--- b. Default route to the ISP cloud using the exit interface argument.
ip route 0.0.0.0 0.0.0.0 Serial0/1/1

!--- c. Automatically distribute the default route to all OSPF routers.
router ospf 10
 default-information originate
 exit

!--- d. Hello and dead timers on the link to PP-1 set to twice the defaults (10/40 -> 20/80).
interface serial 0/1/0
 ip ospf hello-interval 20
 ip ospf dead-interval 80
 exit

!--- e. Reference bandwidth 10000 Mbps: GigabitEthernet cost 10, FastEthernet cost 100.
router ospf 10
 auto-cost reference-bandwidth 10000
 exit

!--- g. No OSPF updates toward the ISP.
router ospf 10
 passive-interface serial 0/1/1
 exit

! --------------------------------------------------------------
!--- Part 2, Step 1: Configure static NAT.
! --------------------------------------------------------------

!--- Translate Internal Server (192.168.11.100) to the public address 192.0.2.115.
ip nat inside source static 192.168.11.100 192.0.2.115

!--- S0/1/1 faces the ISP: NAT outside.
interface serial 0/1/1
 ip nat outside
 exit

!--- G0/0/0 faces the Eastern network (Internal Server traffic arrives here): NAT inside.
interface gigabitethernet 0/0/0
 ip nat inside
 exit

! --------------------------------------------------------------
!--- Part 2, Step 2: Configure dynamic PAT.
! --------------------------------------------------------------

!--- a. Access list 1 permits the whole 192.168.0.0/16 network for translation.
access-list 1 permit 192.168.0.0 0.0.255.255

!--- b. NAT pool POOL-1 with addresses 192.0.2.116 - 192.0.2.118 (/29 mask of the ISP link).
ip nat pool POOL-1 192.0.2.116 192.0.2.118 netmask 255.255.255.248

!--- c. Bind list 1 to POOL-1 with overload (PAT), because more than three hosts will reach the Internet.
ip nat inside source list 1 pool POOL-1 overload

!--- c. S0/1/0 faces the Central network: NAT inside.
interface serial 0/1/0
 ip nat inside
 exit

! --------------------------------------------------------------
!--- Part 3: Configure ACLs.
! --------------------------------------------------------------

!--- a. Named standard ACL VTY-BLOCK: only 192.168.0.0/16 may reach the VTY lines; explicit deny for everything else.
ip access-list standard VTY-BLOCK
 permit 192.168.0.0 0.0.255.255
 deny any
 exit

!--- a. Apply VTY-BLOCK inbound on the telnet (VTY) lines (this router has only VTY 0 4).
line vty 0 4
 access-class VTY-BLOCK in
 exit

end

! --------------------------------------------------------------
!--- Save the configuration to NVRAM. (Press Enter when prompted for the destination filename.)
! --------------------------------------------------------------
copy running-config startup-config


! ==============================================================
!--- Verification:
!---   show ip ospf interface brief  -> G0/0/0 and S0/1/0 in area 0, G0/0/0 state DR, cost 10 on G0/0/0
!---   show ip ospf neighbor         -> BD-2, BD-3 (DROTHER) and PP-1 (S0/1/0) in FULL state
!---   show ip protocols             -> router ID 9.9.9.9, passive S0/1/1, reference bandwidth 10000
!---   show ip route                 -> S* 0.0.0.0/0 via Serial0/1/1
!---   show ip nat translations      -> static 192.0.2.115 -> 192.168.11.100 plus PAT entries
!---   show access-lists             -> VTY-BLOCK and list 1
!--- Note: paste this script on BD-1 before BD-2 and BD-3, so BD-1 wins the DR election
!--- (DR election is not preemptive). The hello/dead mismatch on S0/1/0 is temporary until
!--- the PP-1 script sets the same timers.
! ==============================================================
ROUTER BD-2
! ==============================================================
!--- ENSA Practice PT Skills Assessment (PTSA) - ID 0
!--- ANSWER SCRIPT FOR ROUTER BD-2
!--- Usage: copy this whole file and paste it into the BD-2 console (start at the BD-2> prompt). Every line beginning with "!" is a comment; IOS ignores it, so pasting a comment by accident is harmless.
! ==============================================================

enable
configure terminal

! --------------------------------------------------------------
!--- Part 1, Step 2 (entered first): Configure router IDs.
! --------------------------------------------------------------

!--- Start OSPF process 10 and set router ID 8.8.8.8 before any interface joins OSPF.
router ospf 10
 router-id 8.8.8.8
 exit

! --------------------------------------------------------------
!--- Part 1, Step 1: Activate OSPF.
! --------------------------------------------------------------

!--- a. Eastern network: activate OSPF on the LAN interface G0/0/0, 192.168.11.0/24 (LAN 1).
interface gigabitethernet 0/0/0
 ip ospf 10 area 0
 exit

!--- a. Eastern network: activate OSPF on G0/0/1 (multiaccess segment 10.10.1.16/29 to BD-1).
interface gigabitethernet 0/0/1
 ip ospf 10 area 0
 exit

! --------------------------------------------------------------
!--- Part 1, Step 3: Customize OSPF operation.
! --------------------------------------------------------------

!--- e. Reference bandwidth 10000 Mbps: GigabitEthernet cost 10, FastEthernet cost 100.
router ospf 10
 auto-cost reference-bandwidth 10000
 exit

!--- g. No OSPF updates into the host LAN on G0/0/0.
router ospf 10
 passive-interface gigabitethernet 0/0/0
 exit

end

! --------------------------------------------------------------
!--- Save the configuration to NVRAM. (Press Enter when prompted for the destination filename.)
! --------------------------------------------------------------
copy running-config startup-config


! ==============================================================
!--- Verification:
!---   show ip ospf interface brief  -> G0/0/0 and G0/0/1 in area 0, cost 10
!---   show ip ospf neighbor         -> 9.9.9.9 (BD-1) as DR, 7.7.7.7 (BD-3) in FULL/2WAY
!---   show ip protocols             -> router ID 8.8.8.8, passive G0/0/0
!---   show ip route ospf            -> O*E2 default route and the Central networks
! ==============================================================
ROUTER BD-3
! ==============================================================
!--- ENSA Practice PT Skills Assessment (PTSA) - ID 0
!--- ANSWER SCRIPT FOR ROUTER BD-3
!--- Usage: copy this whole file and paste it into the BD-3 console (start at the BD-3> prompt). Every line beginning with "!" is a comment; IOS ignores it, so pasting a comment by accident is harmless.
! ==============================================================

enable
configure terminal

! --------------------------------------------------------------
!--- Part 1, Step 2 (entered first): Configure router IDs.
! --------------------------------------------------------------

!--- Start OSPF process 10 and set router ID 7.7.7.7 before any interface joins OSPF.
router ospf 10
 router-id 7.7.7.7
 exit

! --------------------------------------------------------------
!--- Part 1, Step 1: Activate OSPF.
! --------------------------------------------------------------

!--- a. Eastern network: activate OSPF on the LAN interface G0/0/0, 192.168.22.0/24 (LAN 2).
interface gigabitethernet 0/0/0
 ip ospf 10 area 0
 exit

!--- a. Eastern network: activate OSPF on G0/0/1 (multiaccess segment 10.10.1.16/29 to BD-1).
interface gigabitethernet 0/0/1
 ip ospf 10 area 0
 exit

! --------------------------------------------------------------
!--- Part 1, Step 3: Customize OSPF operation.
! --------------------------------------------------------------

!--- e. Reference bandwidth 10000 Mbps: GigabitEthernet cost 10, FastEthernet cost 100.
router ospf 10
 auto-cost reference-bandwidth 10000
 exit

!--- g. No OSPF updates into the host LAN on G0/0/0.
router ospf 10
 passive-interface gigabitethernet 0/0/0
 exit

! --------------------------------------------------------------
!--- Part 3: Configure ACLs.
! --------------------------------------------------------------

!--- b. Numbered standard ACL 10: deny LAN 1 (192.168.11.0/24), permit everything else.
access-list 10 deny 192.168.11.0 0.0.0.255
access-list 10 permit any

!--- b. Apply ACL 10 inbound on G0/0/1 of BD-3, the router of the destination network LAN 2.
interface gigabitethernet 0/0/1
 ip access-group 10 in
 exit

end

! --------------------------------------------------------------
!--- Save the configuration to NVRAM. (Press Enter when prompted for the destination filename.)
! --------------------------------------------------------------
copy running-config startup-config


! ==============================================================
!--- Verification:
!---   show ip ospf interface brief             -> G0/0/0 and G0/0/1 in area 0, cost 10
!---   show ip protocols                        -> router ID 7.7.7.7, passive G0/0/0
!---   show access-lists 10                     -> deny 192.168.11.0 0.0.0.255, permit any
!---   show ip interface gigabitethernet 0/0/1  -> inbound access list is 10
!--- Note: the curriculum would place a standard ACL outbound on G0/0/0 (toward LAN 2), but this
!--- activity grades only G0/0/1 in; G0/0/0 out is not scored.
! ==============================================================
ROUTER PP-1
! ==============================================================
!--- ENSA Practice PT Skills Assessment (PTSA) - ID 0
!--- ANSWER SCRIPT FOR ROUTER PP-1
!--- Usage: copy this whole file and paste it into the PP-1 console (start at the PP-1> prompt). Every line beginning with "!" is a comment; IOS ignores it, so pasting a comment by accident is harmless.
! ==============================================================

enable
configure terminal

! --------------------------------------------------------------
!--- Part 1, Step 1: Activate OSPF.
! --------------------------------------------------------------

!--- b. Central network: network statements with wildcard masks, in the order the lab requires: S0/1/1, S0/2/0, S0/1/0.
router ospf 10
 network 10.10.0.240 0.0.0.3 area 0
 network 10.10.0.236 0.0.0.3 area 0
 network 10.10.0.248 0.0.0.3 area 0
 exit

! --------------------------------------------------------------
!--- Part 1, Step 3: Customize OSPF operation.
! --------------------------------------------------------------

!--- d. Hello and dead timers on the link to BD-1 (S0/2/0) set to twice the defaults.
interface serial 0/2/0
 ip ospf hello-interval 20
 ip ospf dead-interval 80
 exit

!--- e. Reference bandwidth 10000 Mbps: GigabitEthernet cost 10, FastEthernet cost 100.
router ospf 10
 auto-cost reference-bandwidth 10000
 exit

!--- f. OSPF cost 50 on Serial0/1/1.
interface serial 0/1/1
 ip ospf cost 50
 exit

end

! --------------------------------------------------------------
!--- Save the configuration to NVRAM. (Press Enter when prompted for the destination filename.)
! --------------------------------------------------------------
copy running-config startup-config


! ==============================================================
!--- Verification:
!---   show ip ospf interface brief         -> S0/1/1 cost 50, S0/2/0 and S0/1/0 in area 0
!---   show ip ospf interface serial 0/2/0  -> Hello 20, Dead 80
!---   show ip ospf neighbor                -> 9.9.9.9 (BD-1), PP-2 and PP-3 in FULL state
!---   show ip route ospf                   -> O*E2 default route learned from BD-1
! ==============================================================
ROUTER PP-2
! ==============================================================
!--- ENSA Practice PT Skills Assessment (PTSA) - ID 0
!--- ANSWER SCRIPT FOR ROUTER PP-2
!--- Usage: copy this whole file and paste it into the PP-2 console (start at the PP-2> prompt). Every line beginning with "!" is a comment; IOS ignores it, so pasting a comment by accident is harmless.
! ==============================================================

enable
configure terminal

! --------------------------------------------------------------
!--- Part 1, Step 1: Activate OSPF.
! --------------------------------------------------------------

!--- b. Central network: network statements in the required order: S0/1/1, S0/1/0, G0/0/0 (/28 -> wildcard 0.0.0.15).
router ospf 10
 network 10.10.0.240 0.0.0.3 area 0
 network 10.10.0.244 0.0.0.3 area 0
 network 192.168.33.0 0.0.0.15 area 0
 exit

! --------------------------------------------------------------
!--- Part 1, Step 3: Customize OSPF operation.
! --------------------------------------------------------------

!--- e. Reference bandwidth 10000 Mbps: GigabitEthernet cost 10, FastEthernet cost 100.
router ospf 10
 auto-cost reference-bandwidth 10000
 exit

!--- g. No OSPF updates into the Admin Server LAN on G0/0/0.
router ospf 10
 passive-interface gigabitethernet 0/0/0
 exit

! --------------------------------------------------------------
!--- Part 4, Step 1: Configure NTP.
! --------------------------------------------------------------

!--- Use Admin Server (192.168.33.14) as the time source.
ntp server 192.168.33.14

end

! --------------------------------------------------------------
!--- Save the configuration to NVRAM. (Press Enter when prompted for the destination filename.)
! --------------------------------------------------------------
copy running-config startup-config


! ==============================================================
!--- Verification:
!---   show ip ospf interface brief  -> S0/1/1, S0/1/0 and G0/0/0 in area 0
!---   show ip protocols             -> passive G0/0/0, reference bandwidth 10000
!---   show ntp associations         -> 192.168.33.14 listed (synchronization can take a few minutes)
!---   show flash:                   -> IOS image file name for Part 4, Step 2
!--- Note: Part 4, Step 2 (Backup IOS to Admin Server) is interactive, so run it by hand after this script:
!---   PP-2# copy flash: tftp:
!---   Source filename []? isr4300-universalk9.03.16.05.S.155-3.S5-ext.SPA.bin
!---   Address or name of remote host []? 192.168.33.14
!---   Destination filename [...]? (press Enter)
! ==============================================================
ROUTER PP-3
! ==============================================================
!--- ENSA Practice PT Skills Assessment (PTSA) - ID 0
!--- ANSWER SCRIPT FOR ROUTER PP-3
!--- Usage: copy this whole file and paste it into the PP-3 console (start at the PP-3> prompt). Every line beginning with "!" is a comment; IOS ignores it, so pasting a comment by accident is harmless.
! ==============================================================

enable
configure terminal

! --------------------------------------------------------------
!--- Part 1, Step 1: Activate OSPF.
! --------------------------------------------------------------

!--- b. Central network: network statements in the required order: S0/1/0, S0/1/1, G0/0/0, G0/0/1.
router ospf 10
 network 10.10.0.248 0.0.0.3 area 0
 network 10.10.0.244 0.0.0.3 area 0
 network 192.168.44.0 0.0.0.255 area 0
 network 192.168.55.0 0.0.0.255 area 0
 exit

! --------------------------------------------------------------
!--- Part 1, Step 3: Customize OSPF operation.
! --------------------------------------------------------------

!--- e. Reference bandwidth 10000 Mbps: GigabitEthernet cost 10, FastEthernet cost 100.
router ospf 10
 auto-cost reference-bandwidth 10000
 exit

!--- g. No OSPF updates into the host LANs LAN 4 (G0/0/0) and the Laptop LAN (G0/0/1).
router ospf 10
 passive-interface gigabitethernet 0/0/0
 passive-interface gigabitethernet 0/0/1
 exit

! --------------------------------------------------------------
!--- Part 3: Configure ACLs.
! --------------------------------------------------------------

!--- c. Extended ACL 101: block HTTP from LAN 4 to Admin Server (192.168.33.14), permit all other traffic.
access-list 101 deny tcp any host 192.168.33.14 eq www
access-list 101 permit ip any any

!--- c. Apply ACL 101 inbound on G0/0/0, closest to the LAN 4 source.
interface gigabitethernet 0/0/0
 ip access-group 101 in
 exit

end

! --------------------------------------------------------------
!--- Save the configuration to NVRAM. (Press Enter when prompted for the destination filename.)
! --------------------------------------------------------------
copy running-config startup-config


! ==============================================================
!--- Verification:
!---   show ip ospf interface brief             -> S0/1/0, S0/1/1, G0/0/0 and G0/0/1 in area 0
!---   show ip protocols                        -> passive G0/0/0 and G0/0/1
!---   show access-lists 101                    -> deny tcp any host 192.168.33.14 eq www, permit ip any any
!---   show ip interface gigabitethernet 0/0/0  -> inbound access list is 101
! ==============================================================


