
ITN ( Version 7.00) Practice PT Skills Assessment (PTSA) Exam Answers
(Last Updated: September, 2025) - 100% Scored
Topology:
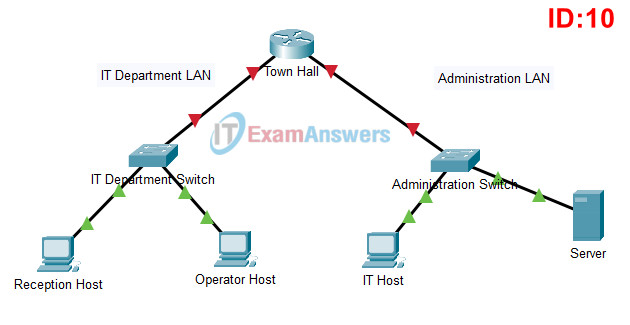
ITN Practice Skills Assessment - Packet Tracer - ID 10
ITN Practice Skills Assessment – Packet Tracer Answers
A few things to keep in mind while completing this activity:
- Do not use the browser Back button or close or reload any exam windows during the exam.
- Do not close Packet Tracer when you are done. It will close automatically.
- Click the Submit Assessment button in the browser window to submit your work.
Introduction
In this assessment, you will configure devices in an IPv4/IPv6 network. For the sake of time, you will not be asked to perform all configurations on all network devices as you may be required to do in a real network or other assessment. Instead, you will use the skills and knowledge that you have learned in the labs and packet tracers in this course to configure the Town Hall router. In addition, you will address the hosts on two LANs with IPv4 and IPv6 addresses and activate and address the management interface of the Administration Switch.
You will receive one of several topologies.
You are not required to configure the IT Department Switch, and you will not be able to access it in this practice skills assessment activity.
All IOS device configurations should be completed from a direct terminal connection to the device console. In addition, many values that are required to complete the configurations have not been given to you. In those cases, create the values that you need to complete the requirements. For values that have been supplied to you, they must be entered exactly as they appear in order for you to get full credit for your configuration.
If the network is configured correctly, all hosts should be able to connect to each other.
You will practice and be assessed on the following skills:
- Configuration of initial IOS device settings
- Design and calculation of IPv4 addressing
- Configuration of IOS device interfaces including IPv4 and IPv6 addressing when appropriate
- Addressing of network hosts with IPv4 and IPv6 addresses
- Enhancing device security, including configuration of the secure transport protocol for remote device management
- Configuration of a switch virtual management interface
Requirements by networking device:
Town Hall router:
- Configuration of initial router settings
- Interface configuration and IPv4 and IPv6 addressing
- Device security enhancement, or device hardening
- Secure transport for remote configuration connections as covered in the labs and Packet Tracers in the course.
Administration Switch:
- Enabling basic remote management by Telnet
PC and Server hosts:
- IPv4 full addressing
- IPv6 addressing
Addressing Table
| Device | Interface | IP Address/Mask | Default Gateway |
|---|---|---|---|
| Town Hall | G0/0 | 192.168.1.126/27 (SM: 255.255.255.224) |
N/A |
| 2001:db8:acad:a::1/64 | N/A | ||
| fe80::1 | N/A | ||
| G0/1 | 192.168.1.158/28 (SM: 255.255.255.240) |
N/A | |
| 2001:db8:acad:b::1/64 | N/A | ||
| fe80::1 | N/A | ||
| Administration Switch | SVI | 192.168.1.157/28 (SM: 255.255.255.240) |
192.168.1.158 |
| Reception Host | NIC | 192.168.1.97/27 (SM: 255.255.255.224) |
192.168.1.126 |
| 2001:db8:acad:a::ff/64 | FE80::1 | ||
| Operator Host | NIC | 192.168.1.98/27 (SM: 255.255.255.224) |
192.168.1.126 |
| 2001:db8:acad:a::15/64 | FE80::1 | ||
| IT Host | NIC | 192.168.1.145/28 (SM: 255.255.255.240) |
192.168.1.158 |
| 2001:db8:acad:b::ff/64 | FE80::1 | ||
| Server | NIC | 192.168.1.146/28 (SM: 255.255.255.240) |
192.168.1.158 |
| 2001:db8:acad:b::15/64 | FE80::1 |
Instructions
Step 1: Determine the IP Addressing Scheme.
Design an IPv4 addressing scheme and complete the Addressing Table based on the following requirements.
- a. Subnet the 192.168.1.0/24 network to provide 30 host addresses per subnet while wasting the fewest addresses.
- b. Assign the fourth subnet to the IT Department LAN.
- c. Assign the last network host address (the highest) in this subnet to the G0/0 interface on Town Hall.
- d. Starting with the fifth subnet, subnet the network again so that the new subnets will provide 14 host addresses per subnet while wasting the fewest addresses.
- e. Assign the second of these new 14-host subnets to the Administration LAN.
- f. Assign the last network host address (the highest) in the Administration LAN subnet to the G0/1 interface of the Town Hall router.
- g. Assign the second to the last address (the second highest) in this subnet to the VLAN 1 interface of the Administration Switch.
- h. Configure addresses on the hosts using any of the remaining addresses in their respective subnets.
Step 2: Configure Host Addressing
Use the IPv4 addressing from Step 1 and the IPv6 addressing values provided in the Addressing Table to configure all host PCs with the correct addressing.
a. Use the router interface link-local address as the IPv6 default gateways on the hosts.
b. Complete the configuration of the server using the IPv4 addressing values from Step 1 and the values in the addressing table
Step 3: Configure the Town Hall Router.
a. Configure the Town Hall router with all initial configurations that you have learned in the course so far:
- Configure the router hostname: Town-Hall
- Protect device configurations from unauthorized access with the encrypted privileged exec password.
- Secure all access lines into the router using methods covered in the course and labs.
- Require newly-entered passwords to have a minimum length of 10 characters.
- Prevent all passwords from being viewed in clear text in device configuration files.
- Configure a banner warning message for unauthorized users.
- Configure the router to only accept in-band management connections over the protocol that is more secure than Telnet, as was done in the labs and PT activities. Use the value 1024 for encryption key strength.
- Configure local user authentication for in-band management connections. Create a user with the name netadmin and a secret password of Cisco_CCNA7.
b. Configure the two Gigabit Ethernet interfaces using the IPv4 addressing values that you calculated and the IPv6 values provided in the addressing table.
- Reconfigure the link local addresses to the value shown in the table.
- Document the interfaces in the configuration file.
Step 4: Configure the Administration Switch.
Configure Administration Switch for remote management over Telnet.
- a. Configure VLAN 1 as the SVI.
- b. Configure IPv4 addressing according to your work in Step 1.
- c. Be sure that the switch is able to accept connections from hosts on other networks.
Answers - Passed 100% Score
Step 1: Determine the IP Addressing Scheme.
How to Solve "Subnetting a Subnet"
Part 1: Creating the 30-Host Subnets
We start with the base network 192.168.1.0/24 and need to create subnets that support at least 30 usable hosts each.
- Find the Host Bits (h): Use the formula 2h − 2 ≥ 30. The smallest power of 2 that works is 5 (since 25 − 2 = 30). So, we need 5 host bits.
- Determine the New Prefix: Subtract the host bits from 32 total bits (32 − 5 = 27). The new subnet mask is
/27. - Calculate the Block Size: The block size (or magic number) is 2h, which is 25 = 32. This means each subnet will jump by 32 in the fourth octet.
- List the Subnets: By adding 32 sequentially to our base address, we get: Subnet 1 (
.0), Subnet 2 (.32), Subnet 3 (.64), Subnet 4 (.96), and Subnet 5 (.128). - Assign the LAN: The assignment asks for the 4th subnet. Therefore, the IT Department LAN is
192.168.1.96/27. We must also save the 5th subnet (192.168.1.128/27) for the next requirement.
Part 2: Breaking Down the 5th Subnet for 14 Hosts
Next, the assignment requires us to take the 5th subnet (192.168.1.128/27) and subnet it further to support 14 hosts per network.
- Find the Host Bits (h): Use the formula 2h − 2 ≥ 14. The smallest working power of 2 is 4 (since 24 − 2 = 14). So, we need 4 host bits.
- Determine the New Prefix: Subtract the host bits from 32 total bits (32 − 4 = 28). The new subnet mask is
/28. - Calculate the Block Size: The new block size is 24 = 16. These new subnets will jump by 16 in the fourth octet.
- List the New Subnets: Starting from our new base address (
.128) and adding 16 sequentially, we get: Subnet 1 (.128) and Subnet 2 (.144). - Assign the LAN: The assignment asks for the 2nd of these new subnets. Therefore, the Administration LAN is
192.168.1.144/28.
While this manual process builds a strong foundation, it can become tedious and error-prone during exams. Below is how you can use our calculator to automate these exact steps instantly.
When an assignment asks you to subnet a network and then take one of those subnets to divide it again (often called hierarchical subnetting or VLSM), you can easily solve it by using our FLSM Subnet Calculator twice.
Specifically, its "Subnet by Number of Hosts" feature automates the entire calculation process without manual binary math. Here is the step-by-step walkthrough based on the CCNA lab requirements:
Run 1: Creating the 30-Host Subnets
First, we need to divide the original 192.168.1.0/24 network into smaller blocks that can support 30 hosts each.
1. Configure the Tool:
- Enter
192.168.1.0in the Major Network Address field. - Select
/24from the Original CIDR dropdown. - Choose the Subnet by Number of Hosts calculation mode.
- Enter
30in the requirement box. - Click Generate Subnets.
2. Read the Results:
- The tool automatically calculates that you need a
/27subnet mask to fit 30 hosts. - Assign the IT LAN: Look at Subnet #4 in the Subnet Table to find
192.168.1.96/27. - Prepare for the next step: Look at Subnet #5, which is
192.168.1.128. Copy this address, as it will become our new base network for the second run.
Run 2: Breaking Down the 5th Subnet for 14 Hosts
Now, we will take that 5th subnet (192.168.1.128/27) and slice it into even smaller pieces that support 14 hosts each.
1. Configure the Tool:
- Change the Major Network Address to
192.168.1.128. - Set the Original CIDR to
/27(the prefix we obtained from Run 1). - Keep the Subnet by Number of Hosts mode selected.
- Change the requirement box to
14. - Click Generate Subnets.
2. Read the Results:
- The tool calculates that you now need a
/28subnet mask to fit 14 hosts. - Assign the Administration LAN: Look at Subnet #2 in the new table to find
192.168.1.144/28.
Final Answer Summary
By taking the output of Run 1 and feeding it back into the tool for Run 2, you have successfully calculated the correct hierarchical assignments for your CCNA assignment:
- IT Department LAN:
192.168.1.96/27 - Administration LAN:
192.168.1.144/28
Step 2: Configure IP addresses for hosts:
Reception Host
Operator Host
IT Host
Server
Step 3: Configure the Town Hall Router
- Establish a console connection between Reception Host and the Town Hall router.
- On Reception Host, navigate to the Desktop tab and select the Terminal application icon.
! ==============================================================
!--- ITN (Version 7.00) Practice PT Skills Assessment (PTSA) - ID 00, 10, 20, 30
!--- ANSWER SCRIPT FOR ROUTER Town Hall (hostname Town-Hall)
!--- Usage: on Reception Host open Desktop > Terminal (console cable to the Town Hall router), then paste this whole file at the Router> prompt. Every line beginning with "!" is a comment; IOS ignores it.
! ==============================================================

enable
configure terminal

! --------------------------------------------------------------
!--- Step 3a: Initial settings and device hardening.
! --------------------------------------------------------------

!--- Router hostname, exactly as given.
hostname Town-Hall

!--- Stop IOS from treating mistyped commands as host names.
no ip domain-lookup

!--- Require newly entered passwords to be at least 10 characters (set before the passwords below).
security passwords min-length 10

!--- Encrypted privileged EXEC password.
enable secret class12345

!--- Hide all plaintext passwords in the configuration files.
service password-encryption

!--- Warning banner for unauthorized users.
banner motd $Authorized Users Only!$

!--- Block logins for 120 seconds after 2 failed attempts within 30 seconds.
login block-for 120 attempts 2 within 30

!--- Secure the console line.
line console 0
 password cisco12345
 login
 logging synchronous
 exec-timeout 60
 exit

!--- Secure the auxiliary line.
line aux 0
 password cisco12345
 login
 logging synchronous
 exec-timeout 60
 exit

!--- SSH prerequisites: domain name and the local user netadmin with secret Cisco_CCNA7.
ip domain-name ITExamAnswers.net
username netadmin privilege 15 secret Cisco_CCNA7

!--- Generate 1024-bit RSA keys (one line, no prompt), then use SSH version 2.
crypto key generate rsa general-keys modulus 1024
ip ssh version 2
ip ssh time-out 120

!--- VTY lines: SSH only, authenticate with the local user database.
line vty 0 4
 password cisco12345
 transport input ssh
 login local
 logging synchronous
 exec-timeout 60
 exit

! --------------------------------------------------------------
!--- Step 3b: Gigabit Ethernet interfaces (IPv4 from Step 1, IPv6 from the Addressing Table).
! --------------------------------------------------------------

!--- Enable IPv6 routing between the two LANs.
ipv6 unicast-routing

!--- G0/0 - IT Department LAN: last host of 192.168.1.96/27, IPv6 GUA, link-local fe80::1, description.
interface gigabitethernet 0/0
 description IT Department LAN
 ip address 192.168.1.126 255.255.255.224
 ipv6 address 2001:db8:acad:a::1/64
 ipv6 address fe80::1 link-local
 no shutdown
 exit

!--- G0/1 - Administration LAN: last host of 192.168.1.144/28, IPv6 GUA, link-local fe80::1, description.
interface gigabitethernet 0/1
 description Administration LAN
 ip address 192.168.1.158 255.255.255.240
 ipv6 address 2001:db8:acad:b::1/64
 ipv6 address fe80::1 link-local
 no shutdown
 exit

end

! --------------------------------------------------------------
!--- Save the configuration to NVRAM. (Press Enter when prompted for the destination filename.)
! --------------------------------------------------------------
copy running-config startup-config


! ==============================================================
!--- Verification:
!---   show ip interface brief    -> G0/0 192.168.1.126 and G0/1 192.168.1.158 up/up
!---   show ipv6 interface brief  -> FE80::1 plus 2001:DB8:ACAD:A::1 / B::1
!---   show ip ssh                -> SSH Enabled - version 2.0
!---   From Reception Host: ssh -l netadmin 192.168.1.126 (password Cisco_CCNA7)
! ==============================================================
Step 4: Configure the Administration Switch
- Establish a console connection between IT Host and the Administration Switch using a console cable.
- On IT Host, navigate to the Desktop tab and select the Terminal application icon.
! ==============================================================
!--- ITN (Version 7.00) Practice PT Skills Assessment (PTSA) - ID 00, 10, 20, 30
!--- ANSWER SCRIPT FOR SWITCH Administration Switch
!--- Usage: on IT Host open Desktop > Terminal (console cable to the Administration Switch), then paste this whole file at the Switch> prompt. Every line beginning with "!" is a comment; IOS ignores it.
! ==============================================================

enable
configure terminal

! --------------------------------------------------------------
!--- Step 4: Remote management over Telnet.
! --------------------------------------------------------------

!--- Basic hardening (not scored, but good practice).
enable secret class12345
service password-encryption
banner motd $Authorized Users Only!$
no ip domain-lookup

!--- Console line password.
line console 0
 password cisco12345
 login
 logging synchronous
 exec-timeout 60
 exit

!--- VTY lines accept Telnet with a password.
line vty 0 15
 password cisco12345
 login
 logging synchronous
 exec-timeout 60
 exit

!--- Step 4a and 4b: VLAN 1 SVI with the second-highest address of 192.168.1.144/28.
interface vlan 1
 ip address 192.168.1.157 255.255.255.240
 no shutdown
 exit

!--- Step 4c: default gateway (router G0/1) so hosts on other networks can reach the switch.
ip default-gateway 192.168.1.158

end

! --------------------------------------------------------------
!--- Save the configuration to NVRAM. (Press Enter when prompted for the destination filename.)
! --------------------------------------------------------------
copy running-config startup-config


! ==============================================================
!--- Verification:
!---   show ip interface brief  -> Vlan1 192.168.1.157 up/up
!---   ping 192.168.1.158       -> reaches the router G0/1
!---   From Reception Host: telnet 192.168.1.157 (password cisco12345)
! ==============================================================
Topology:
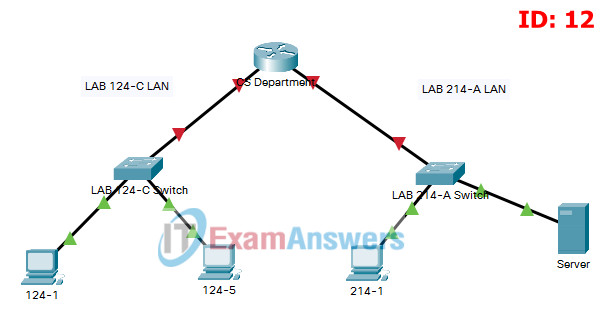
ITN Practice Skills Assessment - Packet Tracer - ID 12
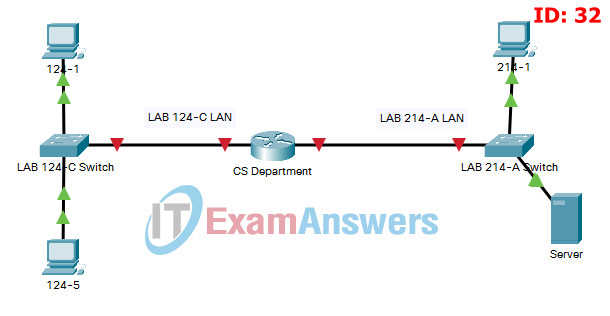
ITN Practice Skills Assessment - Packet Tracer - ID 32
ITN Practice Skills Assessment – Packet Tracer Answers
A few things to keep in mind while completing this activity:
- Do not use the browser Back button or close or reload any exam windows during the exam.
- Do not close Packet Tracer when you are done. It will close automatically.
- Click the Submit Assessment button in the browser window to submit your work.
Introduction
In this assessment, you will configure devices in an IPv4/IPv6 network. For the sake of time, you will not be asked to perform all configurations on all network devices as you may be required to do in a real network or other assessment. Instead, you will use the skills and knowledge that you have learned in the labs and packet tracers in this course to configure the CS Department router. In addition, you will address the hosts on two LANs with IPv4 and IPv6 addresses and activate and address the management interface of the LAB 214-A Switch.
You will receive one of several topologies.
You are not required to configure the LAB 124-C Switch, and you will not be able to access it in this practice skills assessment activity.
All IOS device configurations should be completed from a direct terminal connection to the device console. In addition, many values that are required to complete the configurations have not been given to you. In those cases, create the values that you need to complete the requirements. For values that have been supplied to you, they must be entered exactly as they appear in order for you to get full credit for your configuration.
If the network is configured correctly, all hosts should be able to connect to each other.
You will practice and be assessed on the following skills:
- Configuration of initial IOS device settings
- Design and calculation of IPv4 addressing
- Configuration of IOS device interfaces including IPv4 and IPv6 addressing when appropriate
- Addressing of network hosts with IPv4 and IPv6 addresses
- Enhancing device security, including configuration of the secure transport protocol for remote device management
- Configuration of a switch virtual management interface
Requirements by networking device:
CS Department router:
- Configuration of initial router settings
- Interface configuration and IPv4 and IPv6 addressing
- Device security enhancement, or device hardening
- Secure transport for remote configuration connections as covered in the labs and Packet Tracers in the course.
LAB 214-A Switch:
- Enabling basic remote management by Telnet
PC and Server hosts:
- IPv4 full addressing
- IPv6 addressing
Addressing Table
| Device | Interface | IP Address/Mask | Default Gateway |
|---|---|---|---|
| CS Department | G0/0 | 192.168.1.126/27 (SM: 255.255.255.224) |
N/A |
| 2001:db8:acad:a::1/64 | N/A | ||
| fe80::1 | N/A | ||
| G0/1 | 192.168.1.158/28 (SM: 255.255.255.240) |
N/A | |
| 2001:db8:acad:b::1/64 | N/A | ||
| fe80::1 | N/A | ||
| LAB 214-A Switch | SVI | 192.168.1.157/28 (SM: 255.255.255.240) |
192.168.1.158 |
| 124-1 | NIC | 192.168.1.97/27 (SM: 255.255.255.224) |
192.168.1.126 |
| 2001:db8:acad:a::ff/64 | FE80::1 | ||
| 124-5 | NIC | 192.168.1.98/27 (SM: 255.255.255.224) |
192.168.1.126 |
| 2001:db8:acad:a::15/64 | FE80::1 | ||
| 214-1 | NIC | 192.168.1.145/28 (SM: 255.255.255.240) |
192.168.1.158 |
| 2001:db8:acad:b::ff/64 | FE80::1 | ||
| Server | NIC | 192.168.1.146/28 (SM: 255.255.255.240) |
192.168.1.158 |
| 2001:db8:acad:b::15/64 | FE80::1 |
Instructions
Step 1: Determine the IP Addressing Scheme.
Design an IPv4 addressing scheme and complete the Addressing Table based on the following requirements.
- a. Subnet the 192.168.1.0/24 network to provide 30 host addresses per subnet while wasting the fewest addresses.
- b. Assign the fourth subnet to the LAB 124-C LAN.
- c. Assign the last network host address (the highest) in this subnet to the G0/0 interface on CS Department.
- d. Starting with the fifth subnet, subnet the network again so that the new subnets will provide 14 host addresses per subnet while wasting the fewest addresses.
- e. Assign the second of these new 14-host subnets to the LAB 214-A LAN.
- f. Assign the last network host address (the highest) in the LAB 214-A LAN subnet to the G0/1 interface of the CS Department router.
- g. Assign the second to the last address (the second highest) in this subnet to the VLAN 1 interface of the LAB 214-A Switch.
- h. Configure addresses on the hosts using any of the remaining addresses in their respective subnets.
Step 2: Configure Host Addressing
Use the IPv4 addressing from Step 1 and the IPv6 addressing values provided in the Addressing Table to configure all host PCs with the correct addressing.
a. Use the router interface link-local address as the IPv6 default gateways on the hosts.
b. Complete the configuration of the server using the IPv4 addressing values from Step 1 and the values in the addressing table
Step 3: Configure the CS Department Router.
a. Configure the CS Department router with all initial configurations that you have learned in the course so far:
- Configure the router hostname: CS-Department
- Protect device configurations from unauthorized access with the encrypted privileged exec password.
- Secure all access lines into the router using methods covered in the course and labs.
- Require newly-entered passwords to have a minimum length of 10 characters.
- Prevent all passwords from being viewed in clear text in device configuration files.
- Configure a banner warning message for unauthorized users.
- Configure the router to only accept in-band management connections over the protocol that is more secure than Telnet, as was done in the labs and PT activities. Use the value 1024 for encryption key strength.
- Configure local user authentication for in-band management connections. Create a user with the name netadmin and a secret password of Cisco_CCNA7.
b. Configure the two Gigabit Ethernet interfaces using the IPv4 addressing values that you calculated and the IPv6 values provided in the addressing table.
- Reconfigure the link local addresses to the value shown in the table.
- Document the interfaces in the configuration file.
Step 4: Configure the LAB 214-A Switch.
Configure LAB 214-A Switch for remote management over Telnet.
- a. Configure VLAN 1 as the SVI.
- b. Configure IPv4 addressing according to your work in Step 1.
- c. Be sure that the switch is able to accept connections from hosts on other networks.
Answers - Passed 100% Score
Step 1: Determine the IP Addressing Scheme.
How to Solve "Subnetting a Subnet"
Part 1: Creating the 30-Host Subnets
We start with the base network 192.168.1.0/24 and need to create subnets that support at least 30 usable hosts each.
- Find the Host Bits (h): Use the formula 2h − 2 ≥ 30. The smallest power of 2 that works is 5 (since 25 − 2 = 30). So, we need 5 host bits.
- Determine the New Prefix: Subtract the host bits from 32 total bits (32 − 5 = 27). The new subnet mask is
/27. - Calculate the Block Size: The block size (or magic number) is 2h, which is 25 = 32. This means each subnet will jump by 32 in the fourth octet.
- List the Subnets: By adding 32 sequentially to our base address, we get: Subnet 1 (
.0), Subnet 2 (.32), Subnet 3 (.64), Subnet 4 (.96), and Subnet 5 (.128). - Assign the LAN: The assignment asks for the 4th subnet. Therefore, the LAB 124-C LAN is
192.168.1.96/27. We must also save the 5th subnet (192.168.1.128/27) for the next requirement.
Part 2: Breaking Down the 5th Subnet for 14 Hosts
Next, the assignment requires us to take the 5th subnet (192.168.1.128/27) and subnet it further to support 14 hosts per network.
- Find the Host Bits (h): Use the formula 2h − 2 ≥ 14. The smallest working power of 2 is 4 (since 24 − 2 = 14). So, we need 4 host bits.
- Determine the New Prefix: Subtract the host bits from 32 total bits (32 − 4 = 28). The new subnet mask is
/28. - Calculate the Block Size: The new block size is 24 = 16. These new subnets will jump by 16 in the fourth octet.
- List the New Subnets: Starting from our new base address (
.128) and adding 16 sequentially, we get: Subnet 1 (.128) and Subnet 2 (.144). - Assign the LAN: The assignment asks for the 2nd of these new subnets. Therefore, the LAB 214-A LAN is
192.168.1.144/28.
While this manual process builds a strong foundation, it can become tedious and error-prone during exams. Below is how you can use our calculator to automate these exact steps instantly.
When an assignment asks you to subnet a network and then take one of those subnets to divide it again (often called hierarchical subnetting or VLSM), you can easily solve it by using our FLSM Subnet Calculator twice.
Specifically, its "Subnet by Number of Hosts" feature automates the entire calculation process without manual binary math. Here is the step-by-step walkthrough based on the CCNA lab requirements:
Run 1: Creating the 30-Host Subnets
First, we need to divide the original 192.168.1.0/24 network into smaller blocks that can support 30 hosts each.
1. Configure the Tool:
- Enter
192.168.1.0in the Major Network Address field. - Select
/24from the Original CIDR dropdown. - Choose the Subnet by Number of Hosts calculation mode.
- Enter
30in the requirement box. - Click Generate Subnets.
2. Read the Results:
- The tool automatically calculates that you need a
/27subnet mask to fit 30 hosts. - Assign the LAB 124-C LAN: Look at Subnet #4 in the Subnet Table to find
192.168.1.96/27. - Prepare for the next step: Look at Subnet #5, which is
192.168.1.128. Copy this address, as it will become our new base network for the second run.
Run 2: Breaking Down the 5th Subnet for 14 Hosts
Now, we will take that 5th subnet (192.168.1.128/27) and slice it into even smaller pieces that support 14 hosts each.
1. Configure the Tool:
- Change the Major Network Address to
192.168.1.128. - Set the Original CIDR to
/27(the prefix we obtained from Run 1). - Keep the Subnet by Number of Hosts mode selected.
- Change the requirement box to
14. - Click Generate Subnets.
2. Read the Results:
- The tool calculates that you now need a
/28subnet mask to fit 14 hosts. - Assign the LAB 214-A LAN: Look at Subnet #2 in the new table to find
192.168.1.144/28.
Final Answer Summary
By taking the output of Run 1 and feeding it back into the tool for Run 2, you have successfully calculated the correct hierarchical assignments for your CCNA assignment:
- LAB 124-C LAN:
192.168.1.96/27 - LAB 214-A LAN:
192.168.1.144/28
Step 2: Configure IP addresses for hosts:
124-1
124-5
214-1
Server
Step 3: Configure the CS Department Router
- Establish a console connection between 124-1 and the CS Department router.
- On 124-1, navigate to the Desktop tab and select the Terminal application icon.
! ==============================================================
!--- ITN (Version 7.00) Practice PT Skills Assessment (PTSA) - ID 02, 12, 22, 32
!--- ANSWER SCRIPT FOR ROUTER CS Department (hostname CS-Department)
!--- Usage: on 124-1 open Desktop > Terminal (console cable to the CS Department router), then paste this whole file at the Router> prompt. Every line beginning with "!" is a comment; IOS ignores it.
! ==============================================================

enable
configure terminal

! --------------------------------------------------------------
!--- Step 3a: Initial settings and device hardening.
! --------------------------------------------------------------

!--- Router hostname, exactly as given.
hostname CS-Department

!--- Stop IOS from treating mistyped commands as host names.
no ip domain-lookup

!--- Require newly entered passwords to be at least 10 characters (set before the passwords below).
security passwords min-length 10

!--- Encrypted privileged EXEC password.
enable secret class12345

!--- Hide all plaintext passwords in the configuration files.
service password-encryption

!--- Warning banner for unauthorized users.
banner motd $Authorized Users Only!$

!--- Block logins for 120 seconds after 2 failed attempts within 30 seconds.
login block-for 120 attempts 2 within 30

!--- Secure the console line.
line console 0
 password cisco12345
 login
 logging synchronous
 exec-timeout 60
 exit

!--- Secure the auxiliary line.
line aux 0
 password cisco12345
 login
 logging synchronous
 exec-timeout 60
 exit

!--- SSH prerequisites: domain name and the local user netadmin with secret Cisco_CCNA7.
ip domain-name ITExamAnswers.net
username netadmin privilege 15 secret Cisco_CCNA7

!--- Generate 1024-bit RSA keys (one line, no prompt), then use SSH version 2.
crypto key generate rsa general-keys modulus 1024
ip ssh version 2
ip ssh time-out 120

!--- VTY lines: SSH only, authenticate with the local user database.
line vty 0 4
 password cisco12345
 transport input ssh
 login local
 logging synchronous
 exec-timeout 60
 exit

! --------------------------------------------------------------
!--- Step 3b: Gigabit Ethernet interfaces (IPv4 from Step 1, IPv6 from the Addressing Table).
! --------------------------------------------------------------

!--- Enable IPv6 routing between the two LANs.
ipv6 unicast-routing

!--- G0/0 - LAB 124-C LAN: last host of 192.168.1.96/27, IPv6 GUA, link-local fe80::1, description.
interface gigabitethernet 0/0
 description LAB 124-C LAN
 ip address 192.168.1.126 255.255.255.224
 ipv6 address 2001:db8:acad:a::1/64
 ipv6 address fe80::1 link-local
 no shutdown
 exit

!--- G0/1 - LAB 214-A LAN: last host of 192.168.1.144/28, IPv6 GUA, link-local fe80::1, description.
interface gigabitethernet 0/1
 description LAB 214-A LAN
 ip address 192.168.1.158 255.255.255.240
 ipv6 address 2001:db8:acad:b::1/64
 ipv6 address fe80::1 link-local
 no shutdown
 exit

end

! --------------------------------------------------------------
!--- Save the configuration to NVRAM. (Press Enter when prompted for the destination filename.)
! --------------------------------------------------------------
copy running-config startup-config


! ==============================================================
!--- Verification:
!---   show ip interface brief    -> G0/0 192.168.1.126 and G0/1 192.168.1.158 up/up
!---   show ipv6 interface brief  -> FE80::1 plus 2001:DB8:ACAD:A::1 / B::1
!---   show ip ssh                -> SSH Enabled - version 2.0
!---   From 124-1: ssh -l netadmin 192.168.1.126 (password Cisco_CCNA7)
! ==============================================================
Step 4: Configure the LAB 214-A Switch
- Establish a console connection between 214-1 and the LAB 214-A Switch using a console cable.
- On 214-1, navigate to the Desktop tab and select the Terminal application icon.
! ==============================================================
!--- ITN (Version 7.00) Practice PT Skills Assessment (PTSA) - ID 02, 12, 22, 32
!--- ANSWER SCRIPT FOR SWITCH LAB 214-A Switch
!--- Usage: on 214-1 open Desktop > Terminal (console cable to the LAB 214-A Switch), then paste this whole file at the Switch> prompt. Every line beginning with "!" is a comment; IOS ignores it.
! ==============================================================

enable
configure terminal

! --------------------------------------------------------------
!--- Step 4: Remote management over Telnet.
! --------------------------------------------------------------

!--- Basic hardening (not scored, but good practice).
enable secret class12345
service password-encryption
banner motd $Authorized Users Only!$
no ip domain-lookup

!--- Console line password.
line console 0
 password cisco12345
 login
 logging synchronous
 exec-timeout 60
 exit

!--- VTY lines accept Telnet with a password.
line vty 0 15
 password cisco12345
 login
 logging synchronous
 exec-timeout 60
 exit

!--- Step 4a and 4b: VLAN 1 SVI with the second-highest address of 192.168.1.144/28.
interface vlan 1
 ip address 192.168.1.157 255.255.255.240
 no shutdown
 exit

!--- Step 4c: default gateway (router G0/1) so hosts on other networks can reach the switch.
ip default-gateway 192.168.1.158

end

! --------------------------------------------------------------
!--- Save the configuration to NVRAM. (Press Enter when prompted for the destination filename.)
! --------------------------------------------------------------
copy running-config startup-config


! ==============================================================
!--- Verification:
!---   show ip interface brief  -> Vlan1 192.168.1.157 up/up
!---   ping 192.168.1.158       -> reaches the router G0/1
!---   From 124-1: telnet 192.168.1.157 (password cisco12345)
! ==============================================================
Topology:
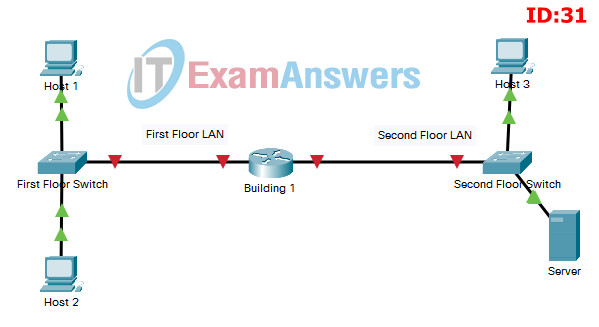
ITN Practice Skills Assessment - Packet Tracer - ID 31
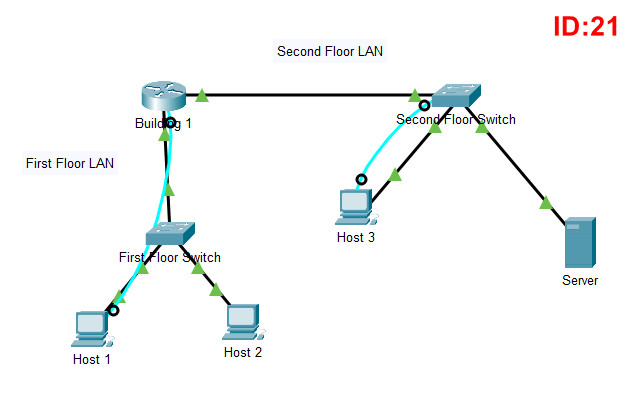
ITN Practice Skills Assessment - Packet Tracer - ID 21
ITN Practice Skills Assessment – Packet Tracer Answers
A few things to keep in mind while completing this activity:
- Do not use the browser Back button or close or reload any exam windows during the exam.
- Do not close Packet Tracer when you are done. It will close automatically.
- Click the Submit Assessment button in the browser window to submit your work.
Introduction
In this assessment, you will configure devices in an IPv4/IPv6 network. For the sake of time, you will not be asked to perform all configurations on all network devices as you may be required to do in a real network or other assessment. Instead, you will use the skills and knowledge that you have learned in the labs and packet tracers in this course to configure the Building 1 router. In addition, you will address the hosts on two LANs with IPv4 and IPv6 addresses and activate and address the management interface of the Second Floor Switch.
You will receive one of several topologies.
You are not required to configure the First Floor Switch, and you will not be able to access it in this practice skills assessment activity.
All IOS device configurations should be completed from a direct terminal connection to the device console. In addition, many values that are required to complete the configurations have not been given to you. In those cases, create the values that you need to complete the requirements. For values that have been supplied to you, they must be entered exactly as they appear in order for you to get full credit for your configuration.
If the network is configured correctly, all hosts should be able to connect to each other.
You will practice and be assessed on the following skills:
- Configuration of initial IOS device settings
- Design and calculation of IPv4 addressing
- Configuration of IOS device interfaces including IPv4 and IPv6 addressing when appropriate
- Addressing of network hosts with IPv4 and IPv6 addresses
- Enhancing device security, including configuration of the secure transport protocol for remote device management
- Configuration of a switch virtual management interface
Requirements by networking device:
Building 1 router:
- Configuration of initial router settings
- Interface configuration and IPv4 and IPv6 addressing
- Device security enhancement, or device hardening
- Secure transport for remote configuration connections as covered in the labs and Packet Tracers in the course.
Second Floor Switch:
- Enabling basic remote management by Telnet
PC and Server hosts:
- IPv4 full addressing
- IPv6 addressing
Addressing Table
| Device | Interface | IP Address/Mask | Default Gateway |
|---|---|---|---|
| Building 1 | G0/0 | 192.168.1.126/27 (SM: 255.255.255.224) |
N/A |
| 2001:db8:acad:a::1/64 | N/A | ||
| fe80::1 | N/A | ||
| G0/1 | 192.168.1.158/28 (SM: 255.255.255.240) |
N/A | |
| 2001:db8:acad:b::1/64 | N/A | ||
| fe80::1 | N/A | ||
| Second Floor Switch | SVI | 192.168.1.157/28 (SM: 255.255.255.240) |
192.168.1.158 |
| Host 1 | NIC | 192.168.1.97/27 (SM: 255.255.255.224) |
192.168.1.126 |
| 2001:db8:acad:a::ff/64 | FE80::1 | ||
| Host 2 | NIC | 192.168.1.98/27 (SM: 255.255.255.224) |
192.168.1.126 |
| 2001:db8:acad:a::15/64 | FE80::1 | ||
| Host 3 | NIC | 192.168.1.145/28 (SM: 255.255.255.240) |
192.168.1.158 |
| 2001:db8:acad:b::ff/64 | FE80::1 | ||
| Server | NIC | 192.168.1.146/28 (SM: 255.255.255.240) |
192.168.1.158 |
| 2001:db8:acad:b::15/64 | FE80::1 |
Instructions
Step 1: Determine the IP Addressing Scheme.
Design an IPv4 addressing scheme and complete the Addressing Table based on the following requirements.
- a. Subnet the 192.168.1.0/24 network to provide 30 host addresses per subnet while wasting the fewest addresses.
- b. Assign the fourth subnet to the First Floor LAN.
- c. Assign the last network host address (the highest) in this subnet to the G0/0 interface on Building 1.
- d. Starting with the fifth subnet, subnet the network again so that the new subnets will provide 14 host addresses per subnet while wasting the fewest addresses.
- e. Assign the second of these new 14-host subnets to the Second Floor LAN.
- f. Assign the last network host address (the highest) in the Second Floor LAN subnet to the G0/1 interface of the Building 1 router.
- g. Assign the second to the last address (the second highest) in this subnet to the VLAN 1 interface of the Second Floor Switch.
- h. Configure addresses on the hosts using any of the remaining addresses in their respective subnets.
Step 2: Configure Host Addressing
Use the IPv4 addressing from Step 1 and the IPv6 addressing values provided in the Addressing Table to configure all host PCs with the correct addressing.
a. Use the router interface link-local address as the IPv6 default gateways on the hosts.
b. Complete the configuration of the server using the IPv4 addressing values from Step 1 and the values in the addressing table
Step 3: Configure the Building 1 Router.
a. Configure the Building 1 router with all initial configurations that you have learned in the course so far:
- Configure the router hostname: Building-1
- Protect device configurations from unauthorized access with the encrypted privileged exec password.
- Secure all access lines into the router using methods covered in the course and labs.
- Require newly-entered passwords to have a minimum length of 10 characters.
- Prevent all passwords from being viewed in clear text in device configuration files.
- Configure a banner warning message for unauthorized users.
- Configure the router to only accept in-band management connections over the protocol that is more secure than Telnet, as was done in the labs and PT activities. Use the value 1024 for encryption key strength.
- Configure local user authentication for in-band management connections. Create a user with the name netadmin and a secret password of Cisco_CCNA7.
b. Configure the two Gigabit Ethernet interfaces using the IPv4 addressing values that you calculated and the IPv6 values provided in the addressing table.
- Reconfigure the link local addresses to the value shown in the table.
- Document the interfaces in the configuration file.
Step 4: Configure the Second Floor Switch.
Configure Second Floor Switch for remote management over Telnet.
- a. Configure VLAN 1 as the SVI.
- b. Configure IPv4 addressing according to your work in Step 1.
- c. Be sure that the switch is able to accept connections from hosts on other networks.
Answers - Passed 100% Score
Step 1: Determine the IP Addressing Scheme.
How to Solve "Subnetting a Subnet"
Part 1: Creating the 30-Host Subnets
We start with the base network 192.168.1.0/24 and need to create subnets that support at least 30 usable hosts each.
- Find the Host Bits (h): Use the formula 2h − 2 ≥ 30. The smallest power of 2 that works is 5 (since 25 − 2 = 30). So, we need 5 host bits.
- Determine the New Prefix: Subtract the host bits from 32 total bits (32 − 5 = 27). The new subnet mask is
/27. - Calculate the Block Size: The block size (or magic number) is 2h, which is 25 = 32. This means each subnet will jump by 32 in the fourth octet.
- List the Subnets: By adding 32 sequentially to our base address, we get: Subnet 1 (
.0), Subnet 2 (.32), Subnet 3 (.64), Subnet 4 (.96), and Subnet 5 (.128). - Assign the LAN: The assignment asks for the 4th subnet. Therefore, the First Floor LAN is
192.168.1.96/27. We must also save the 5th subnet (192.168.1.128/27) for the next requirement.
Part 2: Breaking Down the 5th Subnet for 14 Hosts
Next, the assignment requires us to take the 5th subnet (192.168.1.128/27) and subnet it further to support 14 hosts per network.
- Find the Host Bits (h): Use the formula 2h − 2 ≥ 14. The smallest working power of 2 is 4 (since 24 − 2 = 14). So, we need 4 host bits.
- Determine the New Prefix: Subtract the host bits from 32 total bits (32 − 4 = 28). The new subnet mask is
/28. - Calculate the Block Size: The new block size is 24 = 16. These new subnets will jump by 16 in the fourth octet.
- List the New Subnets: Starting from our new base address (
.128) and adding 16 sequentially, we get: Subnet 1 (.128) and Subnet 2 (.144). - Assign the LAN: The assignment asks for the 2nd of these new subnets. Therefore, the Second Floor LAN is
192.168.1.144/28.
While this manual process builds a strong foundation, it can become tedious and error-prone during exams. Below is how you can use our calculator to automate these exact steps instantly.
When an assignment asks you to subnet a network and then take one of those subnets to divide it again (often called hierarchical subnetting or VLSM), you can easily solve it by using our FLSM Subnet Calculator twice.
Specifically, its "Subnet by Number of Hosts" feature automates the entire calculation process without manual binary math. Here is the step-by-step walkthrough based on the CCNA lab requirements:
Run 1: Creating the 30-Host Subnets
First, we need to divide the original 192.168.1.0/24 network into smaller blocks that can support 30 hosts each.
1. Configure the Tool:
- Enter
192.168.1.0in the Major Network Address field. - Select
/24from the Original CIDR dropdown. - Choose the Subnet by Number of Hosts calculation mode.
- Enter
30in the requirement box. - Click Generate Subnets.
2. Read the Results:
- The tool automatically calculates that you need a
/27subnet mask to fit 30 hosts. - Assign the First Floor LAN: Look at Subnet #4 in the Subnet Table to find
192.168.1.96/27. - Prepare for the next step: Look at Subnet #5, which is
192.168.1.128. Copy this address, as it will become our new base network for the second run.
Run 2: Breaking Down the 5th Subnet for 14 Hosts
Now, we will take that 5th subnet (192.168.1.128/27) and slice it into even smaller pieces that support 14 hosts each.
1. Configure the Tool:
- Change the Major Network Address to
192.168.1.128. - Set the Original CIDR to
/27(the prefix we obtained from Run 1). - Keep the Subnet by Number of Hosts mode selected.
- Change the requirement box to
14. - Click Generate Subnets.
2. Read the Results:
- The tool calculates that you now need a
/28subnet mask to fit 14 hosts. - Assign the Second Floor LAN: Look at Subnet #2 in the new table to find
192.168.1.144/28.
Final Answer Summary
By taking the output of Run 1 and feeding it back into the tool for Run 2, you have successfully calculated the correct hierarchical assignments for your CCNA assignment:
- First Floor LAN:
192.168.1.96/27 - Second Floor LAN:
192.168.1.144/28
Step 2: Configure IP addresses for hosts:
Host 1
Host 2
Host 3
Server
Step 3: Configure the Building 1 Router
- Establish a console connection between Host 1 and the Building 1 router.
- On Host 1, navigate to the Desktop tab and select the Terminal application icon.
! ==============================================================
!--- ITN (Version 7.00) Practice PT Skills Assessment (PTSA) - ID 01, 11, 21, 31
!--- ANSWER SCRIPT FOR ROUTER Building 1 (hostname Building-1)
!--- Usage: on Host 1 open Desktop > Terminal (console cable to the Building 1 router), then paste this whole file at the Router> prompt. Every line beginning with "!" is a comment; IOS ignores it.
! ==============================================================

enable
configure terminal

! --------------------------------------------------------------
!--- Step 3a: Initial settings and device hardening.
! --------------------------------------------------------------

!--- Router hostname, exactly as given.
hostname Building-1

!--- Stop IOS from treating mistyped commands as host names.
no ip domain-lookup

!--- Require newly entered passwords to be at least 10 characters (set before the passwords below).
security passwords min-length 10

!--- Encrypted privileged EXEC password.
enable secret class12345

!--- Hide all plaintext passwords in the configuration files.
service password-encryption

!--- Warning banner for unauthorized users.
banner motd $Authorized Users Only!$

!--- Block logins for 120 seconds after 2 failed attempts within 30 seconds.
login block-for 120 attempts 2 within 30

!--- Secure the console line.
line console 0
 password cisco12345
 login
 logging synchronous
 exec-timeout 60
 exit

!--- Secure the auxiliary line.
line aux 0
 password cisco12345
 login
 logging synchronous
 exec-timeout 60
 exit

!--- SSH prerequisites: domain name and the local user netadmin with secret Cisco_CCNA7.
ip domain-name ITExamAnswers.net
username netadmin privilege 15 secret Cisco_CCNA7

!--- Generate 1024-bit RSA keys (one line, no prompt), then use SSH version 2.
crypto key generate rsa general-keys modulus 1024
ip ssh version 2
ip ssh time-out 120

!--- VTY lines: SSH only, authenticate with the local user database.
line vty 0 4
 password cisco12345
 transport input ssh
 login local
 logging synchronous
 exec-timeout 60
 exit

! --------------------------------------------------------------
!--- Step 3b: Gigabit Ethernet interfaces (IPv4 from Step 1, IPv6 from the Addressing Table).
! --------------------------------------------------------------

!--- Enable IPv6 routing between the two LANs.
ipv6 unicast-routing

!--- G0/0 - First Floor LAN: last host of 192.168.1.96/27, IPv6 GUA, link-local fe80::1, description.
interface gigabitethernet 0/0
 description First Floor LAN
 ip address 192.168.1.126 255.255.255.224
 ipv6 address 2001:db8:acad:a::1/64
 ipv6 address fe80::1 link-local
 no shutdown
 exit

!--- G0/1 - Second Floor LAN: last host of 192.168.1.144/28, IPv6 GUA, link-local fe80::1, description.
interface gigabitethernet 0/1
 description Second Floor LAN
 ip address 192.168.1.158 255.255.255.240
 ipv6 address 2001:db8:acad:b::1/64
 ipv6 address fe80::1 link-local
 no shutdown
 exit

end

! --------------------------------------------------------------
!--- Save the configuration to NVRAM. (Press Enter when prompted for the destination filename.)
! --------------------------------------------------------------
copy running-config startup-config


! ==============================================================
!--- Verification:
!---   show ip interface brief    -> G0/0 192.168.1.126 and G0/1 192.168.1.158 up/up
!---   show ipv6 interface brief  -> FE80::1 plus 2001:DB8:ACAD:A::1 / B::1
!---   show ip ssh                -> SSH Enabled - version 2.0
!---   From Host 1: ssh -l netadmin 192.168.1.126 (password Cisco_CCNA7)
! ==============================================================
Step 4: Configure the Second Floor Switch
- Establish a console connection between Host 3 and the Second Floor Switch using a console cable.
- On Host 3, navigate to the Desktop tab and select the Terminal application icon.
! ==============================================================
!--- ITN (Version 7.00) Practice PT Skills Assessment (PTSA) - ID 01, 11, 21, 31
!--- ANSWER SCRIPT FOR SWITCH Second Floor Switch
!--- Usage: on Host 3 open Desktop > Terminal (console cable to the Second Floor Switch), then paste this whole file at the Switch> prompt. Every line beginning with "!" is a comment; IOS ignores it.
! ==============================================================

enable
configure terminal

! --------------------------------------------------------------
!--- Step 4: Remote management over Telnet.
! --------------------------------------------------------------

!--- Basic hardening (not scored, but good practice).
enable secret class12345
service password-encryption
banner motd $Authorized Users Only!$
no ip domain-lookup

!--- Console line password.
line console 0
 password cisco12345
 login
 logging synchronous
 exec-timeout 60
 exit

!--- VTY lines accept Telnet with a password.
line vty 0 15
 password cisco12345
 login
 logging synchronous
 exec-timeout 60
 exit

!--- Step 4a and 4b: VLAN 1 SVI with the second-highest address of 192.168.1.144/28.
interface vlan 1
 ip address 192.168.1.157 255.255.255.240
 no shutdown
 exit

!--- Step 4c: default gateway (router G0/1) so hosts on other networks can reach the switch.
ip default-gateway 192.168.1.158

end

! --------------------------------------------------------------
!--- Save the configuration to NVRAM. (Press Enter when prompted for the destination filename.)
! --------------------------------------------------------------
copy running-config startup-config


! ==============================================================
!--- Verification:
!---   show ip interface brief  -> Vlan1 192.168.1.157 up/up
!---   ping 192.168.1.158       -> reaches the router G0/1
!---   From Host 1: telnet 192.168.1.157 (password cisco12345)
! ==============================================================


