Enterprise Networking, Security, and Automation ( Version 7.00) – ENSA Final PT Skills Assessment (PTSA)
A few things to keep in mind while completing this activity:
- Do not use the browser Back button or close or reload any exam windows during the exam.
- Do not close Packet Tracer when you are done. It will close automatically.
- Click the Submit Assessment button in the browser window to submit your work.
Topology
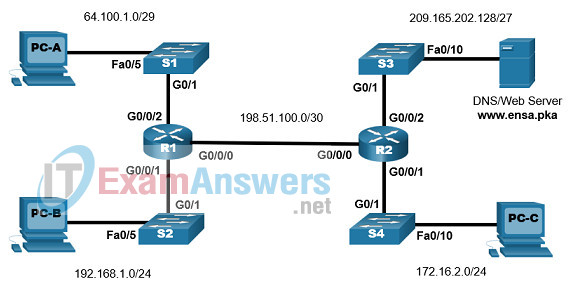
Addressing Table
| Device Name | G0/0/0 | IP Address | Default Gateway |
|---|---|---|---|
| R1 | G0/0/0 | 198.51.100.1/30 | N/A |
| G0/0/1 | 192.168.1.1/24 | N/A | |
| G0/0/2 | 64.100.1.1/29 | N/A | |
| R2 | G0/0/0 | 198.51.100.2/30 | N/A |
| G0/0/1 | 172.16.2.1/24 | N/A | |
| G0/0/2 | 209.165.202.129/27 | N/A | |
| S1 | VLAN1 | 64.100.1.2/29 | 64.100.1.1 |
| S2 | VLAN1 | 192.168.1.2/24 | 192.168.1.1 |
| S3 | VLAN1 | 209.165.202.130/27 | 209.165.202.129 |
| S4 | VLAN1 | 172.16.2.2/24 | 172.16.2.1 |
| DNS/WebServer | NIC | 209.165.202.131/27 | 209.165.202.129 |
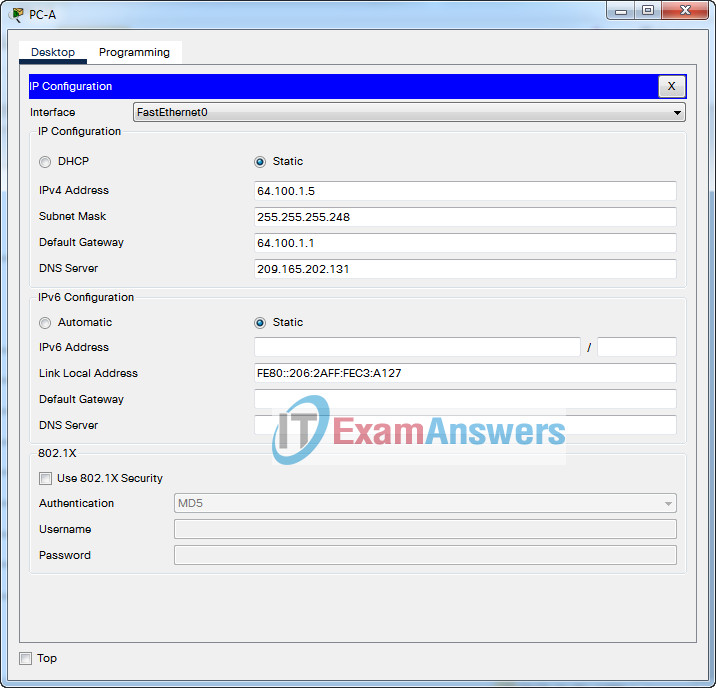
| PC-A | NIC | 64.100.1.5/29 | 64.100.1.1 |
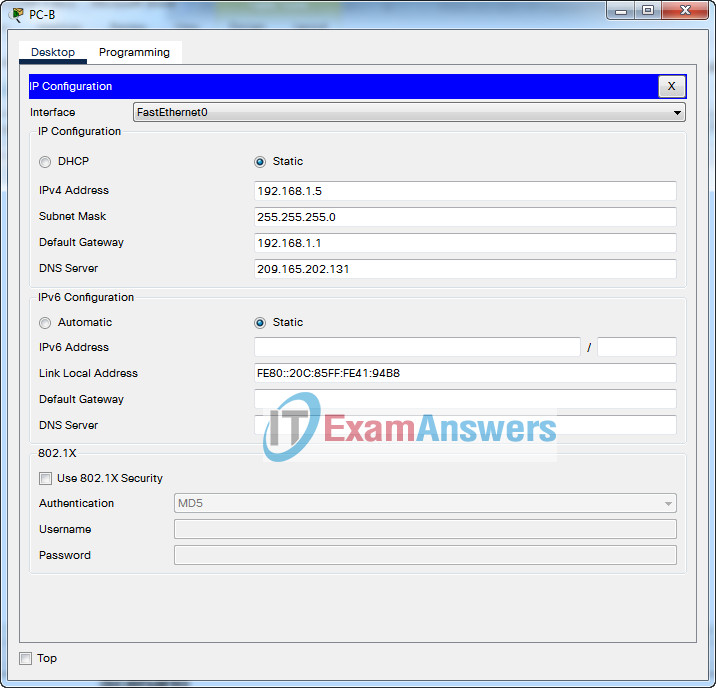
| PC-B | NIC | 192.168.1.5/24 | 192.168.1.1 |
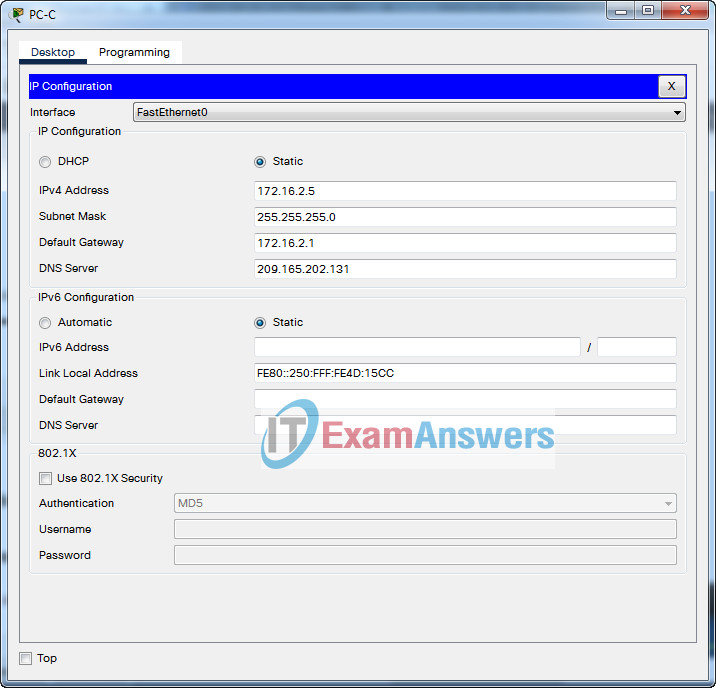
| PC-C | NIC | 172.16.2.5/24 | 172.16.2.1 |
Scenario
In this Packet Tracer Skills Assessment, you will configure the devices in a small network. You will complete all tasks in PT Physical Mode. You will not have access to the logical topology.
You will place devices in proper locations and power them on. You will configure routers, switches, and PCs to support IPv4 connectivity for hosts. The routers and switches must be managed securely. You will configure Single-Area OSPFv2, NAT, and access control lists. Further, you will backup up your working configurations to a TFTP server and upload a working configuration to another device.
Furthermore, different versions of the IOS image are used in switches. You will update a switch to use the latest IOS.
Instructions
Part 1: Place Devices in Proper Locations and Connect them with Proper Cables
Step 1: Place devices in proper Locations inside the main wiring closet
In the Physical Mode place network devices in the following locations:
- Organize the rack for ease of configuration. Place R1, R2, S1, S2, S3, and S4 from top down, with some space between the devices.
- Drag two 4331 routers, R1 and R2, from the shelf to the rack.
- Drag four switches, S1, S2, S3, and S4, from the shelf to the rack.
- Move PC-C to Table1, on the left, and place it in the left-hand area of the tabletop
- Move the DNS server to Table1, on the left, and place it in the right-hand area of the tabletop.
- Move PC-A to Table2, on the right, and place it in the left-hand area of the tabletop.
- Move PC-B to Table2, on the right, and place it in the right-hand area of the tabletop.
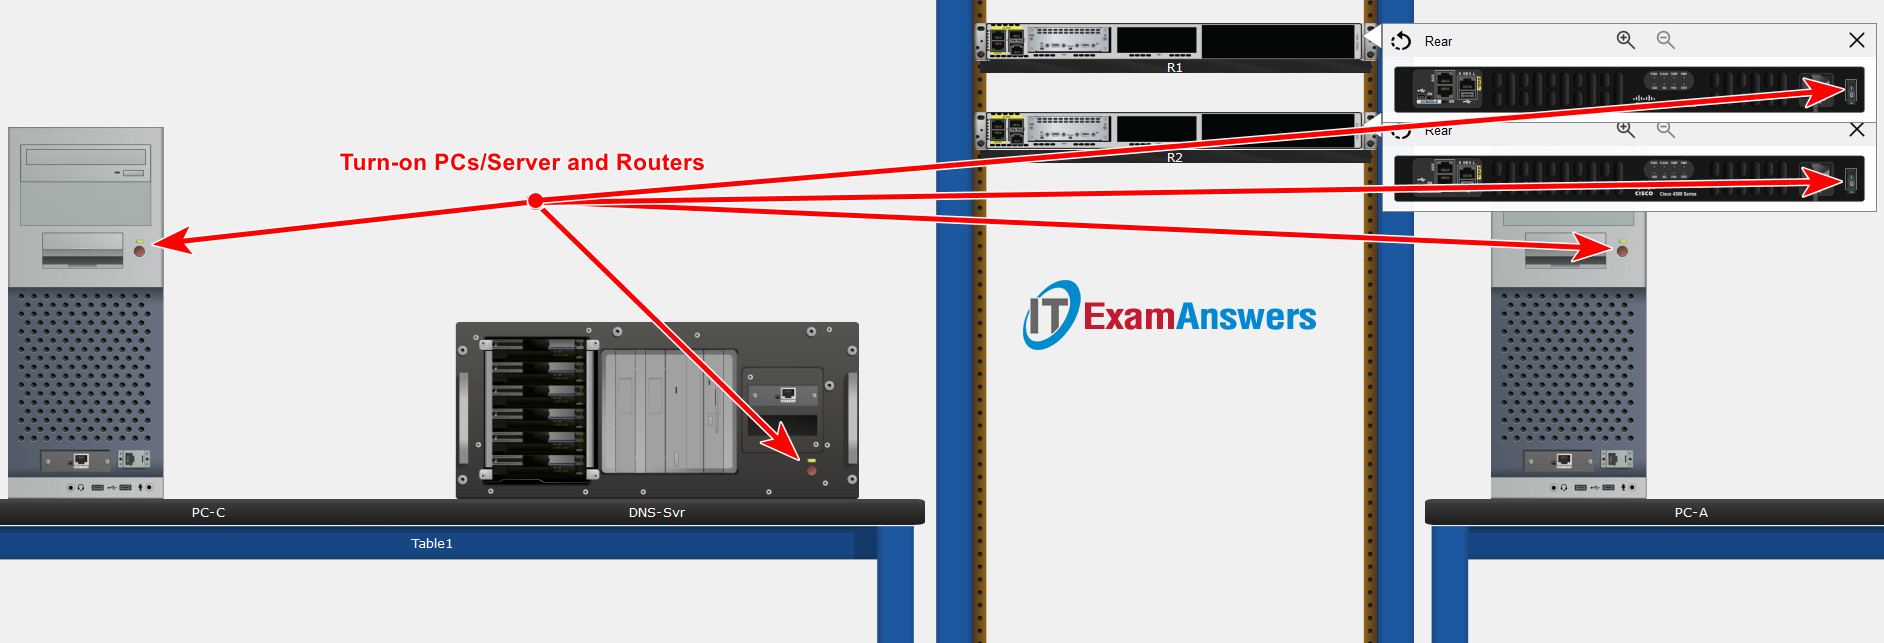
Step 2: Make sure all devices are powered on.
Power on all devices.
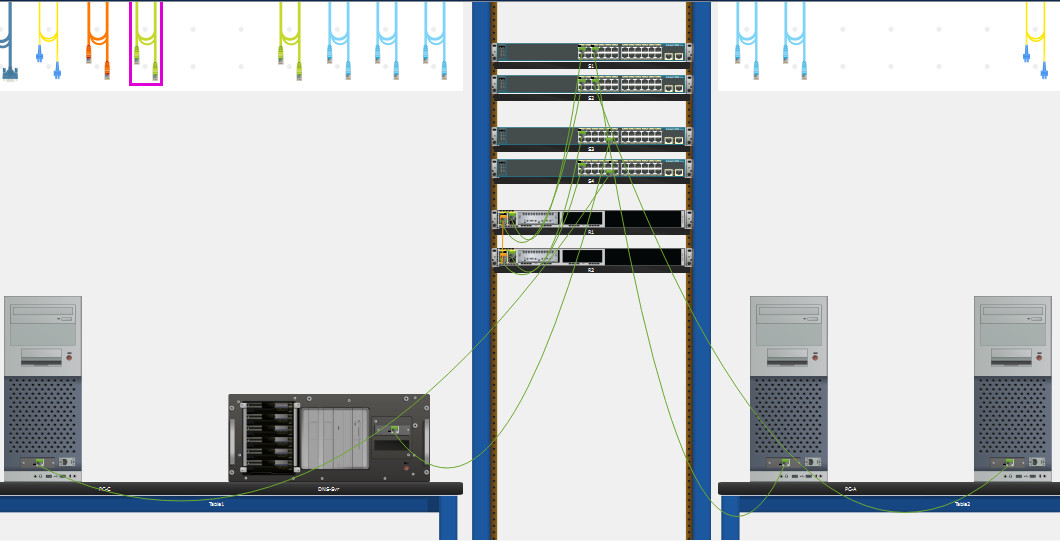
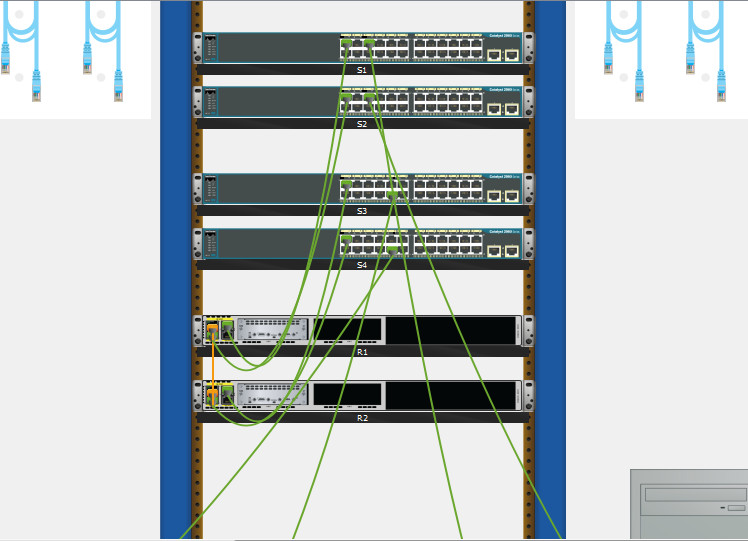
Step 3: Connect devices according to the network topology.
Use the logical topology diagram to connect the devices to the correct ports with correct cables.
Instructions:
Select a Copper Cross-Over cable (orange cable) and connect the G0/0/0 port of Router R1 to the G0/0/0 port of Router R2.
Select a Copper Straight-Through cable (green cable) and connect the remaining devices according to the correct ports on the topology diagram.
Part 2: Configure Basic Devices Settings
All configurations are made through a direct console connection.
Step 1: Configure PCs with IPv4 addresses
Use the addressing table to manually configure the PCs with full IP addressing.
Step 2: Configure router R1 and R2
a. Configure R1 and R2 with the following:
- Prevent the router from attempting to resolve incorrectly entered commands as domain names.
- Router name: R1 or R2.
- Encrypted privileged EXEC secret password: ciscoenpass.
- Console access password: ciscoconpass.
- Set the minimum password length to 10 characters.
- Encrypt the clear text passwords.
- Configure an appropriate MOTD Banner.
Answer:
b. Configure the interfaces of routers R1 and R2 as follows.
- Configure interface G0/0/0 with a description and IPv4 addressing.
- Configure interface G0/0/1 with a description and IPv4 addressing.
- Configure interface G0/0/2 with a description and IPv4 addressing.
- All interfaces should be ready to send and receive traffic.
Answer:
c. Configure SSH.
- Domain name: ccna-lab.com.
- Create an administrative user in the local database:
- Username: admin
- Secret Password: admin1pass
- Set login on VTY lines to use the local database
- Set VTY lines to accept SSH connections only
- Use an RSA crypto key with a 1024 bits modulus.
- Enable SSH using version 2.
Answer:
Step 3: Configure switches S1, S2, S3, and S4
a. Configure the hostname according to the Addressing Table.
b. Configure Management Interface (SVI) for VLAN 1: Set the IPv4 address and activate the interface.
c. Configure default gateway.
Answer:
Part 3: Configure Single Area OSPFv2
Step 1: Configure single-area OSPF routing
a. Configure the OSPF routing process: Use process id 1.
b. Manually configure the router id: Use 0.0.0.1 for R1 and 0.0.0.2 for R2
c. Configure network statements for the appropriate networks on R1 and R2.
Note: For the purposes of this assessment, enter your network statements in the following order:
On R1:
- the G0/0/2 network
- the G0/0/0 network
On R2:
- the G0/0/2 network
- the G0/0/0 network
Answer:
Step 2: Adjust OSPF operation
a. Configure the appropriate interfaces to not forward OSPF updates where they are not required.
b. Configure the reference bandwidth: Adjust the reference bandwidth to 1 Gigabit.
c. Configure the OSPF network as a point-to-point network.
d. Configure the hello time for 30 seconds.
Answer:
Part 4: Configure Access Control and NAT
Step 1: Verify connectivity
- PC-B cannot visit the web server.
- PC-C cannot ping PC-A.
Step 2: Configure NAT
a. Configure static NAT on router R1 with a public IP address 64.100.1.7 to allow PC-B to access the web server.
Answer:
R1(config)# ip nat inside source static 192.168.1.5 64.100.1.7

R1(config)# interface GigabitEthernet0/0/0
R1(config-if)# ip nat outside

R1(config-if)# interface GigabitEthernet0/0/1
R1(config-if)# ip nat inside
b. Configure PAT on router R2 to enable some devices on the network attached to the G0/0/1 interface to access the internet
- Create a NAT pool named IPNAT1 with IP address range of 209.165.202.140 to 209.165.202.150 with the subnet mask of 255.255.255.224.
- Create a numbered ACL (ACL 1) to allow devices with IP address range of 172.16.2.1 through 172.16.2.15 to access the internet through NAT.
- Use PAT to allow the range of the public IP addresses to be shared.
Answer:
R2(config)# ip nat pool IPNAT1 209.165.202.140 209.165.202.150 netmask 255.255.255.224
R2(config)# ip nat inside source list 1 pool IPNAT1 overload
R2(config)# access-list 1 permit 172.16.2.0 0.0.0.15

R2(config)# interface GigabitEthernet0/0/1
R2(config-if)# ip nat inside
Step 3: Configure access control on R1
a. Create a standard ACL R1-VTY-LIMIT to allow only PC-B access to the R1 vty lines.
b. Apply the ACL.
Answer:
R1(config)#ip access-list standard R1-VTY-LIMIT
R1(config-std-nacl)#permit host 192.168.1.5
R1(config-std-nacl)#
R1(config-std-nacl)#line vty 0 15
R1(config-line)#access-class R1-VTY-LIMIT in
Step 4: Configure access control on S1
a. Create a standard ACL S1-VTY-LIMIT to allow only PC-B access to the S1 vty lines.
b. Apply the ACL.
Answer:
S1(config)#ip access-list standard S1-VTY-LIMIT
S1(config-std-nacl)#permit host 192.168.1.5
S1(config-std-nacl)#
S1(config-std-nacl)#line vty 0 15
S1(config-line)#access-class S1-VTY-LIMIT in
Step 5: Configure access control on R2
a. Create a standard ACL R2-VTY-LIMIT to allow only PC-C access to the R2 vty lines.
b. Create an extended ACL R2-SECURITY to restrict access from the internet
- Allow FTP connections from the PC-B public IP address to the web/DNS server
- Deny all other FTP connections from the internet to the R2 LANs
- Deny all SSH connections from the internet
- Allow all other types of connections from the internet
Your ACL should consist of four statements that correspond to the four requirements above.
c. Apply the ACLs
Answer:
R2(config)#ip access-list standard R2-VTY-LIMIT
R2(config-std-nacl)#permit host 172.16.2.5
R2(config-std-nacl)#
R2(config-std-nacl)#line vty 0 15
R2(config-line)#access-class R2-VTY-LIMIT in
R2(config-line)#exit

R2(config)#ip access-list extended R2-SECURITY
R2(config-ext-nacl)#permit tcp host 64.100.1.7 host 209.165.202.131 eq ftp
R2(config-ext-nacl)#deny tcp any any eq ftp
R2(config-ext-nacl)#deny tcp any any eq 22
R2(config-ext-nacl)#permit ip any any

R2(config-ext-nacl)#interface GigabitEthernet0/0/0
R2(config-if)#ip access-group R2-SECURITY in
R2(config-if)#ip nat outside
Step 6: Configure access control on S3
a. Create a standard ACL S3-VTY-LIMIT to allow only PC-C access to the S3 vty lines.
b. Apply the ACL
Answer:
S3(config)#ip access-list standard S3-VTY-LIMIT
S3(config-std-nacl)#permit host 172.16.2.5
S3(config-std-nacl)#
S3(config-std-nacl)#line vty 0 15
S3(config-line)#access-class S3-VTY-LIMIT in
S3(config-line)#login
Part 5: Perform Configuration Backup and IOS Update
Step 1: Use TFTP server to backup device configurations
a. Backup the running configurations of R1, S1, and S2 to the TFTP server on PC-B.
b. Name the configuration files as R1-Run-Config, S1- Run-Config, and S2-Run-Config.
On R1:
R1>en
R1#copy running-config tftp
Address or name of remote host []? 192.168.1.5
Destination filename [R1-confg]? R1-Run-Config
On S1:
S1>en
S1#copy running-config tftp
Address or name of remote host []? 192.168.1.5
Destination filename [S1-confg]? S1-Run-Config
On S2:
S2>en
S2#copy running-config tftp
Address or name of remote host []? 192.168.1.5
Destination filename [S2-confg]? S2-Run-Config

Writing running-config....!!
[OK - 1122 bytes]

1122 bytes copied in 3.003 secs (373 bytes/sec)
Step 2: Use TFTP server to update/upgrade IOS software
a. Obtain a newer IOS image from the TFTP service on the web/DNS server.
b. The newer version of the switch IOS is c2960-lanbasek9-mz.150-2.SE4.bin.
c. Configure S3 to use this newer version IOS after reloading.
Answer:
S3#copy tftp flash:
Address or name of remote host []? 209.165.202.131
Source filename []? c2960-lanbasek9-mz.150-2.SE4.bin
Destination filename [c2960-lanbasek9-mz.150-2.SE4.bin]?

Accessing tftp://209.165.202.131/c2960-lanbasek9-mz.150-2.SE4.bin....
Loading c2960-lanbasek9-mz.150-2.SE4.bin from 209.165.202.131: !!!!!!!!!!!!!!!!!!!!!!!!!!!!!!!!!!!!!!!!!!!!!!!!!!!!!!!!!!!!!!!!!!!!!!!!!!!!!!!!!!!!!!!!!!!!
[OK - 4670455 bytes]

S3#configure terminal
S3(config)#boot system flash:c2960-lanbasek9-mz.150-2.SE4.bin
S3(config)#exit
S3#
%SYS-5-CONFIG_I: Configured from console by console

S3#copy running-config startup-config
Destination filename [startup-config]?
Building configuration...
[OK]
S3#reload
Proceed with reload? [confirm]
Answer script
R1
enable
configure terminal

no ip domain lookup
hostname R1
enable secret ciscoenpass
line console 0
password ciscoconpass
login
exit

security passwords min-length 10
service password-encryption
banner motd #Unauthorized Acess is Prohibited#

interface GigabitEthernet0/0/0
description Connection to R2
ip address 198.51.100.1 255.255.255.252
no shutdown

interface GigabitEthernet0/0/1
description Connection to S2
ip address 192.168.1.1 255.255.255.0
no shutdown

interface GigabitEthernet0/0/2
description Connection to S1
ip address 64.100.1.1 255.255.255.248
no shutdown

ip domain name ccna-lab.com
username admin secret admin1pass

line vty 0 15
login local
transport input ssh
exit

crypto key generate rsa
1024

ip ssh version 2

router ospf 1
router-id 0.0.0.1
network 64.100.1.0 0.0.0.7 area 0
network 198.51.100.0 0.0.0.3 area 0
exit

router ospf 1
passive-interface GigabitEthernet0/0/1
passive-interface GigabitEthernet0/0/2
auto-cost reference-bandwidth 1000
exit

interface GigabitEthernet0/0/0
ip ospf network point-to-point
ip ospf hello-interval 30
exit

ip nat inside source static 192.168.1.5 64.100.1.7

interface GigabitEthernet0/0/0
ip nat outside
interface GigabitEthernet0/0/1
ip nat inside

ip access-list standard R1-VTY-LIMIT
permit host 192.168.1.5

line vty 0 15
access-class R1-VTY-LIMIT in
exit
R2
enable
configure terminal

no ip domain lookup
hostname R2
enable secret ciscoenpass
line console 0
password ciscoconpass
login
exit

security passwords min-length 10
service password-encryption
banner motd #Unauthorized Acess is Prohibited#

interface GigabitEthernet0/0/0
description Connection to R1
ip address 198.51.100.2 255.255.255.252
no shutdown

interface GigabitEthernet0/0/1
description Connection to S4
ip address 172.16.2.1 255.255.255.0
no shutdown

interface GigabitEthernet0/0/2
description Connection to S3
ip address 209.165.202.129 255.255.255.224
no shutdown

ip domain name ccna-lab.com
username admin secret admin1pass

line vty 0 15
login local
transport input ssh
exit

crypto key generate rsa
1024

ip ssh version 2

router ospf 1
router-id 0.0.0.2
network 209.165.202.128 0.0.0.31 area 0
network 198.51.100.0 0.0.0.3 area 0
exit

router ospf 1
passive-interface GigabitEthernet0/0/1
passive-interface GigabitEthernet0/0/2
auto-cost reference-bandwidth 1000
exit

interface GigabitEthernet0/0/0
ip ospf network point-to-point
ip ospf hello-interval 30
exit

ip nat pool IPNAT1 209.165.202.140 209.165.202.150 netmask 255.255.255.224
ip nat inside source list 1 pool IPNAT1 overload
access-list 1 permit 172.16.2.0 0.0.0.15

interface GigabitEthernet0/0/1
ip nat inside

ip access-list standard R2-VTY-LIMIT
permit host 172.16.2.5

line vty 0 15
access-class R2-VTY-LIMIT in
exit

ip access-list extended R2-SECURITY
permit tcp host 64.100.1.7 host 209.165.202.131 eq ftp
deny tcp any any eq ftp
deny tcp any any eq 22
permit ip any any

interface GigabitEthernet0/0/0
ip access-group R2-SECURITY in
ip nat outside
exit
S1
enable
configure ter
configure terminal

hostname S1
interface Vlan1
ip address 64.100.1.2 255.255.255.248
no shutdown

ip default-gateway 64.100.1.1

ip access-list standard S1-VTY-LIMIT
permit host 192.168.1.5

line vty 0 15
access-class S1-VTY-LIMIT in
exit
S2
enable
configure terminal

hostname S2
interface Vlan1
ip address 192.168.1.2 255.255.255.0
no shutdown

ip default-gateway 192.168.1.1
S3
enable
config ter

hostname S3
interface Vlan1
ip address 209.165.202.130 255.255.255.224
no shutdown

ip default-gateway 209.165.202.129

ip access-list standard S3-VTY-LIMIT
permit host 172.16.2.5

line vty 0 15
access-class S3-VTY-LIMIT in
S4
enable
config ter
hostname S4
interface Vlan1
ip address 172.16.2.2 255.255.255.0
no shutdown

ip default-gateway 172.16.2.1


Unable to configure anything on R1 and R2 directly locked buy authors authority…managed to configure with console cable
access from terminal in pc connected with console cable
83%
Still valid !!! 97 %
any reason why we did not configure OSPF network 192.168 network in R1 and network 172.16 in R2 ?
where to connect console cable
With this guide in 2024 I can confirm you will get a 80%, with only 2 items incorrect. Those being “Network:R2:OSPF:1:Networks:Route1″ and “Network:R2:NAT:Inside Source List:1″
Unable to open file. This file requires Cisco Packet Tracer version 8.2.2.0400. Your current version is 8.2.1.0118.
100% Thank you!
Don’t forget to configure ip on server!!!!
Hello, I am trying to configure the routers as shown on Part 2 : Step 2 but I am not able to access the config tab as it has been locked by author’s design. is there another way to do that or am I missing something here?
Additionally is this still valid as of April 2024.
Can I get the file whose completion % is not 100% but 0% so that I can practice?
The attached Packet Tracer does not work correctly.
R1 and R2 have incorrect G0/0/2 ports and you’re unable to properly connect copper straight-through cables to them.
Very strange there is such an obvious mistake so early in the PT.
Fixed, please download again pka file
I am taking this exam in 2 weeks. Is this still valid?
I am trying to connect router with switch, showing cable cannot be connected, pls help.
For whatever reason when trying to connect to R2, I had to click the bottom port to get it to connect. Try and see if that works for you.
I checked DNS configs IPs and all settings. No errors but I’ve got 70%. November 2023
Same here, did everything this page said, no errors, only 70%
26/10/2023 – Está funcionando, segue o passo a passo que é 100%
cuidado na hora de fazer a parte Backup and IOS Update, leia atentamente a sequência de comandos informado.
Still valid 13/10/2023.
And don’t forget to add DNS server ip address in the PC A, B & C network settings
how come it says “Configuration is locked” for all devices except for S4?? its so frustrating I cant find the problem to fix it
very amazing
Thanks, 100%
Thank you guys for this. I get 93% score with this answer
on part4, step 6 …on line VTY does a password need??
on S1, s2,S3,S4 configuration there are no Descriptions of the interfaces
I think that’s because by default, the modulus of a certification authority (CA) key is 1024 bits.
i think the IP address is wrong it should be 192.168.1.5 instead of 64.100.1.7
It is asking for the public address to be used. R1 is set up with NAT to translate the private class c address to a public address.
For Part 5C why is ACL R2-SECURITY applied to g0/0/0 and not g0/0/2 since we should be policing traffic from the internet? I am assuming the internet is where the web server is. I need help in understanding this.
That confused me too, until I got the wording. They state that the ACL is to restrict traffic from the internet, meaning it is not a part of the directly connected networks and accessed through another router. The LANs containing the DNS/Web Server and LAN C are just that, directly connected LANs. Everything else is reached through the “inter-network” via G0/0/0.
For Part 5C why is ACL R2-SECURITY applied to g0/0/0 and not g0/0/2 since we should be policing traffic from the internet? I am assuming the internet is where the web server is. I need help in understanding this.
Where can i download the ENSA (Version 7.00) Final PT Skills Assessment Exam? I would like to try this
Download Packet Tracer File (.PKA)
In Part 4, wouldn’t it make more sense to enter the “Int g0/0/0” and “ip nat outside” command already at Step 2 B in stead of at Step 5 C?
My commands were the same as it is shown above but for some reason, it failed to copy tftp flash which is at step 5 part 2 can anybody tell me what mistake I must’ve committed? Also, I used PC-A for R1 and PC-C for R2 to connect with the console and PC-B for all the switches is that fine?
How did you connect PC-B to multiple switches?
how do i configure the switch
This is coming to Exam ?? any idea guys ?
Is the cable connection correct? Because I see that the Switch should be connected to the G0/0/1 port of the Router with G0/1 port on the topology diagram, but the screenshot shows Fa0/1
I am also confused about the topology. I made it this way. But Console cable of SW have to switch every time while configuring in SW
Don’t forget to add DNS server ip address in the PC A, B & C network settings
Hi Angga, I have an issue with this PT do you know why I can not open the routers and switches. When I click it says “configure locked” is something wrong with Packet Tracer or am I doing something wrong? Thank you !!
You should use console from PC that connected with console cable to the routers & switches
Where’s the DNS server ip address?
209.165.202.131
!!! Click read more for readable format !!!
Part 5: Perform Configuration Backup and IOS Update.
Step 1.
192.168.1.5 shall be the ip address of PC-B, since you set it up manually at the beginning.
Go to R1:
Go to S1:
Go to S2:
If you accidentally misspell something, you can edit the file names in PC-B/TFTP.
Step 2.
Go to S3:
209.165.202.131 is the DNS Server address, it shall be predetermined.
If you successfully got the ISO, then go back to S3:
After that you can check the boot file with:
If you see “BOOT path-list : flash:c2960-lanbasek9-mz.150-2.SE4.bin” in the terminal, then you are good to go.
As far as i know, this way you completed Part 5; uploaded the running configs to PC-B, and downloaded an ISO from the DNS server and set it up for S3’s boot.
Thanks you so much!
do you have a solution for this problem?
Error opening tftp://209.165.202.131/c2960-lanbasek9-mz.150-2.SE4.bin (Timed out)
Hi, What are your grades based on this answer? When connecting, do you follow the connection method in the screenshot? Or connect according to the topological diagram of the topic?
The reason why is Timed Out is you do not turn on DNS Server. Please pay attention about that before you go.
my s1 s2 s3 configure is locked. how do i unlock it?
I have to assume you guys are working on this one. I see this was recently update March 22.
answers
answers??