
17.7.7 Lab - Troubleshoot Connectivity Issues
17.7.6 Lab - Troubleshoot Connectivity Issues
Topology

Addressing Table
| Device | Interface | IP Address | Subnet Mask | Default Gateway |
|---|---|---|---|---|
| R1 | G0/0/0/1 | 192.168.1.1 | 255.255.255.0 | N/A |
| G0/0/0 | 10.1.1.1 | 255.255.255.252 | N/A | |
| ISP | G0/0/0 | 10.1.1.2 | 255.255.255.252 | N/A |
| Lo0 | 209.165.200.226 | 255.255.255.255 | N/A | |
| S1 | VLAN 1 | 192.168.1.2 | 255.255.255.0 | 192.168.1.1 |
| PC-A | NIC | 192.168.1.10 | 255.255.255.0 | 192.168.1.1 |
Objectives
- Part 1: Identify the Problem
- Part 2: Implement Network Changes
- Part 3: Verify Full Functionality
- Part 4: Document Findings and Configuration Changes
Background / Scenario
In this lab, the company that you work for is experiencing problems with their Local Area Network (LAN). You have been asked to troubleshoot and resolve the network issues. In Part 1, you will connect to devices on the LAN and use troubleshooting tools to identify the network issues, establish a theory of probable cause, and test that theory. In Part 2, you will establish a plan of action to resolve and implement a solution. In Part 3, you will verify full functionality has been restored. Part 4 provides space for you to document your troubleshooting findings along with the configuration changes that you made to the LAN devices.
Note: The routers used with CCNA hands-on labs are Cisco 4221 with Cisco IOS XE Release 16.9.4 (universalk9 image). The switches used in the labs are Cisco Catalyst 2960s with Cisco IOS Release 15.2(2) (lanbasek9 image). Other routers, switches, and Cisco IOS versions can be used. Depending on the model and Cisco IOS version, the commands available and the output produced might vary from what is shown in the labs. Refer to the Router Interface Summary Table at the end of the lab for the correct interface identifiers.
Required Resources
- 2 Routers (Cisco 4221 with Cisco IOS XE Release 16.9.4 universal image or comparable)
- 1 Switch (Cisco 2960 with Cisco IOS Release 15.2(2) lanbasek9 image or comparable)
- 1 PC (Windows with a terminal emulation program, such as Tera Term)
- Console cables to configure the Cisco IOS devices via the console ports
- Ethernet cables as shown in the topology
Troubleshooting Configuration
The following settings must be configured on the devices shown in the topology. Paste the configurations onto the specified devices prior to starting the lab.
Lab Preconfiguration
The following settings must be configured on the devices shown in the topology. These settings contain the errors that are being injected into the lab. Paste the configurations onto the specified devices prior to starting the lab.
PC:
IP Address: 192.168.1.10
Subnet Mask: 255.255.255.0
Default Gateway: (leave blank)
Instructor: You may choose to configure the PC settings; if you do not, student will know that the missing default gateway setting is a problem.
S1:
no ip domain-lookup
hostname S1
ip domain-name ccna-lab.com
username admin01 privilege 15 secret cisco12345
interface FastEthernet0/1
 shutdown
interface FastEthernet0/2
 shutdown
interface FastEthernet0/3
 shutdown
interface FastEthernet0/4
 shutdown
interface FastEthernet0/5
 speed 10
 duplex half
! duplex full
interface Vlan1
 ip address 192.168.1.2 255.255.255.0
ip default-gateway 192.168.1.0
!ip default-gateway 192.168.1.1
banner motd $ Authorized Users Only! $
line vty 0 4
 login local
 transport input ssh
line vty 5 15
 login local
 transport input ssh
crypto key generate rsa general-keys modulus 1024
end
R1:
hostname R1
no ip domain lookup
ip domain name ccna-lab.com
username admin01 privilege 15 secret cisco12345
interface GigabitEthernet0/0/1
 ip address 192.168.1.1 255.255.255.0
 no negotiation auto
 speed 100
! speed 100
! negotiation auto
 no shutdown
interface GigabitEthernet0/0/0
 ip address 10.1.1.1 255.255.255.252
 no shutdown
banner motd $ Authorized Users Only! $
line vty 0 4
 login local
!ip route 0.0.0.0 0.0.0.0 10.1.1.2
 transport input ssh
crypto key generate rsa general-keys modulus 1024
end
ISP:
hostname ISP
no ip domain lookup
interface GigabitEthernet0/0/0
 ip address 10.1.1.2 255.255.255.252
 no shut
interface Lo0
 ip address 209.165.200.226 255.255.255.255
ip route 0.0.0.0 0.0.0.0 10.1.1.1
end
Part 1: Identify the Problem.
The only available information about the network problem is that the users are experiencing slow response times and that they are not able to reach an external device on the internet at IP address 209.165.200.226. To determine probable cause(s) for these network issues, you will need to utilize network commands and tools on the LAN equipment shown in the topology.
Note: The user name admin01 with a password of cisco12345 will be required to log into the network equipment.
Step 1: Troubleshoot the network.
Use the tools available to you to troubleshoot the network, keeping in mind that the requirement is to restore connectivity to the external server and the eliminate slow response times.
Note: While using SSH to connect to network devices, issue the terminal monitor privileged exec command to enable log output to the SSH console.
Step 2: Document the probable causes.
List the probable causes for the network problems that employees are experiencing.
1. The Default Gateway is not set on the PC.
2. S1 Interface F0/5 is set to half duplex and speed set to 10.
3. S1 default-gateway set to 192.168.1.0
3. R1 G0/0/1 speed set to 100 and auto negotiation is disabled.
4. The Gateway of last resort is not set on R1.
Part 2: Implement Network Changes
You have communicated the problems that you discovered in Part 1 to your supervisor. She has approved these changes and has requested that you implement them.
Part 3: Verify Full Functionality
Verify that full functionality has been restored. PC-A, S1, and R1 should be able to reach the external server, and ping replies from PC-A to the external server should exhibit no significant variation in response times.
Part 4: Document Findings and Configuration Changes
Use the space provided below to document the issues found during your troubleshooting and the configurations changes made to resolve those issues.
Documentation will vary but should include the date when troubleshooting was conducted, devices that were tested, commands used along with the output generated by those commands, issues found, and configuration changes made to resolve those issues.
Reflection Question
This lab had you troubleshoot all devices before making any changes. Is there another way to apply the troubleshooting methodology?
Answers may vary. Another way the troubleshooting methodology could be applied would be to complete all 6 steps on a device before moving on to another device. e.g. After you determined that the default gateway was not set on the PC, you would add the default gateway setting and verify functionality. If network issues still exist, you would then move on to the next device, S1 in this example. When the troubleshooting process had been completed on S1 and issues still exist, you would then move on to R1. This process would continue until full network functionality was achieved.
Router Interface Summary Table
| Router Model | Ethernet Interface #1 | Ethernet Interface #2 | Serial Interface #1 | Serial Interface #2 |
|---|---|---|---|---|
| 1800 | Fast Ethernet 0/0 (F0/0) | Fast Ethernet 0/1 (F0/1) | Serial 0/0/0 (S0/0/0) | Serial 0/0/1 (S0/0/1) |
| 1900 | Gigabit Ethernet 0/0 (G0/0) | Gigabit Ethernet 0/1 (G0/1) | Serial 0/0/0 (S0/0/0) | Serial 0/0/1 (S0/0/1) |
| 2801 | Fast Ethernet 0/0 (F0/0) | Fast Ethernet 0/1 (F0/1) | Serial 0/1/0 (S0/1/0) | Serial 0/1/1 (S0/1/1) |
| 2811 | Fast Ethernet 0/0 (F0/0) | Fast Ethernet 0/1 (F0/1) | Serial 0/0/0 (S0/0/0) | Serial 0/0/1 (S0/0/1) |
| 2900 | Gigabit Ethernet 0/0 (G0/0) | Gigabit Ethernet 0/1 (G0/1) | Serial 0/0/0 (S0/0/0) | Serial 0/0/1 (S0/0/1) |
| 4221 | Gigabit Ethernet 0/0/0 (G0/0/0) | Gigabit Ethernet 0/0/1 (G0/0/1) | Serial 0/1/0 (S0/1/0) | Serial 0/1/1 (S0/1/1) |
| 4300 | Gigabit Ethernet 0/0/0 (G0/0/0) | Gigabit Ethernet 0/0/1 (G0/0/1) | Serial 0/1/0 (S0/1/0) | Serial 0/1/1 (S0/1/1) |
Note: To find out how the router is configured, look at the interfaces to identify the type of router and how many interfaces the router has. There is no way to effectively list all the combinations of configurations for each router class. This table includes identifiers for the possible combinations of Ethernet and Serial interfaces in the device. The table does not include any other type of interface, even though a specific router may contain one. An example of this might be an ISDN BRI interface. The string in parenthesis is the legal abbreviation that can be used in Cisco IOS commands to represent the interface.
Issues Found and Solutions
The reported symptoms were slow response times and no connectivity to the external server at 209.165.200.226. Troubleshooting the LAN devices uncovered five separate faults.
| # | Device | Issue | Solution |
|---|---|---|---|
| 1 | PC-A | No default gateway configured | Set the default gateway to 192.168.1.1 |
| 2 | S1 — F0/5 | Uplink stuck at speed 10 / duplex half → collisions and slow response times | Set speed 100 and duplex full |
| 3 | S1 | Default gateway set to 192.168.1.0 — a network address, not a host address |
Change it to 192.168.1.1 |
| 4 | R1 — G0/0/1 | Auto-negotiation disabled with no duplex setting → the LAN side falls back to half duplex and mismatches S1 | Set speed 100 and duplex full so both ends of the link match |
| 5 | R1 | No gateway of last resort → no route toward the internet | Add a default route: ip route 0.0.0.0 0.0.0.0 10.1.1.2 |
Why the symptoms split the way they did: faults 3 and 5 break reachability outright — without a valid gateway or default route, packets to 209.165.200.226 are simply dropped. Faults 2 and 4 are a classic duplex/speed mismatch on the R1–S1 link: traffic still flows, but collisions and late collisions make it slow. Both ends of an Ethernet link must agree, so both must be corrected.
Accessing the network devices
SSH into S1 and R1 from PC-A using the username admin01 and password cisco12345 (Telnet is disabled — the VTY lines accept SSH only).
Tip: once connected over SSH, issue terminal monitor in privileged EXEC mode so that log output is displayed in the SSH session.
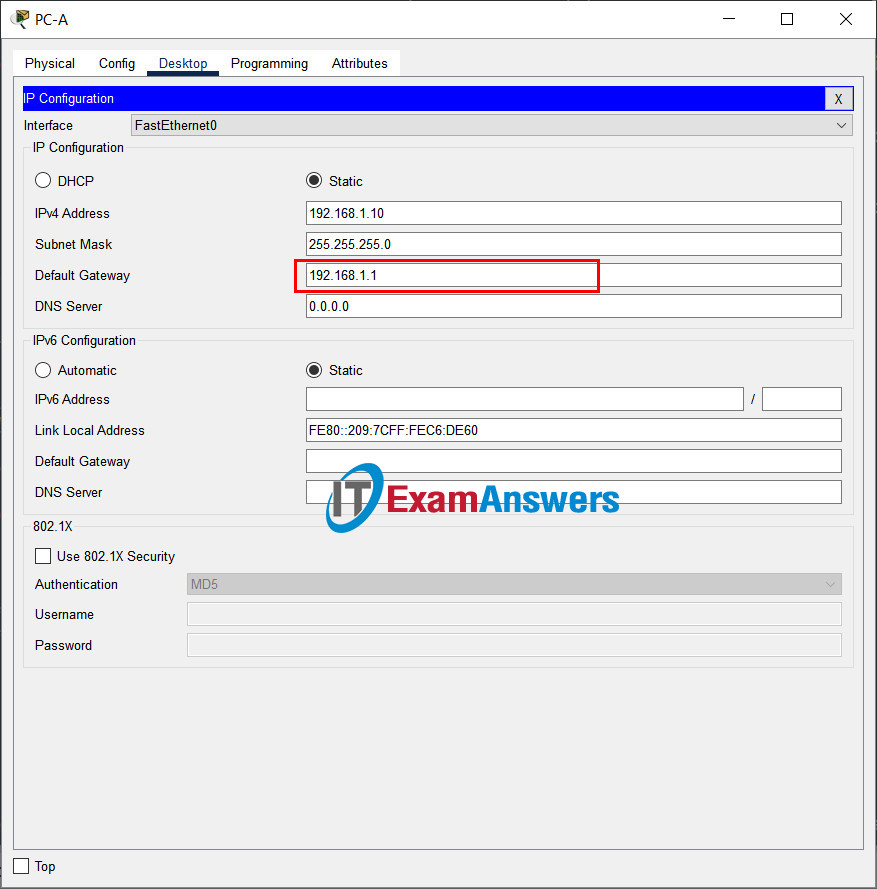
Fix on PC-A (Desktop → IP Configuration)
- Set Default Gateway to
192.168.1.1. - Leave the IP address (
192.168.1.10) and subnet mask (255.255.255.0) unchanged.
Fix on S1
! ==============================================================
!--- 17.7.7 Lab - Troubleshoot Connectivity Issues
!--- FIX SCRIPT FOR SWITCH S1
!--- Usage: SSH into SWITCH S1 from PC-A with username admin01 and password cisco12345, then paste this whole file. Every line beginning with "!" is a comment; IOS ignores it, so pasting a comment by accident is harmless.
!--- This is a TROUBLESHOOTING lab: the script applies only the corrective commands for the diagnosed faults.
! ==============================================================

enable
configure terminal

! --------------------------------------------------------------
!--- Fault 2: F0/5 (the uplink to R1) was left at speed 10 / duplex half. This mismatches R1 and causes collisions and the slow response times users reported.
! --------------------------------------------------------------

!--- Restore the uplink to 100 Mbps full duplex so both ends of the link match.
interface fastethernet 0/5
 speed 100
 duplex full
 exit

! --------------------------------------------------------------
!--- Fault 3: the switch default gateway was set to 192.168.1.0 - that is the NETWORK address, not a host address, so S1 could not reach anything beyond its own subnet.
! --------------------------------------------------------------

!--- Set the correct default gateway (R1 G0/0/1). Re-issuing this command replaces the wrong value.
ip default-gateway 192.168.1.1

end

! --------------------------------------------------------------
!--- Save the configuration to NVRAM. (Press Enter when prompted for the destination filename.)
! --------------------------------------------------------------
copy running-config startup-config


! ==============================================================
!--- Verification:
!---   show interfaces fastethernet 0/5  -> 100 Mb/s, Full-duplex
!---   show running-config | include default-gateway  -> 192.168.1.1
!---   ping 209.165.200.226              -> S1 reaches the external server
! ==============================================================
Fix on R1
! ==============================================================
!--- 17.7.7 Lab - Troubleshoot Connectivity Issues
!--- FIX SCRIPT FOR ROUTER R1
!--- Usage: SSH into ROUTER R1 from PC-A with username admin01 and password cisco12345, then paste this whole file. Every line beginning with "!" is a comment; IOS ignores it, so pasting a comment by accident is harmless.
!--- This is a TROUBLESHOOTING lab: the script applies only the corrective commands for the diagnosed faults.
! ==============================================================

enable
configure terminal

! --------------------------------------------------------------
!--- Fault 4: G0/0/1 (the LAN side) had auto-negotiation disabled and no duplex setting, so it fell back to half duplex while S1 ran at a different speed. The duplex/speed mismatch is what produced the slow response times.
! --------------------------------------------------------------

!--- Hard-set the LAN interface to 100 Mbps full duplex so it matches S1 F0/5.
interface gigabitethernet 0/0/1
 speed 100
 duplex full
 no shutdown
 exit

! --------------------------------------------------------------
!--- Fault 5: no gateway of last resort, so R1 had no route toward the internet (209.165.200.226 lives behind the ISP router). NOTE: 'ip route' is a GLOBAL config command - it must be entered after leaving interface mode, not inside it.
! --------------------------------------------------------------

!--- Add the default route pointing at the ISP router (10.1.1.2 = ISP G0/0/0).
ip route 0.0.0.0 0.0.0.0 10.1.1.2

end

! --------------------------------------------------------------
!--- Save the configuration to NVRAM. (Press Enter when prompted for the destination filename.)
! --------------------------------------------------------------
copy running-config startup-config


! ==============================================================
!--- Verification:
!---   show interfaces gigabitethernet 0/0/1  -> 100 Mb/s, Full-duplex
!---   show ip route                          -> Gateway of last resort is 10.1.1.2
!---   ping 209.165.200.226                   -> R1 reaches the external server
! ==============================================================
Note on command mode: ip route is a global configuration command. It must be entered after leaving interface configuration mode — entering it while still at the R1(config-if)# prompt returns an error.
Verification
- S1 —
show interfaces fastethernet 0/5should report 100 Mb/s, Full-duplex. - R1 —
show interfaces gigabitethernet 0/0/1should report 100 Mb/s, Full-duplex. - R1 —
show ip routeshould show Gateway of last resort is 10.1.1.2. - PC-A, S1 and R1 — all three should now ping
209.165.200.226successfully, with no significant variation in response times.
Device Configs - Final (Corrected)
Switch S1
hostname S1
!
no ip domain-lookup
ip domain-name ccna-lab.com
!
username admin01 privilege 15 secret cisco12345
!
interface FastEthernet0/1
 shutdown
interface FastEthernet0/2
 shutdown
interface FastEthernet0/3
 shutdown
interface FastEthernet0/4
 shutdown
!
interface FastEthernet0/5
 speed 100
 duplex full
!
interface Vlan1
 ip address 192.168.1.2 255.255.255.0
 no shutdown
!
ip default-gateway 192.168.1.1
!
banner motd ^C Authorized Users Only! ^C
!
line vty 0 4
 login local
 transport input ssh
line vty 5 15
 login local
 transport input ssh
!
end
Router R1
hostname R1
!
no ip domain-lookup
ip domain-name ccna-lab.com
!
username admin01 privilege 15 secret cisco12345
!
interface GigabitEthernet0/0/0
 ip address 10.1.1.1 255.255.255.252
 duplex auto
 speed auto
 no shutdown
!
interface GigabitEthernet0/0/1
 ip address 192.168.1.1 255.255.255.0
 speed 100
 duplex full
 no shutdown
!
ip route 0.0.0.0 0.0.0.0 10.1.1.2
!
banner motd ^C Authorized Users Only! ^C
!
line vty 0 4
 login local
 transport input ssh
!
end
Router ISP (reference — no changes required)
hostname ISP
!
no ip domain-lookup
!
interface GigabitEthernet0/0/0
 ip address 10.1.1.2 255.255.255.252
 negotiation auto
 no shutdown
!
interface Loopback0
 ip address 209.165.200.226 255.255.255.255
!
ip route 0.0.0.0 0.0.0.0 10.1.1.1
!
end


