5.3.4.4 Lab – Power Plant Earthquake Emergency Shutdown System (Instructor Version)
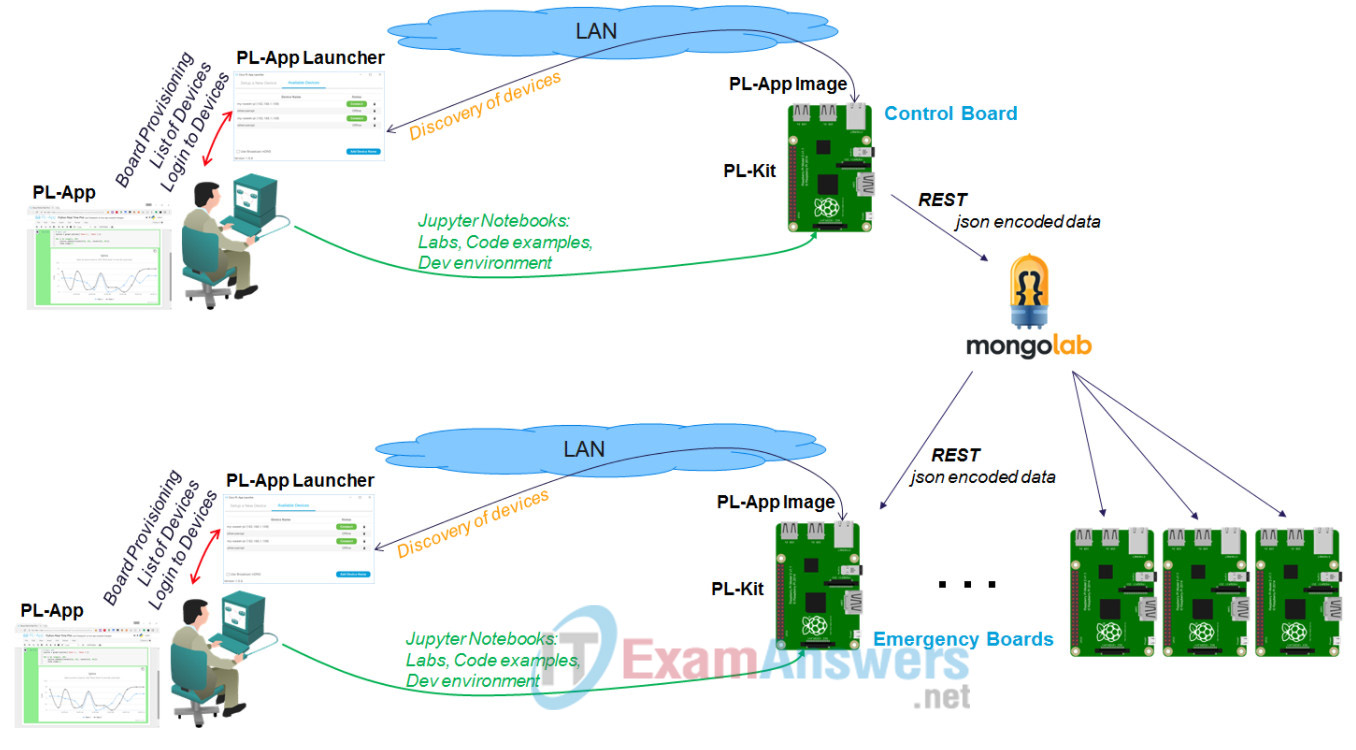
Lab Topology
Background / Scenario
This lab demonstrates the use of HTTP based REST API calls to integrate third party services into your application. You will learn how to store and retrieve JSON data in a MongoDB database running in the cloud, build applications that store the device state in a central place, and build multiple clients that can react based on the stored data.
MongoDB is an open source NoSQL document-oriented database that directly maps to applications. It provides a mechanism allowing the integration of data in certain types of applications to become much easier and faster. While it has native support for most programming languages, this lab will for simplicity use an HTTP based REST API access to an mLab hosted MongoDB instance (https://www.mongodb.com).
The application simulates a simplified factory emergency shutdown system where a single control board can be used by an operator to update the state of an alarm variable in a central database. Multiple emergency client boards periodically check for the alarm property value and trigger an alarm on an external electrical system. For simplicity in this lab you will only be turning on or off LEDs. In real world practice, the control boards could turn off gas pumps, close fire doors, or perform other vital tasks.
Required Resources
- Prototyping Lab with two Raspberry Pi boards that are configured and imaged with PL-App
- Internet connection with no traffic filtering for port 443 (https)
- MongoDB account
Task 1: Set up an MongoDB User Account for a Cloud MongoDB Database
Step 1: Import MongoDB Modules
# Install pymongo
!pip install pymongo dnspython

# Import the MongoClient acts as a client from Python to MongoDB
from pymongo import MongoClient

# Import the pprint library
from pprint import pprint

#Ignore warnings
import warnings
warnings.filterwarnings('ignore')
Step 2: Register a free user account at MongoDB
a. If you currently do not have an MongoDB user account, go to https://www.mongodb.com/download-center/ to get one for free. Otherwise, proceed to the next step.
b. Enter your email address, First Name, Last Name, and Password. Agree to the terms of service. Click Get started free to deploy a free cluster.
Step 3: Setup a new MongoDB database using the MongoDB cloud
a. After creating an account, click Build my first cluster to build your first cluster.
b. Click Developing a new app to answer the questions to create your cluster. Click Get Started to continue.
c. In the create new cluster step, select AWS as the cloud provider. Select a region that provides free tier. You could also change the cluster name if desired. Verify that your cluster is free. Click Create Cluster to continue. Verify that you are not a robot to continue. Be patience while your cluster is being created.
d. Click Clusters under the PROJECT heading. Select the Security tab. You will configure the MongoDB Users and IP Whitelist.
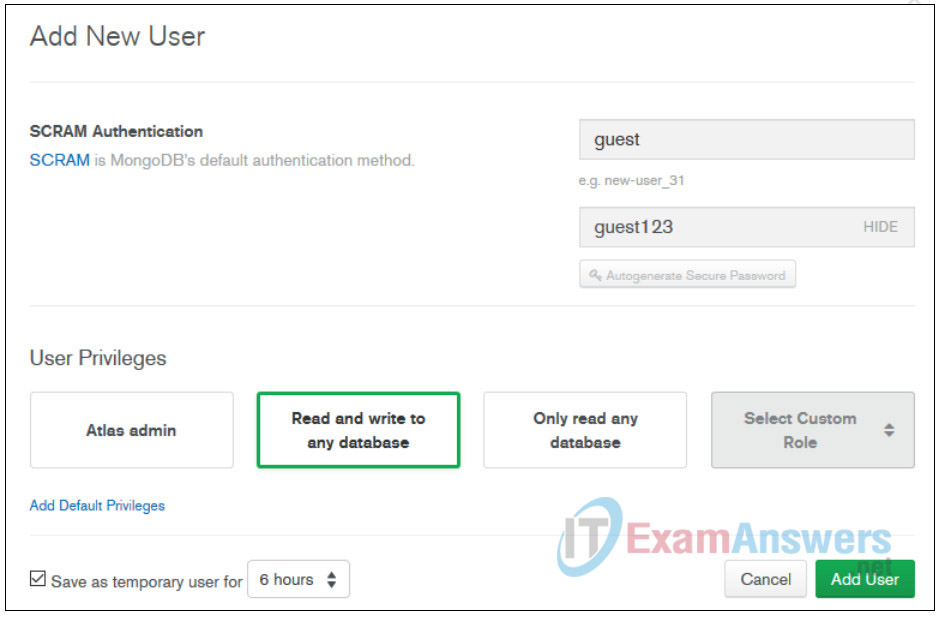
e. Select MongoDB Users, click + ADD NEW USER. Enter a username and password. Select Read and write to any database for the new user privileges. You can also save this user as a temporary user to the new cluster for a desired time period. Click Add User to contine. Note the user password for connection to the database later in this lab.
f. Select IP Whitelist, click + ADD IP ADDRESS. Click ALLOW ACCESS FROM ANYWHERE or enter specific IP addresses for access. You can also save this as a temporary whitelist for a desired time period. Click Confirm to continue.
Step 4: Connect to the Online Mongo Database
a. Navigate to the Overview tab. Click Connect to connect to your cluster. Click Connect Your Application as the connection method. Click Standard connection string and copy the URI connection string. Click Close after you have copied the URI connection string. Paste the URI into the MonogoURI variable in the code cell below.
b. Replace < PASSWORD > with the password for the indicated user . If you used any special characters in your password (%, @, and :), the password will need to be URL encoded. If you do not remember the password, you can reset the password.
Note: Search for an URL encoder if needed. A sample encoder for your reference: https://www.urlencoder.org/
#Paste the URI connection string and replace  with new user password

MongoURI="!!! Paste your URI connection string here !!!"
Step 5: Create Database, Collection, and Document
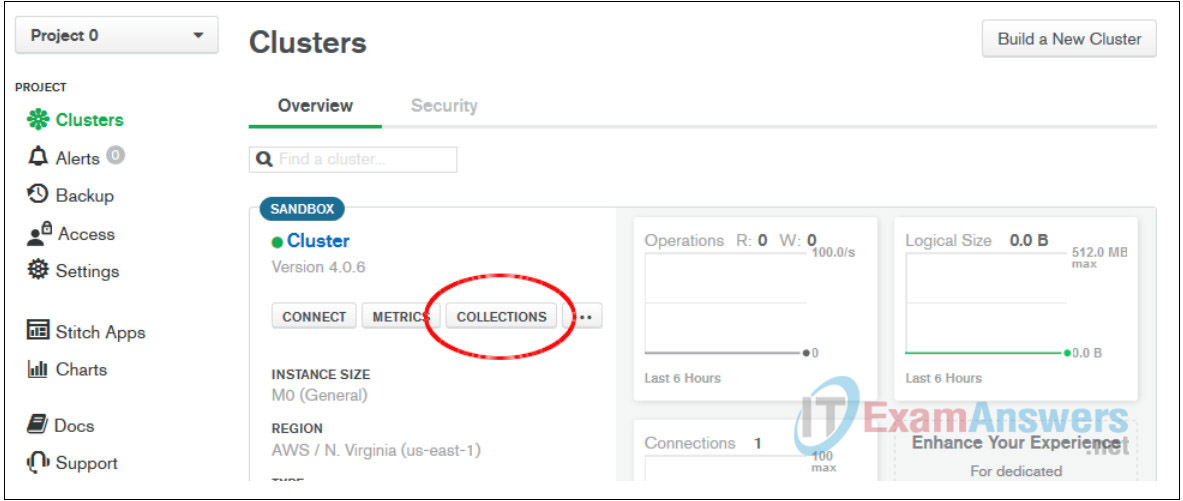
a. In the Clusters screen, select COLLECTIONS and click Create Database. Replace database and collection in the db_collection variable in the code cell below.
# CONNECT TO THE ONLINE MONGO DATABASE
client = MongoClient(MongoURI)

# LOAD THE COLLECTION OF "DOCUMENTS" (AKA. JSON FORMAT)
# Replace database with your database name
# Replace collection with your collection name

db_collection = client.database.collection
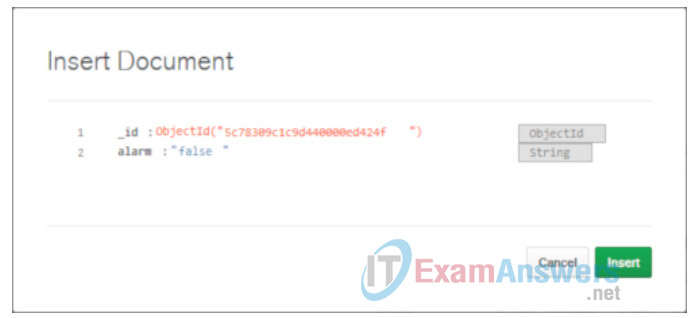
b. In the Collections tab, click + INSERT to create a new document. In the String field, enter alarm:”false”. Click Insert to continue.
Step 6: Display Current Alarm Status
The current alarm status should be the same input in the MongoDB database document.
print("\n\n ------ THE CURRENT STATUS -------")
# FIND THE FIRST MATCH
found=db_collection.find_one({"alarm": 'True'})
if found is None:
    alarm_status='False'
else:
    alarm_status=found['alarm']
print('Current State = ', alarm_status)
Step 7: Update the Alarm Status
The following cell is used to update the alarm status. Run this twice to return to the false state for the alarm.
The code in the cell will be used in the control board to update the alarm status.
# UPDATE THE DB HERE
# SET NEW SEARCH VARIABLE
if alarm_status == 'True':
    db_collection.replace_one({'alarm':'True'},{'alarm':'False'})
    new_find='False'
else:
    db_collection.replace_one({'alarm':'False'},{'alarm':'True'})
    new_find='True'

print('\n\n New Status')
pprint(db_collection.find_one())
print('\n\n ------ SET THE VARIABLE -------')

# RE-FIND THE FIRST MATCH USING THE new_find VARIABLE SET ABOVE
found=db_collection.find_one({"alarm": new_find})
alarm_status=found['alarm']
print('Sound the Alarm = ', alarm_status)
Task 2: Connect Electronic Circuits
Step 1: Connect external LEDs using a breadboard to the Raspberry Pi Emergency Board.
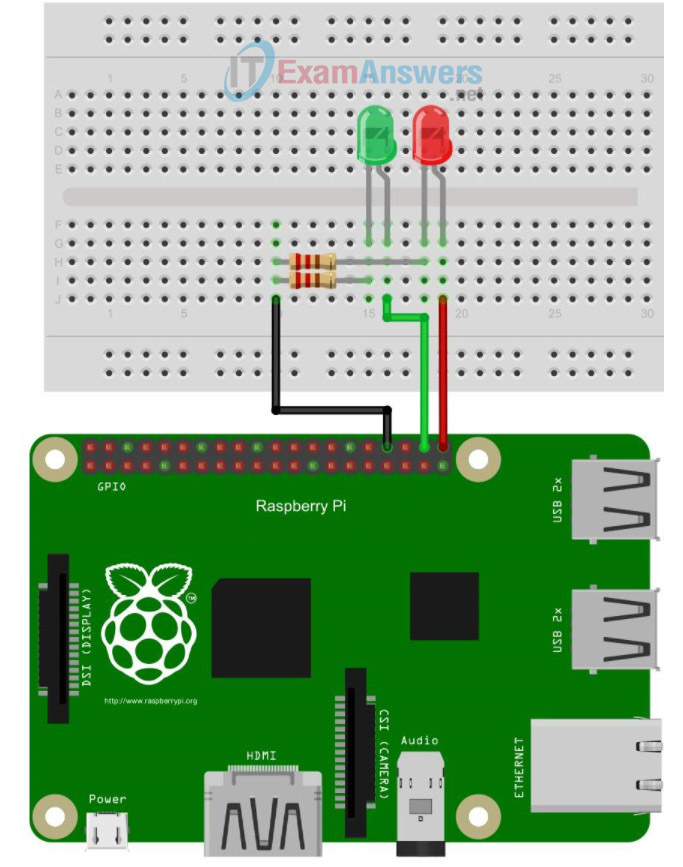
a. Using red and green color LEDs, resistors, jumper cables and a breadboard connect the Raspberry Pi that is to be used as the Emergency Board.
b. The logical schematic is outlined in the figure below. The anode leg of the red LED1 is to be connected to GPIO pin number 21 based on the BCM GPIO scheme (or pin number 40 based on the physical pin numbering scheme) of the Raspberry Pi version version 3, while the anode leg of the green LED2 is to be connected to the GPIO pin number 20 based on the BCM GPIO scheme (or pin number 38 based on the physical pin numbering scheme) of the Raspberry Pi version 3) .
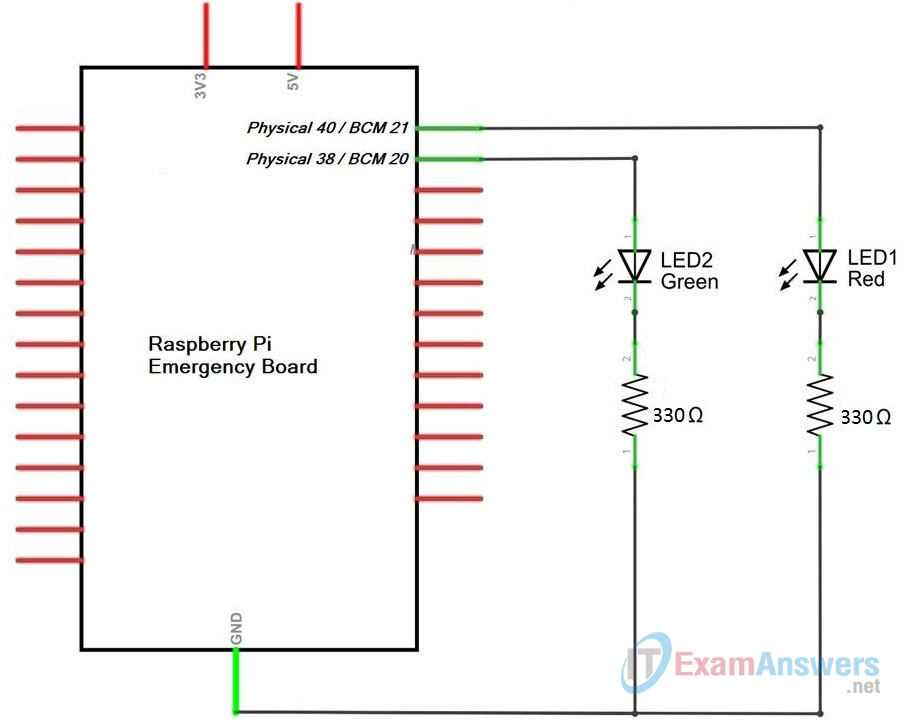
c. Connect the LEDs, two 330Ω resistors and jumper cables as shown on the physical diagram below to a breadboard and to the first Raspberry Pi. The physical connections are outlined in the figure below.
Step 2: Connect a Button Using a Breadboard to the Raspberry Pi Control Board
a. Using a push button, resistor, jumper cables and a breadboard connect the Raspberry Pi that is to be used as the Control Board.
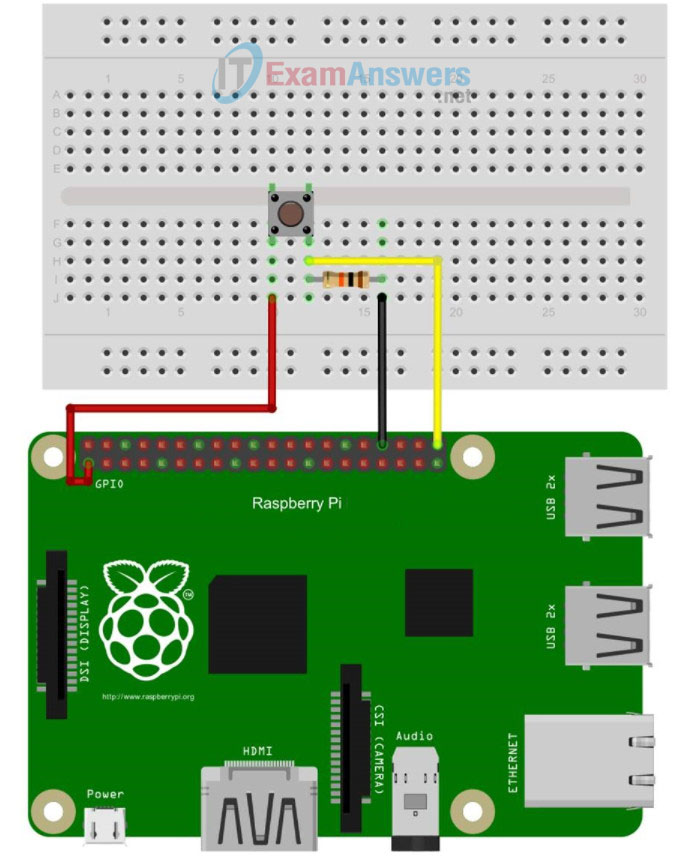
Note: The logical schematic is outlined in the figure below. The push button is connected to the input GPIO pin of the Raspberry Pi with a pull down resistor. This ensures that when the button is off, the GPIO pin is sensing a logical LOW state. Once the button is pressed and goes on, the current flows from the +3.3V pin directly to the input GPIO pin, thus sensing a logical HIGH state. The pull down leg of the push button S1 is to be connected to GPIO pin number 21 based on the BCM GPIO scheme (or pin number 40 based on the physical pin numbering scheme) of the Raspberry Pi version 3).

b. Connect the push button, a 10kΩ resistor and jumper cables as shown on the physical diagram below to a breadboard and to the second Raspberry Pi. The physical connections are outlined in the figure below.
Task 3: Software to Connect the Dots
Step 1: Import the Needed Python Modules
The RPi.GPIO Raspberry Pi Python’s module is used to interact with the physical GPIO pins of the Raspberry Pi. The RPi.GPIO module provides functions to set various PIN numbering schemes, input or output mode of the GPIO pins and functions to either read the current state of an input pin, or set the state of an output pin.
Most of the messages that are exchanged between the API client and API server have a special formating. Most common are XML and JSON. Webex Teams API uses JSON to encode messages. To work with JSON encoded data, in Python import the json module.
# Import the GPIO modules to control the GPIO pins of the Raspberry Pi
import RPi.GPIO as GPIO

# Import the json module to work with JSON encoded objects
import json

# Import the time module to control the timing of your application (e.g. add delay, etc.)
import time
Step 2: Emergency Board: Checking for Alarms
Note: Only run the code cells in this step on the Raspberry Pi board that functions as the emergency board.
a. Set the GPIO pin numbering scheme to BCM.
b. Set the pins with the LEDs to the OUTput mode.
# LED LIGHTS PIN NUMBERS (GPIO PIN using BCM scheme)
GPIO.setmode(GPIO.BCM)
GreenLEDPin = 20
RedLEDPin = 21
# SET PIN MODE TO SEND POWER OUT
GPIO.setup(GreenLEDPin, GPIO.OUT)
GPIO.setup(RedLEDPin, GPIO.OUT)
c. Execute the cell below to verify the LEDs are blinking and the GPIO access is working.
for i in range(2):
    print("ON")
    GPIO.output(GreenLEDPin, True) # True = set 3.3V on the pin
    GPIO.output(RedLEDPin, True) # True = set 3.3V on the pin
    time.sleep(1)
    print("OFF")
    GPIO.output(GreenLEDPin, False) # False = set 0V on the pin
    GPIO.output(RedLEDPin, False) # False = set 0V on the pin
    time.sleep(1)
print("Started the factory Emergency Shutdown system ...")

# LOOP FOREVER
while True:
# FIND THE FIRST MATCH
    found = db_collection.find_one({"alarm": 'True'})
    if found is None:
        alarm_status = 'False'
    else:
        alarm_status = found['alarm']
    if alarm_status == 'True':
        print("RUN!!! RUN!! RUN!!")
        GPIO.output(GreenLEDPin, False)
        GPIO.output(RedLEDPin, True)
    else:
        print("All Clear")
        GPIO.output(GreenLEDPin, True)
        GPIO.output(RedLEDPin, False)
    # wait one second before the next iteration
    time.sleep(1)
Step 3: Control Board: Controlling the Alarm States
Note: Only run the code cells in this step on the Raspberry Pi board that functions as the control board.
a. Execute the cell below to view the current alarm status.
# IF YOU ARE THE EMERGENCY SIGNAL SENDER
# AKA THE BUTTON PUSHER !!

print("\n\n ------ THE CURRENT DB STATUS -------")
# FIND THE FIRST MATCH
found = db_collection.find_one({"alarm": 'True'})
if found is None:
    alarm_status = 'False'
else:
    alarm_status = found['alarm']
print('STORED DB STATUS = ', alarm_status)
# END MONGO DB CONNECTION TEST
b. Set the GPIO pin numbering scheme to BCM.
c. Set the pin with the button to the input mode.
########################################################################
# RED PANIC EMERGENCY button PIN NUMBER (GPIO PIN using BCM scheme)
GPIO.setmode(GPIO.BCM)
buttonPin = 21

# SET PIN MODE TO READ INPUT
GPIO.setup(buttonPin, GPIO.IN)
c. Execute the cell below to verify the button and the GPIO access are working. Press and release the button to see the changes.
# READ THE VOLTAGE ON THE PIN
# POSITIVE VOLTAGE = TRUE BUTTON STATE = BUTTON IS CURRENTLY PRESSED
buttonState = previousItterationButtonState = GPIO.input(buttonPin)

print("Button state is: " + str(buttonState))
print("Try to press the button...")

push_count = 0
while True:
    buttonState = GPIO.input(buttonPin)
    # CHECK IF THE CURRENT STATE = THE PREVIOUS STATE
    if(buttonState != previousItterationButtonState):
        push_count = push_count + 1
        print("Button change. New state is: " + str(buttonState))
    # UPDATE CURRENT STATE
    previousItterationButtonState = buttonState
    if push_count >= 2:
        break
print("Exiting Loop, and ...")
d. Execute the cell below to start the Emergency Shutdown system on the control board. (Make sure the above code in Step 3c is not actively running before executing the code below.)
- The code will be running in a while loop until manually stoped or an error occurs.
- In each itteration of the loop, the state of the button is checked.
- If change is detected, the new button state representing the alarm state is sent to MongoDB database.
- Simultaneously with this, the other Raspberry Pi board that was setup as the emergecy board can check for the new alarm records on the MongoDB database and accordingly set the LEDs.
print("Press and hold the button to simulate an emergency alarm ...")
print("Started the factory Control system ...")

buttonState = previousItterationButtonState = GPIO.input(buttonPin)
while True:
    buttonState = GPIO.input(buttonPin)
    if(buttonState != previousItterationButtonState):
    # CONVERT BUTTON STATE TO BOOLEN VALUE (1=True, 0=False)
        alarmValue = True if buttonState == 1 else False
        print("Button change. New state is: " + str(buttonState) + " and alarm is: " + str(alarmValue))
        # UPDATE THE DB HERE
        if alarmValue == True:
            db_collection.replace_one({'alarm':'False'},{'alarm':'True'})
            print('Updating DB Status to True')
        else:
            db_collection.replace_one({'alarm':'True'},{'alarm':'False'})
            print('Updating DB Status to False')
        # UPDATE CURRENT STATE
        previousItterationButtonState = buttonState
Reflection
What are the geographical limitations regarding the placement of the control board and the emergency board?
