10.0. Introduction
10.0.1. Why should I take this module?
Welcome to Network Management!
Imagine that you are at the helm of a spaceship. There are many, many components that work together to move this ship. There are multiple systems to manage these components. To get where you are going you would need to have a full understanding of the components and the systems that manage them. You would probably appreciate any tools that would make managing your spaceship – while you are also flying it – simpler.
Like a complex spaceship, networks also need to be managed. Happily, there are many tools that are designed to make network management simpler. This module introduces you to several tools and protocols to help you manage your network – while your users are using it. It also includes many Packet Tracer activities and Hands On Labs to test your skills. These are the tools of great network administrators, so you will definitely want to get started!
10.0.2. What will I learn to do in this module?
Module Title: Network Management
Module Objective: Implement protocols to manage the network.
| Topic Title | Topic Objective |
|---|---|
| Device Discovery with CDP | Use CDP to map a network topology. |
| Device Discovery with LLDP | Use LLDP to map a network topology. |
| NTP | Implement NTP between an NTP client and NTP server. |
| SNMP | Explain how SNMP operates. |
| Syslog | Explain syslog operation. |
| Router and Switch File Maintenance | Use commands to back up and restore an IOS configuration file. |
| IOS Image Management | Implement protocols to manage the network. |
10.1. Device Discovery with CDP
10.1.1. CDP Overview
The first thing you want to know about your network is what is in it? Where are these components? How are they connected? Basically, you need a map. This topic explains how you can use Cisco Discovery Protocol (CDP) to create a map of your network.
CDP is a Cisco proprietary Layer 2 protocol that is used to gather information about Cisco devices which share the same data link. CDP is media and protocol independent and runs on all Cisco devices, such as routers, switches, and access servers.
The device sends periodic CDP advertisements to connected devices, as shown in the figure.

These advertisements share information about the type of device that is discovered, the name of the devices, and the number and type of the interfaces.
Because most network devices are connected to other devices, CDP can assist in network design decisions, troubleshooting, and making changes to equipment. CDP can also be used as a network discovery tool to determine the information about the neighboring devices. This information gathered from CDP can help build a logical topology of a network when documentation is missing or lacking in detail.
10.1.2. Configure and Verify CDP
For Cisco devices, CDP is enabled by default. For security reasons, it may be desirable to disable CDP on a network device globally, or per interface. With CDP, an attacker can gather valuable insight about the network layout, such as IP addresses, IOS versions, and types of devices.
To verify the status of CDP and display information about CDP, enter the show cdp command, as displayed in the example.
Router# show cdp
Global CDP information:
      Sending CDP packets every 60 seconds
      Sending a holdtime value of 180 seconds
      Sending CDPv2 advertisements is enabled
To enable CDP globally for all the supported interfaces on the device, enter cdp run in the global configuration mode. CDP can be disabled for all the interfaces on the device with the no cdp run command in the global configuration mode.
Router(config)# no cdp run
Router(config) # exit
Router# show cdp
CDP is not enabled
Router# configure terminal
Router(config) # cdp run
To disable CDP on a specific interface, such as the interface facing an ISP, enter no cdp enable in the interface configuration mode. CDP is still enabled on the device; however, no more CDP advertisements will be sent out that interface. To enable CDP on the specific interface again, enter cdp enable, as shown in the example.
Switch(config) # interface gigabitethernet 0/0/1
Switch(config-if)# cdp enable
To verify the status of CDP and display a list of neighbors, use the show cdp neighbors command in the privileged EXEC mode. The show cdp neighbors command displays important information about the CDP neighbors. Currently, this device does not have any neighbors because it is not physically connected to any devices, as indicated by the results of the show cdp neighbors command displayed in the example.
Router# show cdp neighbors
Capability Codes: R - Router, T - Trans Bridge, B - Source Route Bridge
                  S - Switch, H - Host, I - IGMP, r - Repeater, P - Phone,
                  D - Remote, C - CVTA, M - Two-port Mac Relay

Device ID        Local Intrfce     Holdtme    Capability  Platform  Port ID

Total cdp entries displayed : 0
Use the show cdp interface command to display the interfaces that are CDP-enabled on a device. The status of each interface is also displayed. The figure shows that five interfaces are CDP-enabled on the router with only one active connection to another device.
Router# show cdp interface
GigabitEthernet0/0/0 is administratively down, line protocol is down
  Encapsulation ARPA
  Sending CDP packets every 60 seconds
  Holdtime is 180 seconds
GigabitEthernet0/0/1 is up, line protocol is up
  Encapsulation ARPA
  Sending CDP packets every 60 seconds
  Holdtime is 180 seconds
GigabitEthernet0/0/2 is down, line protocol is down
  Encapsulation ARPA
  Sending CDP packets every 60 seconds
  Holdtime is 180 seconds
Serial0/1/0 is administratively down, line protocol is down
  Encapsulation HDLC
  Sending CDP packets every 60 seconds
  Holdtime is 180 seconds
Serial0/1/1 is administratively down, line protocol is down
  Encapsulation HDLC
  Sending CDP packets every 60 seconds
  Holdtime is 180 seconds
GigabitEthernet0 is down, line protocol is down
  Encapsulation ARPA
  Sending CDP packets every 60 seconds
  Holdtime is 180 seconds
 cdp enabled interfaces : 6
 interfaces up          : 1
 interfaces down        : 5
10.1.3. Discover Devices by Using CDP
Consider the lack of documentation in the topology shown in the figure. The network administrator only knows that R1 is connected to another device.

With CDP enabled on the network, the show cdp neighbors command can be used to determine the network layout, as shown in the output.
R1# show cdp neighbors
Capability Codes: R - Router, T - Trans Bridge, B - Source Route Bridge
                  S - Switch, H - Host, I - IGMP, r - Repeater, P - Phone,
                  D - Remote, C - CVTA, M - Two-port Mac Relay

Device ID        Local Intrfce     Holdtme    Capability  Platform  Port ID
S1               Gig 0/0/1           179         S I      WS-C3560- Fas 0/5
No information is available regarding the rest of the network. The show cdp neighbors command provides helpful information about each CDP neighbor device, including the following:
- Device identifiers – This is the host name of the neighbor device (S1).
- Port identifier – This is the name of the local and remote port (G0/0/1 and F0/5, respectively).
- Capabilities list – This shows whether the device is a router or a switch (S for switch; I for IGMP is beyond scope for this course)
- Platform – This is the hardware platform of the device (WS-C3560 for Cisco 3560 switch).
The output shows that there is another Cisco device, S1, connected to the G0/0/1 interface on R1. Furthermore, S1 is connected through its F0/5, as shown in the updated topology.
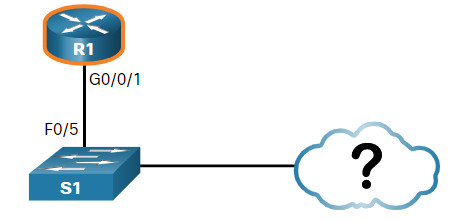
The network administrator uses show cdp neighbors detail to discover the IP address for S1. As displayed in the output, the address for S1 is 192.168.1.2.
R1# show cdp neighbors detail
-------------------------
Device ID: S1
Entry address(es):
  IP address: 192.168.1.2
Platform: cisco WS-C3560-24TS,  Capabilities: Switch IGMP
Interface: GigabitEthernet0/0/1,  Port ID (outgoing port): FastEthernet0/5
Holdtime : 136 sec

Version :
Cisco IOS Software, C3560 Software (C3560-LANBASEK9-M), Version 15.0(2)SE7, R
RELEASE SOFTWARE (fc1)
Technical Support: http://www.cisco.com/techsupport
Copyright (c) 1986-2014 by Cisco Systems, Inc.
Compiled Thu 23-Oct-14 14:49 by prod_rel_team

advertisement version: 2
Protocol Hello:  OUI=0x00000C, Protocol ID=0x0112; payload len=27,
value=00000000FFFFFFFF010221FF000000000000002291210380FF0000
VTP Management Domain: ''
Native VLAN: 1
Duplex: full
Management address(es):
  IP address: 192.168.1.2

Total cdp entries displayed : 1
By accessing S1 either remotely through SSH, or physically through the console port, the network administrator can determine what other devices are connected to S1, as displayed in the output of the show cdp neighbors in the figure.
S1# show cdp neighbors
Capability Codes: R - Router, T - Trans Bridge, B - Source Route Bridge
                  S - Switch, H - Host, I - IGMP, r - Repeater, P - Phone,
                  D - Remote, C - CVTA, M - Two-port Mac Relay
Device ID        Local Intrfce     Holdtme    Capability  Platform  Port ID
S2               Fas 0/1           150              S I   WS-C2960- Fas 0/1
R1               Fas 0/5           179             R S I  ISR4331/K Gig 0/0/1
Another switch, S2, is revealed in the output. S2 is using F0/1 to connect to the F0/1 interface on S1, as shown in the figure.
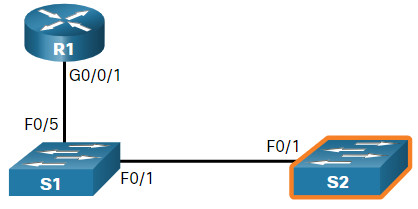
Again, the network administrator can use show cdp neighbors detail to discover the IP address for S2, and then remotely access it. After a successful login, the network administrator uses the show cdp neighbors command to discover if there are more devices.
S2# show cdp neighbors
Capability Codes: R - Router, T - Trans Bridge, B - Source Route Bridge
                  S - Switch, H - Host, I - IGMP, r - Repeater, P - Phone,
                  D - Remote, C - CVTA, M - Two-port Mac Relay
Device ID        Local Intrfce     Holdtme    Capability  Platform  Port ID
S1               Fas 0/1           141              S I   WS-C3560- Fas 0/1
The only device connected to S2 is S1. Therefore, there are no more devices to discover in the topology. The network administrator can now update the documentation to reflect the discovered devices.
10.1.4. Syntax Checker – Configure and Verify CDP
Practice configuring and verifying CDP.
Display the status of CDP on R1.

R1#show cdp
% CDP is not enabled
Enter Global Configuration mode to configure the following:
- Enable CDP globally on R1.
- Disable CDP on interface S0/0/0. Use s0/0/0 as the interface designation.
- Use end command to exit Global Configuration mode.
R1#configure terminal
R1(config)#cdp run
R1(config)#interface s0/0/0
R1(config-if)#no cdp enable
R1(config-if)#end
\*Oct  2 15:43:46.288: %SYS-5-CONFIG\_I: Configured from console by console
Display the list of CDP neighbors on R1.

R1#show cdp neighbors
Capability Codes: R - Router, T - Trans Bridge, B - Source Route Bridge
                  S - Switch, H - Host, I - IGMP, r - Repeater, P - Phone,
                  D - Remote, C - CVTA, M - Two-port Mac Relay
Device ID        Local Intrfce     Holdtme    Capability  Platform  Port ID
S1               Gig 0/0/1         179              S I   WS-C3560- Fas 0/5
Display more details from the list of CDP neighbors on R1.

R1#show cdp neighbors detail
\-------------------------
Device ID: S1
Entry address(es):
Platform: cisco WS-C3560-24TS,  Capabilities: Switch IGMP
Interface: GigabitEthernet0/0/1,  Port ID (outgoing port): FastEthernet0/5
Holdtime : 174 sec

Version :
Cisco IOS Software, C3560 Software (C3560-IPSERVICESK9-M), Version 15.0(2)SE7, RELEASE SOFTWARE (fc1)
Technical Support: http://www.cisco.com/techsupport
Copyright (c) 1986-2014 by Cisco Systems, Inc.
Compiled Thu 23-Oct-14 14:13 by prod\_rel\_team

advertisement version: 2
Protocol Hello:  OUI=0x00000C, Protocol ID=0x0112; payload len=27, value=00000000FFFFFFFF010221FF000000000000FCFBFB957300FF0000
VTP Management Domain: ''
Native VLAN: 1
Duplex: full

Total cdp entries displayed : 1
You have successfully configured and verified CDP on the router.
10.1.5. Packet Tracer – Use CDP to Map a Network
A senior network administrator requires you to map the Remote Branch Office network and discover the name of a recently installed switch that still needs an IPv4 address to be configured. Your task is to create a map of the branch office network. To map the network, you will use SSH for remote access and the Cisco Discovery Protocol (CDP) to discover information about neighboring network devices, like routers and switches.
10.1.5 Packet Tracer – Use CDP to Map a Network
10.2. Device Discovery with LLDP
10.2.1. LLDP Overview
The Link Layer Discovery Protocol (LLDP) does the same thing as CDP, but it is not specific to Cisco devices. As a bonus, you can still use it if you have Cisco devices. One way or another, you will get your network map.
LLDP is a vendor-neutral neighbor discovery protocol similar to CDP. LLDP works with network devices, such as routers, switches, and wireless LAN access points. This protocol advertises its identity and capabilities to other devices and receives the information from a physically-connected Layer 2 device.

10.2.2. Configure and Verify LLDP
Depending on the device, LLDP may be enabled by default. To enable LLDP globally on a Cisco network device, enter the lldp run command in the global configuration mode. To disable LLDP, enter the no lldp run command in the global configuration mode.
Similar to CDP, LLDP can be configured on specific interfaces. However, LLDP must be configured separately to transmit and receive LLDP packets, as shown in the figure.
To verify LLDP has been enabled on the device, enter the show lldp command in privileged EXEC mode.
Switch# conf t
Enter configuration commands, one per line.  End with CNTL/Z.
Switch(config)# lldp run
Switch(config)# interface gigabitethernet 0/1
Switch(config-if)# lldp transmit
Switch(config-if)# lldp receive
Switch(config-if)# end
Switch# show lldp
Global LLDP Information:
    Status: ACTIVE
    LLDP advertisements are sent every 30 seconds
    LLDP hold time advertised is 120 seconds
    LLDP interface reinitialisation delay is 2 seconds
10.2.3. Discover Devices by Using LLDP
Consider the lack of documentation in the topology shown in the figure. The network administrator only knows that S1 is connected to two devices.

With LLDP enabled, device neighbors can be discovered by using the show lldp neighbors command, as displayed in the output.
S1# show lldp neighbors
Capability codes:
    (R) Router, (B) Bridge, (T) Telephone, (C) DOCSIS Cable Device
    (W) WLAN Access Point, (P) Repeater, (S) Station, (O) Other
Device ID           Local Intf     Hold-time  Capability      Port ID
R1                  Fa0/5          117        R               Gi0/0/1
S2                  Fa0/1          112        B               Fa0/1
Total entries displayed: 2
The network administrator discovers that S1 has a router and a switch as a neighbors. For this output, the letter B for bridge also means switch.
From the results of show lldp neighbors, a topology from S1 can be constructed, as displayed in the figure.

When more details about the neighbors are needed, the show lldp neighbors detail command can provide information, such as the neighbor IOS version, IP address, and device capability.
S1# show lldp neighbors detail
------------------------------------------------
Chassis id: 848a.8d44.49b0
Port id: Gi0/0/1
Port Description: GigabitEthernet0/0/1
System Name: R1

System Description:
Cisco IOS Software [Fuji], ISR Software (X86_64_LINUX_IOSD-UNIVERSALK9-M), Version 16.9.4, RELEASE SOFTWARE (fc2)
Technical Support: http://www.cisco.com/techsupport
Copyright (c) 1986-2019 by Cisco Systems, Inc.
Compiled Thu 22-Aug-19 18:09 by mcpre

Time remaining: 111 seconds
System Capabilities: B,R
Enabled Capabilities: R
Management Addresses - not advertised
Auto Negotiation - not supported
Physical media capabilities - not advertised
Media Attachment Unit type - not advertised
Vlan ID: - not advertised

------------------------------------------------
Chassis id: 0025.83e6.4b00
Port id: Fa0/1
Port Description: FastEthernet0/1
System Name: S2

System Description:
Cisco IOS Software, C2960 Software (C2960-LANBASEK9-M), Version 15.0(2)SE4, RELEASE SOFTWARE (fc1)
Technical Support: http://www.cisco.com/techsupport
Copyright (c) 1986-2013 by Cisco Systems, Inc.
Compiled Wed 26-Jun-13 02:49 by prod_rel_team

Time remaining: 107 seconds
System Capabilities: B
Enabled Capabilities: B
Management Addresses - not advertised
Auto Negotiation - supported, enabled
Physical media capabilities:
    100base-TX(FD)
    100base-TX(HD)
    10base-T(FD)
    10base-T(HD)
Media Attachment Unit type: 16
Vlan ID: 1

Total entries displayed: 2
10.2.4. Syntax Checker – Configure and Verify LLDP
Practice configuring and verifying LLDP.
Complete the following steps to configure LLDP on R1:
- Enter global configuration mode and enable LLDP globally.
- Enter interface configuration mode for g0/0/0. Use g0/0/0 as the interface designation.
- Disable the sending of LLDP messages on the interface.
- Disable the receiving of LLDP messages on the interface.
- Use the end command to return to global configuration mode.
R1#configure terminal
R1(config)#lldp run
R1(config)#interface g0/0/0
R1(config-if)#no lldp transmit
R1(config-if)#no lldp receive
R1(config-if)#end
\*Oct  2 16:19:16.167: %SYS-5-CONFIG\_I: Configured from console by console
You are now logged into S1. Display the list of LLDP neighbors.

S1#show lldp neighbors
capability codes:
    (R) Router, (B) Bridge, (T) Telephone, (C) DOCSIS Cable Device
    (W) WLAN Access Point, (P) Repeater, (S) Station, (O) Other
Device ID           Local Intf     Hold-time  Capability      Port ID
R1                  Fa0/5          115        R               Gi0/0/1
Total entries displayed: 1
Display more details from the list of LLDP neighbors on S1.

S1#show lldp neighbors detail
\------------------------------------------------
Chassis id: 848a.8d44.49b0
Port id: Gi0/0/1
Port Description: GigabitEthernet0/0/1
System Name: R1

System Description:
Cisco IOS Software \[Fuji\], ISR Software (X86\_64\_LINUX\_IOSD-UNIVERSALK9-M), Version 16.9.4, RELEASE SOFTWARE (fc2)
Technical Support: http://www.cisco.com/techsupport
Copyright (c) 1986-2019 by Cisco Systems, Inc.
Compiled Thu 22-Aug-19 18:09 by mcpre

Time remaining: 114 seconds
System Capabilities: B,R
Enabled Capabilities: R
Management Addresses - not advertised
Auto Negotiation - not supported
Physical media capabilities - not advertised
Media Attachment Unit type - not advertised
Vlan ID: - not advertised

Total entries displayed: 1
You have successfully configured and verified LLDP on the router.
10.2.6. Packet Tracer – Use LLDP to Map a Network
In this Packet Tracer activity, you will complete the following objectives:
- Build the Network and Configure Basic Device Settings
- Network Discovery with CDP
- Network Discovery with LLDP
10.2.6 Packet Tracer – Use LLDP to Map a Network
10.3. NTP
10.3.1. Time and Calendar Services
Before you get really deep into network management, the one thing that will help keep you on track is ensuring that all of your components are set to the same time and date.
The software clock on a router or switch starts when the system boots. It is the primary source of time for the system. It is important to synchronize the time across all devices on the network because all aspects of managing, securing, troubleshooting, and planning networks require accurate timestamping. When the time is not synchronized between devices, it will be impossible to determine the order of the events and the cause of an event.
Typically, the date and time settings on a router or switch can be set by using one of two methods You can manually configure the date and time, as shown in the example, or configure the Network Time Protocol (NTP).
R1# clock set 20:36:00 nov 15 2019
R1#
*Nov 15 20:36:00.000: %SYS-6-CLOCKUPDATE: System clock has been
updated from 21:32:31 UTC Fri Nov 15 2019 to 20:36:00 UTC Fri Nov 15
2019, configured from console by console.
As a network grows, it becomes difficult to ensure that all infrastructure devices are operating with synchronized time. Even in a smaller network environment, the manual method is not ideal. If a router reboots, how will it get an accurate date and timestamp?
A better solution is to configure the NTP on the network. This protocol allows routers on the network to synchronize their time settings with an NTP server. A group of NTP clients that obtain time and date information from a single source have more consistent time settings. When NTP is implemented in the network, it can be set up to synchronize to a private master clock, or it can synchronize to a publicly available NTP server on the internet.
NTP uses UDP port 123 and is documented in RFC 1305.
10.3.2. NTP Operation
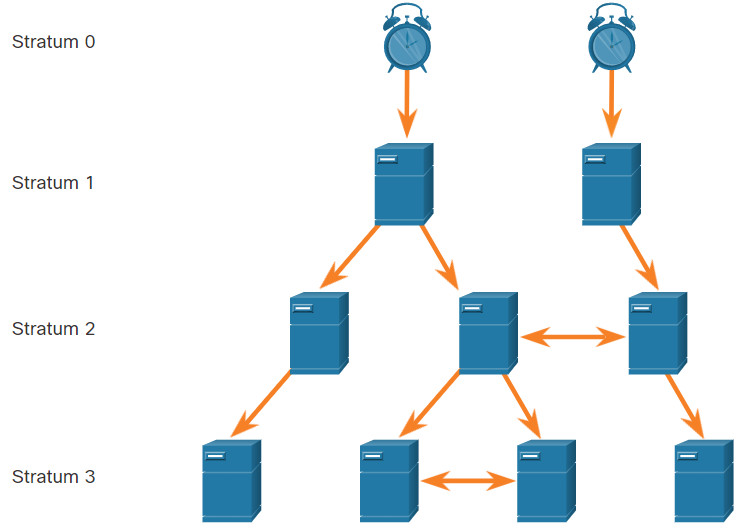
NTP networks use a hierarchical system of time sources. Each level in this hierarchical system is called a stratum. The stratum level is defined as the number of hop counts from the authoritative source. The synchronized time is distributed across the network by using NTP. The figure displays a sample NTP network.
NTP servers are arranged in three levels showing the three strata. Stratum 1 is connected to Stratum 0 clocks.
Stratum 0
An NTP network gets the time from authoritative time sources. These authoritative time sources, also referred to as stratum 0 devices, are high-precision timekeeping devices assumed to be accurate and with little or no delay associated with them. Stratum 0 devices are represented by the clock in the figure.
Stratum 1
The stratum 1 devices are directly connected to the authoritative time sources. They act as the primary network time standard.
Stratum 2 and Lower
The stratum 2 servers are connected to stratum 1 devices through network connections. Stratum 2 devices, such as NTP clients, synchronize their time by using the NTP packets from stratum 1 servers. They could also act as servers for stratum 3 devices.
Smaller stratum numbers indicate that the server is closer to the authorized time source than larger stratum numbers. The larger the stratum number, the lower the stratum level. The max hop count is 15. Stratum 16, the lowest stratum level, indicates that a device is unsynchronized. Time servers on the same stratum level can be configured to act as a peer with other time servers on the same stratum level for backup or verification of time.
10.3.3. Configure and Verify NTP
The figure shows the topology used to demonstrate NTP configuration and verification.

Before NTP is configured on the network, the show clock command displays the current time on the software clock, as shown in the example. With the detail option, notice that the time source is user configuration. That means the time was manually configured with the clock command.
R1# show clock detail
20:55:10.207 UTC Fri Nov 15 2019
Time source is user configuration
The ntp server ip-address command is issued in global configuration mode to configure 209.165.200.225 as the NTP server for R1. To verify the time source is set to NTP, use the show clock detail command. Notice that now the time source is NTP.
R1(config)# ntp server 209.165.200.225
R1(config)# end
R1# show clock detail
21:01:34.563 UTC Fri Nov 15 2019
Time source is NTP
In the next example, the show ntp associations and show ntp status commands are used to verify that R1 is synchronized with the NTP server at 209.165.200.225. Notice that R1 is synchronized with a stratum 1 NTP server at 209.165.200.225, which is synchronized with a GPS clock. The show ntp status command displays that R1 is now a stratum 2 device that is synchronized with the NTP server at 209.165.220.225.
Note: The highlight st stands for stratum.
R1# show ntp associations

  address         ref clock       st   when   poll reach  delay  offset   disp
*~209.165.200.225 .GPS.           1     61     64   377  0.481   7.480  4.261
 * sys.peer, # selected, + candidate, - outlyer, x falseticker, ~ configured

R1# show ntp status
Clock is synchronized, stratum 2, reference is 209.165.200.225
nominal freq is 250.0000 Hz, actual freq is 249.9995 Hz, precision is 2**19
ntp uptime is 589900 (1/100 of seconds), resolution is 4016
reference time is DA088DD3.C4E659D3 (13:21:23.769 PST Fri Nov 15 2019)
clock offset is 7.0883 msec, root delay is 99.77 msec
root dispersion is 13.43 msec, peer dispersion is 2.48 msec
loopfilter state is 'CTRL' (Normal Controlled Loop), drift is 0.000001803 s/s
system poll interval is 64, last update was 169 sec ago.
Next, the clock on S1 is configured to synchronize to R1 with the ntp server command and then the configuration is verified with the show ntp associations command, as displayed.
S1(config)# ntp server 192.168.1.1
S1(config)# end
S1# show ntp associations

  address         ref clock       st   when   poll reach  delay  offset   disp
*~192.168.1.1     209.165.200.225  2     12     64   377  1.066  13.616  3.840
 * sys.peer, # selected, + candidate, - outlyer, x falseticker, ~ configured
Output from the show ntp associations command verifies that the clock on S1 is now synchronized with R1 at 192.168.1.1 via NTP. R1 is a stratum 2 device and NTP server to S1. Now S1 is a stratum 3 device that can provide NTP service to other devices in the network, such as end devices.
S1# show ntp status
Clock is synchronized, stratum 3, reference is 192.168.1.1
nominal freq is 119.2092 Hz, actual freq is 119.2088 Hz, precision is 2**17
reference time is DA08904B.3269C655 (13:31:55.196 PST Tue Nov 15 2019)
clock offset is 18.7764 msec, root delay is 102.42 msec
root dispersion is 38.03 msec, peer dispersion is 3.74 msec
loopfilter state is 'CTRL' (Normal Controlled Loop), drift is 0.000003925 s/s
system poll interval is 128, last update was 178 sec ago.
10.3.4. Packet Tracer – Configure and Verify NTP
NTP synchronizes the time of day among a set of distributed time servers and clients. While there are a number of applications that require synchronized time, this lab will focus on the need to correlate events when listed in the system logs and other time-specific events from multiple network devices.
10.3.4 Packet Tracer – Configure and Verify NTP
10.4. SNMP
10.4.1. Introduction to SNMP
Now that your network is mapped and all of your components are using the same clock, it is time to look at how you can manage your network by using Simple Network Management Protocol (SNMP).
SNMP was developed to allow administrators to manage nodes such as servers, workstations, routers, switches, and security appliances, on an IP network. It enables network administrators to monitor and manage network performance, find and solve network problems, and plan for network growth.
SNMP is an application layer protocol that provides a message format for communication between managers and agents. The SNMP system consists of three elements:
- SNMP manager
- SNMP agents (managed node)
- Management Information Base (MIB)
To configure SNMP on a networking device, it is first necessary to define the relationship between the manager and the agent.
The SNMP manager is part of a network management system (NMS). The SNMP manager runs SNMP management software. As shown in the figure, the SNMP manager can collect information from an SNMP agent by using the “get” action and can change configurations on an agent by using the “set” action. In addition, SNMP agents can forward information directly to a network manager by using “traps”.
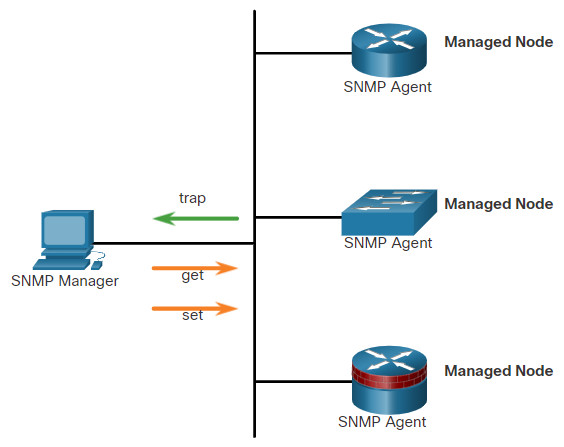
The SNMP agent and MIB reside on SNMP client devices. Network devices that must be managed, such as switches, routers, servers, firewalls, and workstations, are equipped with an SMNP agent software module. MIBs store data about the device and operational statistics and are meant to be available to authenticated remote users. The SNMP agent is responsible for providing access to the local MIB.
SNMP defines how management information is exchanged between network management applications and management agents. The SNMP manager polls the agents and queries the MIB for SNMP agents on UDP port 161. SNMP agents send any SNMP traps to the SNMP manager on UDP port 162.
10.4.2. SNMP Operation
SNMP agents that reside on managed devices collect and store information about the device and its operation. This information is stored by the agent locally in the MIB. The SNMP manager then uses the SNMP agent to access information within the MIB.
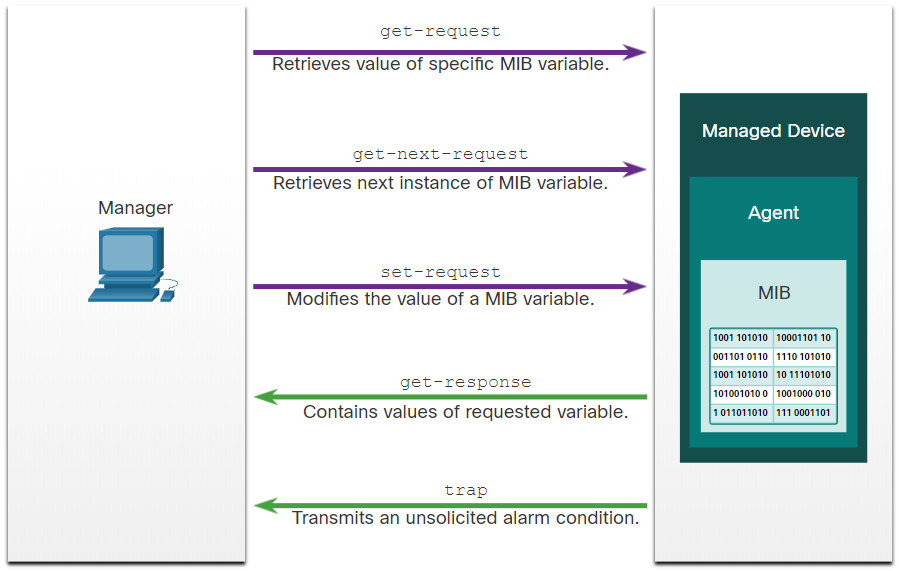
There are two primary SNMP manager requests, get and set. A get request is used by the NMS to query the device for data. A set request is used by the NMS to change configuration variables in the agent device. A set request can also initiate actions within a device. For example, a set can cause a router to reboot, send a configuration file, or receive a configuration file. The SNMP manager uses the get and set actions to perform the operations described in the table.
| Operation | Description |
|---|---|
get-request |
Retrieves a value from a specific variable. |
get-next-request |
Retrieves a value from a variable within a table; the SNMP manager does not need to know the exact variable name. A sequential search is performed to find the needed variable from within a table. |
get-bulk-request |
Retrieves large blocks of data, such as multiple rows in a table, that would otherwise require the transmission of many small blocks of data. (Only works with SNMPv2 or later.) |
get-response |
Replies to a get-request, get-next-request, and set-request sent by an NMS. |
set-request |
Stores a value in a specific variable. |
The SNMP agent responds to SNMP manager requests as follows:
- Get an MIB variable – The SNMP agent performs this function in response to a GetRequest-PDU from the network manager. The agent retrieves the value of the requested MIB variable and responds to the network manager with that value.
- Set an MIB variable – The SNMP agent performs this function in response to a SetRequest-PDU from the network manager. The SNMP agent changes the value of the MIB variable to the value specified by the network manager. An SNMP agent reply to a set request includes the new settings in the device.
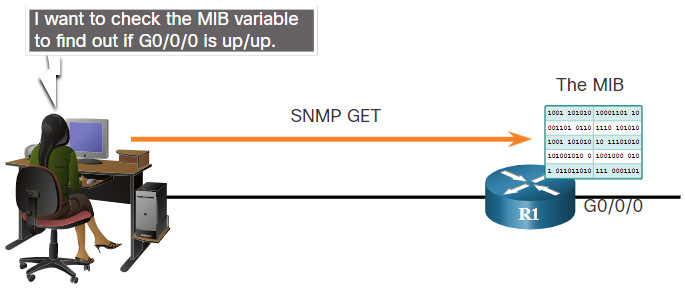
The figure illustrates the use of an SNMP GetRequest to determine if interface G0/0/0 is up/up.
10.4.3. SNMP Agent Traps
An NMS periodically polls the SNMP agents that are residing on managed devices using the get request. The NMS queries the device for data. Using this process, a network management application can collect information to monitor traffic loads and to verify the device configurations of managed devices. The information can be displayed via a GUI on the NMS. Averages, minimums, or maximums can be calculated. The data can be graphed, or thresholds can be set to trigger a notification process when the thresholds are exceeded. For example, an NMS can monitor CPU utilization of a Cisco router. The SNMP manager samples the value periodically and presents this information in a graph for the network administrator to use in creating a baseline, creating a report, or viewing real time information.
Periodic SNMP polling does have disadvantages. First, there is a delay between the time that an event occurs and the time that it is noticed (via polling) by the NMS. Second, there is a trade-off between polling frequency and bandwidth usage.
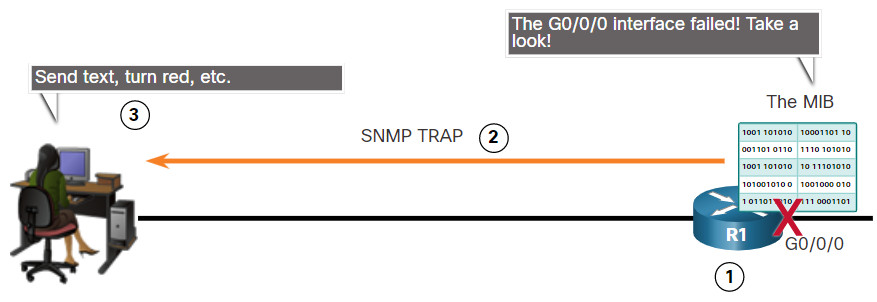
To mitigate these disadvantages, it is possible for SNMP agents to generate and send traps to inform the NMS immediately of certain events. Traps are unsolicited messages alerting the SNMP manager to a condition or event on the network. Examples of trap conditions include, but are not limited to, improper user authentication, restarts, link status (up or down), MAC address tracking, closing of a TCP connection, loss of connection to a neighbor, or other significant events. Trap-directed notifications reduce network and agent resources by eliminating the need for some of SNMP polling requests.
The figure illustrates the use of an SNMP trap to alert the network administrator that interface G0/0/0 has failed. The NMS software can send the network administrator a text message, pop up a window on the NMS software, or turn the router icon red in the NMS GUI.
The exchange of all SNMP messages is illustrated in the figure.
10.4.4. SNMP Versions
There are several versions of SNMP:
- SNMPv1 – This is the Simple Network Management Protocol, a Full Internet Standard, that is defined in RFC 1157.
- SNMPv2c – This is defined in RFCs 1901 to 1908. It uses a community-string-based Administrative Framework.
- SNMPv3 – This is an interoperable standards-based protocol originally defined in RFCs 2273 to 2275. It provides secure access to devices by authenticating and encrypting packets over the network. It includes these security features: message integrity to ensure that a packet was not tampered with in transit, authentication to determine that the message is from a valid source, and encryption to prevent the contents of a message from being read by an unauthorized source.
All versions use SNMP managers, agents, and MIBs. Cisco IOS software supports the above three versions. Version 1 is a legacy solution and is not often encountered in networks today; therefore, this course focuses on versions 2c and 3.
Both SNMPv1 and SNMPv2c use a community-based form of security. The community of managers that is able to access the MIB of the agent is defined by a community string.
Unlike SNMPv1, SNMPv2c includes a bulk retrieval mechanism and more detailed error message reporting to management stations. The bulk retrieval mechanism retrieves tables and large quantities of information, minimizing the number of round-trips required. The SNMPv2c improved error-handling includes expanded error codes that distinguish different kinds of error conditions. These conditions are reported through a single error code in SNMPv1. Error return codes in SNMPv2c include the error type.
Note: SNMPv1 and SNMPv2c offer minimal security features. Specifically, SNMPv1 and SNMPv2c can neither authenticate the source of a management message nor provide encryption. SNMPv3 is most currently described in RFCs 3410 to 3415. It adds methods to ensure the secure transmission of critical data between managed devices.
SNMPv3 provides for both security models and security levels. A security model is an authentication strategy set up for a user and the group within which the user resides. A security level is the permitted level of security within a security model. A combination of the security level and the security model determine which security mechanism is used when handling an SNMP packet. Available security models are SNMPv1, SNMPv2c, and SNMPv3.
The table identifies the characteristics of the different combinations of security models and levels.
Click each button for more information about the characteristics of the different combinations of security models and levels.
A network administrator must configure the SNMP agent to use the SNMP version supported by the management station. Because an agent can communicate with multiple SNMP managers, it is possible to configure the software to support communications by using SNMPv1, SNMPv2c, or SNMPv3.
10.4.6. Community Strings
For SNMP to operate, the NMS must have access to the MIB. To ensure that access requests are valid, some form of authentication must be in place.
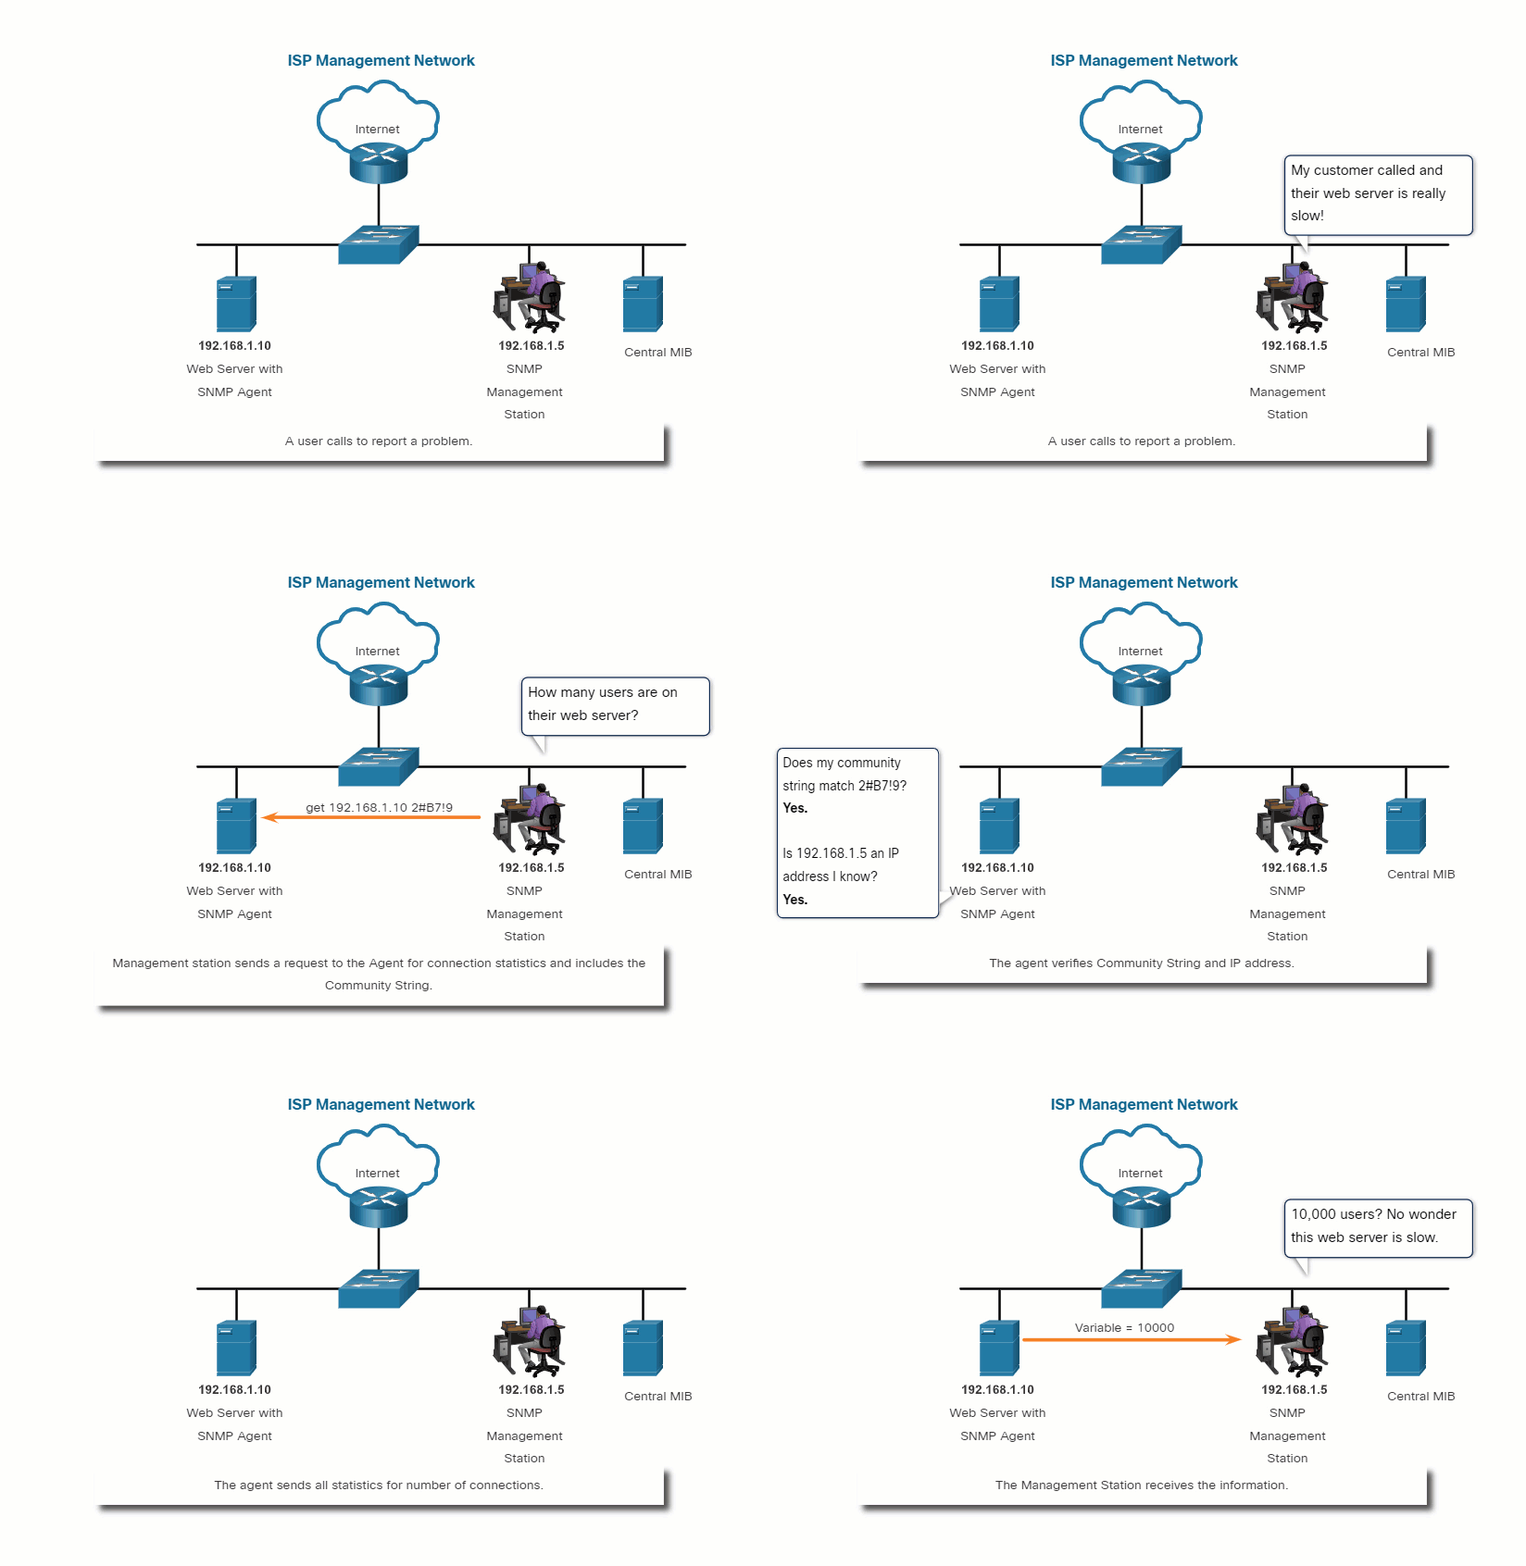
SNMPv1 and SNMPv2c use community strings that control access to the MIB. Community strings are plaintext passwords. SNMP community strings authenticate access to MIB objects.
There are two types of community strings:
- Read-only (ro) – This type provides access to the MIB variables, but does not allow these variables to be changed, only read. Because security is minimal in version 2c, many organizations use SNMPv2c in read-only mode.
- Read-write (rw) – This type provides read and write access to all objects in the MIB.
To view or set MIB variables, the user must specify the appropriate community string for read or write access.
Click Play to see an animation about how SNMP operates with the community string.
10.4.7. MIB Object ID
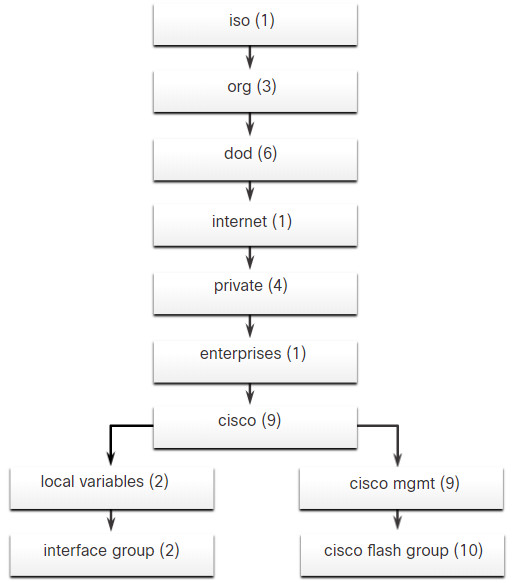
The MIB organizes variables hierarchically. MIB variables enable the management software to monitor and control the network device. Formally, the MIB defines each variable as an object ID (OID). OIDs uniquely identify managed objects in the MIB hierarchy. The MIB organizes the OIDs based on RFC standards into a hierarchy of OIDs, usually shown as a tree.
The MIB tree for any given device includes some branches with variables common to many networking devices and some branches with variables specific to that device or vendor.
RFCs define some common public variables. Most devices implement these MIB variables. In addition, networking equipment vendors, like Cisco, can define their own private branches of the tree to accommodate new variables specific to their devices.
The figure shows portions of the MIB structure defined by Cisco. Note how the OID can be described in words or numbers to help locate a particular variable in the tree. OIDs belonging to Cisco, are numbered as follows: .iso (1).org (3).dod (6).internet (1).private (4).enterprises (1).cisco (9). Therefore, the OID is 1.3.6.1.4.1.9.
10.4.8. SNMP Polling Scenario
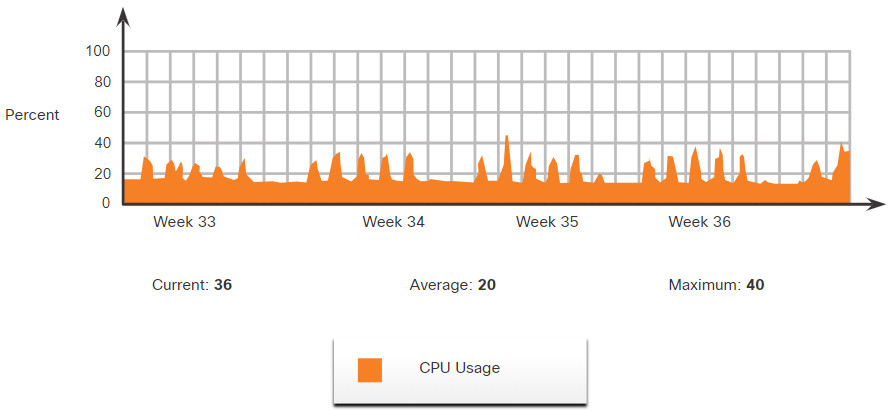
SNMP can be used is to observe CPU utilization over a period of time by polling devices. CPU statistics can then be compiled on the NMS and graphed. This creates a baseline for the network administrator. Threshold values can then be set relative to this baseline. When CPU utilization exceeds this threshold, notifications are sent. The figure illustrates 5-minute samples of router CPU utilization over the period of a few weeks.
The data is retrieved via the snmpget utility, issued on the NMS. Using the snmpget utility, you can manually retrieve real-time data, or have the NMS run a report. This report would give you a period of time that you could use the data to get the average. The snmpget utility requires that the SNMP version, the correct community, the IP address of the network device to query, and the OID number are set. The figure demonstrates the use of the freeware snmpget utility, which allows quick retrieval of information from the MIB.
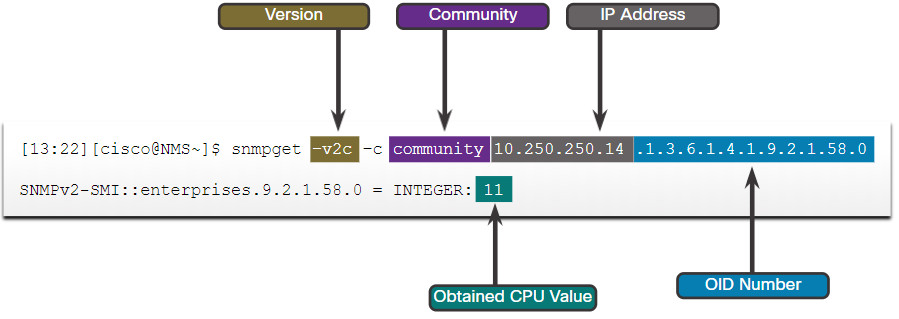
The snmpget utility command has several parameters, including:
- -v2c – This is the version of SNMP.
- -c community – This is the SNMP password, called a community string.
- 10.250.250.14 – This is the IP address of the monitored device.
- 1.3.6.1.4.1.9.2.1.58.0 – This is the OID of MIB variable.
The last line shows the response. The output shows a shortened version of the MIB variable. It then lists the actual value in the MIB location. In this case, the 5-minute moving average of the CPU busy percentage is 11 percent.
10.4.9. SNMP Object Navigator
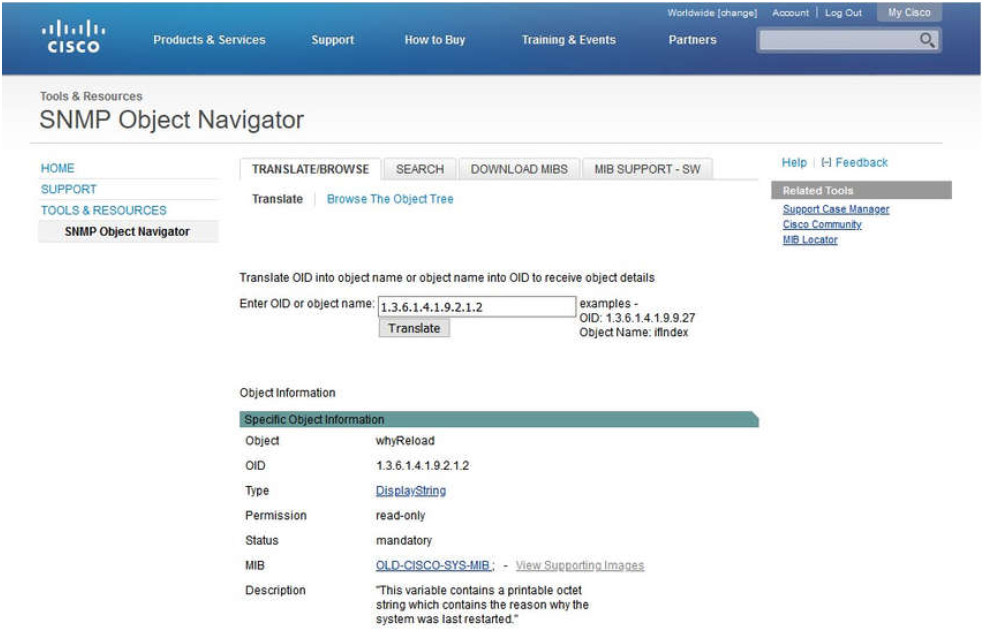
The snmpget utility gives some insight into the basic mechanics of how SNMP works. However, working with long MIB variable names like 1.3.6.1.4.1.9.2.1.58.0 can be problematic for the average user. More commonly, the network operations staff uses a network management product with an easy-to-use GUI, which makes the entire MIB data variable naming transparent to the user.
The Cisco SNMP Navigator on the http://www.cisco.com website allows a network administrator to research details about a particular OID. The figure displays an example of using the navigator to research the OID information for the whyReload object.
10.4.10. Lab – Research Network Monitoring Software
In this lab, you will complete the following objectives:
- Part 1: Survey Your Understanding of Network Monitoring
- Part 2: Research Network Monitoring Tools
- Part 3: Select a Network Monitoring Tool
10.4.10 Lab – Research Network Monitoring Software
10.5. Syslog
10.5.1. Introduction to Syslog
Like a Check Engine light on your car dashboard, the components in your network can tell you if there is something wrong. The syslog protocol was designed to ensure that you can receive and understand these messages. When certain events occur on a network, networking devices have trusted mechanisms to notify the administrator with detailed system messages. These messages can be either non-critical or significant. Network administrators have a variety of options for storing, interpreting, and displaying these messages. They can also be alerted to those messages that could have the greatest impact on the network infrastructure.
The most common method of accessing system messages is to use a protocol called syslog.
Syslog is a term used to describe a standard. It is also used to describe the protocol developed for that standard. The syslog protocol was developed for UNIX systems in the 1980s but was first documented as RFC 3164 by IETF in 2001. Syslog uses UDP port 514 to send event notification messages across IP networks to event message collectors, as shown in the figure.
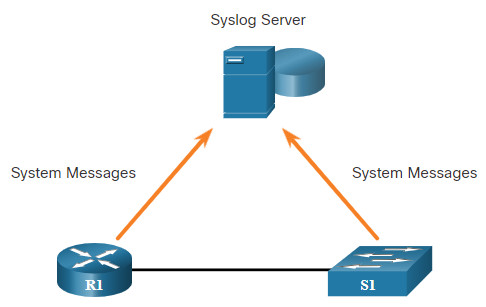
Many networking devices support syslog, including: routers, switches, application servers, firewalls, and other network appliances. The syslog protocol allows networking devices to send their system messages across the network to syslog servers.
There are several different syslog server software packages for Windows and UNIX. Many of them are freeware.
The syslog logging service provides three primary functions, as follows:
- The ability to gather logging information for monitoring and troubleshooting
- The ability to select the type of logging information that is captured
- The ability to specify the destinations of captured syslog messages
10.5.2. Syslog Operation
On Cisco network devices, the syslog protocol starts by sending system messages and debug output to a local logging process that is internal to the device. How the logging process manages these messages and outputs is based on device configurations. For example, syslog messages may be sent across the network to an external syslog server. These messages can be retrieved without needing to access the actual device. Log messages and outputs stored on the external server can be pulled into various reports for easier reading.
Alternatively, syslog messages may be sent to an internal buffer. Messages sent to the internal buffer are only viewable through the CLI of the device.
Finally, the network administrator may specify that only certain types of system messages be sent to various destinations. For example, the device may be configured to forward all system messages to an external syslog server. However, debug-level messages are forwarded to the internal buffer and are only accessible by the administrator from the CLI.
As shown in the figure, popular destinations for syslog messages include the following:
- Logging buffer (RAM inside a router or switch)
- Console line
- Terminal line
- Syslog server
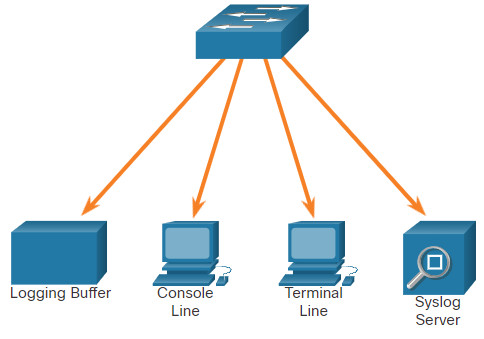
It is possible to remotely monitor system messages by viewing the logs on a syslog server, or by accessing the device through Telnet, SSH, or through the console port.
10.5.3. Syslog Message Format
Cisco devices produce syslog messages as a result of network events. Every syslog message contains a severity level and a facility.
The smaller numerical levels are the more critical syslog alarms. The severity level of the messages can be set to control where each type of message is displayed (i.e. on the console or the other destinations). The complete list of syslog levels is shown in the table.
| Severity Name | Severity Level | Explanation |
|---|---|---|
| Emergency | Level 0 | System Unusable |
| Alert | Level 1 | Immediate Action Needed |
| Critical | Level 2 | Critical Condition |
| Error | Level 3 | Error Condition |
| Warning | Level 4 | Warning Condition |
| Notification | Level 5 | Normal, but Significant Condition |
| Informational | Level 6 | Informational Message |
| Debugging | Level 7 | Debugging Message |
Each syslog level has its own meaning:
- Warning Level 4 – Emergency Level 0: These messages are error messages about software or hardware malfunctions; these types of messages mean that the functionality of the device is affected. The severity of the issue determines the actual syslog level applied.
- Notification Level 5: This notifications level is for normal, but significant events. For example, interface up or down transitions, and system restart messages are displayed at the notifications level.
- Informational Level 6: This is a normal information message that does not affect device functionality. For example, when a Cisco device is booting, you might see the following informational message: %LICENSE-6-EULA_ACCEPT_ALL: The Right to Use End User License Agreement is accepted.
- Debugging Level 7: This level indicates that the messages are output generated from issuing various debug commands.
10.5.4. Syslog Facilities
In addition to specifying the severity, syslog messages also contain information on the facility. Syslog facilities are service identifiers that identify and categorize system state data for error and event message reporting. The logging facility options that are available are specific to the networking device. For example, Cisco 2960 Series switches running Cisco IOS Release 15.0(2) and Cisco 1941 routers running Cisco IOS Release 15.2(4) support 24 facility options that are categorized into 12 facility types.
Some common syslog message facilities reported on Cisco IOS routers include:
- IP
- OSPF protocol
- SYS operating system
- IP security (IPsec)
- Interface IP (IF)
By default, the format of syslog messages on the Cisco IOS Software is as follows:
%facility-severity-MNEMONIC: description
For example, sample output on a Cisco switch for an EtherChannel link changing state to up is:
%LINK-3-UPDOWN: Interface Port-channel1, changed state to up
Here the facility is LINK and the severity level is 3, with a MNEMONIC of UPDOWN.
The most common messages are link up and down messages, and messages that a device produces when it exits from configuration mode. If ACL logging is configured, the device generates syslog messages when packets match a parameter condition.
10.5.5. Configure Syslog Timestamp
By default, log messages are not timestamped. In the example, the R1 GigabitEthernet 0/0/0 interface is shutdown. The message logged to the console does not identify when the interface state was changed. Log messages should be timestamped so that when they are sent to another destination, such as a Syslog server, there is record of when the message was generated.
R1# configure terminal
R1(config)# interface g0/0/0
R1(config-if)# shutdown
%LINK-5-CHANGED: Interface GigabitEthernet0/0/0, changed state to administratively down
%LINEPROTO-5-UPDOWN: Line protocol on Interface GigabitEthernet0/0/0, changed state to down
R1(config-if)# exit
R1(config)# service timestamps log datetime
R1(config)# interface g0/0/0
R1(config-if)# no shutdown
*Mar  1 11:52:42: %LINK-3-UPDOWN: Interface GigabitEthernet0/0/0, changed state to down
*Mar  1 11:52:45: %LINK-3-UPDOWN: Interface GigabitEthernet0/0/0, changed state to up
*Mar  1 11:52:46: %LINEPROTO-5-UPDOWN: Line protocol on Interface GigabitEthernet0/0/0,
changed state to up
R1(config-if)#
Use the command service timestamps log datetime to force logged events to display the date and time. As shown in the figure, when the R1 GigabitEthernet 0/0/0 interface is reactivated, the log messages now contain the date and time.
Note: When using the datetime keyword, the clock on the networking device must be set, either manually or through NTP, as previously discussed.
10.6. Router and Switch File Maintenance
10.6.1. Router File Systems
If you are thinking that you cannot possibly remember how you configured every device in your network, you are not alone. In a large network, it would not be possible to manually configure every device. Fortunately, there are many ways to copy or update your configurations, and then simply paste them in. To do this, you will need to know how to view and manage your file systems.
The Cisco IOS File System (IFS) allows the administrator to navigate to different directories and list the files in a directory. The administrator can also create subdirectories in flash memory or on a disk. The directories available depend on the device.
The example displays the output of the show file systems command, which lists all of the available file systems on a Cisco 4221 router.
Router# show file systems
File Systems:
       Size(b)       Free(b)      Type  Flags  Prefixes
             -             -    opaque     rw   system:
             -             -    opaque     rw   tmpsys:
*   7194652672    6294822912      disk     rw   bootflash: flash:
     256589824     256573440      disk     rw   usb0:
    1804468224    1723789312      disk     ro   webui:
             -             -    opaque     rw   null:
             -             -    opaque     ro   tar:
             -             -   network     rw   tftp:
             -             -    opaque     wo   syslog:
      33554432      33539983     nvram     rw   nvram:
             -             -   network     rw   rcp:
             -             -   network     rw   ftp:
             -             -   network     rw   http:
             -             -   network     rw   scp:
             -             -   network     rw   sftp:
             -             -   network     rw   https:
             -             -    opaque     ro   cns:
Router#
This command provides useful information such as the amount of total and free memory, the type of file system, and its permissions. Permissions include read only (ro), write only (wo), and read and write (rw). The permissions are shown in the Flags column of the command output.
Although there are several file systems listed, of interest to us will be the tftp, flash, and nvram file systems.
Notice that the flash file system also has an asterisk preceding it. This indicates that flash is the current default file system. The bootable IOS is located in flash; therefore, the pound symbol (#) is appended to the flash listing, indicating that it is a bootable disk.
The Flash File System
The example displays the output from the dir (directory) command.
Router# dir
Directory of bootflash:/
   11  drwx            16384   Aug 2 2019 04:15:13 +00:00  lost+found
370945  drwx             4096   Oct 3 2019 15:12:10 +00:00  .installer
338689  drwx             4096   Aug 2 2019 04:15:55 +00:00  .ssh
217729  drwx             4096   Aug 2 2019 04:17:59 +00:00  core
379009  drwx             4096  Sep 26 2019 15:54:10 +00:00  .prst_sync
80641  drwx             4096   Aug 2 2019 04:16:09 +00:00  .rollback_timer
161281  drwx             4096   Aug 2 2019 04:16:11 +00:00  gs_script
112897  drwx           102400   Oct 3 2019 15:23:07 +00:00  tracelogs
362881  drwx             4096  Aug 23 2019 17:19:54 +00:00  .dbpersist
298369  drwx             4096   Aug 2 2019 04:16:41 +00:00  virtual-instance
   12  -rw-               30   Oct 3 2019 15:14:11 +00:00  throughput_monitor_params
 8065  drwx             4096   Aug 2 2019 04:17:55 +00:00  onep
   13  -rw-               34   Oct 3 2019 15:19:30 +00:00  pnp-tech-time
249985  drwx             4096  Aug 20 2019 17:40:11 +00:00  Archives
   14  -rw-            65037   Oct 3 2019 15:19:42 +00:00  pnp-tech-discovery-summary
   17  -rw-          5032908  Sep 19 2019 14:16:23 +00:00  isr4200_4300_rommon_1612_1r_SPA.pkg
   18  -rw-        517153193  Sep 21 2019 04:24:04 +00:00  isr4200-universalk9_ias.16.09.04.SPA.bin
7194652672 bytes total (6294822912 bytes free)
Router#
Because flash is the default file system, the dir command lists the contents of flash. Several files are located in flash, but of specific interest is the last listing. This is the name of the current Cisco IOS file image that is running in RAM.
The NVRAM File System
To view the contents of NVRAM, you must change the current default file system by using the cd (change directory) command, as shown in the example.
Router#
Router# cd nvram:
Router# pwd
nvram:/
Router# dir
Directory of nvram:/
32769  -rw-             1024                      startup-config
32770  ----               61                      private-config
32771  -rw-             1024                      underlying-config
    1  ----                4                      private-KS1
    2  -rw-             2945                      cwmp_inventory
    5  ----              447                      persistent-data
    6  -rw-             1237                      ISR4221-2x1GE_0_0_0
    8  -rw-               17                      ecfm_ieee_mib
    9  -rw-                0                      ifIndex-table
   10  -rw-             1431                      NIM-2T_0_1_0
   12  -rw-              820                      IOS-Self-Sig#1.cer
   13  -rw-              820                      IOS-Self-Sig#2.cer
33554432 bytes total (33539983 bytes free)
Router#
The present working directory command is pwd. This command verifies that we are viewing the NVRAM directory. Finally, the dir command lists the contents of NVRAM. Although there are several configuration files listed, of specific interest is the startup-configuration file.
10.6.2. Switch File Systems
With the Cisco 2960 switch flash file system, you can copy configuration files, and archive (upload and download) software images.
The command to view the file systems on a Catalyst switch is the same as on a Cisco router: show file systems, as displayed in the example.
Switch# show file systems
File Systems:
       Size(b)     Free(b)     Type  Flags  Prefixes
*    32514048    20887552     flash     rw    flash:
          -           -      opaque     rw       vb:
          -           -      opaque     ro       bs:
          -           -      opaque     rw   system:
          -           -      opaque     rw   tmpsys:
        65536       48897     nvram     rw    nvram:
          -           -      opaque     ro   xmodem:
          -           -      opaque     ro   ymodem:
          -           -      opaque     rw     null:
          -           -      opaque     ro      tar:
          -           -     network     rw     tftp:
          -           -     network     rw      rcp:
          -           -     network     rw     http:
          -           -     network     rw      ftp:
          -           -     network     rw      scp:
          -           -     network     rw    https:
          -           -     opaque      ro      cns:
Switch#
10.6.3. Use a Text File to Back Up a Configuration
Configuration files can be saved to a text file by using Tera Term, as shown in the figure.
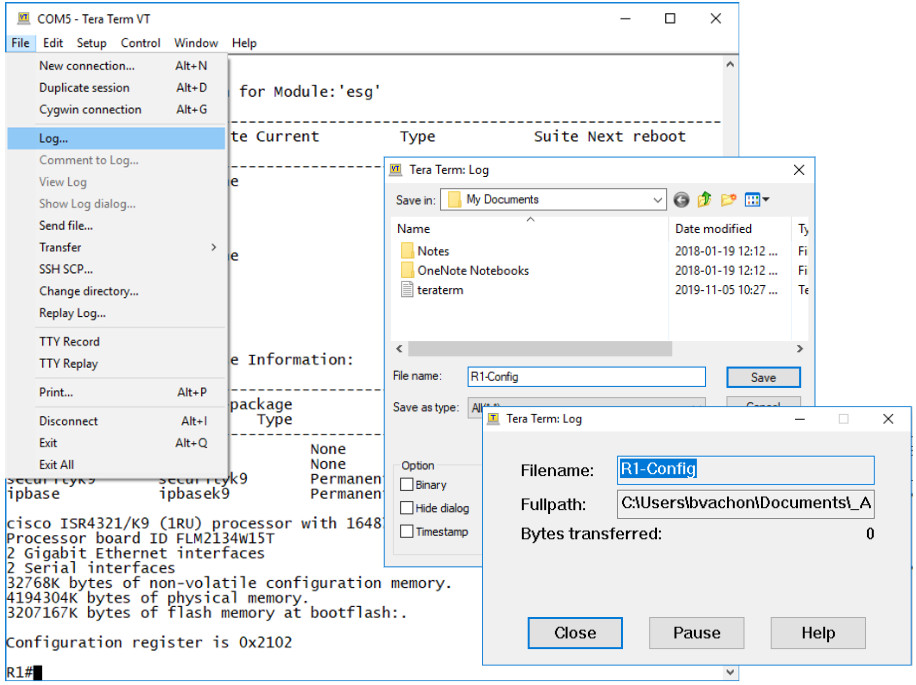
Step 1. On the File menu, click Log.
Step 2. Choose the location to save the file. Tera Term will begin capturing text.
Step 3. After capture has been started, execute the show running-config or show startup-config command at the privileged EXEC prompt. Text displayed in the terminal window will be directed to the chosen file.
Step 4. When the capture is complete, select Close in the Tera Term: Log window.
Step 5. View the file to verify that it was not corrupted.
10.6.4. Use a Text File to Restore a Configuration
A configuration can be copied from a file and then directly pasted to a device. The IOS executes each line of the configuration text as a command. This means that the file will require editing to ensure that encrypted passwords are in plaintext, and that non-command text such as –More– and IOS messages are removed. In addition, you may want to add enable and configure terminal to the beginning of the file or enter global configuration mode before pasting the configuration. This process is discussed in the lab later is this topic.
Instead of copying and pasting, a configuration can be restored from a text file by using Tera Term, as shown in the figure.
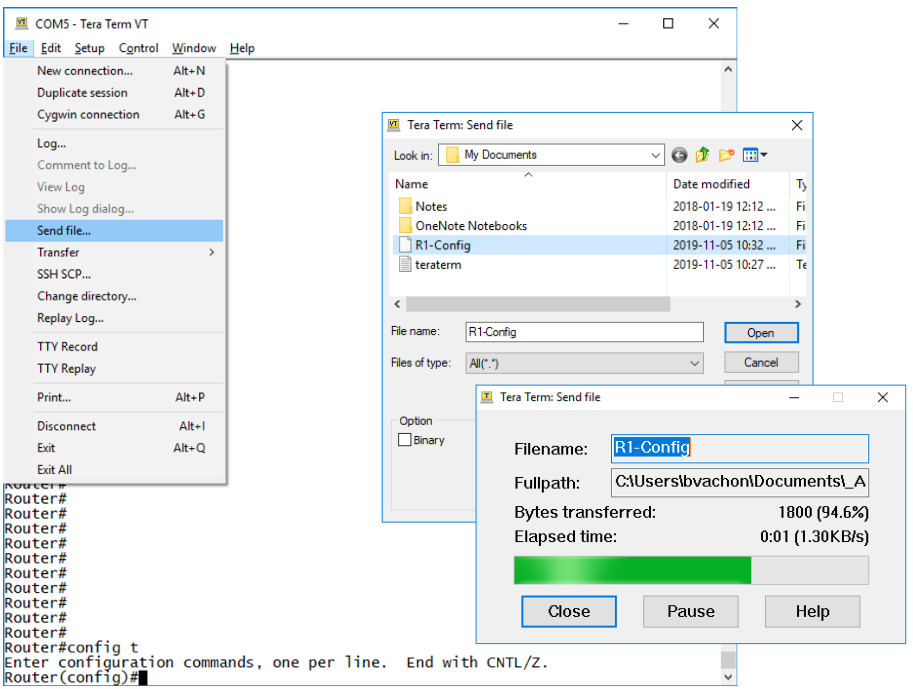
When using Tera Term, the steps are as follows:
Step 1. On the File menu, click Send file.
Step 2. Locate the file to be copied into the device and click Open.
Step 3. Tera Term will paste the file into the device.
The text in the file will be applied as commands in the CLI and become the running configuration on the device.
10.6.5. Use TFTP to Back Up and Restore a Configuration
Use TFTP to Back Up a Configuration
Copies of configuration files should be stored as backup files in the event of a problem. Configuration files can be stored on a Trivial File Transfer Protocol (TFTP) server, or a USB drive. A configuration file should also be included in the network documentation.
To save the running configuration or the startup configuration to a TFTP server, use either the copy running-config tftp or copy startup-config tftp command, as shown in the example.
R1# copy running-config tftp
Remote host []?192.168.10.254
Name of the configuration file to write[R1-config]? R1-Jan-2019
Write file R1-Jan-2019 to 192.168.10.254? [confirm]
Writing R1-Jan-2019 !!!!!! [OK]
Follow these steps to back up the running configuration to a TFTP server:
Step 1. Enter the copy running-config tftp command.
Step 2. Enter the IP address of the host where the configuration file will be stored.
Step 3. Enter the name to assign to the configuration file.
Step 4. Press Enter to confirm each choice.
Use TFTP to Restore a Configuration
To restore the running configuration or the startup configuration from a TFTP server, use either the copy tftp running-config or copy tftp startup-config command. Use the following steps to restore the running configuration from a TFTP server:
Step 1. Enter the copy tftp running-config command.
Step 2. Enter the IP address of the host where the configuration file is stored.
Step 3. Enter the name to assign to the configuration file.
Step 4. Press Enter to confirm each choice.
10.6.6. USB Ports on a Cisco Router
The Universal Serial Bus (USB) storage feature enables certain models of Cisco routers to support USB flash drives. The USB flash feature provides an optional secondary storage capability and an additional boot device. Images, configurations, and other files can be copied to or from the Cisco USB flash memory with the same reliability as storing and retrieving files by using the Compact Flash card. In addition, modular integrated services routers can boot any Cisco IOS Software image saved on USB flash memory. Ideally, USB flash can hold multiple copies of the Cisco IOS and multiple router configurations. The USB ports of a Cisco 4321 Router are shown in the figure.

Use the dir command to view the contents of the USB flash drive, as shown in the example.
Router# dir usbflash0:
Directory of usbflash0:/
1 -rw- 30125020 Dec 22 2032 05:31:32 +00:00 c3825-entservicesk9-mz.123-14.T
63158272 bytes total (33033216 bytes free)
10.6.7. Use USB to Back Up and Restore a Configuration
When backing up to a USB port, it is a good idea to issue the show file systems command to verify that the USB drive is there and confirm the name, as shown in the example.
R1# show file systems
File Systems:
		Size(b)       Free(b)      Type  Flags  Prefixes
             -             -    opaque     rw   archive:
             -             -    opaque     rw   system:
             -             -    opaque     rw   tmpsys:
             -             -    opaque     rw   null:
             -             -   network     rw   tftp:
*    256487424     184819712      disk     rw   flash0: flash:#
             -             -      disk     rw   flash1:
        262136        249270     nvram     rw   nvram:
             -             -    opaque     wo   syslog:
             -             -    opaque     rw   xmodem:
             -             -    opaque     rw   ymodem:
             -             -   network     rw   rcp:
             -             -   network     rw   http:
             -             -   network     rw   ftp:
             -             -   network     rw   scp:
             -             -    opaque     ro   tar:
             -             -   network     rw   https:
             -             -    opaque     ro   cns:
    4050042880    3774152704  usbflash     rw   usbflash0:
R1#
Notice the last line of output shows the USB port and name: “usbflash0:”.
Next, use the copy run usbflash0:/ command to copy the configuration file to the USB flash drive. Be sure to use the name of the flash drive, as indicated in the file system. The slash is optional but indicates the root directory of the USB flash drive.
The IOS will prompt for the filename. If the file already exists on the USB flash drive, the router will prompt to overwrite, as shown in the examples.
When copying to USB flash drive, with no pre-existing file will display the following output.
R1# copy running-config usbflash0:
Destination filename [running-config]? R1-Config
5024 bytes copied in 0.736 secs (6826 bytes/sec)
When copying to USB flash drive, with the same configuration file already on the drive will display the following output.
R1# copy running-config usbflash0:
Destination filename [running-config]? R1-Config
%Warning:There is a file already existing with this name
Do you want to over write? [confirm]
5024 bytes copied in 1.796 secs (2797 bytes/sec)
R1#
Use the dir command to see the file on the USB drive and use the more command to see the contents, as shown in the example.
R1# dir usbflash0:/
Directory of usbflash0:/
    1  drw-     0  Oct 15 2010 16:28:30 +00:00  Cisco
   16  -rw-  5024   Jan 7 2013 20:26:50 +00:00  R1-Config
4050042880 bytes total (3774144512 bytes free)
R1#
R1# more usbflash0:/R1-Config
!
! Last configuration change at 20:19:54 UTC Mon Jan 7 2013 by
admin version 15.2
service timestamps debug datetime msec
service timestamps log datetime msec
no service password-encryption
!
hostname R1
!
boot-start-marker
boot-end-marker
!
logging buffered 51200 warnings
!
no aaa new-model
!
no ipv6 cef
R1#
Restore Configurations with a USB Flash Drive
To copy the file back, it will be necessary to edit the USB R1-Config file with a text editor. Assuming the file name is R1-Config, use the command copy usbflash0:/R1-Config running-config to restore a running configuration.
10.6.8. Password Recovery Procedures
Passwords on devices are used to prevent unauthorized access. For encrypted passwords, such as the enable secret passwords, the passwords must be replaced after recovery. Depending on the device, the detailed procedure for password recovery varies. However, all the password recovery procedures follow the same principle:
Step 1. Enter the ROMMON mode.
Step 2. Change the configuration register.
Step 3. Copy the startup-config to the running-config.
Step 4. Change the password.
Step 5. Save the running-config as the new startup-config.
Step 6. Reload the device.
Console access to the device through a terminal or terminal emulator software on a PC is required for password recovery. The terminal settings to access the device are:
- 9600 baud rate
- No parity
- 8 data bits
- 1 stop bit
- No flow control
10.6.9. Password Recovery Example
Click each step for an example of completing a password recovery.
10.6.10. Packet Tracer – Back Up Configuration Files
In this activity you will restore a configuration from a backup and then perform a new backup. Due to an equipment failure, a new router has been put in place. Fortunately, backup configuration files have been saved to a Trivial File Transfer Protocol (TFTP) Server. You are required to restore the files from the TFTP Server to get the router back online as quickly as possible.
10.6.10 Packet Tracer – Back Up Configuration Files
10.6.11. Lab – Use Tera Term to Manage Router Configuration Files
In this lab, you will complete the following objectives:
- Part 1: Configure Basic Device Settings
- Part 2: Use Terminal Emulation Software to Create a Backup Configuration File
- Part 3: Use a Backup Configuration File to Restore a Router
10.6.11 Lab – Use Tera Term to Manage Router Configuration Files
10.6.12. Lab – Use TFTP, Flash, and USB to Manage Configuration Files
Skills Practice Opportunity
In this lab, you will complete the following objectives:
- Part 1: Build the Network and Configure Basic Device Settings
- Part 2: (Optional) Download TFTP Server Software
- Part 3: Use TFTP to Back Up and Restore the Switch Running Configuration
- Part 4: Use TFTP to Back Up and Restore the Router Running Configuration
- Part 5: Back Up and Restore Running Configurations Using Router Flash Memory
- Part 6: (Optional) Use a USB Drive to Back Up and Restore the Running Configuration
You can practice these skills using the Packet Tracer or lab equipment, if available.
Packet Tracer – Physical Mode (PTPM)
10.6.12 Packet Tracer – Use TFTP and Flash to Manage Configuration Files – Physical Mode
Lab Equipment
10.6.12 Lab – Use TFTP, Flash, and USB to Manage Configuration Files
10.6.13. Lab – Research Password Recovery Procedures
Skills Practice Opportunity
In this lab, you will complete the following objectives:
- Part 1: Research the Configuration Register
- Part 2: Document the Password Recovery Procedure for a Specific Cisco Router
You can practice these skills using the Packet Tracer or lab equipment, if available.
Packet Tracer – Physical Mode (PTPM)
10.6.13 Packet Tracer – Research and Execute Password Recovery Procedures – Physical Mode
Lab Equipment
10.6.13 Lab – Research Password Recovery Procedures
10.7. IOS Image Management
10.7.1 Video – Managing Cisco IOS Images
Click Play in the figure to view a demonstration of managing Cisco IOS images.
10.7.2. TFTP Servers as a Backup Location
In the previous topic you learned the ways to copy and paste a configuration. This topic takes that idea one step further with IOS software images. As a network grows, Cisco IOS Software images and configuration files can be stored on a central TFTP server, as shown in the figure. This helps to control the number of IOS images and the revisions to those IOS images, as well as the configuration files that must be maintained.
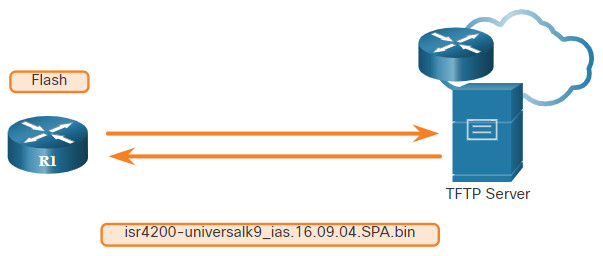
Production internetworks usually span wide areas and contain multiple routers. For any network, it is good practice to keep a backup copy of the Cisco IOS Software image in case the system image on the router becomes corrupted or accidentally erased.
Widely distributed routers need a source or backup location for Cisco IOS Software images. Using a network TFTP server allows image and configuration uploads and downloads over the network. The network TFTP server can be another router, a workstation, or a host system.
10.7.3. Backup IOS Image to TFTP Server Example
To maintain network operations with minimum down time, it is necessary to have procedures in place for backing up Cisco IOS images. This allows the network administrator to quickly copy an image back to a router in case of a corrupted or erased image.
In the figure, the network administrator wants to create a backup of the current image file on the router (isr4200-universalk9_ias.16.09.04.SPA.bin) to the TFTP server at 172.16.1.100.
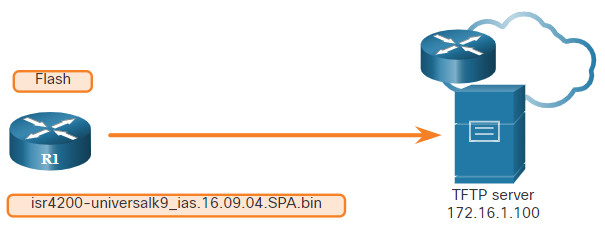
Click each button for the steps to create a backup of the Cisco IOS image to a TFTP server.
10.7.4. Copy an IOS Image to a Device Example
Cisco consistently releases new Cisco IOS software versions to resolve caveats and provide new features. This example uses IPv6 for the transfer to show that TFTP can also be used across IPv6 networks.
The figure illustrates copying a Cisco IOS software image from a TFTP server. A new image file (isr4200-universalk9_ias.16.09.04.SPA.bin) will be copied from the TFTP server at 2001:DB8:CAFE:100::99 to the router.
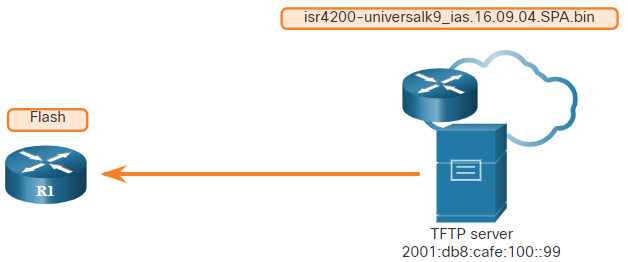
Select a Cisco IOS image file that meets the requirements in terms of platform, features, and software. Download the file from cisco.com and transfer it to the TFTP server. Click each button for the steps to upgrade the IOS image on the Cisco router.
10.7.5. The boot system Command
To upgrade to the copied IOS image after that image is saved on the flash memory of the router, configure the router to load the new image during bootup by using the boot system command, as shown in the example. Save the configuration. Reload the router to boot the router with new image.
R1# configure terminal
R1(config)# boot system flash0:isr4200-universalk9_ias.16.09.04.SPA.bin
R1(config)# exit
R1# copy running-config startup-config
R1# reload
During startup, the bootstrap code parses the startup configuration file in NVRAM for the boot system commands that specify the name and location of the Cisco IOS Software image to load. Several boot system commands can be entered in sequence to provide a fault-tolerant boot plan.
If there are no boot system commands in the configuration, the router defaults to loading the first valid Cisco IOS image in flash memory and runs it.
After the router has booted, to verify that the new image has loaded, use the show version command, as displayed in the example.
R1# show version
Cisco IOS XE Software, Version 16.09.04
Cisco IOS Software [Fuji], ISR Software (X86_64_LINUX_IOSD-UNIVERSALK9_IAS-M), Version 16.9.4, RELEASE SOFTWARE (fc2)
Technical Support: http://www.cisco.com/techsupport
Copyright (c) 1986-2019 by Cisco Systems, Inc.
Compiled Thu 22-Aug-19 18:09 by mcpre
Cisco IOS-XE software, Copyright (c) 2005-2019 by cisco Systems, Inc.
All rights reserved.  Certain components of Cisco IOS-XE software are
licensed under the GNU General Public License ("GPL") Version 2.0.  The
software code licensed under GPL Version 2.0 is free software that comes
with ABSOLUTELY NO WARRANTY.  You can redistribute and/or modify such
GPL code under the terms of GPL Version 2.0.  For more details, see the
documentation or "License Notice" file accompanying the IOS-XE software,
or the applicable URL provided on the flyer accompanying the IOS-XE
software.

ROM: IOS-XE ROMMON
Router uptime is 2 hours, 19 minutes
Uptime for this control processor is 2 hours, 22 minutes
System returned to ROM by PowerOn
System image file is "flash:isr4200-universalk9_ias.16.09.04.SPA.bin"
(output omitted)
10.7.6. Packet Tracer – Use a TFTP Server to Upgrade a Cisco IOS Image
A TFTP server can help manage the storage of IOS images and revisions to IOS images. For any network, it is good practice to keep a backup copy of the Cisco IOS Software image in case the system image in the router becomes corrupted or accidentally erased. A TFTP server can also be used to store new upgrades to the IOS and then deployed throughout the network where it is needed. In this activity, you will upgrade the IOS images on Cisco devices by using a TFTP server. You will also backup an IOS image with the use of a TFTP server.
10.7.6 Packet Tracer – Use a TFTP Server to Upgrade a Cisco IOS Image
10.8. Module Practice and Quiz
10.8.1. Packet Tracer – Configure CDP, LLDP, and NTP
In this Packet Tracer activity, you will complete the following objectives:
- Build the Network and Configure Basic Device Settings
- Network Discovery with CDP
- Network Discovery with LLDP
- Configure and Verify NTP
10.8.1 Packet Tracer – Configure CDP, LLDP, and NTP
10.8.2. Lab – Configure CDP, LLDP, and NTP
In this lab, you will complete the following objectives:
- Build the Network and Configure Basic Device Settings
- Network Discovery with CDP
- Network Discovery with LLDP
- Configure and Verify NTP
10.8.2 Lab – Configure CDP, LLDP, and NTP
10.8.3. What did I learn in this module?
Device Discovery with CDP
Cisco Discovery Protocol (CDP) is a Cisco proprietary Layer 2 protocol that is used to gather information about Cisco devices which share the same data link. The device sends periodic CDP advertisements to connected devices. CDP can be used as a network discovery tool to determine the information about the neighboring devices. This information gathered from CDP can help build a logical topology of a network when documentation is missing or lacking in detail. CDP can assist in network design decisions, troubleshooting, and making changes to equipment. On Cisco devices, CDP is enabled by default. To verify the status of CDP and display information about CDP, enter the show cdp command. To enable CDP globally for all the supported interfaces on the device, enter cdp run in the global configuration mode. To enable CDP on the specific interface, enter the cdp enable command. To verify the status of CDP and display a list of neighbors, use the show cdp neighbors command in the privileged EXEC mode. The show cdp neighbors command provides helpful information about each CDP neighbor device, including device identifiers, port identifier, capabilities list, and platform. Use the show cdp interface command to display the interfaces that are CDP enabled on a device.
Device Discovery with LLDP
Cisco devices also support Link Layer Discovery Protocol (LLDP), which is a vendor-neutral neighbor discovery protocol similar to CDP. This protocol advertises its identity and capabilities to other devices and receives the information from a physically connected Layer 2 device. To enable LLDP globally on a Cisco network device, enter the lldp run command in the global configuration mode. To verify LLDP has been enabled on the device, enter the show lldp command in privileged EXEC mode. With LLDP enabled, device neighbors can be discovered by using the show lldp neighbors command. When more details about the neighbors are needed, the show lldp neighbors detail command can provide information, such as the neighbor IOS version, IP address, and device capability.
NTP
The software clock on a router or switch starts when the system boots and is the primary source of time for the system. When the time is not synchronized between devices, it will be impossible to determine the order of the events and the cause of an event. You can manually configure the date and time, or you can configure the NTP. This protocol allows routers on the network to synchronize their time settings with an NTP server. When NTP is implemented in the network, it can be set up to synchronize to a private master clock or it can synchronize to a publicly available NTP server on the Internet. NTP networks use a hierarchical system of time sources and each level in this system is called a stratum. The synchronized time is distributed across the network by using NTP. Authoritative time sources, also referred to as stratum 0 devices, are high-precision timekeeping devices. Stratum 1 devices are directly connected to the authoritative time sources. Stratum 2 devices, such as NTP clients, synchronize their time by using the NTP packets from stratum 1 servers. The ntp server ip-address command is issued in global configuration mode to configure a device as the NTP server. To verify the time source is set to NTP, use the show clock detail command. The show ntp associations and show ntp status commands are used to verify that a device is synchronized with the NTP server.
SNMP
SNMP allows administrators to manage servers, workstations, routers, switches, and security appliances, on an IP network. SNMP is an application layer protocol that provides a message format for communication between managers and agents. The SNMP system consists of three elements: SNMP manager, SNMP agents, and the MIB. To configure SNMP on a networking device, you must define the relationship between the manager and the agent. The SNMP manager is part of an NMS. The SNMP manager can collect information from an SNMP agent by using the “get” action and can change configurations on an agent by using the “set” action. SNMP agents can forward information directly to a network manager by using “traps”. The SNMP agent responds to SNMP manager GetRequest-PDUs (to get an MIB variable) and SetRequest-PDUs (to set an MIB variable). An NMS periodically uses the get request to poll the SNMP agents by querying the device for data. A network management application can collect information to monitor traffic loads and to verify device configurations of managed devices.
SNMPv1, SNMPv2c, and SNMPv3 are all versions of SNMP. SNMPv1 is a legacy solution. Both SNMPv1 and SNMPv2c use a community-based form of security. The community of managers that is able to access the agent’s MIB is defined by a community string. SNMPv2c includes a bulk retrieval mechanism and more detailed error message reporting. SNMPv3 provides for both security models and security levels. SNMP community strings are read-only (ro) and read-write (rw). They are used to authenticate access to MIB objects. The MIB organizes variables hierarchically. MIB variables enable the management software to monitor and control the network device. OIDs uniquely identify managed objects in the MIB hierarchy. The snmpget utility gives some insight into the basic mechanics of how SNMP works. The Cisco SNMP Navigator on the http://www.cisco.com website allows a network administrator to research details about a particular OID.
Syslog
The most common method of accessing system messages is to use a protocol called syslog. The syslog protocol uses UDP port 514 to allow networking devices to send their system messages across the network to syslog servers. The syslog logging service provides three primary functions: gather logging information for monitoring and troubleshooting, select the type of logging information that is captured, and specify the destinations of captured syslog messages. Destinations for syslog messages include the logging buffer (RAM inside a router or switch), console line, terminal line, and syslog server. This table shows syslog levels:
| Severity Name | Severity Level | Explanation |
|---|---|---|
| Emergency | Level 0 | System Unusable |
| Alert | Level 1 | Immediate Action Needed |
| Critical | Level 2 | Critical Condition |
| Error | Level 3 | Error Condition |
| Warning | Level 4 | Warning Condition |
| Notification | Level 5 | Normal, but Significant Condition |
| Informational | Level 6 | Informational Message |
| Debugging | Level 7 | Debugging Message |
Syslog facilities identify and categorize system state data for error and event message reporting. Common syslog message facilities reported on Cisco IOS routers include: IP, OSPF protocol, SYS operating system, IPsec, and IF. The default format of syslog messages on Cisco IOS software is: %facility-severity-MNEMONIC: description. Use the command service timestamps log datetime to force logged events to display the date and time.
Router and Switch File Maintenance
The Cisco IFS lets the administrator navigate to different directories and list the files in a directory, and to create subdirectories in flash memory or on a disk. Use the show file systems command to display lists all of the available file systems on a Cisco router. Use the directory command dir to display the directory of bootflash. Use the change directory command cd to view the contents of NVRAM. Use the present working directory command pwd to that you are viewing the current directory. Use the show file systems command to view the file systems on a Catalyst switch or a Cisco router. Configuration files can be saved to a text file by using Tera Term. A configuration can be copied from a file and then directly pasted to a device. Configuration files can be stored on a TFTP server, or a USB drive. To save the running configuration or the startup configuration to a TFTP server, use either the copy running-config tftp or copy startup-config tftp command. Use the dir command to view the contents of the USB flash drive. Use the copy run usbflash0:/ command to copy the configuration file to the USB flash drive. Use the dir command to see the file on the USB drive. Use the more command to see the contents of the drive. For encrypted passwords, such as the enable secret passwords, the passwords must be replaced after recovery.
IOS Image Management
Cisco IOS Software images and configuration files can be stored on a central TFTP server to control the number of IOS images and the revisions to those IOS images, as well as the configuration files that must be maintained. Select a Cisco IOS image file that meets the requirements in terms of platform, features, and software. Download the file from cisco.com and transfer it to the TFTP server. Ping the TFTP server. Verify the amount of free flash. The amount of free flash can be verified by using the show flash: command. If there is enough free flash to hold the new IOS image, copy the new IOS image to flash. To upgrade to the copied IOS image after that image is saved on the router’s flash memory, configure the router to load the new image during bootup by using the boot system command. Save the configuration. Reload the router to boot the router with new image. After the router has booted, to verify the new image has loaded, use the show version command.
