CCNAv7 ENSA Skills Assessment – ENSA Final Skills Exam (Equipment)
Your exam may be different
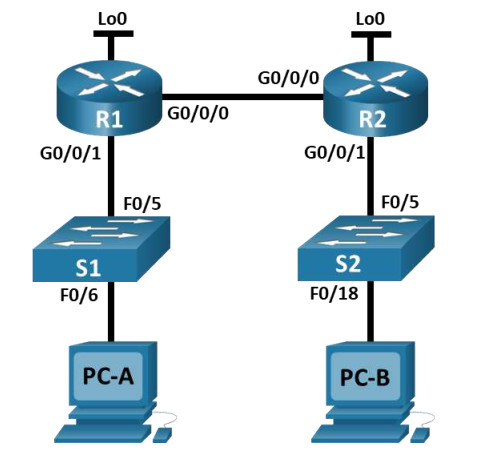
Topology

Addressing Table
| Device | Interface | IP Address | Subnet Mask | Default Gateway |
|---|---|---|---|---|
| R1 | G0/0/0 | 10.67.254.2 | 255.255.255.252 | N/A |
| G0/0/1 | 192.168.1.1 | 255.255.255.0 | N/A | |
| Lo0 | 10.52.0.1 | 255.255.255.248 | N/A | |
| R2 | G0/0/0 | 10.67.254.1 | 255.255.255.252 | N/A |
| Lo0 | 209.165.201.1 | 255.255.255.224 | N/A | |
| G0/0/1 | 10.67.1.1 | 255.255.255.0 | N/A | |
| S1 | VLAN 1 | 192.168.1.2 | 255.255.255.0 | 192.168.1.1 |
| S2 | VLAN 1 | 10.67.1.2 | 255.255.255.0 | 10.67.1.1 |
Assessment Objectives
- Part 1: Initialize, Reload and Configure Basic Device Settings (40 points, 40 minutes)
- Part 2: Configure and Single Area OSPFv2 (20 points, 10 minutes)
- Part 3: Optimize Single Area OSPFv2 (25 points, 20 minutes)
- Part 4: Configure Access Control, NAT, and perform configuration backup (15 points, 30 minutes)
Scenario
In this Skills Assessment (SA) you will configure the devices in a small network. You must configure a router, switch and PCs to support IPv4 connectivity for supported hosts. Your router and switch must also be managed securely. You will configure Single-Area OSPFv2, NAT, and access control lists. Further, you will backup up your working configurations to a TFTP server.
Required Resources
- 2 Routers (Cisco 4221 with Cisco IOS XE Release 16.9.4 universal image or comparable)
- 2 Switches (Cisco 2960 with Cisco IOS Release 15.2(2) lanbasek9 image or comparable)
- 2 PCs (Windows with a terminal emulation program, such as Tera Term)
- Console cables to configure the Cisco IOS devices via the console ports
- Ethernet cables as shown in the topology
Instructions
Part 1: Initialize, Reload and Configure Basic Device Settings
Total points: 40
Time: 40 minutes
Step 1: Initialize and reload routers and switches.
Erase the startup configurations and VLANs from the router and switch and reload the devices.
Before proceeding, ask your instructor verify device initializations.
On Router R1-R2
Router>enable
Router#erase startup-config
Erasing the nvram filesystem will remove all configuration files! Continue? [confirm]
[OK]
Erase of nvram: complete
%SYS-7-NV_BLOCK_INIT: Initialized the geometry of nvram
Router#reload
On Switch S1-S2
Switch>enable
Switch#erase startup-config
Switch#delete vlan.dat
Delete filename [vlan.dat]?
Delete flash:/vlan.dat? [confirm]

Switch#reload
Step 2: Configure the routers.
Configuration tasks for R1 and R2 include the following:
| Task | Specification | R1 | R2 |
|---|---|---|---|
| Disable DNS lookup | 0.5 pt | 0.5 pt | |
| Router name | R1 or R2, as appropriate | 0.5 pt | 0.5 pt |
| Domain name | ccna-lab.com | 0.5 pt | 0.5 pt |
| Encrypted privileged EXEC password | ciscoenpass | 0.5 pt | 0.5 pt |
| Console access password | ciscoconpass | 0.5 pt | 0.5 pt |
| Set the minimum length for passwords | 10 characters | 0.5 pt | 0.5 pt |
| Create an administrative user in the local database |
Username: admin Password: admin1pass |
0.5 pt | 0.5 pt |
| Set login on VTY lines to use local database | 0.5 pt | 0.5 pt | |
| Set VTY lines to accept SSH connections only | 0.5 pt | 0.5 pt | |
| Encrypt the clear text passwords | 0.5 pt | 0.5 pt | |
| Configure an MOTD Banner | 0.5 pt | 0.5 pt | |
| Configure interface G0/0/1 | Set the description Set the Layer 3 IPv4 address Activate Interface |
2 pts | 2 pts |
| Configure interface G0/0/0 | Set the description Set the Layer 3 IPv4 address Activate Interface |
2 pts | 2 pts |
| Configure interface Lo0 | Configure IPv4 address | 0.5 pt | 0.5 pts |
| Generate an RSA crypto key | 1024 bits modulus | 0.5 pt | 0.5 pt |
Step 3: Configure S1 and S2.
Configuration tasks for the switches include the following:
| Task | Specification | S1 | S2 |
|---|---|---|---|
| Disable DNS lookup | 0.5 pt | 0.5 pt | |
| Switch name | S1 or S2, as appropriate | 0.5 pt | 0.5 pt |
| Domain name | ccna-lab.com | 0.5 pt | 0.5 pt |
| Encrypted privileged EXEC password | ciscoenpass | 0.5 pt | 0.5 pt |
| Console access password | ciscoconpass | 0.5 pt | 0.5 pt |
| Shutdown all unused interfaces | 0.5 pt | 0.5 pt | |
| Create an administrative user in the local database | Username: admin Password: admin1pass |
0.5 pt | 0.5 pt |
| Set login on VTY lines to use local database | 0.5 pt | 0.5 pt | |
| Set VTY lines to accept SSH connections only | 0.5 pt | 0.5 pt | |
| Encrypt the clear text passwords | 0.5 pt | 0.5 pt | |
| Configure an MOTD Banner | 0.5 pt | 0.5 pt | |
| Generate an RSA crypto key | 1024 bits modulus | 0.5 pt | 0.5 pt |
| Configure Management Interface (SVI) for VLAN 1 (the Management VLAN) |
Set the Layer 3 IPv4 address | 0.5 pt | 0.5 pt |
| Configure Default Gateway | 0.5 pt | 0.5 pt |
Points for Step 1 (5 points):
Enter score here.
Points for Step 2 (21 points):
Enter score here.
Points for Step 3 (14 points):
Enter score here.
Instructor Sign-off Part 1:
Instructor Sign-off
Total points for Part 1 (40 points):
Enter score here.
Part 2: Configure Single Area OSPFv2
Total points: 10
Time: 10 minutes
Configuration tasks for R1 and R2 include the following:
| Task | Specification | R1 | R2 |
|---|---|---|---|
| Configure the OSPF routing process | Use process id 1 | 1 pt | 1 pt |
| Manually configure the router id | Use 0.0.0.1 for R1 and 0.0.0.2 for R2 | 1 pt | 1 pt |
| Configure network statements | Configure a network statement for each locally attached network using a wild card mask that matches each network’s subnet mask Note: R2 Lo0 network should not be included in the OSPF process. |
3 pts | 3 pts |
Instructor Sign-off Part 2
Instruction Sign-off
Total Points (10 points):
Enter score here.
Part 3: Optimize Single-Area OSPFv2
Total points: 20
Time: 20 minutes
Step 1: Configure R1.
Configuration Tasks for R1 include the following:
| Task | Specification | Points |
|---|---|---|
| Configure passive interfaces | Configure all interfaces that are not directly connected to an OSPF neighbor to be passive | 3 points |
| Configure the reference bandwidth | Adjust the reference bandwidth to 1 Gigabit | 2 points |
| Configure Loopback 0 to report the mask it is configured with instead of a host mask | Configure Loopback0 as a point-to-point network for OSPF | 2 points |
| Tune the timers for your network | Configure the hello time for 30 seconds | 1 point |
Router 1
R1>enable
Password: ciscoenpass
R1#configure terminal

R1(config)#router ospf 1

R1(config-router)#passive-interface g0/0/1
R1(config-router)#passive-interface loopback 0

R1(config-router)#auto-cost reference-bandwidth 1000
R1(config-router)#exit

R1(config)#interface loopback 0
R1(config-if)#ip ospf network point-to-point
R1(config-if)#exit

R1(config)#interface g0/0/0
R1(config-if)#ip ospf hello-interval 30
R1(config-if)#
Step 2: Configure R2.
Configuration tasks for R2 include the following:
| Task | Specification | Points |
|---|---|---|
| Configure passive interfaces | Configure all interfaces that are not directly connected to an OSPF neighbor to be passive | 2 points |
| Configure the reference bandwidth | Adjust the reference bandwidth to 1 Gigabit | 2 points |
| Provide default routing for the OSPF domain | Configure a static default route with loopback 0 as the exit interface, then share the default information with other OSPF speakers | 5 points |
| Tune the timers for your network | Configure the hello time for 30 seconds | 1 point |
| Tune the DR/BDR election to favor R2 | Set the OSPF priority for R2 to a value of 50 | 2 points |
Router 2
R2>en
Password: ciscoenpass
R2#configure terminal

R2(config)#router ospf 1

R2(config-router)#passive-interface g0/0/1
R2(config-router)#passive-interface loopback 0

R2(config-router)#auto-cost reference-bandwidth 1000

R2(config)#ip route 0.0.0.0 0.0.0.0 loopback 0
R2(config)#router ospf 1
R2(config-router)#default-information originate
R2(config-router)#exit

R2(config)#interface g0/0/0
R2(config-if)#ip ospf hello-interval 30

R2(config-if)#ip ospf priority 50
R2(config-if)#exit
R2(config)#
Points for Step 1 (8 points)
Enter score here.
Points for Step 2 (12 points)
Enter score here.
Instructor Sign-off Part 3:
Instructor Sign-off
Total points (20 points):
Enter score here.
Part 4: Configure Access Control, NAT, and perform configuration backup
Total points: 30
Time: 30 minutes
Step 1: Configure host computers.
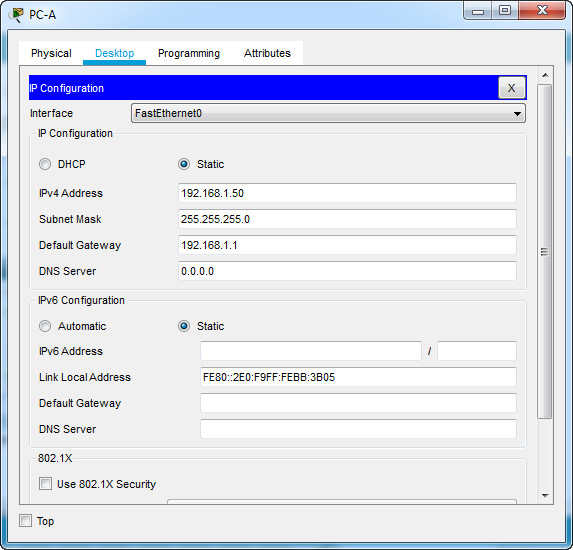
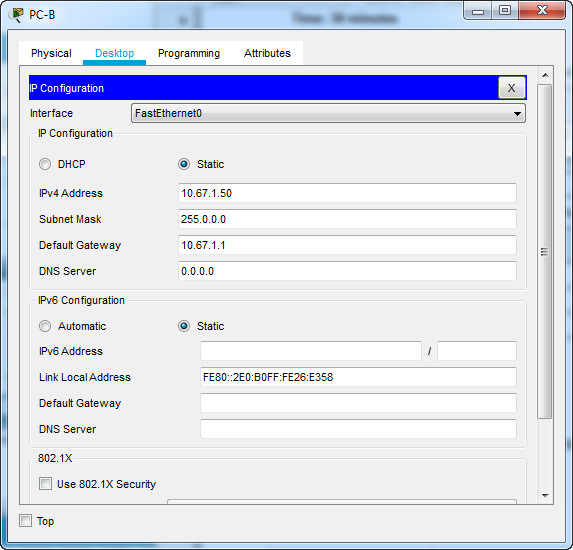
Configure the host computers PC-A and PC-B with IPv4 addresses. (4 points)
| Description | PC-A | PC-B |
|---|---|---|
| IP Address | 192.168.1.50 | 10.67.1.50 |
| Subnet Mask | 255.255.255.0 | 255.255.255.0 |
| Default Gateway | 192.168.1.1 | 10.67.1.1 |
PC-A

PC-B

After configuring each host computer, perform the following tests: (4 points)
| Source | Target | Protocol | Expected Result |
|---|---|---|---|
| PC-A | PC-B | Ping ( C:\>ping 10.67.1.50) |
Success |
| PC-A | https://209.165.201.1 | HTTPS (On browser, access: https://209.165.201.1) |
Success |
| PC-A | 209.165.201.1 | SSHC:\>ssh -l admin 209.165.201.1Enter password: admin1pass |
Success |
| PC-B | 209.165.201.1 | SSHC:\>ssh -l admin 209.165.201.1Enter password: admin1pass |
Success |
If you get different results, troubleshoot your OSPF and host configurations.
Note: If you are unable to access 209.165.201.1 via https, enter ip http secure-server at R2 CLI.
R2(config)# ip http secure-server
Step 2: Configure Access Control on R2.
Create and apply an access control list on R2 named R2-SECURITY to do the following:
| Task | Specification | Points |
|---|---|---|
| Create an access control list | R2-SECURITY | 2 points |
| Control HTTP and HTTPS traffic | Only hosts from the 10.0.0.0/8 network are allowed to reach the web server at 209.165.201.1 | 2 points |
| Control SSH traffic | SSH is not allowed to the address 209.165.201.1 | 2 points |
| Permit traffic | All other traffic, regardless of protocol, is allowed | 2 points |
| Apply the ACL | Filter traffic originating from R1 | 2 points |
On Router R2
R2(config)#ip access-list extended R2-SECURITY
R2(config-ext-nacl)#deny tcp any host 209.165.201.1 eq 443
R2(config-ext-nacl)#deny tcp any host 209.165.201.1 eq 22
R2(config-ext-nacl)#permit ip any any
R2(config-ext-nacl)#exit

R2(config)#interface g0/0/0
R2(config-if)#ip access-group R2-SECURITY in
After configuring and applying the ACL, perform the following tests: (2 points)
| Source | Target | Protocol | Expected Result |
|---|---|---|---|
| PC-A | PC-B | Ping | Success |
| PC-A | https://209.165.201.1 | HTTPS | Failure |
| PC-A | 209.165.201.1 | SSH | Failure |
| PC-B | 209.165.201.1 | SSH | Success |
If you get different results, double check your ACL configuration and application.
Step 3: Configure NAT.
The decision has been made that the entire organization should be using addresses in the 10.0.0.0/8 network space. R1’s LAN is out of compliance. There are applications and services running in the R1 LAN that cannot have their IP address changed without the entire system being rebuilt, so NAT is in order. Here are the configuration tasks at R1:
| Task | Specification | Points |
|---|---|---|
| Remove 192.168.1.0/24 from OSPF | Remove the appropriate network statement at R1 | 2 points |
| Create an ACL to identify hosts allowed to be translated | Create an ACL that matches the 192.168.1.0 network | 2 points |
| Configure Port Address Translation on the outside interface of R1 | Configure the NAT association between the ACL and the interface g0/0/0 so that it uses port address translation | 2 points |
| Identify the interfaces involved in NAT | Specify inside or outside on the appropriate interfaces | 2 points |
On Router R1
R1(config)#router ospf 1
R1(config-router)#no network 192.168.1.0 0.0.0.255 area 0
R1(config-router)#exit

R1(config)#access-list 1 permit 192.168.1.0 0.0.0.255

R1(config)#ip nat inside source list 1 interface g0/0/0 overload

R1(config)#interface g0/0/0
R1(config-if)#ip nat outside
R1(config-if)#interface g0/0/1
R1(config-if)#ip nat inside
R1(config-if)#
Step 4: Backup all device configurations.
| Task | Specification | Points |
|---|---|---|
| Using the TFTP server on PC-B, backup the running configuration of all of your devices to PC-B using the TFTP protocol | 2 points |
On 4 devices: R1, R2, S1, S2:
User Access Verification

Password: ciscoconpass

R1/R2/S1/S2>en
Password: ciscoenpass
R1/R2/S1/S2#copy running-config tftp
Address or name of remote host []? 10.67.1.50
Points for Step 1 (8 points):
Enter score here.
Points for Step 2 (12 points):
Enter score here.
Points for Step 3 (8 points):
Enter score here.
Points for Step 4 (2 points):
Enter score here.
Instructor Sign-off Part 4:
Instructor Sign-off
Total points (30 points):
Enter score here.
Part 5: Cleanup
NOTE: DO NOT PROCEED WITH CLEANUP UNTIL YOUR INSTRUCTOR HAS GRADED YOUR SKILLS EXAM AND HAS INFORMED YOU THAT YOU MAY BEGIN CLEANUP.
Unless directed otherwise by the instructor, restore host computer network connectivity, and then turn off power to the host computers.
Before turning off power to the router and switch, remove the NVRAM configuration files (if saved) from both devices.
Disconnect and neatly put away all LAN cables that were used in the Final.
Router Interface Summary Table
| Router Model | Ethernet Interface #1 | Ethernet Interface #2 | Serial Interface #1 | Serial Interface #2 |
|---|---|---|---|---|
| 1800 | Fast Ethernet 0/0 (F0/0) | Fast Ethernet 0/1 (F0/1) | Serial 0/0/0 (S0/0/0) | Serial 0/0/1 (S0/0/1) |
| 1900 | Gigabit Ethernet 0/0 (G0/0) | Gigabit Ethernet 0/1 (G0/1) | Serial 0/0/0 (S0/0/0) | Serial 0/0/1 (S0/0/1) |
| 2801 | Fast Ethernet 0/0 (F0/0) | Fast Ethernet 0/1 (F0/1) | Serial 0/1/0 (S0/1/0) | Serial 0/1/1 (S0/1/1) |
| 2811 | Fast Ethernet 0/0 (F0/0) | Fast Ethernet 0/1 (F0/1) | Serial 0/0/0 (S0/0/0) | Serial 0/0/1 (S0/0/1) |
| 2900 | Gigabit Ethernet 0/0 (G0/0) | Gigabit Ethernet 0/1 (G0/1) | Serial 0/0/0 (S0/0/0) | Serial 0/0/1 (S0/0/1) |
| 4221 | Gigabit Ethernet 0/0/0 (G0/0/0) | Gigabit Ethernet 0/0/1 (G0/0/1) | Serial 0/1/0 (S0/1/0) | Serial 0/1/1 (S0/1/1) |
| 4300 | Gigabit Ethernet 0/0/0 (G0/0/0) | Gigabit Ethernet 0/0/1 (G0/0/1) | Serial 0/1/0 (S0/1/0) | Serial 0/1/1 (S0/1/1) |
Note: To find out how the router is configured, look at the interfaces to identify the type of router and how many interfaces the router has. There is no way to effectively list all the combinations of configurations for each router class. This table includes identifiers for the possible combinations of Ethernet and Serial interfaces in the device.
The table does not include any other type of interface, even though a specific router may contain one. An example of this might be an ISDN BRI interface. The string in parenthesis is the legal abbreviation that can be used in Cisco IOS commands to represent the interface.

according to instructions is the packet tracer file is correct ? please answer an early response will highly be appreciated
hi i cant copy the running config of S1 to 10.67.1.50
Pinging PC A to PC says host unreachable and i cant see where the problem is. Ive troubleshooted and everything config is correct. Also the subnet mask of PC B is 255.255.255.255 as shown in the table but it says 255.0.0.0 on the answers sheet
PC-B 255.255.255.0
Hi, can’t understand this passage Part 4 Step 2
“Only hosts from the 10.0.0.0/8 network are allowed
to reach the web server at 209.165.201.1”
“R2(config-ext-nacl)#deny tcp any host 209.165.201.1 eq 443”
why deny? is correct?
Here he describes why, i think i got it, that’s because you put acl inbound on g0/0/0 of R2 filtering (DENY)all traffic from that way and allowing only the subnet on R2 g0/0/1 to access the destination (209.165.201.1 the loopback of R2 that is the exit)
i forgot the link https://youtu.be/jXJqcGygI-Q?t=2746
In my opinion this would be bad practice and should be done like this in the real world. Suppose the network infrastructure gets updated in the future and another switch on another 10.X.X.X network is added. Then this would no longer be a solution. :( poor design.
S1 cant save running configuration on tftp because there is no route to pc-b. Can you fix it or it should be like that?
Step 4, Part 3 Identify the interfaces involved in NAT
Is the inside and outside in the right order? Should it not be the other way around?
nvm