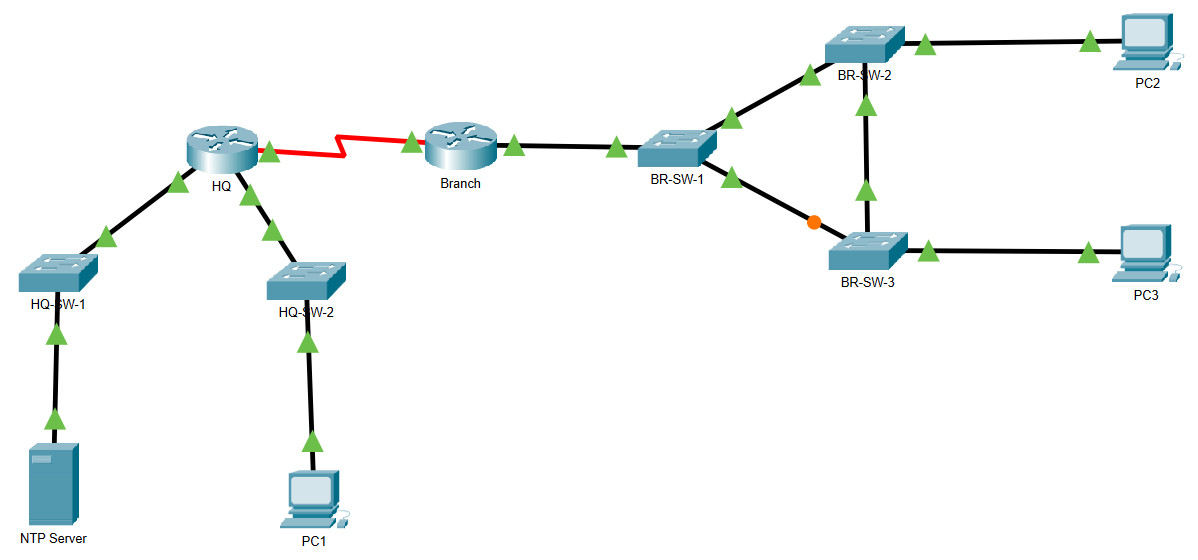
10.8.1 Packet Tracer – Configure CDP, LLDP, and NTP (Instructor Version)
Instructor Note: Red font color or gray highlights indicate text that appears in the instructor copy only.

10.8.1 Packet Tracer – Configure CDP, LLDP, and NTP
Addressing Table
| Device | Interface | IP Address |
|---|---|---|
| HQ | G0/0/0 | 192.168.1.1/24 |
| G0/0/1 | 192.168.2.1/24 | |
| S0/1/0 | 192.168.3.1/30 | |
| Branch | G0/0/0 | 192.168.1.2 |
| S0/1/0 | 192.168.3.2/30 | |
| HQ-SW-1 | VLAN 1 | Not configured |
| HQ-SW-2 | VLAN 1 | Not configured |
| BR-SW-1 | VLAN 10 | 192.168.4.250 |
| BR-SW-2 | VLAN 10 | 192.168.4.253 |
| BR-SW-3 | VLAN 10 | 192.168.4.254 |
| NTP Server | NIC | 192.168.1.254 |
| PC1 | NIC | 192.168.2.10 |
| PC2 | NIC | 192.168.4.10 |
| PC3 | NIC | 192.168.4.20 |
Objectives
In this activity, you will configure a router to receive time information over NTP and configure devices with CDP and LLDP.
- Configure CDP to run globally on a device.
- Disable CDP on device interfaces where necessary.
- Configure LLDP to run globally on a device.
- Configure LLDP to send and receive messages according to requirements.
- Configure a router to use an NTP server.
Background / Scenario
A network administrator has been asked to investigate a new client’s network. Documentation is incomplete for the network, so some information needs to be discovered. In addition, the NTP server needs to be configured on a router. Discovery protocols must also be adjusted to control traffic discovery protocol traffic and prevent information about the network from being received by potentially unauthorized hosts.
Some of the device IP addresses are unknown to you. You must determine what the IP addresses are so that you can connect to the devices over SSH in order to configure them. You can enter them into the Addressing Table as you discover them.
Instructions
Use the table below to logon to the Branch switches when you need to do so.
| Device | Username | User Password | Enable Secret |
|---|---|---|---|
| BR-SW1 | admin | SW1admin# | SW1EnaAccess# |
| BR-SW2 | admin | SW2admin# | SW2EnaAccess# |
| BR-SW3 | admin | SW3admin# | SW3EnaAccess# |
Note: Click the Fast Forward Time button in the blue bar below the topology to speed up STP convergence. You can also click it several times to speed up the CDP update process.
Configure LLDP as follows:
- Disable CDP on the HQ router.
- Enable LLDP globally on HQ.
- On HQ, configure the links to the switches to only receive LLDP messages.
- Disable CDP on the HQ-SW-1 and HQ-SW-2 switches.
- Enable LLDP on the HQ-SW-1 and HQ-SW-2 switches.
- On the HQ-SW-1 and HQ-SW-2 switches, configure the links to the HQ router to only send, not receive, LLDP messages.
- Disable LLDP completely on the HQ-SW-1 and HQ-SW-2 access ports that are in use.
Configure CDP as follows:
- Activate CDP on the Branch router.
- Connect to switch BR-SW1 over SSH. You will not be able to open a CLI window by clicking the Branch switches.
- Connect to switches BR-SW2 and BR-SW3 over SSH. Configure the access ports that are in use to not send CDP messages out of the ports.
Configure NTP:
- Configure HQ to use the device at 192.168.1.254 as an NTP server.
Answer Scripts
Router HQ
enable
conf t
lldp run
interface GigabitEthernet0/0/0
 no lldp transmit
 lldp receive
interface GigabitEthernet0/0/1
 no lldp transmit
 lldp receive
no cdp run
ntp server 192.168.1.254
end
Router Branch
enable
conf t
cdp run
end
Switch HQ-SW-1
enable
conf t
lldp run
no cdp run
interface FastEthernet0/24
 no lldp receive
 no lldp transmit
interface GigabitEthernet0/1
 no lldp receive
end
Switch HQ-SW2
enable
conf t
lldp run
no cdp run
interface FastEthernet0/1
 no lldp receive
 no lldp transmit
interface GigabitEthernet0/1
 no lldp receive
end
Switch BR-SW-2
enable
conf t
int fa0/1
 no cdp enable
end
Switch BR-SW-3
ena
conf t
int fa0/1
 no cdp enable
end

can i have this pka file without answer!
Here is how to reset the activity.
https://itexamanswers.net/how-to-reset-activity-packet-tracer-pka-file.html
Thank you for explaining.
Where do you see any explanations? :| How did he get to those ip’s in red for example?
show cdp neighbor detail on the branch router will give you the IP for BR-SW1. Then SSH into BR-SW1 and use the same command to get the IPs for BR-SW2 and BR-SW3.
Thank you! I am having issues with ssh connecting from the branch router to the switch BR-SW-1. Can you help me?
Save the Packet Tracer close it. Then reopen it and try again