3.2.5.14 Lab – Interacting with a physical world from Webex Teams (Instructor Version)
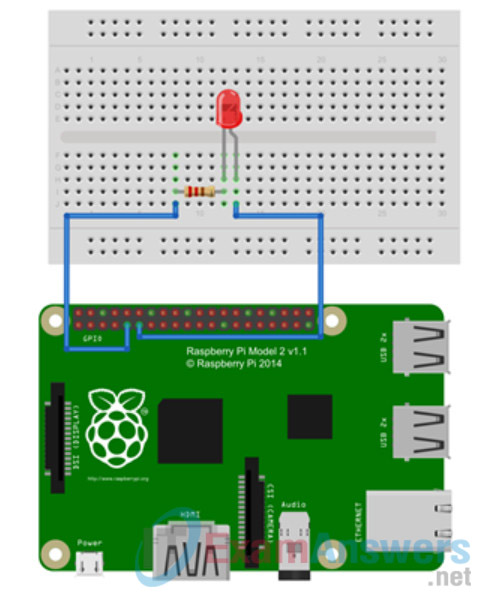
Topology

Objectives
- Build a Prototype Circuit
- Use the Webex Teams RESTful API
- Build a simple messaging “bot” to interact with the physical world
Background / Scenario
In this lab, you will learn how to build a simple messaging “bot”. The messaging bot will listen to commands on Webex Teams and control the physical world represented by the GPIO pins of the Raspberry Pi.
Required Resources
- PC with Internet Access
- Ethernet or Wi-Fi based connection to the Internet with DHCP and no traffic filtering
- Raspberry Pi that is configured and imaged for PL-App access
- Breadboard, resistors, LEDs, wires
Part 1: Building the Electronic Circuit
Step 1: Build the prototyping circuit on the breadboard.
1. Select 1 – 330 Ohm (Ω) resistor, 1 LED, 1 red jumper wire, 1 black jumper wire from the Raspberry Pi starter kit.
2. Insert the LED onto the breadboard. The cathode leg is connected to c13 and the anode leg is to be connected c14.
3. Insert the resistor onto the breadboard into the b9 and b13 connectors.
Step 2: Complete the prototyping circuit by connecting it to the Raspberry Pi.
Note: The GPIO pins on the Raspberry Pi are male. If available, use male to female jumper wires to connect from the breadboard to the Raspberry Pi. Otherwise, use the GPIO ribbon cable, provided in the starter kit, to convert the GPIO pins to female connectors.
1. Connect one end of the black jumper wire to the breadboard a9 connector and the other end to GPIO Physical pin 9 on the Raspberry Pi.
2. Connect one end of the red jumper wire to the breadboard a14 connector and the other end to GPIO Physical pin 11 (BCM17) on the Raspberry Pi.


Step 3: Blink the LED
1. Import the RPi.GPIO Python Module to interact with the GPIO pins of the Raspberry Pi.
2. Set the pin numbering scheme to BCM
3. Set the pin with the LED to be OUTput.
# Import the GPIO modules to control the GPIO pins of the Raspberry Pi
import RPi.GPIO as GPIO
# Set the desired pin numbering scheme:
GPIO.setmode(GPIO.BCM)


# GPIO PIN where the LED is connected
#  pin numbering based on the BCM scheme
LEDPin = 17

# Setup the direction of the GPIO pin - either INput or OUTput
GPIO.setup(LEDPin, GPIO.OUT)
4. Execute the cell below to verify the LED is blinking and that the GPIO access is working.
import time

for i in range(5):
    print("ON")
    GPIO.output(LEDPin, True)
    time.sleep(1)
    print("OFF")
    GPIO.output(LEDPin, False)
    time.sleep(1)
Part 2: Connecting to a Webex Teams space
Step 1: Get Webex Teams API Token Key
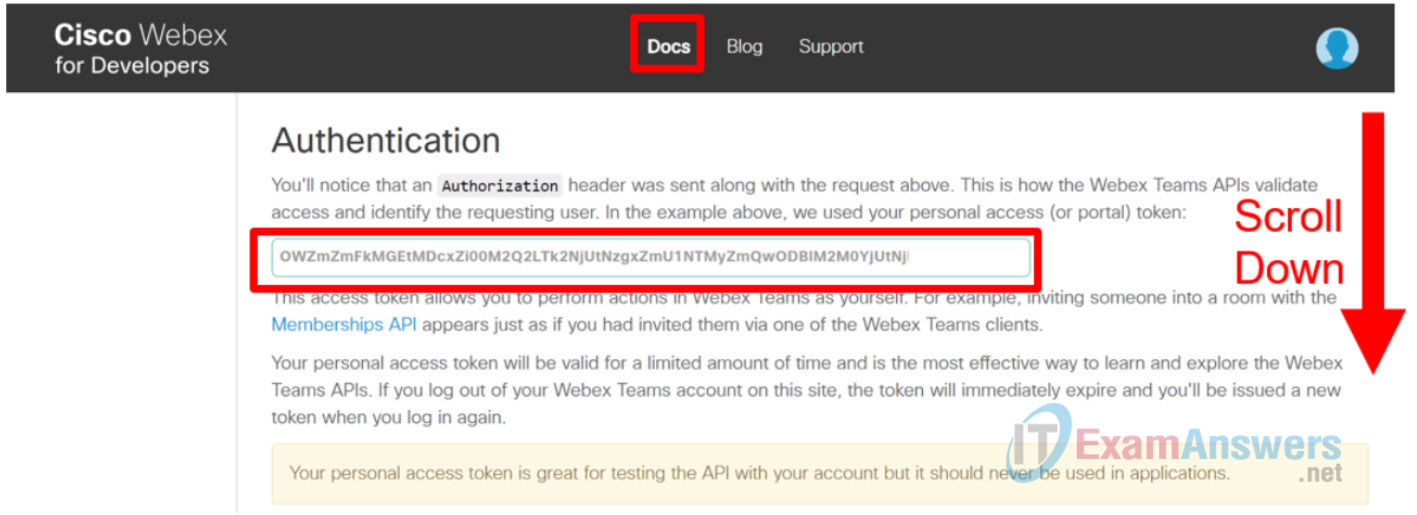
The Webex Teams RESTful API is authenticating all requests using a Token Key. To get the Token Key associated with your account, follow the steps bellow:
1. Browse to the website https://developer.webex.com and login to your Webex Teams account.
2. If you don’t have an account, please create one and download the Webex Teams client do your device.
3. Get the Webex Teams API KEY (personal access token)

4. Learn more about the Webex Teams APIs from the Webex Teams API Quick Reference
5. Enter your Token Key in the cell below and execute it to define the APIAuthorizationKey variable that will be used to authenticate your reqeusts in the upcoming steps.
# Define a local variable in Python that will hold our Authentication API KEY:
APIAuthorizationKey = 'Bearer YjcxZDkxMTItMWFhMy00NjQ1LTxxxxxxxxxxxxxxxxxxxxxxxxxxxxxxxxxxxxxxxx';
NOTE: The Webex Teams Access Token expires in 2 years and gets imediatelly inactivated when you log out from developer.webex.com. If the code returns a 401 error code, you may need to create a new token and modify the code for it to work correctly.
Step 2: Import the needed Python modules
The Python’s requests module provides an easy to use HTTP library to send and receive messages to web servers. Since RESTful API services, such as Webex Teams APIs, are implemented as small web servers, this is an essential module.
Most of the messages that are exchanged between the API client and API server have a special formatting. The most common are XML and JSON. The Webex Teams API uses JSON to encode messages. To work with JSON encoded data, in Python import the json module.
import requests
import json
import time
Step 3: Access the API Endpoints – rooms
1. Use the following Python code to access the rooms API Endpoint. The HTTP GET request returns all the Webex Teams Rooms you are a member of.
2. The local object r will hold the response.
# Using the requests library, create a new HTTP GET Request against the Webex Teams API Endpoint for Webex Teams Rooms:
#  the local object "r" will hold the returned data:
r = requests.get(   "https://api.ciscospark.com/v1/rooms",
                    headers={'Authorization':APIAuthorizationKey}
                )

# Check if the response from the API call was OK (resp. code 200)
if(r.status_code != 200):
    print("Something wrong has happened:")
    print("ERROR CODE: {} \nRESPONSE: {}".format(r.status_code, r.text))
    assert()
3. Use the following code to see the contents of the returned data. The returned data from the Webex Teams API are usually formatted using the JSON encoding. The json.dumps() function generates a more easily readable output.
# See what is in the JSON data:

jsonData = r.json()

print(
    json.dumps(
        jsonData,
        indent=4
    )
)
4. To programmatically go through the list of rooms, you can use the following code:
rooms = r.json()['items']
for room in rooms:
    print ("Room name: '" + room['title'] + "' ID: " + room['id'])
5. To programmatically identify a room with a specific name, we can use the following code.
NOTE: Do not forget to update the roomNameToSearch variable with a name of valid room from your Webex Teams account
# Replace contents of this varialble with a real room name from your Webex Teams account
roomNameToSearch = 'Jozef'

# Define a variable that will hold the roomId
roomIdToMessage = None

rooms = r.json()['items']
for room in rooms:
    #print "Room name: '" + room['title'] + "' ID: " + room['id']
    if(room['title'].find(roomNameToSearch) != -1):
        print ("Found rooms with the word " + roomNameToSearch)
        print ("Room name: '" + room['title'] + "' ID: " + room['id'])
        roomIdToMessage = room['id']
        roomTitleToMessage = room['title']
        break

if(roomIdToMessage == None):
    print("Did not found any room with " + roomNameToSearch + " name in it.")
else:
    print("A valid room has been found and this is the room id: " + roomIdToMessage)
6. Vefify that the roomIdToMessage contains a valid room ID:
print(roomIdToMessage)
Step 4: Access the API Endpoints – messages
1. Use the following Python code to access the messages API Endpoint. The HTTP GET request returns all the messages in the room specified in the GET parameters.
2. The local object r will hold the response.
# define the mandatory or optional GET parameters for the `messages` API endpoint:
getMessagesUrlParameters = {
            # mandatory parameter - the room ID
            "roomId": roomIdToMessage,
            # optional parameter - number of the last messages to return
            "max": 8
}

# Using the requests library, create a new HTTP GET Request against the Webex Teams API Endpoint for Webex Teams Messages:
#  the local object "r" will hold the returned data:
r = requests.get(   "https://api.ciscospark.com/v1/messages",
                    params=getMessagesUrlParameters,
                    headers={'Authorization':APIAuthorizationKey}
                )

if(r.status_code != 200):
    print("Something wrong has happened:")
    print("ERROR CODE: {} \nRESPONSE: {}".format(r.status_code, r.text))
    assert()
3. Use the following code to see the contents of the returned data. The returned data from the Webex Teams API are usually formatted using the JSON encoding.
# See what is in the JSON data:

jsonData = r.json()

print(
    json.dumps(
        jsonData,
        indent=4
    )
)
4. The following code will loop through the messages and try to identify a message with a command (e.g. message /Turn On or /Turn Off). If such message is found, the loop breaks and an informational message is displayed.
5. Try to execute the code cell below. If you, or someone else, in the Webex Teams Room from above has entered the /Turn On or /Turn Off message, it will be seen here.
NOTE: If you haven’t entered the /Turn On or /Turn Off message in the Webex Teams room before this step, please re-run the code cell from Step 4 to get all the new messages from your Webex Teams Room.
messages = jsonData['items']
for message in messages:
    print("Message: " + message['text'])
    if(message['text'] == '/Turn On'):
        messageId = message['id']
        print("Found a command message to TURN ON the LED!")
        break
    if(message['text'] == '/Turn Off'):
        messageId = message['id']
        print("Found a command message to TURN OFF the LED!")
        break
Step 5: Continuos loop for new messages
1. To continuously get new messages from the Webex Teams Room, a while loop executes the commands from above over and over.
2. In each iteration of the while loop, check for new messages. Limit the number of returned messages to 1 (e.g. newest message)
3. To only process new messages, verify if the current message ID is the same as in the previous iteration.
4. Based on the text of the message, control the GPIO pins of the Raspberry Pi.
5. To interupt the loop, click on the STOP icon next to the cell.
lastMessageId = None

while True:
    # the code should not hammer the API service with too many reqeuests in a short time
    #  to limit the number of requests in the while loop, begin with a short 1 second delay:
    time.sleep(1)
    print("Next iteration is starting ...")

    # define the mandatory or optional GET parametrs for the `messages` API endpoint:
    getMessagesUrlParameters = {
                # mandatory parameter - the room ID
                "roomId": roomIdToMessage,
                # optional parameter - number of the last messages to return
                #  only interested in the very last message in the room
                #   thefore max = 1
                "max": 1
    }

    # Using the requests library, creare a new HTTP GET Request against the Webex Teams API Endpoint for Webex Teams Messages:
    #  the local object "r" will hold the returned data:
    r = requests.get(   "https://api.ciscospark.com/v1/messages",
                        params=getMessagesUrlParameters,
                        headers={'Authorization':APIAuthorizationKey}
                    )
    if(r.status_code != 200):
        print("Something wrong has happened:")
        print("ERROR CODE: {} \nRESPONSE: {}".format(r.status_code, r.text))
        assert()


    # Store the json data from the reply
    jsonData = r.json()

    # Get the items (array of messages) from the jsonData.
    messages = jsonData['items']
    # since the request specified max=1, only one message should be returned:
    message  = messages[0]

    # Verify if this is a new message:
    if(lastMessageId == message['id']):
        #this is the same message as before, no new messages
        print("No New Messages.")
    else:
        # this is a new message, its ID is different from the one in the previous iteration
        print("New Message: " + message['text'])
        # save the message id for the next iteration:
        lastMessageId = message['id']
        if(message['text'] == '/Turn On'):
            messageId = message['id']
            print("Found a command message to TURN ON the LED!")
            # Turn on the LED:
            GPIO.output(LEDPin, True)
            #break
        if(message['text'] == '/Turn Off'):
            messageId = message['id']
            print("Found a command message to TURN OFF the LED!")
            # Turn off the LED:
            GPIO.output(LEDPin, False)
            #break
Reflection:
Try to update the code and the electronic circuit to be able not only control the Physical World from Webex Teams, but also sense. In that case, you could ask on Webex Teams questions such as “What is the temperature?”.
