11.6.1 Packet Tracer – Switch Security Configuration (Instructor Version)
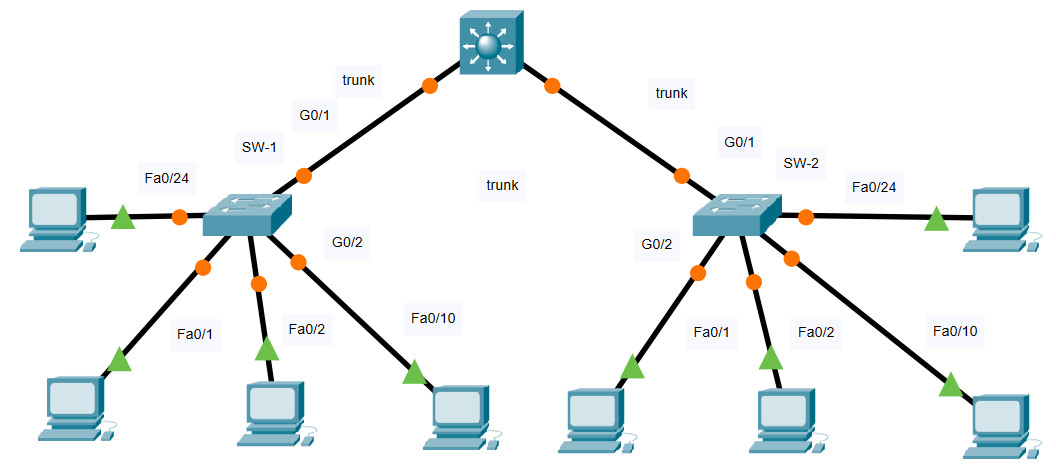
Topology

11.6.1 Packet Tracer – Switch Security Configuration
VLAN Table
| Switch | VLAN Number | VLAN Name | Port Membership | Network |
|---|---|---|---|---|
| SW-1 | 10 | Admin | F0/1, F0/2 | 192.168.10.0/24 |
| 20 | Sales | F0/10 | 192.168.20.0/24 | |
| 99 | Management | F0/24 | 192.168.99.0/24 | |
| 100 | Native | G0/1, G0/2 | None | |
| 999 | BlackHole | All unused | None | |
| SW-2 | 10 | Admin | F0/1, F0/22 | 192.168.10.0/24 |
| 20 | Sales | F0/10 | 192.168.20.0/24 | |
| 99 | Management | F0/24 | 192.168.99.0/24 | |
| 100 | Native | None | None | |
| 999 | BlackHole | All unused | None |
Objectives
- Part 1: Create a Secure Trunk
- Part 2: Secure Unused Switchports
- Part 3: Implement Port Security
- Part 4: Enable DHCP Snooping
- Part 5: Configure Rapid PVST PortFast and BPDU Guard
Background
You are enhancing security on two access switches in a partially configured network. You will implement the range of security measures that were covered in this module according to the requirements below. Note that routing has been configured on this network, so connectivity between hosts on different VLANs should function when completed.
Instructions
Step 1: Create a Secure Trunk.
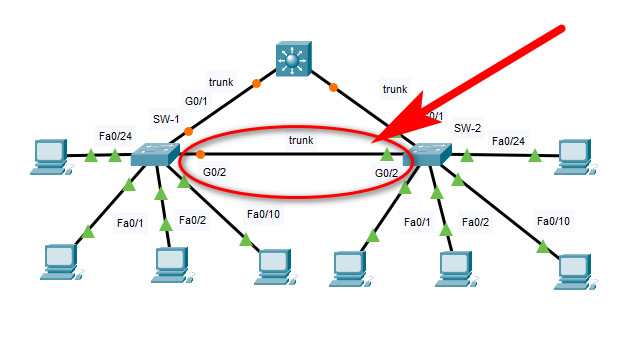
a. Connect the G0/2 ports of the two access layer switches.
b. Configure ports G0/1 and G0/2 as static trunks on both switches.
c. Disable DTP negotiation on both sides of the link.
d. Create VLAN 100 and give it the name Native on both switches.
e. Configure all trunk ports on both switches to use VLAN 100 as the native VLAN.
SW-1 and SW-2
SW-1/SW-2(config)#interface range GigabitEthernet0/1 - 2
SW-1/SW-2(config-if-range)#switchport mode trunk
SW-1/SW-2(config-if-range)#switchport nonegotiate
SW-1/SW-2(config-if-range)#
SW-1/SW-2(config-if-range)#vlan 100
SW-1/SW-2(config-vlan)#name Native
SW-1/SW-2(config-vlan)#
SW-1/SW-2(config-vlan)#interface range GigabitEthernet0/1 - 2
SW-1/SW-2(config-if-range)#switchport trunk native vlan 100
Step 2: Secure Unused Switchports.
a. Shutdown all unused switch ports on SW-1.
b. On SW-1, create a VLAN 999 and name it BlackHole. The configured name must match the requirement exactly.
c. Move all unused switch ports to the BlackHole VLAN.
SW-1(config)#interface range FastEthernet0/3-9, FastEthernet0/11-23
SW-1(config-if-range)#shutdown
SW-1(config-if-range)#exit

SW-1(config)#vlan 999
SW-1(config-vlan)#name BlackHole
SW-1(config-vlan)#exit

SW-1(config)#interface range FastEthernet0/3-9, FastEthernet0/11-23
SW-1(config-if-range)#switchport access vlan 999
Step 3: Implement Port Security.
a. Activate port security on all the active access ports on switch SW-1.
SW-1(config)#interface range FastEthernet0/1, FastEthernet0/2, FastEthernet0/10,FastEthernet0/24
SW-1(config-if-range)#switchport mode access
SW-1(config-if-range)#switchport port-security
b. Configure the active ports to allow a maximum of 4 MAC addresses to be learned on the ports.
SW-1(config)#interface range FastEthernet0/1, FastEthernet0/2, FastEthernet0/10,FastEthernet0/24
SW-1(config-if-range)#switchport port-security maximum 4
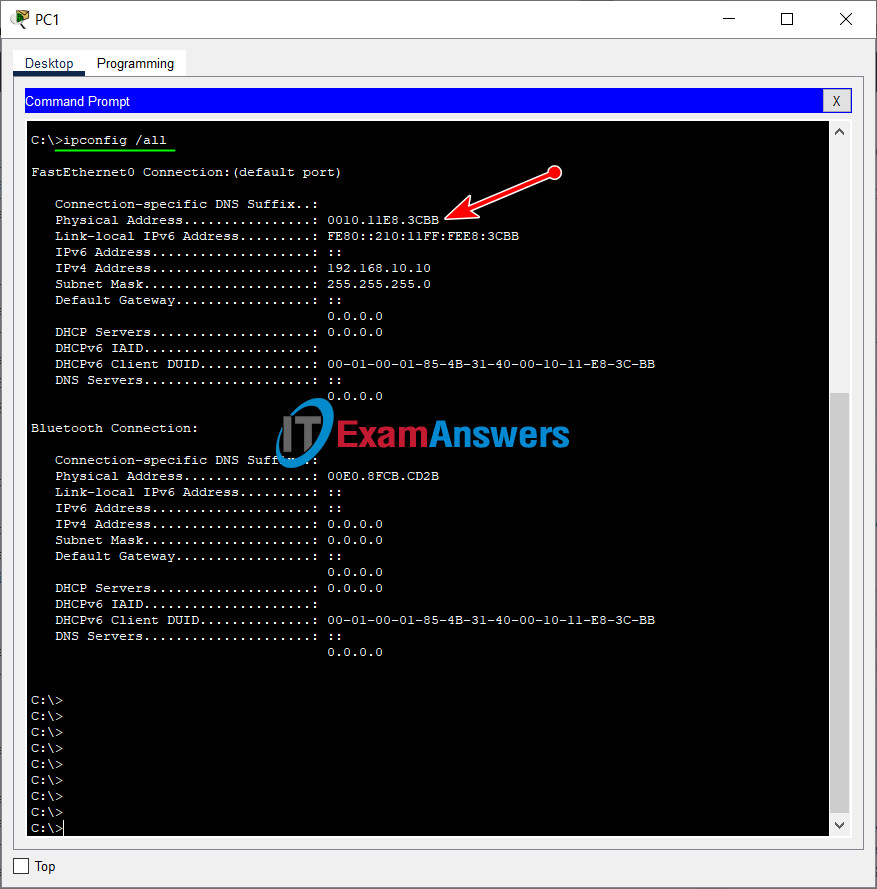
c. For ports F0/1 on SW-1, statically configure the MAC address of the PC using port security.
SW-1(config)#interface FastEthernet0/1
SW-1(config-if)#switchport port-security mac-address 0010.11E8.3CBB
d. Configure each active access port so that it will automatically add the MAC addresses learned on the port to the running configuration.
SW-1(config)#interface range FastEthernet0/1, FastEthernet0/2, FastEthernet0/10,FastEthernet0/24
SW-1(config-if-range)#switchport port-security mac-address sticky
e. Configure the port security violation mode to drop packets from MAC addresses that exceed the maximum, generate a Syslog entry, but not disable the ports.
SW-1(config)#interface range FastEthernet0/1, FastEthernet0/2, FastEthernet0/10,FastEthernet0/24
SW-1(config-if-range)#switchport port-security violation restrict
Step 4: Configure DHCP Snooping.
a. Configure the trunk ports on SW-1 as trusted ports.
SW-1(config)#interface range GigabitEthernet0/1-2
SW-1(config-if-range)#ip dhcp snooping trust
b. Limit the untrusted ports on SW-1 to five DHCP packets per second.
SW-1(config)#interface range FastEthernet0/2, FastEthernet0/10,FastEthernet0/24
SW-1(config-if-range)#ip dhcp snooping limit rate 5
c. On SW-2, enable DHCP snooping globally and for VLANs 10, 20 and 99.
SW-2(config)#ip dhcp snooping
SW-2(config)#ip dhcp snooping vlan 10,20,99
Note: The DHCP snooping configuration may not score properly in Packet Tracer.
Step 5: Configure PortFast, and BPDU Guard.
a. Enable PortFast on all the access ports that are in use on SW-1.
b. Enable BPDU Guard on all the access ports that are in use on SW-1.
SW-1(config)#interface range FastEthernet0/1-2, FastEthernet0/10,FastEthernet0/24
SW-1(config-if-range)#spanning-tree portfast
SW-1(config-if-range)#spanning-tree bpduguard enable
c. Configure SW-2 so that all access ports will use PortFast by default.
SW-2(config)#spanning-tree portfast default
Devices Config:
SW1 Configurations
enable
configure terminal
spanning-tree portfast default
interface FastEthernet0/1
ip dhcp snooping limit rate 5
switchport mode access
switchport port-security
switchport port-security maximum 4
switchport port-security mac-address sticky
switchport port-security violation restrict
switchport port-security mac-address 0010.11E8.3CBB
spanning-tree portfast
spanning-tree bpduguard enable

interface range FastEthernet0/2, FastEthernet0/10,FastEthernet0/24
ip dhcp snooping limit rate 5
switchport mode access
switchport port-security
switchport port-security maximum 4
switchport port-security mac-address sticky
switchport port-security violation restrict
spanning-tree portfast
spanning-tree bpduguard enable

interface range FastEthernet0/3-9, FastEthernet0/11-23
switchport access vlan 999
shutdown

interface range GigabitEthernet0/1-2
switchport trunk native vlan 100
ip dhcp snooping trust
switchport mode trunk
switchport nonegotiate
vlan 100
name Native
vlan 999
name BlackHole
SW-2 Configuration
enable
configure terminal
ip dhcp snooping
ip dhcp snooping vlan 10,20,99
spanning-tree portfast default
interface GigabitEthernet0/1
switchport trunk native vlan 100
switchport mode trunk
switchport nonegotiate

interface GigabitEthernet0/2
switchport trunk native vlan 100
switchport mode trunk
switchport nonegotiate

vlan 100
name Native


SW1 configs are wrong at the bottom. You have where you add vlan 999 with the GigE. However, it needs to be up with the FastE
OMG – The manul addition — THANK U:)
im just not understanding how to get the mac address since it isnt on the table… where do i look? :(
check the pc and interface goto fast ethernet you’ll find the mac address up there.
thank you so much this was really helpful it saved lots of my time :) thanks again
ping isn’t successful
Very repetitive commands when it could be shorten for each specific instruction and range.
Como descargo el archivo?
You must manually add a crossover cable between the g0/2 ports on the switches to get to 100%
Yes, I did that in the file pka, but I’ll add it to this post, thanks for your comments :)
Yeah that’s where I stuck for the last 10 min 2% left