7.0 Introduction
7.0.1 Why should I take this module?
Welcome to DHCPv4!
The Dynamic Host Configuration Protocol (DHCP) dynamically assigns IP addresses to devices. DHCPv4 is for an IPv4 network. (Don’t worry, you’ll learn about DHCPv6 in another module.) This means that you, the network administrator, do not have to spend your day configuring IP addresses for every device on your network. In a small home or office, that would not be very difficult, but any large network might have hundreds, or even thousands of devices.
In this module, you will learn how to configure a Cisco IOS router to be a DHCPv4 server. Then you will learn how to configure a Cisco IOS router as a client. This module includes a few Syntax Checkers and a Packet Tracer activity to help you try out your new knowledge. DHCPv4 configuration skills will significantly reduce your workload, and who doesn’t want that?
7.0.2 What will I learn to do in this module?
Module Title: DHCPv4
Module Objective: Implement DHCPv4 to operate across multiple LANs.
| Topic Title | Topic Objective |
|---|---|
| DHCPv4 Concepts | Explain how DHCPv4 operates in a small- to medium-sized business network. |
| Configure a Cisco IOS DHCPv4 Server | Configure a router as a DHCPv4 server. |
| Configure a DHCPv4 Client | Configure a router as a DHCPv4 client. |
7.1 DHCPv4 Concepts
7.1.1 DHCPv4 Server and Client
Dynamic Host Configuration Protocol v4 (DHCPv4) assigns IPv4 addresses and other network configuration information dynamically. Because desktop clients typically make up the bulk of network nodes, DHCPv4 is an extremely useful and timesaving tool for network administrators.
A dedicated DHCPv4 server is scalable and relatively easy to manage. However, in a small branch or SOHO location, a Cisco router can be configured to provide DHCPv4 services without the need for a dedicated server. Cisco IOS software supports an optional, full-featured DHCPv4 server.
The DHCPv4 server dynamically assigns, or leases, an IPv4 address from a pool of addresses for a limited period of time chosen by the server, or until the client no longer needs the address.
Clients lease the information from the server for an administratively defined period. Administrators configure DHCPv4 servers to set the leases to time out at different intervals. The lease is typically anywhere from 24 hours to a week or more. When the lease expires, the client must ask for another address, although the client is typically reassigned the same address.
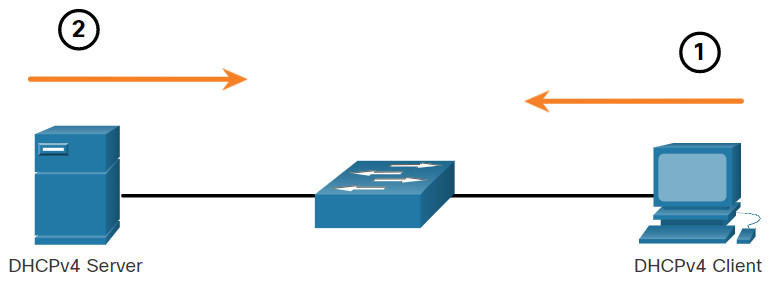
- The DHCPv4 lease process begins with the client sending a message requesting the services of a DHCP server.
- If there is a DHCPv4 server that receives the message, it will respond with an IPv4 address and possible other network configuration information.
7.1.2 DHCPv4 Operation
DHCPv4 works in a client/server mode. When a client communicates with a DHCPv4 server, the server assigns or leases an IPv4 address to that client. The client connects to the network with that leased IPv4 address until the lease expires. The client must contact the DHCP server periodically to extend the lease. This lease mechanism ensures that clients that move or power off do not keep addresses that they no longer need. When a lease expires, the DHCP server returns the address to the pool where it can be reallocated as necessary.
7.1.3 Steps to Obtain a Lease
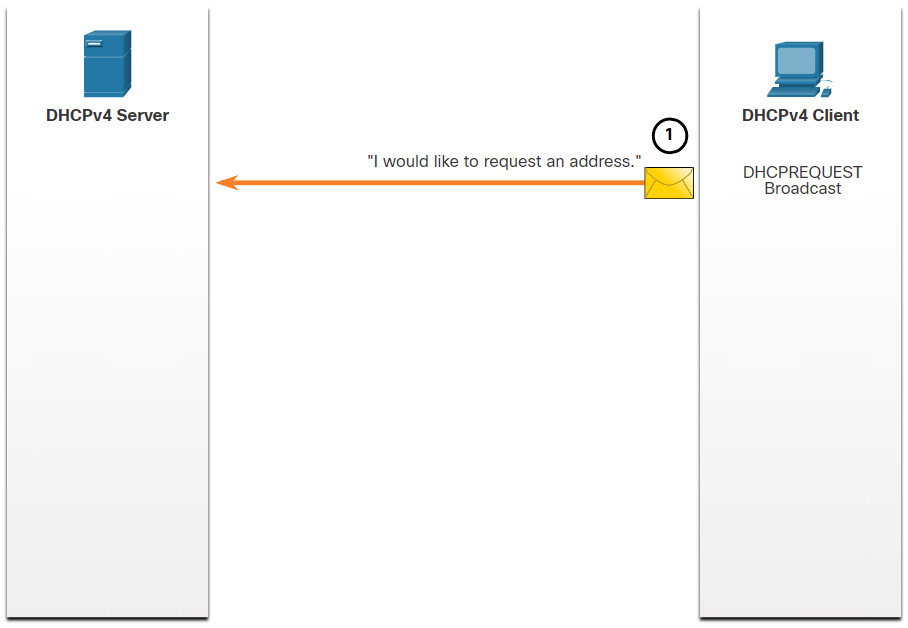
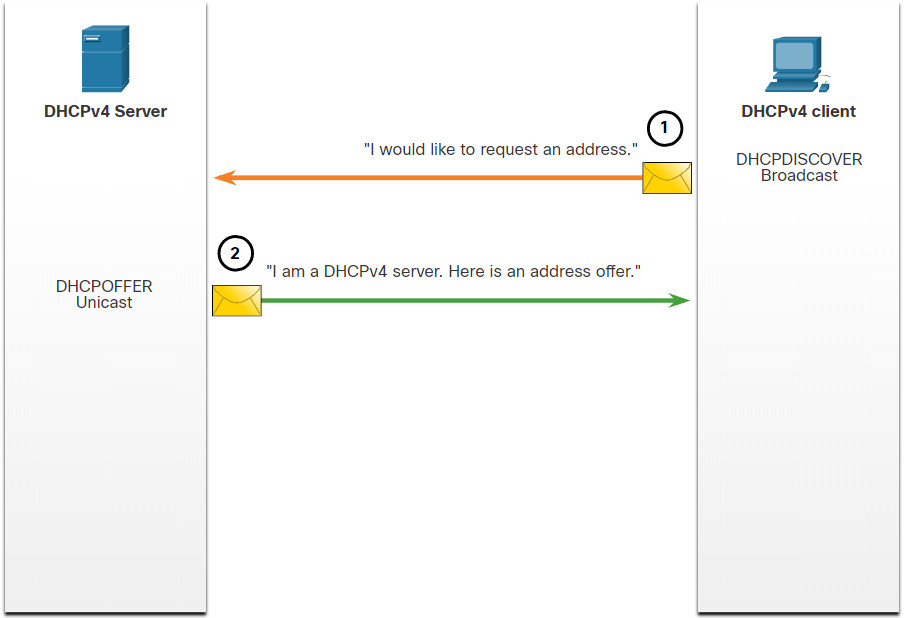
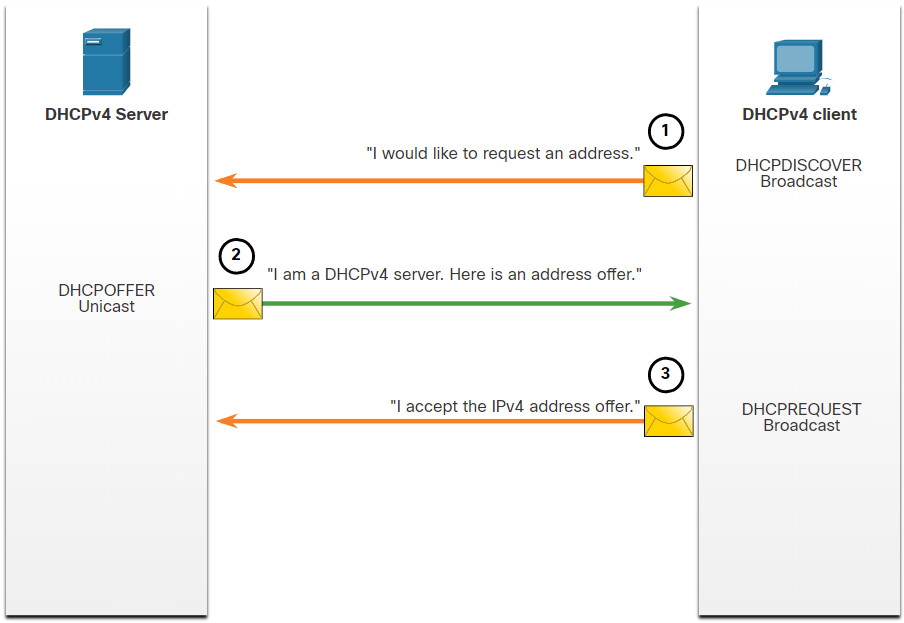
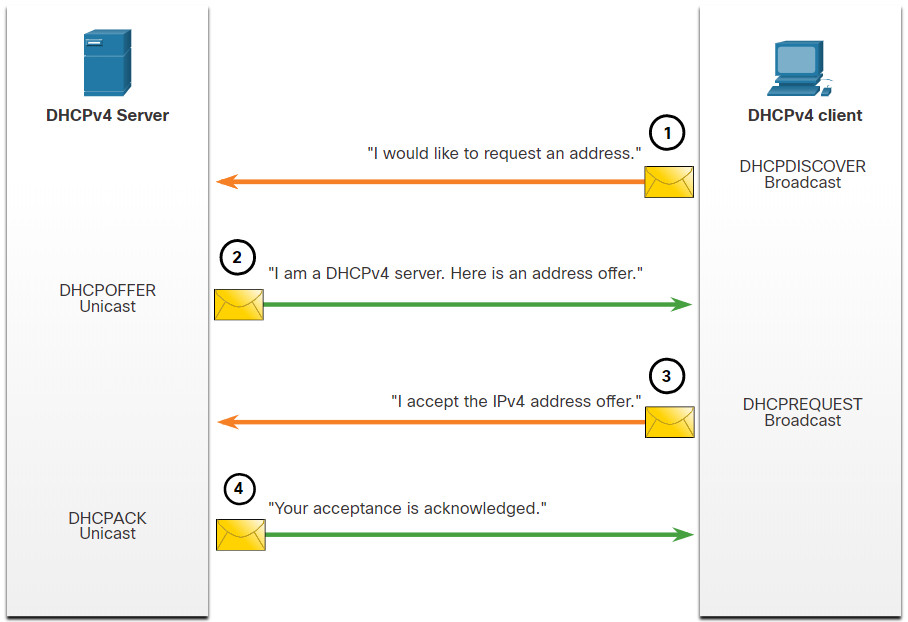
When the client boots (or otherwise wants to join a network), it begins a four-step process to obtain a lease:
- DHCP Discover (DHCPDISCOVER)
- DHCP Offer (DHCPOFFER)
- DHCP Request (DHCPREQUEST)
- DHCP Acknowledgment (DHCPACK)
Click each button to learn the four-step process to obtain a DHCP lease.
7.1.4 Steps to Renew a Lease
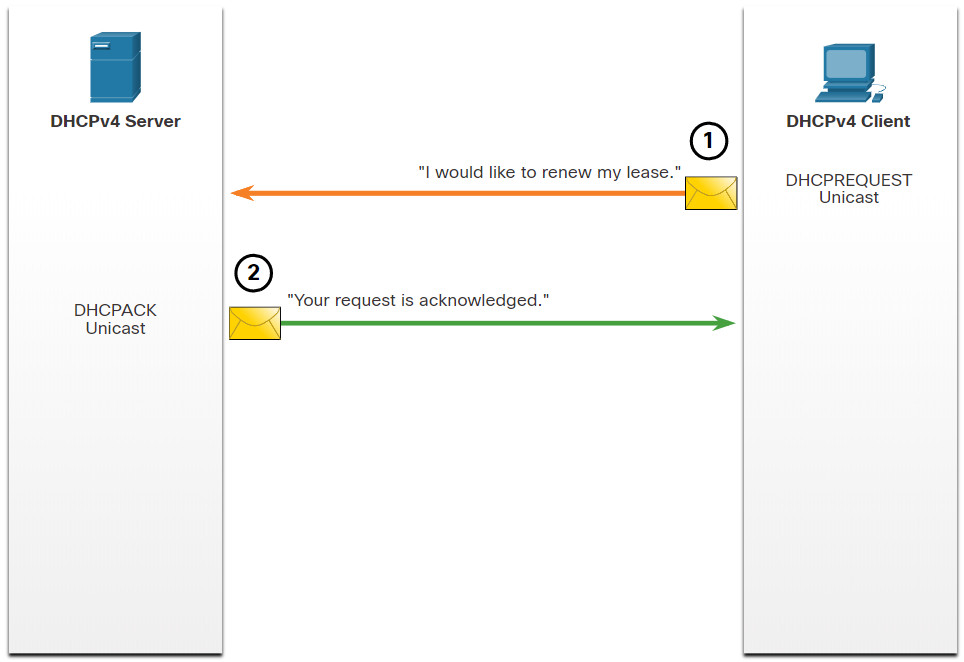
Prior to lease expiration, the client begins a two-step process to renew the lease with the DHCPv4 server, as shown in the figure:
1. DHCP Request (DHCPREQUEST)
Before the lease expires, the client sends a DHCPREQUEST message directly to the DHCPv4 server that originally offered the IPv4 address. If a DHCPACK is not received within a specified amount of time, the client broadcasts another DHCPREQUEST so that one of the other DHCPv4 servers can extend the lease.
2. DHCP Acknowledgment (DHCPACK)
On receiving the DHCPREQUEST message, the server verifies the lease information by returning a DHCPACK.
Note: These messages (primarily the DHCPOFFER and DHCPACK) can be sent as unicast or broadcast according to IETF RFC 2131.
7.2 Configure a Cisco IOS DHCPv4 Server
7.2.1 Cisco IOS DHCPv4 Server
Now you have a basic understanding of how DHCPv4 works and how it can make your job a bit easier. If you do not have a separate DHCPv4 server, this topic will show you how to configure a Cisco IOS router to act as one. A Cisco router running Cisco IOS software can be configured to act as a DHCPv4 server. The Cisco IOS DHCPv4 server assigns and manages IPv4 addresses from specified address pools within the router to DHCPv4 clients.
7.2.2 Steps to Configure a Cisco IOS DHCPv4 Server
Use the following steps to configure a Cisco IOS DHCPv4 server:
Step 1. Exclude IPv4 addresses.
Step 2. Define a DHCPv4 pool name.
Step 3. Configure the DHCPv4 pool.
Step 1. Exclude IPv4 Addresses
The router functioning as the DHCPv4 server assigns all IPv4 addresses in a DHCPv4 address pool unless it is configured to exclude specific addresses. Typically, some IPv4 addresses in a pool are assigned to network devices that require static address assignments. Therefore, these IPv4 addresses should not be assigned to other devices. The command syntax to exclude IPv4 addresses is the following:
Router(config)# ip dhcp excluded-address low-address [high-address]
A single address or a range of addresses can be excluded by specifying the low-address and high-address of the range. Excluded addresses should be those addresses that are assigned to routers, servers, printers, and other devices that have been, or will be, manually configured. You can also enter the command multiple times.
Step 2. Define a DHCPv4 Pool Name
Configuring a DHCPv4 server involves defining a pool of addresses to assign.
As shown in the example, the ip dhcp pool pool-name command creates a pool with the specified name and puts the router in DHCPv4 configuration mode, which is identified by the prompt Router(dhcp-config)#.
The command syntax to define the pool is the following:
Router(config)# ip dhcp pool pool-name
Router(dhcp-config)#
Step 3. Configure the DHCPv4 Pool
The table lists the tasks to complete the DHCPv4 pool configuration.
The address pool and default gateway router must be configured. Use the network statement to define the range of available addresses. Use the default-router command to define the default gateway router. Typically, the gateway is the LAN interface of the router closest to the client devices. One gateway is required, but you can list up to eight addresses if there are multiple gateways.
Other DHCPv4 pool commands are optional. For example, the IPv4 address of the DNS server that is available to a DHCPv4 client is configured using the dns-server command. The domain-name command is used to define the domain name. The duration of the DHCPv4 lease can be changed using the lease command. The default lease value is one day. The netbios-name-server command is used to define the NetBIOS WINS server.
| Task | IOS Command |
|---|---|
| Define the address pool. |
network network-number [mask | / prefix-length] |
| Define the default router or gateway. |
default-router address [ address2….address8] |
| Define a DNS server. |
dns-server address [ address2…address8] |
| Define the domain name. |
domain-name domain |
| Define the duration of the DHCP lease. |
lease {days [hours [ minutes]] | infinite}
|
| Define the NetBIOS WINS server. |
netbios-name-server address [ address2…address8] |
Note: Microsoft recommends not deploying WINS, instead configure DNS for Windows name resolution and decommission WINS.
7.2.3 Configuration Example
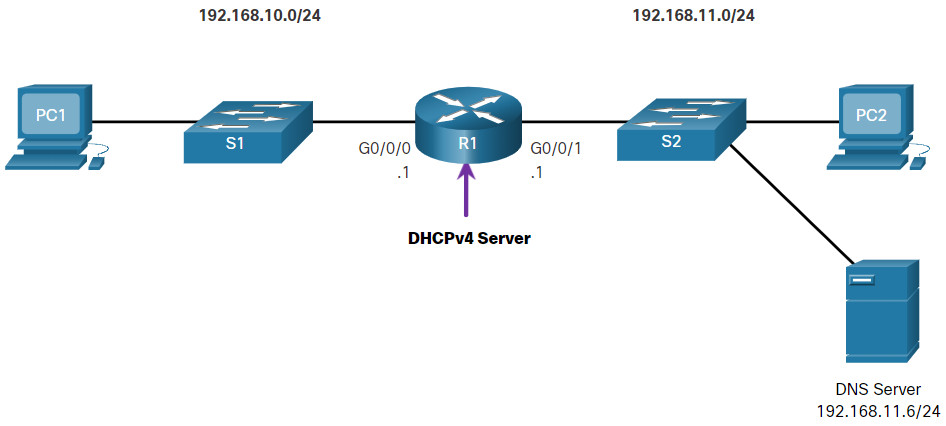
The topology for the example configuration is shown in the figure.
The example shows the configuration to make R1 a DHCPv4 server for the 192.168.10.0/24 LAN.
R1(config)# ip dhcp excluded-address 192.168.10.1 192.168.10.9
R1(config)# ip dhcp excluded-address 192.168.10.254
R1(config)# ip dhcp pool LAN-POOL-1
R1(dhcp-config)# network 192.168.10.0 255.255.255.0
R1(dhcp-config)# default-router 192.168.10.1
R1(dhcp-config)# dns-server 192.168.11.5
R1(dhcp-config)# domain-name example.com
R1(dhcp-config)# end
R1#
7.2.4 DHCPv4 Verification Commands
Use the commands in the table to verify that the Cisco IOS DHCPv4 server is operational.
| Command | Description |
|---|---|
show running-config | section dhcp |
Displays the DHCPv4 commands configured on the router. |
show ip dhcp binding |
Displays a list of all IPv4 address to MAC address bindings provided by the DHCPv4 service. |
show ip dhcp server statistics |
Displays count information regarding the number of DHCPv4 messages that have been sent and received. |
7.2.5 Verify DHCPv4 is Operational
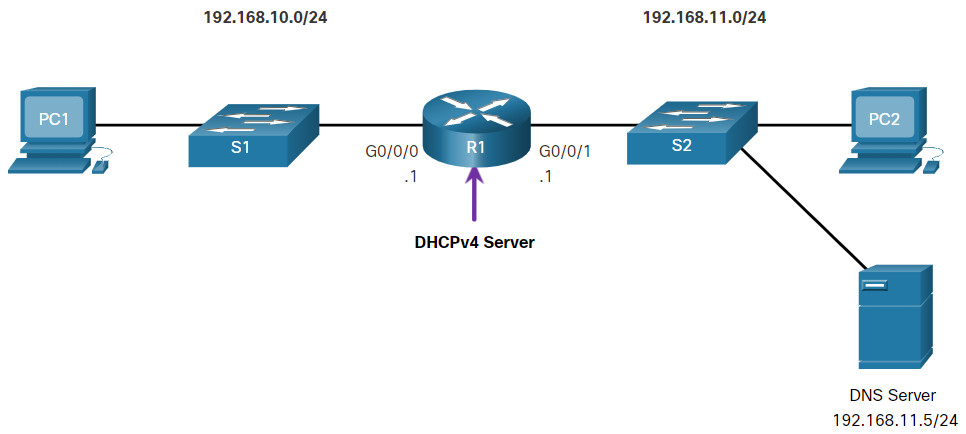
The topology shown in the figure is used in the example output. In this example, R1 has been configured to provide DHCPv4 services. PC1 has not been powered up and, therefore, does not have an IP address.

The output for the following commands assumes PC1 has received its IPv4 addressing information from the DHCPv4 server. You may need to enter ipconfig /renew on a Windows PC to force it to send out a DHCPDISCOVER message.Click each button to see the command output verifying that DHCPv4 is operational.
7.2.6 Syntax Checker – Configure DHCPv4
In this Syntax Checker activity, you will configure R1 to be the DHCPv4 server for the 192.168.11.0/24 network.

Exclude the following addresses from the 192.168.11.0/24 address range:
- Exclude the .1 through the .9 address.
- Exclude the .254 address.
R1(config)#ip dhcp excluded-address 192.168.11.1 192.168.11.9
R1(config)#ip dhcp excluded-address 192.168.11.254
Configure the DHCPv4 pool with the following requirements:
- Define the pool name of LAN-POOL-2.
- Configure the network address.
- Configure the default gateway address.
- Configure the DNS server address.
- Configure example.com as the domain name.
- Return to privileged EXEC mode.
R1(config)#ip dhcp pool LAN-POOL-2
R1(dhcp-config)#network 192.168.11.0 255.255.255.0
R1(dhcp-config)#default-router 192.168.11.1
R1(dhcp-config)#dns-server 192.168.11.6
R1(dhcp-config)#domain-name example.com
R1(dhcp-config)#end
You have successfully configured DHCPv4 server and relay agent
7.2.7 Disable the Cisco IOS DHCPv4 Server
The DHCPv4 service is enabled by default. To disable the service, use the no service dhcp global configuration mode command. Use the service dhcp global configuration mode command to re-enable the DHCPv4 server process, as shown in the example. Enabling the service has no effect if the parameters are not configured.
Note: Clearing the DHCP bindings or stopping and restarting the DHCP service may result in duplicate IP addresses being temporarily assigned on the network.
R1(config)# no service dhcp
R1(config)# service dhcp
R1(config)#
7.2.8 DHCPv4 Relay
In a complex hierarchical network, enterprise servers are usually located centrally. These servers may provide DHCP, DNS, TFTP, and FTP services for the network. Network clients are not typically on the same subnet as those servers. In order to locate the servers and receive services, clients often use broadcast messages.
In the figure, PC1 is attempting to acquire an IPv4 address from a DHCPv4 server using a broadcast message. In this scenario, R1 is not configured as a DHCPv4 server and does not forward the broadcast. Because the DHCPv4 server is located on a different network, PC1 cannot receive an IP address using DHCP. R1 must be configured to relay DHCPv4 messages to the DHCPv4 server.
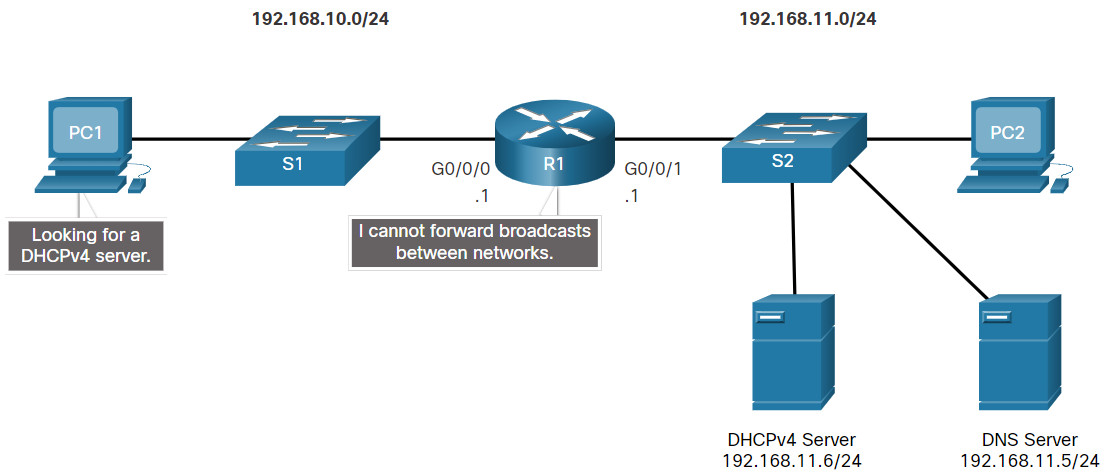
In this scenario, a network administrator is attempting to renew IPv4 addressing information for PC1. Click each button to see the command output as the network administrator resolves this issue.
7.2.9 Other Service Broadcasts Relayed
DHCPv4 is not the only service that the router can be configured to relay. By default, the ip helper-address command forwards the following eight UDP services:
- Port 37: Time
- Port 49: TACACS
- Port 53: DNS
- Port 67: DHCP/BOOTP server
- Port 68: DHCP/BOOTP client
- Port 69: TFTP
- Port 137: NetBIOS name service
- Port 138: NetBIOS datagram service
7.2.10 Packet Tracer – Configure DHCPv4
In this Packet Tracer Activity, you will complete the following objectives:
- Part 1: Configure a Router as a DHCP Server
- Part 2: Configure DHCP Relay
- Part 3: Configure a Router as a DHCP Client
- Part 4: Verify DHCP and Connectivity
7.2.10 Packet Tracer – Configure DHCPv4
7.3 Configure a DHCPv4 Client
7.3.1 Cisco Router as a DHCPv4 Client
There are scenarios where you might have access to a DHCP server through your ISP. In these instances, you can configure a Cisco IOS router as a DHCPv4 client. This topic walks you through that process.
Sometimes, Cisco routers in a small office or home office (SOHO) and branch sites have to be configured as DHCPv4 clients in a similar manner to client computers. The method used depends on the ISP. However, in its simplest configuration, the Ethernet interface is used to connect to a cable or DSL modem.
To configure an Ethernet interface as a DHCP client, use the ip address dhcp interface configuration mode command.
In the figure, assume that an ISP has been configured to provide select customers with IP addresses from the 209.165.201.0/27 network range after the G0/0/1 interface is configured with the ip address dhcp command.

7.3.2 Configuration Example
To configure an Ethernet interface as a DHCP client, use the ip address dhcp interface configuration mode command, as shown in the example. This configuration assumes that the ISP has been configured to provide select customers with IPv4 addressing information.
SOHO(config)# interface G0/0/1
SOHO(config-if)# ip address dhcp
SOHO(config-if)# no shutdown
Sep 12 10:01:25.773: %DHCP-6-ADDRESS_ASSIGN: Interface GigabitEthernet0/0/1 assigned DHCP address 209.165.201.12, mask 255.255.255.224, hostname SOHO
The show ip interface g0/1 command confirms that the interface is up and that the address was allocated by a DHCPv4 server.
SOHO# show ip interface g0/0/1
GigabitEthernet0/0/1 is up, line protocol is up
  Internet address is 209.165.201.12/27
  Broadcast address is 255.255.255.255
  Address determined by DHCP
(output omitted)
7.3.3 Home Router as a DHCPv4 Client
Home routers are typically already set to receive IPv4 addressing information automatically from the ISP. This is so that customers can easily set up the router and connect to the internet.
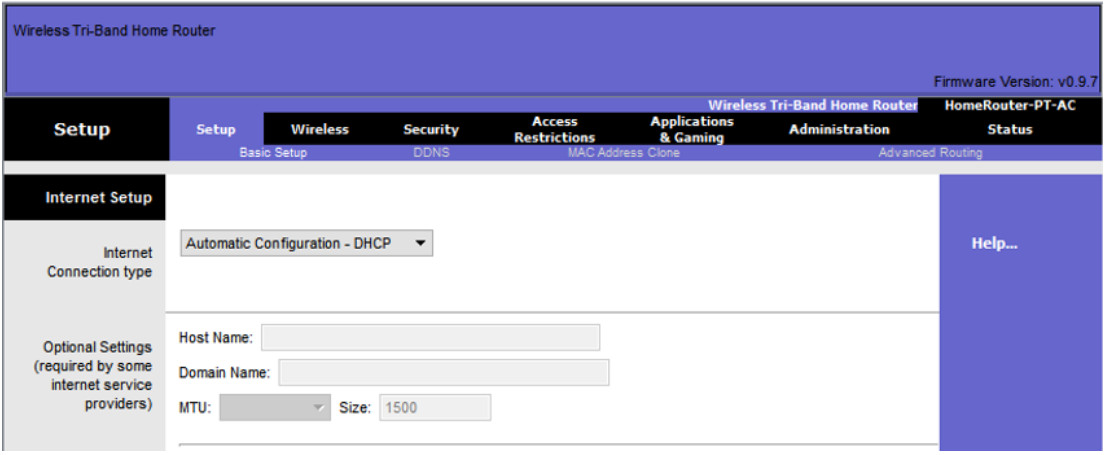
For example, the figure shows the default WAN setup page for a Packet Tracer wireless router. Notice that the internet connection type is set to Automatic Configuration – DHCP. This selection is used when the router is connected to a DSL or cable modem and acts as a DHCPv4 client, requesting an IPv4 address from the ISP.
Various manufacturers of home routers will have a similar setup.
7.3.4 Syntax Checker – Configure a Cisco Router as DHCP Client
In this Syntax Checker activity, you will configure a Cisco router as DHCP client.

Enter interface configuration mode. Use g0/0/1 as the interface name.

SOHO(config)#interface g0/0/1

Configure the interface to acquire IPv4 addressing information from the ISP.

SOHO(config-if)#ip address dhcp

Activate the interface.

SOHO(config-if)#no shutdown
Sep 12 10:01:25.773: %DHCP-6-ADDRESS\_ASSIGN: Interface GigabitEthernet0/0/1 assigned DHCP address 209.165.201.12, mask 255.255.255.224, hostname SOHO

Return to privileged EXEC mode.

SOHO(config-if)#end

Use the show ip interface g0/0/1 command to verify the IPv4 information.

SOHO#show ip interface g0/0/1
GigabitEthernet0/0/1 is up, line protocol is up
  Internet address is 209.165.201.12/27
  Broadcast address is 255.255.255.255
  Address determined by DHCP
(output omitted)

You have successfully configured the router as a DHCP client.
7.4 Module Practice and Quiz
7.4.1 Packet Tracer – Implement DHCPv4
As the network technician for your company, you are tasked with configuring a Cisco router as a DHCP server to provide dynamic allocation of addresses to clients on the network. You are also required to configure the edge router as a DHCP client so that it receives an IP address from the ISP network. Because the server is centralized, you will need to configure the two LAN routers to relay DHCP traffic between the LANs and the router that is serving as the DHCP server.
7.4.1 Packet Tracer – Implement DHCPv4
7.4.2 Lab – Implement DHCPv4
In this lab, you will complete the following objectives:
- Part 1: Build the Network and Configure Basic Device Settings
- Part 2: Configure and Verify Two DHCPv4 Servers on R1
- Part 3: Configure and Verify a DHCP Relay on R2
7.4.3 What did I learn in this module?
DHCPv4 Concepts
The DHCPv4 server dynamically assigns, or leases, an IPv4 address to a client from a pool of addresses for a limited period of time chosen by the server, or until the client no longer needs the address. The DHCPv4 lease process begins with the client sending message requesting the services of a DHCP server. If there is a DHCPv4 server that receives the message it will respond with an IPv4 address and possible other network configuration information. The client must contact the DHCP server periodically to extend the lease. This lease mechanism ensures that clients that move or power off do not keep addresses that they no longer need. When the client boots (or otherwise wants to join a network), it begins a four-step process to obtain a lease: DHCPDISCOVER, then DHCPOFFER, then DHCPREQUEST, and finally DHCPACK. Prior to lease expiration, the client begins a two-step process to renew the lease with the DHCPv4 server: DHCPREQUEST then DHCPACK.
Configure a Cisco IOS DHCPv4 Server
A Cisco router running Cisco IOS software can be configured to act as a DHCPv4 server. Use the following steps to configure a Cisco IOS DHCPv4 server: exclude IPv4 addresses, define a DHCPv4 pool name, and configure the DHCPv4 pool. Verify your configuration using the show running-config | section dhcp, show ip dhcp binding, and show ip dhcp server statistics commands. The DHCPv4 service is enabled, by default. To disable the service, use the no service dhcp global configuration mode command. In a complex hierarchical network, enterprise servers are usually located centrally. These servers may provide DHCP, DNS, TFTP, and FTP services for the network. Network clients are not typically on the same subnet as those servers. In order to locate the servers and receive services, clients often use broadcast messages. A PC is attempting to acquire an IPv4 address from a DHCPv4 server using a broadcast message. If the router is not configured as a DHCPv4 server, it will not forward the broadcast. If the DHCPv4 server is located on a different network, the PC cannot receive an IP address using DHCP. The router must be configured to relay DHCPv4 messages to the DHCPv4 server. The network administrator releases all current IPv4 addressing information using the ipconfig /release command. Next, the network administrator attempts to renew the IPv4 addressing information with the ipconfig /renew command. A better solution is to configure R1 with the ip helper-address address interface configuration command. The network administrator can use the show ip interface command to verify the configuration. The PC is now able to acquire an IPv4 address from the DHCPv4 server as verified with the ipconfig /all command. By default, the ip helper-address command forwards the following eight UDP services:
- Port 37: Time
- Port 49: TACACS
- Port 53: DNS
- Port 67: DHCP/BOOTP server
- Port 68: DHCP/BOOTP client
- Port 69: TFTP
- Port 137: NetBIOS name service
- Port 138: NetBIOS datagram service
Configure a DHCPv4 Client
The Ethernet interface is used to connect to a cable or DSL modem. To configure an Ethernet interface as a DHCP client, use the ip address dhcp interface configuration mode command. Home routers are typically already set to receive IPv4 addressing information automatically from the ISP. The internet connection type is set to Automatic Configuration – DHCP. This selection is used when the router is connected to a DSL or cable modem and acts as a DHCPv4 client, requesting an IPv4 address from the ISP.

