2.2.4.2 Lab – Flex Sensor and Servo (Instructor Version)
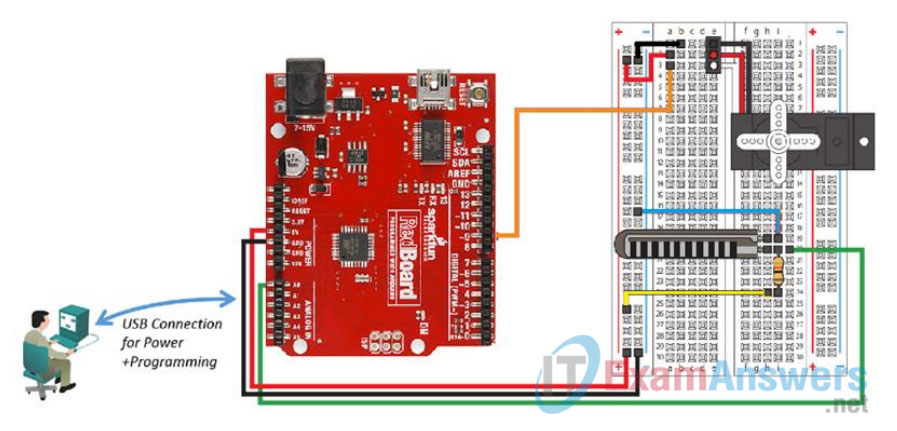
Topology

Objectives
- Connect the circuits between the breadboard and RedBoard
- Load and run the sketch in the Arduino IDE
Background / Scenario
This lab will make use of a special Flex Sensor to change resistance based on the amount of bend placed on the sensor. The varying resistance will then be used to control the voltage sent to the Servo which will cause it to change positions.

Required Resources
- SparkFun Inventors Kit (SIK) or equivalent components
- PC configured with Arduino drivers and Arduino software
- SparkFun SIK Guide Code example files
Step 1: Connect the circuits between the breadboard and RedBoard.
Refer to the Topology diagram for a visual reference of the following steps.
a. Select 1 – 10K Ohm (Ω) resistor, 3 black wires, 3 red wires, 1 orange wire, 1 green wire, 1 blue wire, 1 yellow wire, 1 white wire, 1 Servo, and the Flex Sensor from the SIK.
b. Insert the 10K Ohm (Ω) resistor connecting leads to i20 and i24.
c. Insert the Flex Sensor into h19 and h20.
d. Connect the servo using a black, red, and white lead to match the colors coming out of the servo. The black lead connects to e1, red to e2, and white to e3.
e. Connect a black wire from b1 to the (-) bar closest to row a.
f. Connect a red wire from a2 to the (+) bar closest to row a.
g. Connect a blue wire from i19 to the (-) bar closest to row a.
h. Connect a yellow wire from h24 to the (+) bar closest to row a.
i. Connect an orange wire from a3 to Pin 9 on the RedBoard.
j. Connect a green wire from j20 to Pin A0 on the RedBoard.
k. Connect the black (-) wire from the breadboard to the GND on the RedBoard.
l. Connect the red (+) wire from the breadboard to the 5V pin on the RedBoard.
Step 2: Load and run the sketch in the Arduino IDE.
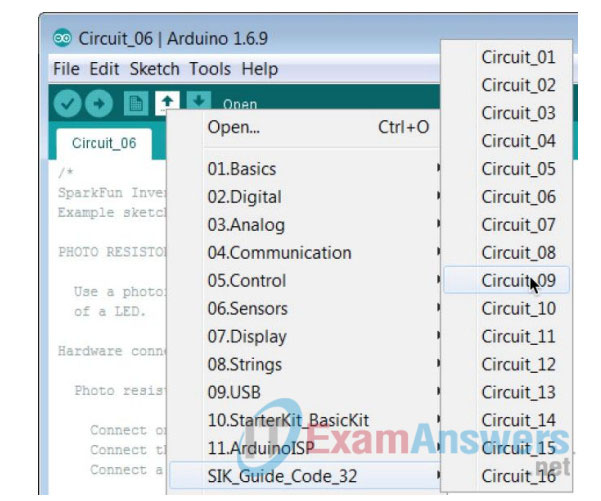
a. Click the up arrow to display the examples folder. Select Circuit_09 from the SIK_Guide_Code_32 folder.
Note: The SIK_Guide_Code_32 folder will only exist if the code has been downloaded from http://sparkfun.com/sikcode and copied to the examples folder located under the Arduino program files, typically C:\Program Files\Arduino\examples.

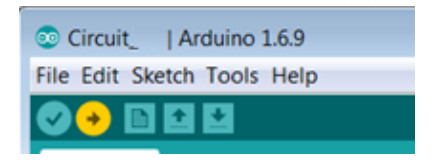
b. Verify and compile the sketch to create an executable firmware that can be uploaded to the Flash memory of the microcontroller.

c. Make sure the RedBoard is connected to the PC with the USB cable. Upload the firmware to the RedBoard.

d. Bend the Flex Sensor. The Servo motor should turn clockwise depending on how much the sensor is bent. As the flex on the sensor is released the Servo should return to the start position.
Reflection
What other SIK included component might work better for controlling the servo than the Flex Sensor?
Answers may vary, but the potentiometer would be a good choice. The photoresistor can also be a good choice depending on the task.
