
Lab - Configure DHCPv6 (Instructor Version)
Topology

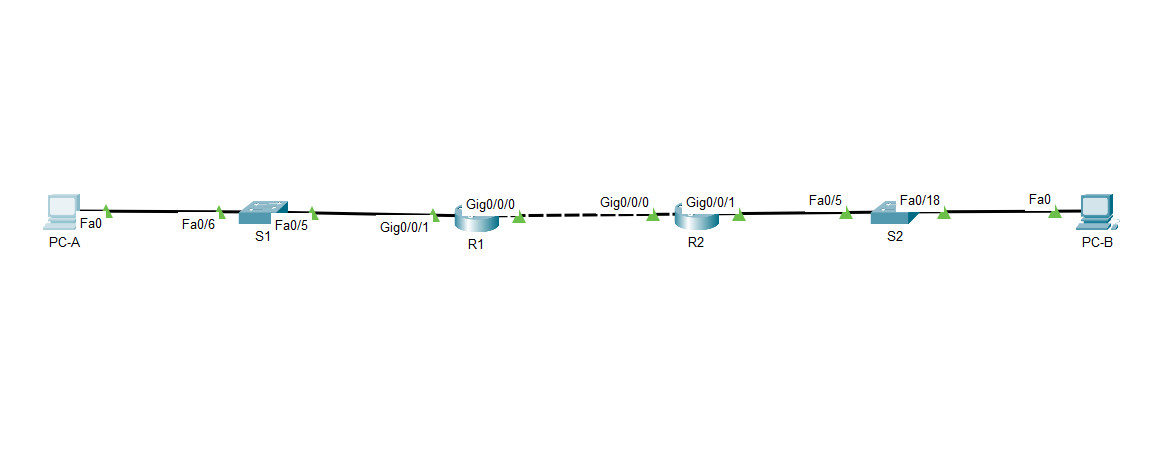
8.5.1 Packet Tracer Lab – Configure DHCPv6
Addressing Table
| Device | Interface | IPv6 Address |
|---|---|---|
| R1 | G0/0/0 | 2001:db8:acad:2::1 /64 |
| fe80::1 | ||
| G0/0/1 | 2001:db8:acad:1::1/64 | |
| fe80::1 | ||
| R2 | G0/0/0 | 2001:db8:acad:2::2/64 |
| fe80::2 | ||
| G0/0/1 | 2001:db8:acad:3::1 /64 | |
| fe80::1 | ||
| PC-A | NIC | DHCP |
| PC-B | NIC | DHCP |
Objectives
- Part 1: Build the Network and Configure Basic Device Settings
- Part 2: Verify SLAAC address assignment from R1
- Part 3: Configure and verify a Stateless DHCPv6 Server on R1
- Part 4: Configure and verify a Stateful DHCPv6 Server on R1
- Part 5: Configure and verify a DHCPv6 Relay on R2
Background / Scenario
The dynamic assignment of IPv6 global unicast addresses (GUA) can be configured the following three ways:
- Stateless Address Auoconfiguration (SLACC)
- Stateless Dynamic Host Configuration Protocol for IPv6 (DHCPv6)
- Stateful DHCPv6
When using SLACC to assign IPv6 addresses to hosts a DHCPv6 server is not used. Because a DHCPv6 server is not used when implementing SLACC, hosts are unable to receive additional critical network information, including a domain name server (DNS) address as well as a domain name.
When using Stateless DHCPv6 to assign IPv6 addresses to host, a DHCPv6 server is used to assign the additional critical network information, however the IPv6 address is assigned using SLACC.
When implementing Stateful DHCPv6, a DHCPv6 server assigns all network information, including the IPv6 address.
The determination of how hosts obtain they dynamic IPv6 addressing is dependent on flag setting contain within the router advertisement (RA) messages.
In this scenario, the company has grown in size, and the network administrators can no longer assign IP addresses to devices manually. Your job is to configure the R2 router to assign IPv6 addresses on two different subnets connected to router R1.
Note: The routers used with CCNA hands-on labs are Cisco 4221 with Cisco IOS XE Release 16.9.4 (universalk9 image). The switches used in the labs are Cisco Catalyst 2960s with Cisco IOS Release 15.2(2) (lanbasek9 image). Other routers, switches, and Cisco IOS versions can be used. Depending on the model and Cisco IOS version, the commands available and the output produced might vary from what is shown in the labs. Refer to the Router Interface Summary Table at the end of the lab for the correct interface identifiers.
Note: Ensure that the routers and switches have been erased and have no startup configurations. If you are unsure contact your instructor.
Instructor Note: Refer to the Instructor Lab Manual for the procedures to initialize and reload devices
Required Resources
- 2 Routers (Cisco 4221 with Cisco IOS XE Release 16.9.4 universal image or comparable)
- 2 Switches (Cisco 2960 with Cisco IOS Release 15.2(2) lanbasek9 image or comparable) - Optional
- 2 PCs (Windows with a terminal emulation program, such as Tera Term)
- Console cables to configure the Cisco IOS devices via the console ports
- Ethernet cables as shown in the topology
Instructions
Part 1: Build the Network and Configure Basic Device Settings
In Part 1, you will set up the network topology and configure basic settings on the PC hosts and switches.
Step 1: Cable the network as shown in the topology.
Attach the devices as shown in the topology diagram, and cable as necessary.
Step 2: Configure basic settings for each switch. (Optional)
a. Assign a device name to the switch.
switch(config)# hostname S1
switch(config)# hostname S2
b. Disable DNS lookup to prevent the router from attempting to translate incorrectly entered commands as though they were host names.
S1(config)# no ip domain-lookup
S2(config)# no ip domain-lookup
c. Assign class as the privileged EXEC encrypted password.
S1(config)# enable secret class
S2(config)# enable secret class
d. Assign cisco as the console password and enable login.
S1(config)# line console 0
S1(config-line)# password cisco
S1(config-line)# login

S2(config)# line console 0
S2(config-line)# password cisco
S2(config-line)# login
e. Assign cisco as the VTY password and enable login.
S1(config)# line vty 0 4
S1(config-line)# password cisco
S1(config-line)# login

S2(config)# line vty 0 4
S2(config-line)# password cisco
S2(config-line)# login
f. Encrypt the plaintext passwords.
S1(config)# service password-encryption

S2(config)# service password-encryption
g. Create a banner that warns anyone accessing the device that unauthorized access is prohibited.
S1(config)# banner motd $ Authorized Users Only! $

S2(config)# banner motd $ Authorized Users Only! $
h. Shutdown all unused ports
S1(config)# interface range f0/1-4, f0/7-24, g0/1-2
S1(config-if-range)# shutdown

S2(config)# interface range f0/1-4, f0/7-17, f0/19-24, g0/1-2
S2(config-if-range)# shutdown
i. Save the running configuration to the startup configuration file.
S1# copy running-config startup-config

S2# copy running-config startup-config
Step 3: Configure basic settings for each router.
a. Assign a device name to the router.
router(config)# hostname R1

router(config)# hostname R2
b. Disable DNS lookup to prevent the router from attempting to translate incorrectly entered commands as though they were host names.
R1(config)# no ip domain-lookup

R2(config)# no ip domain-lookup
c. Assign class as the privileged EXEC encrypted password.
R1(config)# enable secret class
R2(config)# enable secret class
d. Assign cisco as the console password and enable login.
R1(config)# line console 0
R1(config-line)# password cisco
R1(config-line)# login

R2(config)# line console 0
R2(config-line)# password cisco
R2(config-line)# login
e. Assign cisco as the VTY password and enable login.
R1(config)# line vty 0 4
R1(config-line)# password cisco
R1(config-line)# login

R2(config)# line vty 0 4
R2(config-line)# password cisco
R2(config-line)# login
f. Encrypt the plaintext passwords.
R1(config)# service password-encryption

R2(config)# service password-encryption
g. Create a banner that warns anyone accessing the device that unauthorized access is prohibited.
R1(config)# banner motd $ Authorized Users Only! $

R2(config)# banner motd $ Authorized Users Only! $
h. Enable IPv6 Routing
R1(config)# ipv6 unicast-routing

R2(config)# ipv6 unicast-routing
i. Save the running configuration to the startup configuration file.
R1(config)# exit
R1# copy running-config startup-config

R2(config)# exit
R2# copy running-config startup-config
Step 4: Configure interfaces and routing for both routers.
a. Configure the G0/0/0 and G0/0/1 interfaces on R1 and R2 with the IPv6 addresses specified in the table above.
R1(config)# interface g0/0/1
R1(config-if)# ipv6 address fe80::1 link-local
R1(config-if)# ipv6 address 2001:db8:acad:1::1/64
R1(config-if)# no shutdown
R1(config)# interface g0/0/0
R1(config-if)# ipv6 address fe80::1 link-local
R1(config-if)# ipv6 address 2001:db8:acad:2::1/64
R1(config-if)# no shutdown

R2(config)# interface g0/0/1
R2(config-if)# ipv6 address fe80::1 link-local
R2(config-if)# ipv6 address 2001:db8:acad:3::1/64
R2(config-if)# no shutdown
R2(config)# interface g0/0/0
R2(config-if)# ipv6 address fe80::2 link-local
R2(config-if)# ipv6 address 2001:db8:acad:2::2/64
R2(config-if)# no shutdown
b. Configure a default route on each router pointed to the IP address of G0/0/0 on the other router.
R1(config)# ipv6 route ::/0 2001:db8:acad:2::2
R2(config)# ipv6 route ::/0 2001:db8:acad:2::1
c. Verify routing is working by pinging R2’s G0/0/1 address from R1
R1#(config)# exit
R1# ping 2001:db8:acad:3::1
d. Save the running configuration to the startup configuration file.
R1# copy running-config startup-config
Part 2: Verify SLAAC Address Assignment from R1
In Part 2, you will verify that Host PC-A receives an IPv6 address using the SLAAC method.
Power PC-A up and ensure that the NIC is configured for IPv6 automatic configuration.
After a few moments, the results of the command ipconfig should show that PC-A has assigned itself an address from the 2001:db8:1::/64 network.
C:\Users\Student> ipconfig
Windows IP Configuration

Ethernet adapter Ethernet 2:

   Connection-specific DNS Suffix  . :
   IPv6 Address. . . . . . . . . . . : 2001:db8:acad:1:5c43:ee7c:2959:da68
   Temporary IPv6 Address. . . . . . : 2001:db8:acad:1:3c64:e4f9:46e1:1f23
   Link-local IPv6 Address . . . . . : fe80::5c43:ee7c:2959:da68%6
   IPv4 Address. . . . . . . . . . . : 169.254.218.104
   Subnet Mask . . . . . . . . . . . : 255.255.0.0
   Default Gateway . . . . . . . . . : fe80::1%6
Where did the host-id portion of the address come from?
Answer will depend upon the operating system configuration. Either the host generates an EUI-64 address based on the interface MAC, or the host generates a random 64-bit address.
Part 3: Configure and Verify a DHCPv6 server on R1
In Part 3, you will configure and verify a stateless DHCP server on R1. The objective is to provide PC-A with DNS server and Domain information.
Step 1: Examine the configuration of PC-A in more detail.
a. Issue the command ipconfig /all on PC-A and take a look at the output.
C:\Users\Student> ipconfig /all
Windows IP Configuration

   Host Name . . . . . . . . . . . . : DESKTOP-3FR7RKA
   Primary Dns Suffix  . . . . . . . :
   Node Type . . . . . . . . . . . . : Hybrid
   IP Routing Enabled. . . . . . . . : No
   WINS Proxy Enabled. . . . . . . . : No

Ethernet adapter Ethernet0:

   Connection-specific DNS Suffix  . :
   Description . . . . . . . . . . . : Intel(R) 852574L Gigabit Network Connection
   Physical Address. . . . . . . . . : 00-50-56-83-63-6D
   IPv6 Address. . . . . . . . . . . : 2001:db8:acad:1:5c43:ee7c:2959:da68(Preferred)
   Temporary IPv6 Address. . . . . . : 2001:db8:acad:1:3c64:e4f9:46e1:1f23(Preferred)
   Link-local IPv6 Address . . . . . : fe80::5c43:ee7c:2959:da68%6(Preferred)
   IPv4 Address. . . . . . . . . . . : 169.254.218.104(Preferred)
   Subnet Mask . . . . . . . . . . . : 255.255.0.0
   Default Gateway . . . . . . . . . : fe80::1%6
   DHCPv6 IAID . . . . . . . . . . . : 50334761
   DHCPv6 Client DUID. . . . . . . . : 00-01-00-01-24-F5-CE-A2-00-50-56-B3-63-6D
   DNS Servers . . . . . . . . . . . : fec0:0:0:ffff::1%1
                                       fec0:0:0:ffff::2%1
                                       fec0:0:0:ffff::3%1
   NetBIOS over Tcpip. . . . . . . . : Enabled
b. Notice that there is no Primary DNS suffix. Also note that the DNS server addresses provided are “site local anycast” addresses, and not unicast addresses, as would be expected.
Step 2: Configure R1 to provide stateless DHCPv6 for PC-A.
a. Create an IPv6 DHCP pool on R1 named R1-STATELESS. As a part of that pool, assign the DNS server address as 2001:db8:acad::1 and the domain name as stateless.com.
R1(config)# ipv6 dhcp pool R1-STATELESS
R1(config-dhcp)# dns-server 2001:db8:acad::254
R1(config-dhcp)# domain-name STATELESS.com
b. Configure the G0/0/1 interface on R1 to provide the OTHER config flag to the R1 LAN, and specify the DHCP pool you just created as the DHCP resource for this interface.
R1(config)# interface g0/0/1
R1(config-if)# ipv6 nd other-config-flag
R1(config-if)# ipv6 dhcp server R1-STATELESS
c. Save the running configuration to the startup configuration file.
R1# copy running-config startup-config
d. Restart PC-A.
e. Examine the output of ipconfig /all and notice the changes.
C:\Users\Student> ipconfig /all
Windows IP Configuration

   Host Name . . . . . . . . . . . . : DESKTOP-3FR7RKA
   Primary Dns Suffix  . . . . . . . :
   Node Type . . . . . . . . . . . . : Hybrid
   IP Routing Enabled. . . . . . . . : No
   WINS Proxy Enabled. . . . . . . . : No
   DNS Suffix Search List. . . . . . : STATELESS.com

Ethernet adapter Ethernet0:

   Connection-specific DNS Suffix  . : STATELESS.com
   Description . . . . . . . . . . . : Intel(R) 82574L Gigabit Network Connection
   Physical Address. . . . . . . . . : 00-50-56-83-63-6D
   DHCP Enabled. . . . . . . . . . . : Yes
   Autoconfiguration Enabled . . . . : Yes
   IPv6 Address. . . . . . . . . . . : 2001:db8:acad:1:5c43:ee7c:2959:da68(Preferred)
   Temporary IPv6 Address. . . . . . : 2001:db8:acad:1:3c64:e4f9:46e1:1f23(Preferred)
   Link-local IPv6 Address . . . . . : fe80::5c43:ee7c:2959:da68%6(Preferred)
   IPv4 Address. . . . . . . . . . . : 169.254.218.104(Preferred)
   Subnet Mask . . . . . . . . . . . : 255.255.0.0
   Default Gateway . . . . . . . . . : fe80::1%6
   DHCPv6 IAID . . . . . . . . . . . : 50334761
   DHCPv6 Client DUID. . . . . . . . : 00-01-00-01-24-F5-CE-A2-00-50-56-B3-63-6D
   DNS Servers . . . . . . . . . . . : 2001:db8:acad::254
   NetBIOS over Tcpip. . . . . . . . : Enabled
   Connection-specific DNS Suffix Search List :
                                       STATELESS.com
f. Test connectivity by pinging R2’s G0/0/1 interface IP address.
Part 4: Configure a stateful DHCPv6 server on R1
In Part 4, you will configure R1 to respond to DHCPv6 requests from the LAN on R2.
a. Create a DHCPv6 pool on R1 for the 2001:db8:acad:3:aaaa::/80 network. This will provide addresses to the LAN connected to interface G0/0/1 on R2. As a part of the pool, set the DNS server to 2001:db8:acad::254, and set the domain name to STATEFUL.com.
R1(config)# ipv6 dhcp pool R2-STATEFUL
R1(config-dhcp)# address prefix 2001:db8:acad:3:aaaa::/80
R1(config-dhcp)# dns-server 2001:db8:acad::254
R1(config-dhcp)# domain-name STATEFUL.com
b. Assign the DHCPv6 pool you just created to interface g0/0/0 on R1.
R1(config)# interface g0/0/0
R1(config-if)# ipv6 dhcp server R2-STATEFUL
Part 5: Configure and verify DHCPv6 relay on R2.
In Part 5, you will configure and verify DHCPv6 relay on R2, allowing PC-B to receive an IPv6 Address.
Step 1: Power on PC-B and examine the SLAAC address that it generates.
C:\Users\Student> ipconfig /all
Windows IP Configuration

   Host Name . . . . . . . . . . . . : DESKTOP-3FR7RKA
   Primary Dns Suffix  . . . . . . . :
   Node Type . . . . . . . . . . . . : Hybrid
   IP Routing Enabled. . . . . . . . : No
   WINS Proxy Enabled. . . . . . . . : No

Ethernet adapter Ethernet0:

   Connection-specific DNS Suffix  . :
   Description . . . . . . . . . . . : Intel(R) 82574L Gigabit Network Connection
   Physical Address. . . . . . . . . : 00-50-56-B3-7B-06
   DHCP Enabled. . . . . . . . . . . : Yes
   Autoconfiguration Enabled . . . . : Yes
   IPv6 Address. . . . . . . . . . . : 2001:db8:acad:3:a0f3:3d39:f9fb:a020(Preferred)
   Temporary IPv6 Address. . . . . . : 2001:db8:acad:3:d4f3:7b16:eeee:b2b5(Preferred)
   Link-local IPv6 Address . . . . . : fe80::a0f3:3d39:f9fb:a020%6(Preferred)
   IPv4 Address. . . . . . . . . . . : 169.254.160.32(Preferred)
   Subnet Mask . . . . . . . . . . . : 255.255.0.0
   Default Gateway . . . . . . . . . : fe80::1%6
   DHCPv6 IAID . . . . . . . . . . . : 50334761
   DHCPv6 Client DUID. . . . . . . . : 00-01-00-01-24-F2-08-38-00-50-56-B3-7B-06
   DNS Servers . . . . . . . . . . . : fec0:0:0:ffff::1%1
                                       fec0:0:0:ffff::2%1
                                       fec0:0:0:ffff::3%1
   NetBIOS over Tcpip. . . . . . . . : Enabled
Notice in the output that the prefix used is 2001:db8:acad:3::
Step 2: Configure R2 as a DHCP relay agent for the LAN on G0/0/1.
a. Configure the ipv6 dhcp relay command on R2 interface G0/0/1, specifying the destination address of the G0/0/0 interface on R1. Also configure the managed-config-flag command.
R2(config)# interface g0/0/1
R2(config-if)# ipv6 nd managed-config-flag
R2(config-if)# ipv6 dhcp relay destination 2001:db8:acad:2::1 g0/0/0
b. Save your configuration.
R2# copy running-config startup-config
Step 3: Attempt to acquire an IPv6 address from DHCPv6 on PC-B.
a. Restart PC-B.
b. Open a command prompt on PC-B and issue the command ipconfig /all and examine the output to see the results of the DHCPv6 relay operation.
C:\Users\Student> ipconfig /all
Windows IP Configuration

   Host Name . . . . . . . . . . . . : DESKTOP-3FR7RKA
   Primary Dns Suffix  . . . . . . . :
   Node Type . . . . . . . . . . . . : Hybrid
   IP Routing Enabled. . . . . . . . : No
   WINS Proxy Enabled. . . . . . . . : No
   DNS Suffix Search List. . . . . . : STATEFUL.com

Ethernet adapter Ethernet0:

   Connection-specific DNS Suffix  . : STATEFUL.com
   Description . . . . . . . . . . . : Intel(R) 852574L Gigabit Network Connection
   Physical Address. . . . . . . . . : 00-50-56-B3-7B-06
   DHCP Enabled. . . . . . . . . . . : Yes
   Autoconfiguration Enabled . . . . : Yes
   IPv6 Address. . . . . . . . . . . : 2001:db8:acad3:aaaa:7104:8b7d:5402(Preferred)
   Lease Obtained. . . . . . . . . . : Sunday, October 6, 2019 3:27:13 PM
   Lease Expires . . . . . . . . . . : Tuesday, October 8, 2019 3:27:13 PM
   Link-local IPv6 Address . . . . . : fe80::a0f3:3d39:f9fb:a020%6(Preferred)
   IPv4 Address. . . . . . . . . . . : 169.254.160.32(Preferred)
   Subnet Mask . . . . . . . . . . . : 255.255.0.0
   Default Gateway . . . . . . . . . : fe80::2%6
   DHCPv6 IAID . . . . . . . . . . . : 50334761
   DHCPv6 Client DUID. . . . . . . . : 00-01-00-01-24-F2-08-38-00-50-56-B3-7B-06
   DNS Servers . . . . . . . . . . . : 2001:db8:acad::254
   NetBIOS over Tcpip. . . . . . . . : Enabled
   Connection-specific DNS Suffix Search List  :
                                       STATEFUL.com
c. Test connectivity by pinging R1’s G0/0/1 interface IP address.
Device Configs - Final
Switch S1
! ==============================================================
!--- 8.5.1 Lab - Configure DHCPv6
!--- ANSWER SCRIPT FOR SWITCH S1
!--- Usage: copy this whole file and paste it into the SWITCH S1 terminal (start at the Switch> prompt). Every line beginning with "!" is a comment; IOS ignores it, so pasting a comment by accident is harmless.
! ==============================================================

enable
configure terminal

! --------------------------------------------------------------
!--- Part 1: Configure Basic Device Settings
! --------------------------------------------------------------

!--- Assign a device name.
hostname S1

!--- Disable DNS lookup to prevent the switch from trying to translate incorrectly entered commands as though they were host names.
no ip domain-lookup

!--- Assign "class" as the privileged EXEC encrypted password.
enable secret class

!--- Assign "cisco" as the console password and enable login.
line console 0
 password cisco
 login
 exit

!--- Assign "cisco" as the VTY password and enable login.
line vty 0 4
 password cisco
 login
 exit

!--- Encrypt the plaintext passwords.
service password-encryption

!--- Create a banner that warns anyone accessing the device that unauthorized access is prohibited.
banner motd $ Authorized Users Only! $

! --------------------------------------------------------------
!--- Part 1 (cont.): Shut down unused ports
! --------------------------------------------------------------

!--- This lab's switches are optional and flat (no VLANs, no management SVI). Simply administratively shut down all unused ports.
interface range f0/1-4, f0/7-24, g0/1-2
 shutdown
 exit

end

! --------------------------------------------------------------
!--- Save the running configuration to the startup configuration file. (Press Enter when prompted for the destination filename.)
! --------------------------------------------------------------
copy running-config startup-config


! ==============================================================
!--- Verification commands:
!---   show ip interface brief  -> unused ports administratively down
!---   show interfaces status   -> confirm active/uplink ports
! ==============================================================
Switch S2
! ==============================================================
!--- 8.5.1 Lab - Configure DHCPv6
!--- ANSWER SCRIPT FOR SWITCH S2
!--- Usage: copy this whole file and paste it into the SWITCH S2 terminal (start at the Switch> prompt). Every line beginning with "!" is a comment; IOS ignores it, so pasting a comment by accident is harmless.
! ==============================================================

enable
configure terminal

! --------------------------------------------------------------
!--- Part 1: Configure Basic Device Settings
! --------------------------------------------------------------

!--- Assign a device name.
hostname S2

!--- Disable DNS lookup to prevent the switch from trying to translate incorrectly entered commands as though they were host names.
no ip domain-lookup

!--- Assign "class" as the privileged EXEC encrypted password.
enable secret class

!--- Assign "cisco" as the console password and enable login.
line console 0
 password cisco
 login
 exit

!--- Assign "cisco" as the VTY password and enable login.
line vty 0 4
 password cisco
 login
 exit

!--- Encrypt the plaintext passwords.
service password-encryption

!--- Create a banner that warns anyone accessing the device that unauthorized access is prohibited.
banner motd $ Authorized Users Only! $

! --------------------------------------------------------------
!--- Part 1 (cont.): Shut down unused ports
! --------------------------------------------------------------

!--- This lab's switches are optional and flat (no VLANs, no management SVI). Simply administratively shut down all unused ports.
interface range f0/1-4, f0/7-17, f0/19-24, g0/1-2
 shutdown
 exit

end

! --------------------------------------------------------------
!--- Save the running configuration to the startup configuration file. (Press Enter when prompted for the destination filename.)
! --------------------------------------------------------------
copy running-config startup-config


! ==============================================================
!--- Verification commands:
!---   show ip interface brief  -> unused ports administratively down
!---   show interfaces status   -> confirm active/uplink ports
! ==============================================================
Router R1
! ==============================================================
!--- 8.5.1 Lab - Configure DHCPv6
!--- ANSWER SCRIPT FOR ROUTER R1
!--- Usage: copy this whole file and paste it into the ROUTER R1 terminal (start at the Router> prompt). Every line beginning with "!" is a comment; IOS ignores it, so pasting a comment by accident is harmless.
! ==============================================================

enable
configure terminal

! --------------------------------------------------------------
!--- Part 1: Configure Basic Device Settings
! --------------------------------------------------------------

!--- Assign a device name.
hostname R1

!--- Disable DNS lookup to prevent the router from trying to translate incorrectly entered commands as though they were host names.
no ip domain-lookup

!--- Assign "class" as the privileged EXEC encrypted password.
enable secret class

!--- Assign "cisco" as the console password and enable login.
line console 0
 password cisco
 login
 exit

!--- Assign "cisco" as the VTY password and enable login.
line vty 0 4
 password cisco
 login
 exit

!--- Encrypt the plaintext passwords.
service password-encryption

!--- Create a banner that warns anyone accessing the device that unauthorized access is prohibited.
banner motd $ Authorized Users Only! $

!--- Enable IPv6 routing.
ipv6 unicast-routing

! --------------------------------------------------------------
!--- Part 1 (cont.): Configure interfaces and default route
! --------------------------------------------------------------

!--- G0/0/1 (LAN toward S1/PC-A): link-local + GUA from the Addressing Table.
interface g0/0/1
 ipv6 address fe80::1 link-local
 ipv6 address 2001:db8:acad:1::1/64
 no shutdown
 exit

!--- G0/0/0 (link to R2): link-local + GUA from the Addressing Table.
interface g0/0/0
 ipv6 address fe80::1 link-local
 ipv6 address 2001:db8:acad:2::1/64
 no shutdown
 exit

!--- Default route pointing to R2's G0/0/0.
ipv6 route ::/0 2001:db8:acad:2::2

! --------------------------------------------------------------
!--- Part 3: Stateless DHCPv6 server on R1 (for PC-A)
! --------------------------------------------------------------

!--- Create the stateless pool: supplies DNS server and domain only (the address itself still comes from SLAAC).
ipv6 dhcp pool R1-STATELESS
 dns-server 2001:db8:acad::254
 domain-name STATELESS.com
 exit

!--- On G0/0/1: set the OTHER-config flag (tells hosts to fetch DNS/domain via DHCPv6) and bind the pool.
interface g0/0/1
 ipv6 nd other-config-flag
 ipv6 dhcp server R1-STATELESS
 exit

! --------------------------------------------------------------
!--- Part 4: Stateful DHCPv6 server on R1 (for R2's LAN)
! --------------------------------------------------------------

!--- Create the stateful pool for the 2001:db8:acad:3:aaaa::/80 network: assigns the full address plus DNS and domain.
ipv6 dhcp pool R2-STATEFUL
 address prefix 2001:db8:acad:3:aaaa::/80
 dns-server 2001:db8:acad::254
 domain-name STATEFUL.com
 exit

!--- Bind the stateful pool to G0/0/0 (the interface receiving relayed requests from R2).
interface g0/0/0
 ipv6 dhcp server R2-STATEFUL
 exit

end

! --------------------------------------------------------------
!--- Save the running configuration to the startup configuration file. (Press Enter when prompted for the destination filename.)
! --------------------------------------------------------------
copy running-config startup-config


! ==============================================================
!--- Verification commands:
!---   show ipv6 interface brief   -> interfaces up, addresses set
!---   show ipv6 dhcp pool          -> R1-STATELESS and R2-STATEFUL
!---   show ipv6 dhcp binding       -> stateful leases handed out
!---   ping 2001:db8:acad:3::1      -> reach R2 G0/0/1 over the link
! ==============================================================
Router R2
! ==============================================================
!--- 8.5.1 Lab - Configure DHCPv6
!--- ANSWER SCRIPT FOR ROUTER R2
!--- Usage: copy this whole file and paste it into the ROUTER R2 terminal (start at the Router> prompt). Every line beginning with "!" is a comment; IOS ignores it, so pasting a comment by accident is harmless.
! ==============================================================

enable
configure terminal

! --------------------------------------------------------------
!--- Part 1: Configure Basic Device Settings
! --------------------------------------------------------------

!--- Assign a device name.
hostname R2

!--- Disable DNS lookup to prevent the router from trying to translate incorrectly entered commands as though they were host names.
no ip domain-lookup

!--- Assign "class" as the privileged EXEC encrypted password.
enable secret class

!--- Assign "cisco" as the console password and enable login.
line console 0
 password cisco
 login
 exit

!--- Assign "cisco" as the VTY password and enable login.
line vty 0 4
 password cisco
 login
 exit

!--- Encrypt the plaintext passwords.
service password-encryption

!--- Create a banner that warns anyone accessing the device that unauthorized access is prohibited.
banner motd $ Authorized Users Only! $

!--- Enable IPv6 routing.
ipv6 unicast-routing

! --------------------------------------------------------------
!--- Part 1 (cont.): Configure interfaces and default route
! --------------------------------------------------------------

!--- G0/0/0 (link to R1): link-local + GUA from the Addressing Table.
interface g0/0/0
 ipv6 address fe80::2 link-local
 ipv6 address 2001:db8:acad:2::2/64
 no shutdown
 exit

!--- G0/0/1 (LAN toward S2/PC-B): link-local + GUA from the Addressing Table.
interface g0/0/1
 ipv6 address fe80::2 link-local
 ipv6 address 2001:db8:acad:3::1/64
 no shutdown
 exit

!--- Default route pointing to R1's G0/0/0.
ipv6 route ::/0 2001:db8:acad:2::1

! --------------------------------------------------------------
!--- Part 5: DHCPv6 relay on R2 (for PC-B)
! --------------------------------------------------------------

!--- On G0/0/1 (PC-B LAN): set the MANAGED-config flag so hosts use stateful DHCPv6 for their address.
!--- Relay DHCPv6 requests to R1's G0/0/0 address.
interface g0/0/1
 ipv6 nd managed-config-flag
 ipv6 dhcp relay destination 2001:db8:acad:2::1 g0/0/0
 exit

end

! --------------------------------------------------------------
!--- Save the running configuration to the startup configuration file. (Press Enter when prompted for the destination filename.)
! --------------------------------------------------------------
copy running-config startup-config


! ==============================================================
!--- Verification commands:
!---   show ipv6 interface brief   -> interfaces up, addresses set
!---   show ipv6 route              -> default route via 2001:db8:acad:2::1
!---   ping 2001:db8:acad:1::1      -> reach R1 G0/0/1
! ==============================================================


