NetEss Final Packet Tracer Skills Assessment (PTSA) Answers
Networking Essentials ( Version 2) – Networking Essentials 2.0 PT Skills Assessment Answers
Networking Essentials: Practice Skills Assessment - PT - ID:2221
Topology:
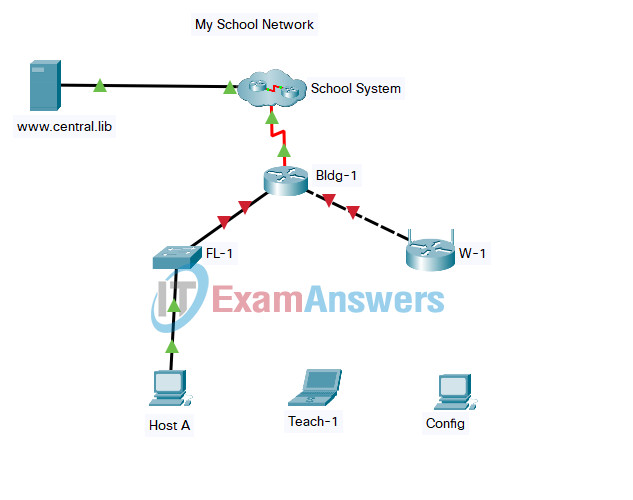
Networking Essentials 2.0 PT Skills Assessment - ID 2221
A few things to keep in mind while completing this activity:
- Do not use the browser Back button or close or reload any exam windows during the exam.
- Do not close Packet Tracer when you are done. It will close automatically.
- Click the Submit Assessment button in the browser window to submit your work.
Introduction
In this practice skills assessment, you will configure the My School Network. You will configure a router and enable remote management of a switch. You will also configure a wireless networking device to provide connectivity to a wireless LAN. Finally, you will configure hosts to communicate on the wired and wireless LAN.
All IOS device configurations should be completed from a direct terminal connection to the device console from a host device.
For a full list of tasks, see below.
You will practice and be assessed on the following skills:
- Basic configuration of a router
- Router interface configuration
- Switch Virtual Interface (SVI) configuration
- Wireless network device configuration
- Wireless host configuration
- Wired host configuration
You will do the following on specific devices:
Router Bldg-1:
- Activate interfaces.
- Address interfaces.
- Configure privileged EXEC mode password.
- Protect configuration lines with passwords.
- Name the device.
- Configure MOTD banner.
Switch FL-1:
- Activate the VLAN 1 SVI.
- Address the VLAN 1 SVI.
- Configure SSH for remote access.
Wireless Network Device W-1:
- Configure Internet interface addressing.
- Configure DHCP server.
- Configure the wireless network name.
- Configure basic wireless network security.
Host Host A:
- Configure IP addressing information.
- Configure default gateway address.
Host Config:
- Connect to a router using the correct cable.
- Configure host addressing.
Wireless Laptop Teach-1:
- Configure the wireless network name (SSID).
- Configure the wireless authentication type.
- Configure the wireless passphrase.
Addressing Table
Use the following addresses to configure the network. Some addresses are preconfigured, and are provided for reference purposes only. The address that is not provided in the table should be determined by you as part of this assessment.
| Device | Interface | Address | Mask | Gateway |
|---|---|---|---|---|
| Bldg-1 | G0/0 | 172.16.1.1 | 255.255.255.0 | N/A |
| G0/1 | 172.16.2.1 | 255.255.255.252 | N/A | |
| FL-1 | VLAN 1 | 172.16.1.150 | 255.255.255.0 | |
| W-1 | Internet | 172.16.2.2 | 255.255.255.252 | 172.16.2.1 |
| Router IP | 192.168.0.1 | 255.255.255.0 | N/A | |
| Host A | NIC | 172.16.1.5 | 255.255.255.0 | 172.16.1.1 |
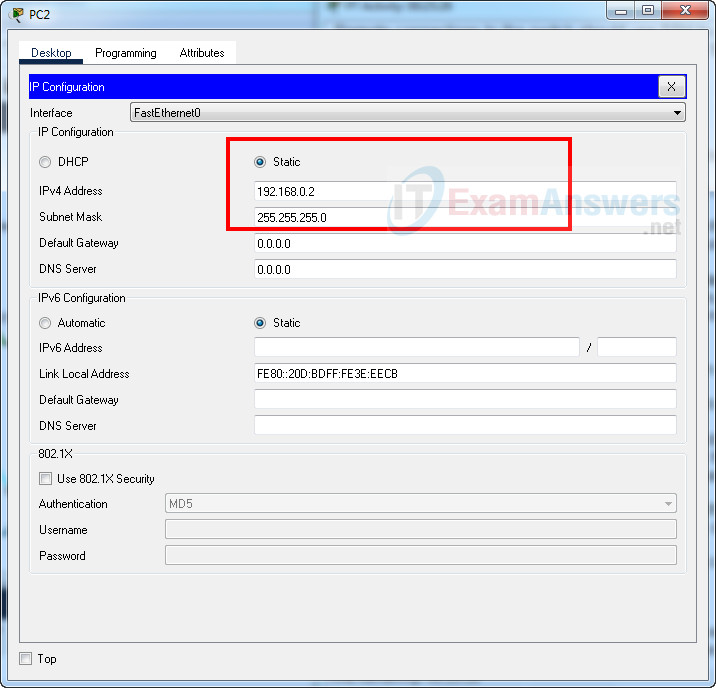
| Config | NIC | 192.168.0.2 | 255.255.255.0 | N/A |
| DNS Server | NIC | 198.51.100.5 | N/A | N/A |
Instructions
Step 1: Configure basic settings on the Bldg-1 router.
In order to be scored as correct, the values that you configure must match the exact values that are provided unless otherwise noted. Configure the following:
- The router name: Bldg-1
- The enable secret (privileged EXEC mode) password: LMn789
- An MOTD banner. You can use any text for this.
- The console line should require a password for all logins. Use a password of CDe123
- The VTY lines should require a password for remote access. Use a password of EFg456
- All passwords should automatically be encrypted.
Instructions (answers):
Use console cable to connect Host A and Bldg-1 (detail)
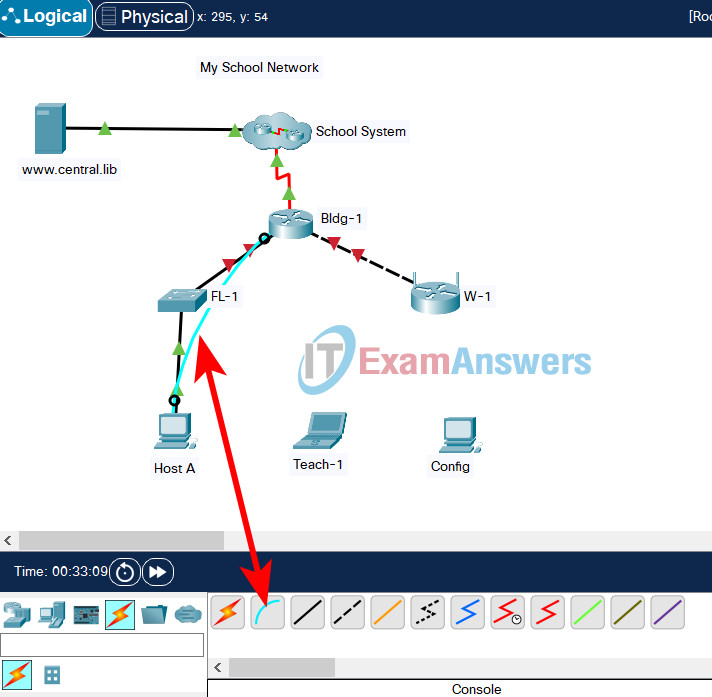
On PC A, go to Desktop tab --> Terminal --> OK
Router(config)#hostname Bldg-1
Bldg-1(config)#enable secret LMn789
Bldg-1(config)#banner motd #Unauthorized access to this device is prohibited!#

Bldg-1(config)#line console 0
Bldg-1(config-line)#password CDe123
Bldg-1(config-line)#login

Bldg-1(config-line)#line vty 0 15
Bldg-1(config-line)#password EFg456
Bldg-1(config-line)#login

Bldg-1(config-line)#service password-encryption
Step 2: Configure the LAN interfaces of the Bldg-1 router.
Configure the interfaces as follows:
- Activate both LAN interfaces of Bldg-1.
- Address both LAN interfaces using the information in the addressing table.
Instructions (answers):
Bldg-1(config-if)#interface gigabitEthernet 0/0
Bldg-1(config-if)#ip address 172.16.1.1 255.255.255.0
Bldg-1(config-if)#no shutdown

Bldg-1(config-if)#interface gigabitEthernet 0/1
Bldg-1(config-if)#ip address 172.16.2.1 255.255.255.252
Bldg-1(config-if)#no shutdown
Step 3: Configure remote management on the FL-1 switch.
Configure the switch SVI by using the default management interface as follows:
- Activate the interface.
- Address the interface according to the values shown in the addressing table.
- Determine the address to use as the switch default gateway from the addressing table. Configure the switch default gateway. The switch should be reachable from other networks.
Instructions (answers):
Use console cable to connect Host A and FL-1
On PC A, go to Desktop tab --> Terminal --> OK
Switch(config)#interface vlan 1
Switch(config-if)#ip address 172.16.1.150 255.255.255.0
Switch(config-if)#no shutdown
Switch(config-if)#exit

Switch(config)#ip default-gateway 172.16.1.1
Step 4: Configure the FL-1 switch to use SSH for remote connections.
Remote connections to the switch should use SSH to connect. All configured values must match the values provided below exactly. Configure SSH by using the following:
- Domain name: school
- Switch name: FL-1
- Crypto key modulus: 1024
- Configure local login on the VTY lines
- Incoming connections should use the SSH protocol only.
- Create a user named: ops
- The user should be required to use a password of ABC234
Note: In order to access privileged EXEC mode remotely from an SSH client, a privileged EXEC mode password must be set. This is not a requirement for this assessment.
Instructions (answers):
Switch(config)#ip domain-name school

Switch(config)#hostname FL-1
FL-1(config)#crypto key generate rsa
How many bits in the modulus [512]: 1024
% Generating 1024 bit RSA keys, keys will be non-exportable...[OK]

FL-1(config)#line vty 0 15
FL-1(config-line)#transport input ssh
FL-1(config-line)#login local
FL-1(config-line)#exit

FL-1(config)#username ops password ABC234
Step 5: Configure the W-1 wireless network device.
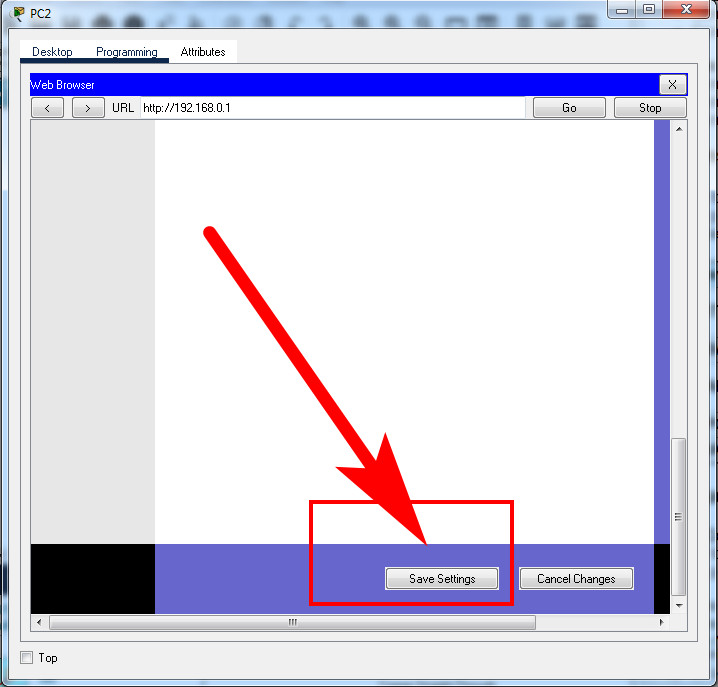
Configure the wireless network device with addresses, DHCP settings, and wireless network settings. Be certain to save your settings before moving between screens in the device configuration GUI. It may take some time for settings to save. When both link lights on the cable to the wireless router are green, you will be able to continue configuring.
1. Establish a connection with the W-1 device from host Config.
- Connect an Ethernet cable from Config to any LAN port on the W-1 device. Do not delete this connection.
- Use the addressing table to provide an IP address and mask to Config.
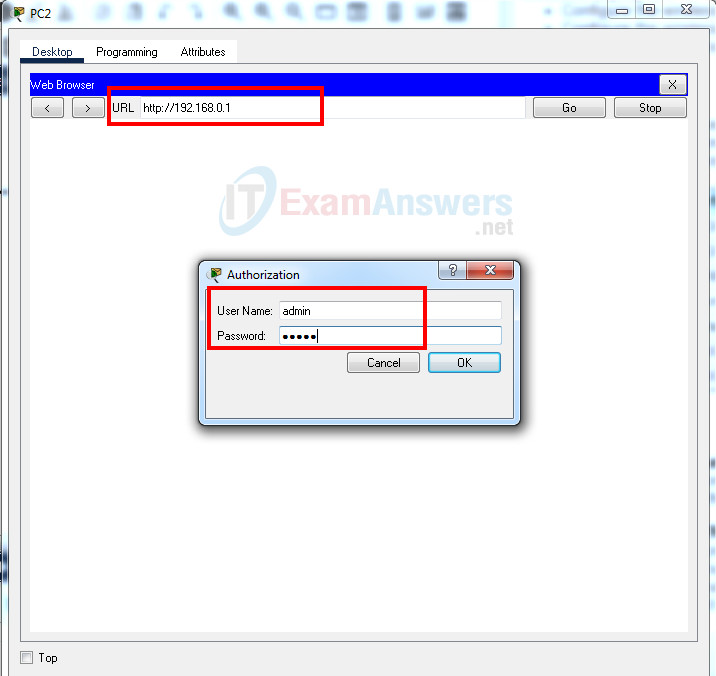
- Use the browser on Config to connect to the router IP address of the wireless device. Use admin as both the username and password.
Note: You may need to watch and wait until the link lights on the Ethernet cable are green before you can connect or reconnect to the W-1 wireless network device from host Config.
Instructions (answers):
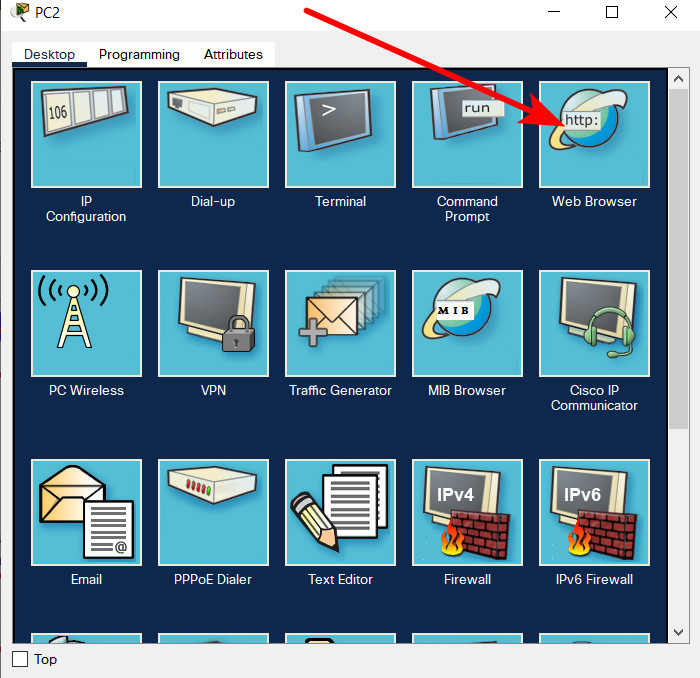
Use copper straight through cable to connect Config PC and W-1
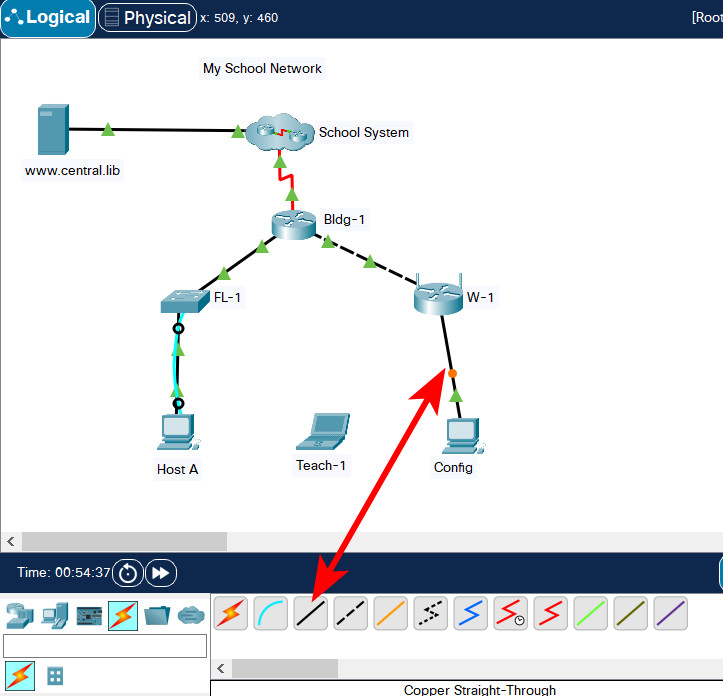
Go to: Config PC --> Desktop tab --> IP Configuration menu
Go to Web Browser
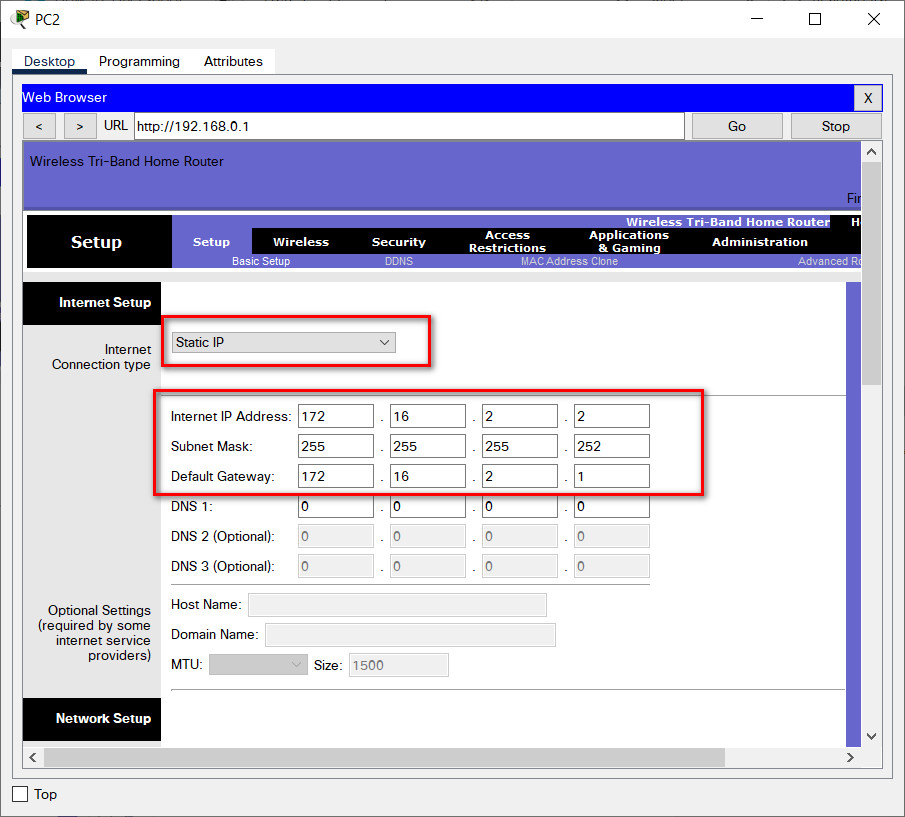
2. Configure the Internet interface of the device according to the values in the addressing table.
3. Configure DHCP as follows:
- a. Configure the router IP address and mask with the values shown in the addressing table. Save this setting to update the pool of addresses that will be used by DHCP.
- b. Set the first address to be used to 192.168.0.150.
- c. DHCP should provide 50 IP addresses for hosts on the LAN.
- d. DHCP should provide the DNS server IP address with the value shown in the Addressing Table.
Instructions (answers):
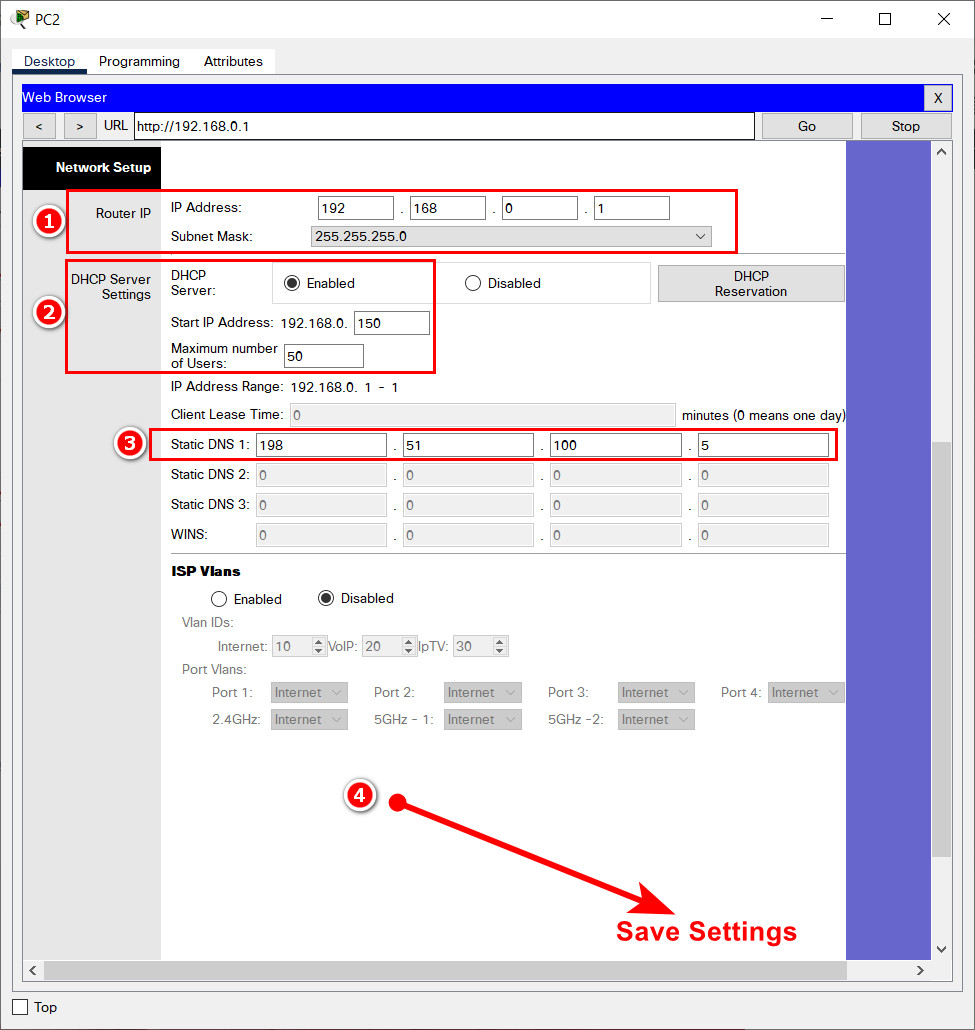
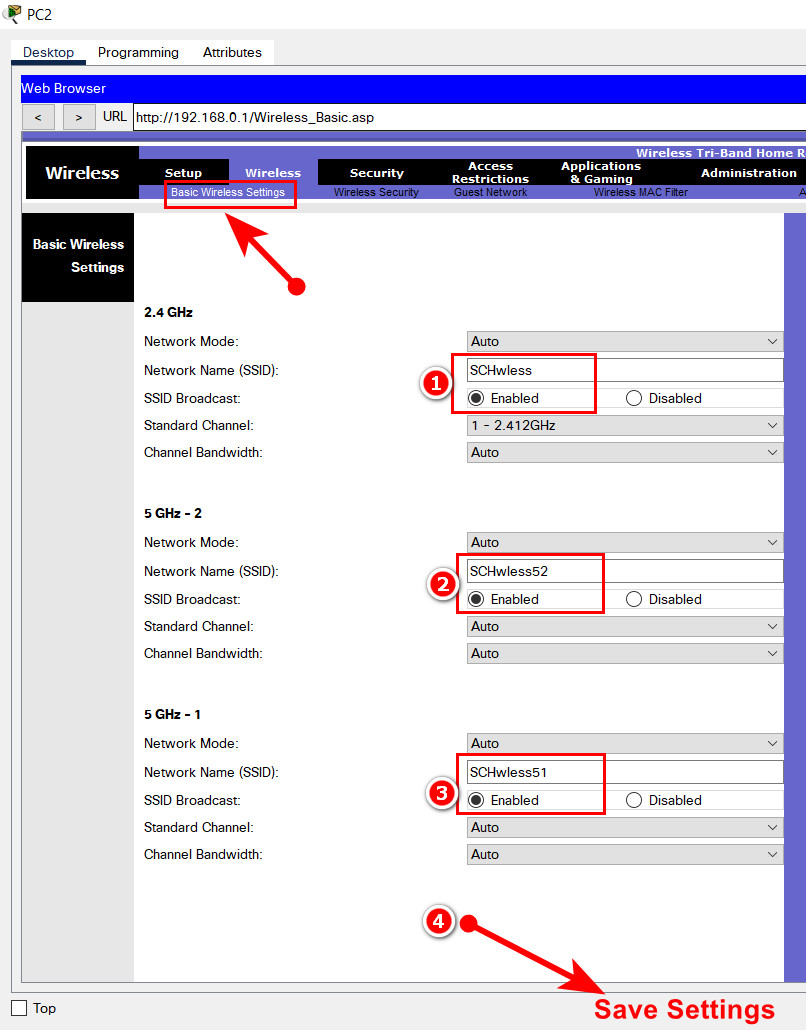
4. Configure wireless settings as follows:
- a. For the 2.4 GHz network , use the network name of SCHwless. Be sure that the SSID can be seen by hosts that are attempting to connect to the wireless LAN.
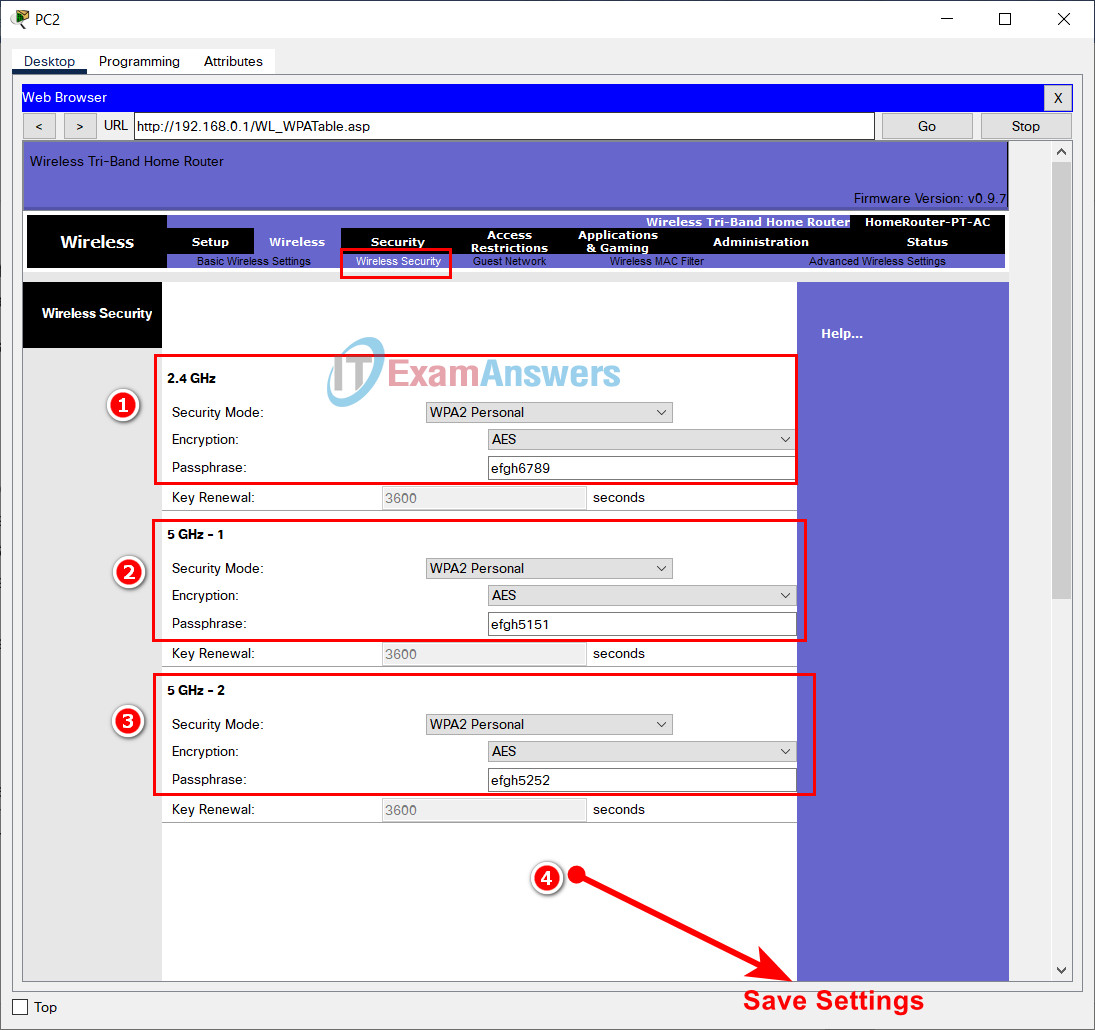
- b. Secure the wireless LAN with WPA2 Personal. Use AES for encryption. The passphrase should be ijkl0123.
- c. For the 5 Ghz - 2 network , use the network name of SCHwless52. Be sure that the SSID can be seen by hosts that are attempting to connect to the wireless LAN.
- d. Secure the wireless LAN with WPA2 Personal. Use AES for encryption. The passphrase should be ijkl5252.
- e. For the 5 Ghz - 1 network , use the network name of SCHwless51. Be sure that the SSID can be seen by hosts that are attempting to connect to the wireless LAN.
- f. Secure the wireless LAN with WPA2 Personal. Use AES for encryption. The passphrase should be ijkl5151.
Instructions (answers):
Go to Wireless menu:
Step 6: Configure the Host A and Teach-1 hosts.
Configure the wired and wireless hosts as follows.
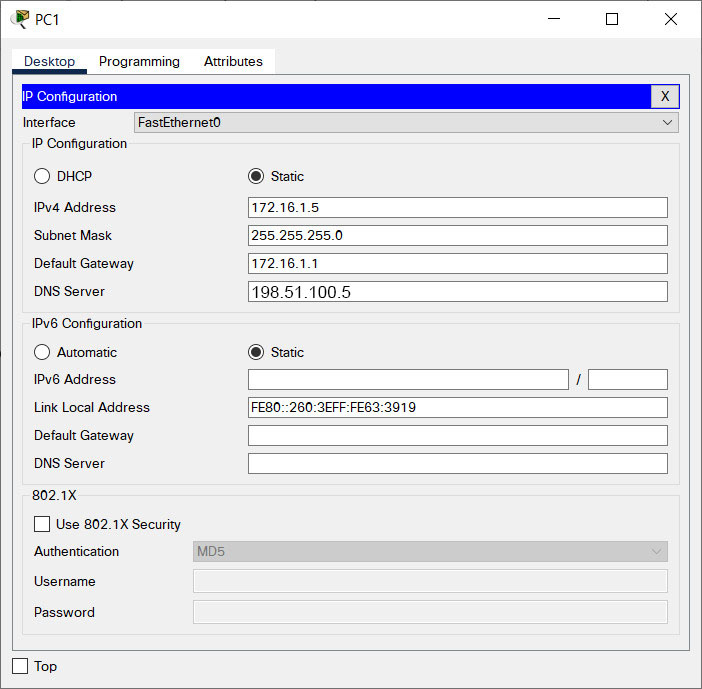
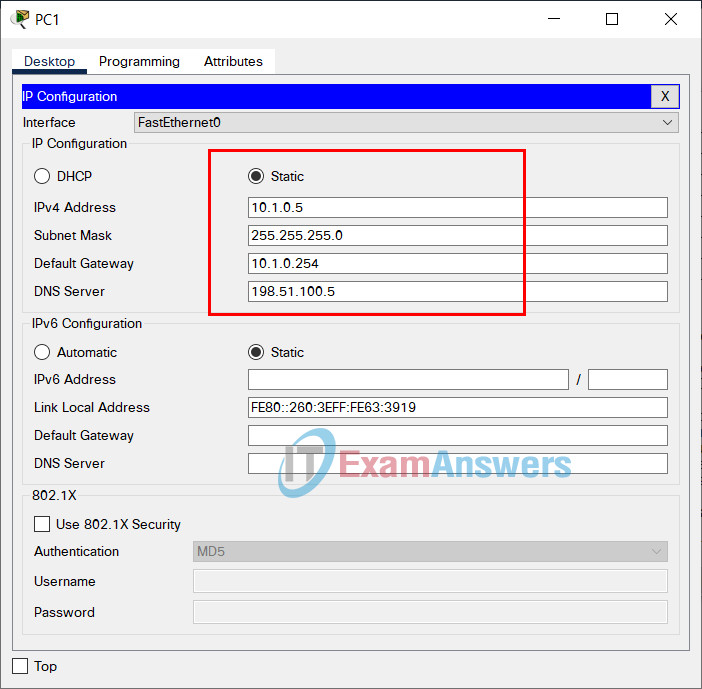
- Configure the Host A host with the addressing values and DNS server shown in the addressing table.
- Configure the Teach-1 host to connect to one of wireless networks using the values that you configured in Step 5.
- The Teach-1 host will receive its network addressing and DNS server information over DHCP. Verify connectivity.
If you have configured everything correctly the Host A and Teach-1 hosts should be able to connect to the webserver with its URL https://www.central.lib. In addition, the FL-1 switch should be reachable by the Host A and Teach-1 hosts.
Instructions (answers):
Configure Host A host
Configure Teach-1 host
On Laptop Teach-1, go to --> Dektop tab --> PC Wireless
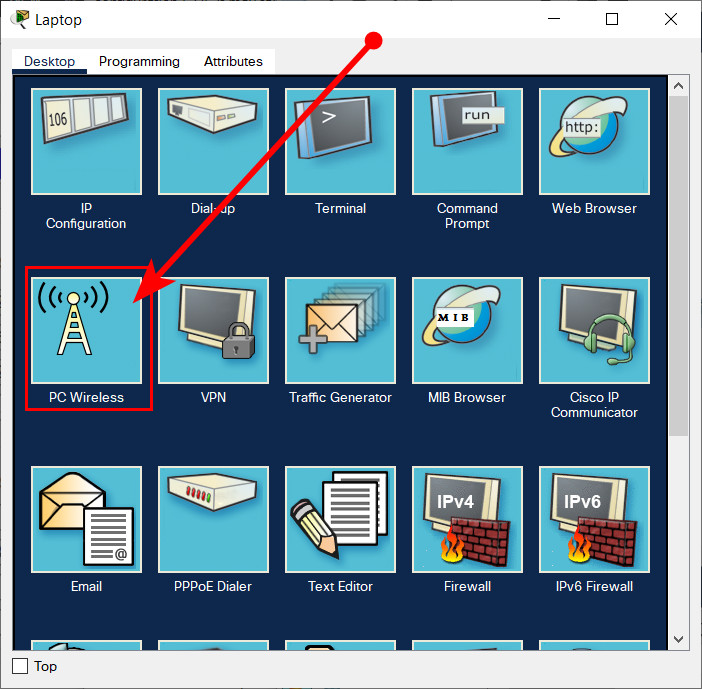
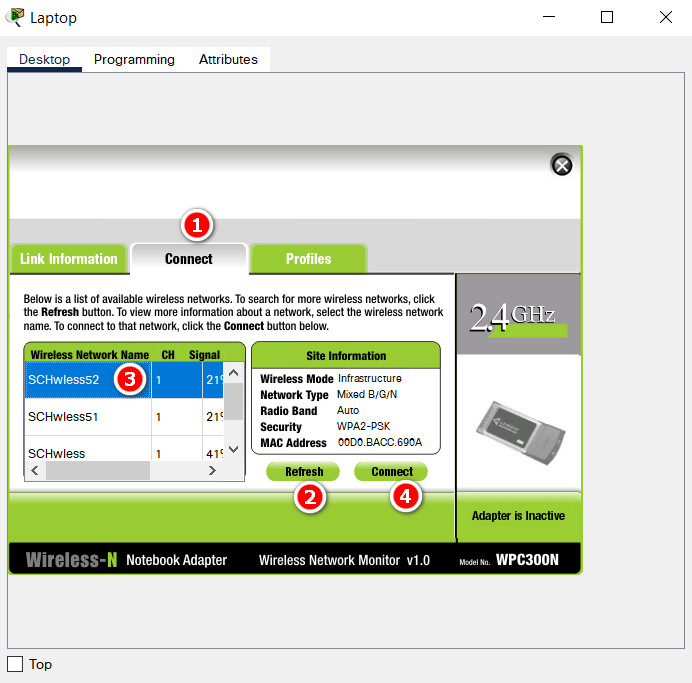
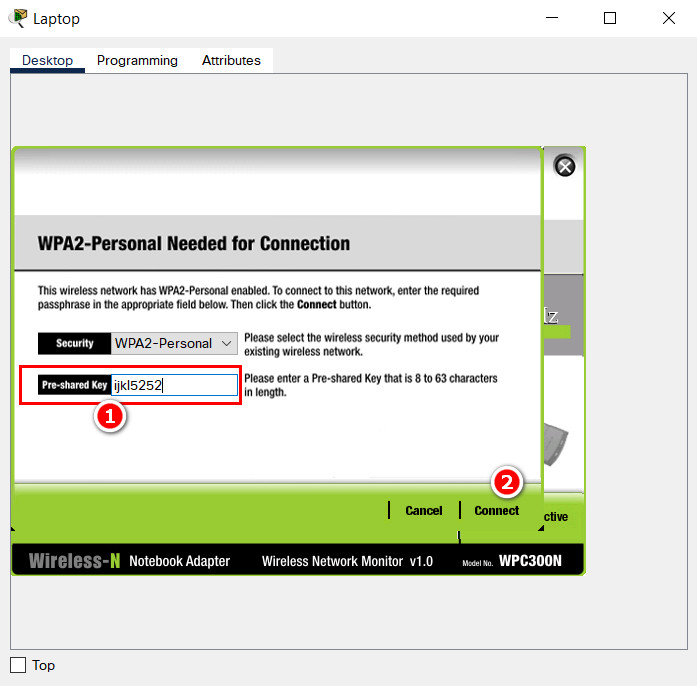
Results:
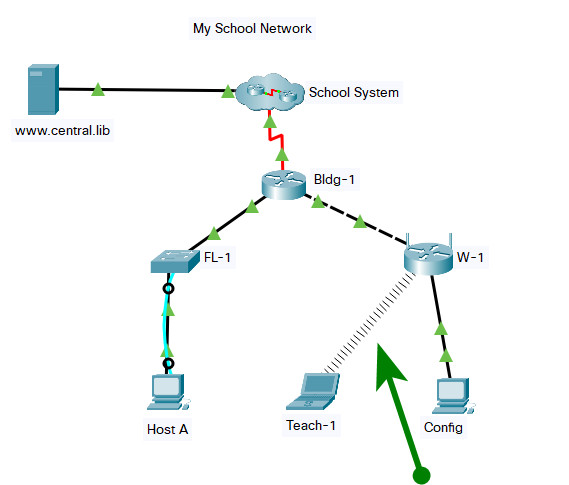
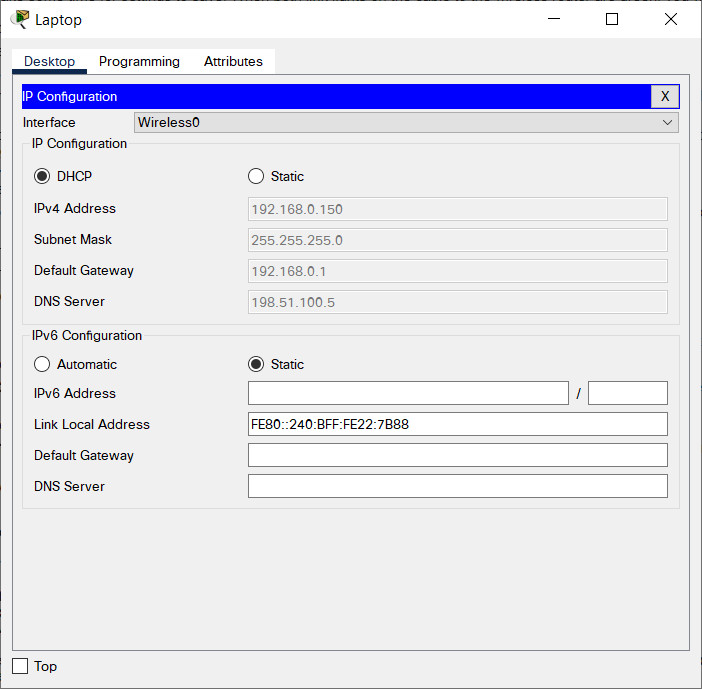
Active DHCP on Teach-1 host
Answers script:
Bldg-1 Router
enable
configure terminal
hostname Bldg-1
enable secret LMn789
banner motd #Unauthorized access to this device is prohibited!#
line console 0
password CDe123
login

line vty 0 15
password EFg456
login

service password-encryption

interface gigabitEthernet 0/0
ip address 172.16.1.1 255.255.255.0
no shutdown

interface gigabitEthernet 0/1
ip address 172.16.2.1 255.255.255.252
no shutd
no shutdown
end
wr
FL-1 Switch
enable
configure terminal

interface vlan 1
ip address 172.16.1.150 255.255.255.0
no shutdown
exit
ip default-gateway 172.16.1.1

ip domain-name school
hostname FL-1
crypto key generate rsa
1024
line vty 0 15
transport input ssh
login local
exit

username ops password ABC234
end
wr
Networking Essentials: Practice Skills Assessment - PT - ID:2121
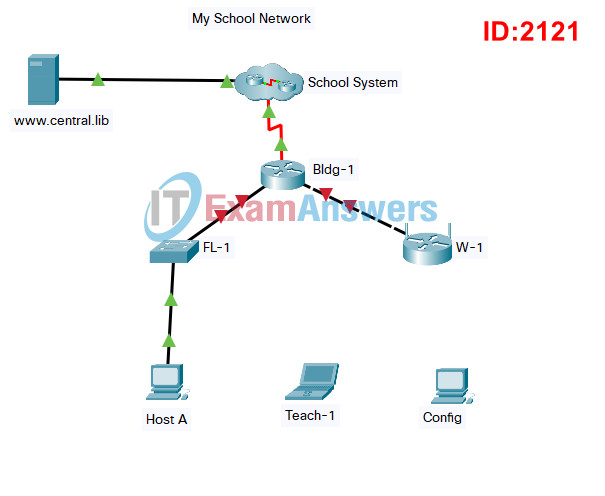
Topology:
Networking Essentials 2.0 PT Skills Assessment - ID 2121
A few things to keep in mind while completing this activity:
- Do not use the browser Back button or close or reload any exam windows during the exam.
- Do not close Packet Tracer when you are done. It will close automatically.
- Click the Submit Assessment button in the browser window to submit your work.
Introduction
In this practice skills assessment, you will configure the My School Network. You will configure a router and enable remote management of a switch. You will also configure a wireless networking device to provide connectivity to a wireless LAN. Finally, you will configure hosts to communicate on the wired and wireless LAN.
All IOS device configurations should be completed from a direct terminal connection to the device console from a host device.
For a full list of tasks, see below.
You will practice and be assessed on the following skills:
- Basic configuration of a router
- Router interface configuration
- Switch Virtual Interface (SVI) configuration
- Wireless network device configuration
- Wireless host configuration
- Wired host configuration
You will do the following on specific devices:
Router Bldg-1:
- Activate interfaces.
- Address interfaces.
- Configure privileged EXEC mode password.
- Protect configuration lines with passwords.
- Name the device.
- Configure MOTD banner.
Switch FL-1:
- Activate the VLAN 1 SVI.
- Address the VLAN 1 SVI.
- Configure SSH for remote access.
Wireless Network Device W-1:
- Configure Internet interface addressing.
- Configure DHCP server.
- Configure the wireless network name.
- Configure basic wireless network security.
Host Host A:
- Configure IP addressing information.
- Configure default gateway address.
Host Config:
- Connect to a router using the correct cable.
- Configure host addressing.
Wireless Laptop Teach-1:
- Configure the wireless network name (SSID).
- Configure the wireless authentication type.
- Configure the wireless passphrase.
Addressing Table
Use the following addresses to configure the network. Some addresses are preconfigured, and are provided for reference purposes only. The address that is not provided in the table should be determined by you as part of this assessment.
| Device | Interface | Address | Mask | Gateway |
|---|---|---|---|---|
| Bldg-1 | G0/0 | 10.1.0.254 | 255.255.255.0 | N/A |
| G0/1 | 10.2.0.254 | 255.255.255.252 | N/A | |
| FL-1 | VLAN 1 | 10.1.0.200 | 255.255.255.0 | |
| W-1 | Internet | 10.2.0.253 | 255.255.255.252 | 10.2.0.254 |
| Router IP | 192.168.0.1 | 255.255.255.0 | N/A | |
| Host A | NIC | 10.1.0.5 | 255.255.255.0 | 10.1.0.254 |
| Config | NIC | 192.168.0.2 | 255.255.255.0 | N/A |
| DNS Server | NIC | 198.51.100.5 | N/A | N/A |
Instructions
Step 1: Configure basic settings on the Bldg-1 router.
In order to be scored as correct, the values that you configure must match the exact values that are provided unless otherwise noted. Configure the following:
- The router name: Bldg-1
- The enable secret (privileged EXEC mode) password: LMn789
- An MOTD banner. You can use any text for this.
- The console line should require a password for all logins. Use a password of CDe123
- The VTY lines should require a password for remote access. Use a password of EFg456
- All passwords should automatically be encrypted.
Instructions (answers):
Use console cable to connect Host A and Bldg-1 (detail)

On PC A, go to Desktop tab --> Terminal --> OK
Router(config)#hostname Bldg-1
Bldg-1(config)#enable secret LMn789
Bldg-1(config)#banner motd #Unauthorized access to this device is prohibited!#

Bldg-1(config)#line console 0
Bldg-1(config-line)#password CDe123
Bldg-1(config-line)#login

Bldg-1(config-line)#line vty 0 15
Bldg-1(config-line)#password EFg456
Bldg-1(config-line)#login

Bldg-1(config-line)#service password-encryption
Step 2: Configure the LAN interfaces of the Bldg-1 router.
Configure the interfaces as follows:
- Activate both LAN interfaces of Bldg-1.
- Address both LAN interfaces using the information in the addressing table.
Instructions (answers):
Bldg-1(config-if)#interface gigabitEthernet 0/0
Bldg-1(config-if)#ip address 10.1.0.254 255.255.255.0
Bldg-1(config-if)#no shutdown

Bldg-1(config-if)#interface gigabitEthernet 0/1
Bldg-1(config-if)#ip address 10.2.0.254 255.255.255.252
Bldg-1(config-if)#no shutdown
Step 3: Configure remote management on the FL-1 switch.
Configure the switch SVI by using the default management interface as follows:
- Activate the interface.
- Address the interface according to the values shown in the addressing table.
- Determine the address to use as the switch default gateway from the addressing table. Configure the switch default gateway. The switch should be reachable from other networks.
Instructions (answers):
Use console cable to connect Host A and FL-1
On PC A, go to Desktop tab --> Terminal --> OK
Switch(config)#interface vlan 1
Switch(config-if)#ip address 10.1.0.200 255.255.255.0
Switch(config-if)#no shutdown
Switch(config-if)#exit

Switch(config)#ip default-gateway 10.1.0.254
Step 4: Configure the FL-1 switch to use SSH for remote connections.
Remote connections to the switch should use SSH to connect. All configured values must match the values provided below exactly. Configure SSH by using the following:
- Domain name: school
- Switch name: FL-1
- Crypto key modulus: 1024
- Configure local login on the VTY lines
- Incoming connections should use the SSH protocol only.
- Create a user named: ops
- The user should be required to use a password of ABC234
Note: In order to access privileged EXEC mode remotely from an SSH client, a privileged EXEC mode password must be set. This is not a requirement for this assessment.
Instructions (answers):
Switch(config)#ip domain-name school

Switch(config)#hostname FL-1
FL-1(config)#crypto key generate rsa
How many bits in the modulus [512]: 1024
% Generating 1024 bit RSA keys, keys will be non-exportable...[OK]

FL-1(config)#line vty 0 15
FL-1(config-line)#transport input ssh
FL-1(config-line)#login local
FL-1(config-line)#exit

FL-1(config)#username ops password ABC234
Step 5: Configure the W-1 wireless network device.
Configure the wireless network device with addresses, DHCP settings, and wireless network settings. Be certain to save your settings before moving between screens in the device configuration GUI. It may take some time for settings to save. When both link lights on the cable to the wireless router are green, you will be able to continue configuring.
1. Establish a connection with the W-1 device from host Config.
- Connect an Ethernet cable from Config to any LAN port on the W-1 device. Do not delete this connection.
- Use the addressing table to provide an IP address and mask to Config.
- Use the browser on Config to connect to the router IP address of the wireless device. Use admin as both the username and password.
Note: You may need to watch and wait until the link lights on the Ethernet cable are green before you can connect or reconnect to the W-1 wireless network device from host Config.
Instructions (answers):
Use copper straight through cable to connect Config PC and W-1

Go to: Config PC --> Desktop tab --> IP Configuration menu

Go to Web Browser


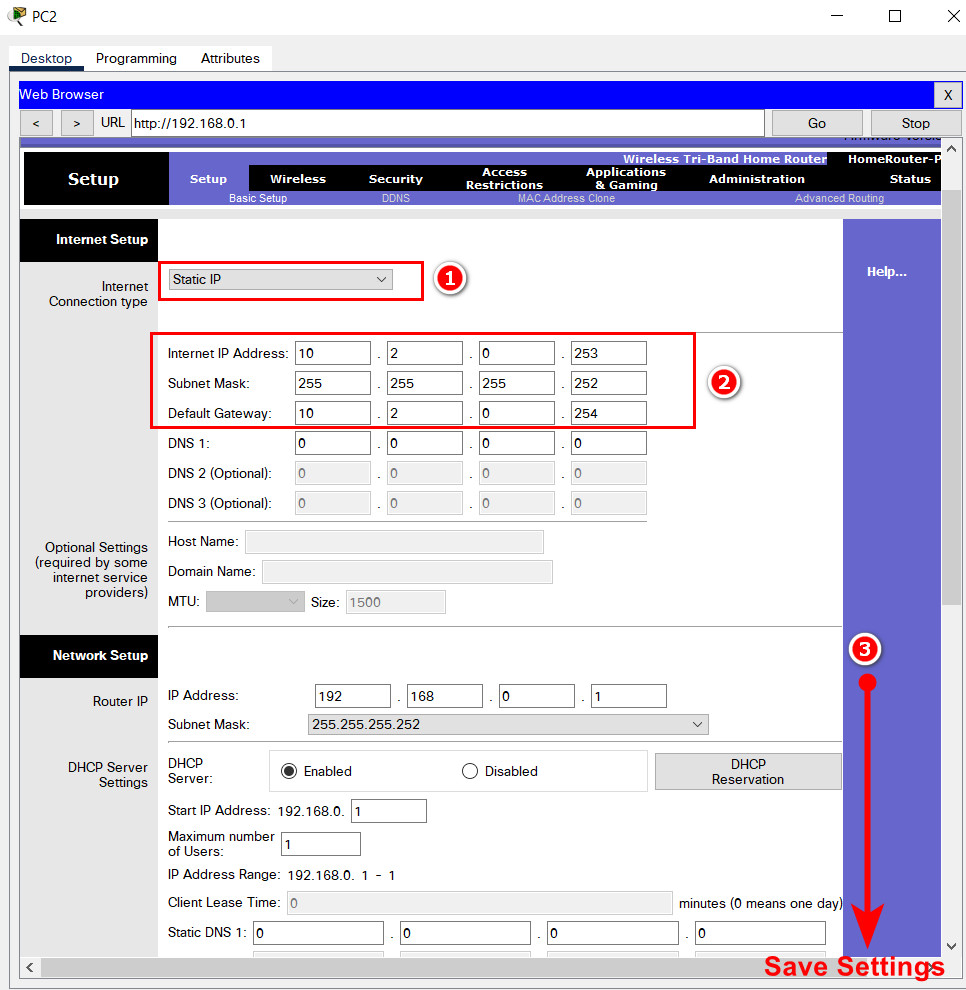

2. Configure the Internet interface of the device according to the values in the addressing table.
3. Configure DHCP as follows:
- a. Configure the router IP address and mask with the values shown in the addressing table. Save this setting to update the pool of addresses that will be used by DHCP.
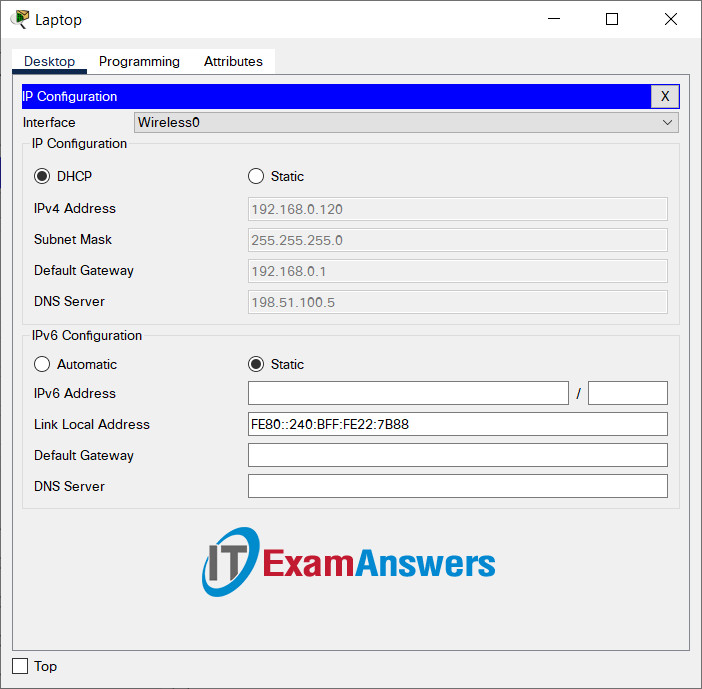
- b. Set the first address to be used to 192.168.0.120.
- c. DHCP should provide 25 IP addresses for hosts on the LAN.
- d. DHCP should provide the DNS server IP address with the value shown in the Addressing Table.
Instructions (answers):
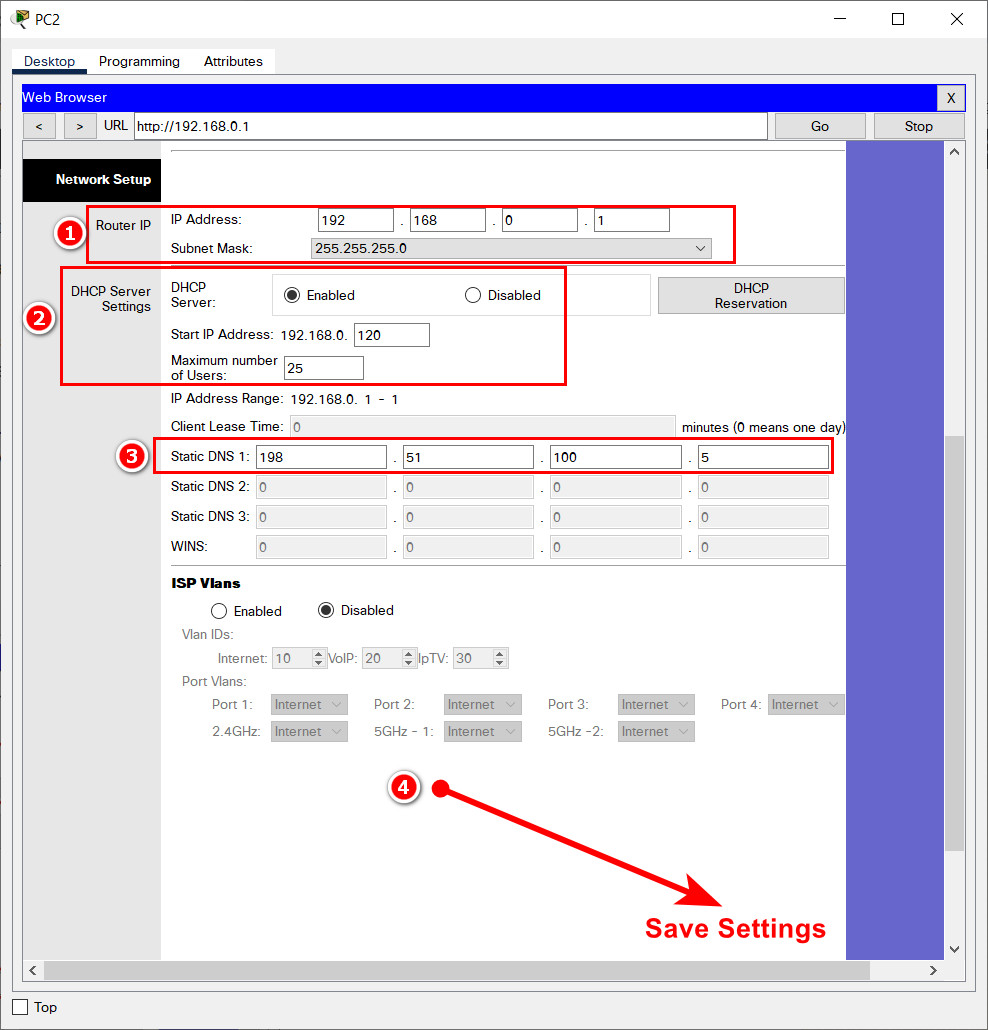
4. Configure wireless settings as follows:
- a. For the 2.4 GHz network , use the network name of SCHwless. Be sure that the SSID can be seen by hosts that are attempting to connect to the wireless LAN.
- b. Secure the wireless LAN with WPA2 Personal. Use AES for encryption. The passphrase should be ijkl0123.
- c. For the 5 Ghz - 2 network , use the network name of SCHwless52. Be sure that the SSID can be seen by hosts that are attempting to connect to the wireless LAN.
- d. Secure the wireless LAN with WPA2 Personal. Use AES for encryption. The passphrase should be ijkl5252.
- e. For the 5 Ghz - 1 network , use the network name of SCHwless51. Be sure that the SSID can be seen by hosts that are attempting to connect to the wireless LAN.
- f. Secure the wireless LAN with WPA2 Personal. Use AES for encryption. The passphrase should be ijkl5151.
Instructions (answers):
Go to Wireless menu:


Step 6: Configure the Host A and Teach-1 hosts.
Configure the wired and wireless hosts as follows.
- Configure the Host A host with the addressing values and DNS server shown in the addressing table.
- Configure the Teach-1 host to connect to one of wireless networks using the values that you configured in Step 5.
- The Teach-1 host will receive its network addressing and DNS server information over DHCP. Verify connectivity.
If you have configured everything correctly the Host A and Teach-1 hosts should be able to connect to the webserver with its URL https://www.central.lib. In addition, the FL-1 switch should be reachable by the Host A and Teach-1 hosts.
Instructions (answers):
Configure Host A host
Configure Teach-1 host
On Laptop Teach-1, go to --> Dektop tab --> PC Wireless


Results:

Active DHCP on Teach-1 host
Answers script:
Bldg-1 Router
enable
configure terminal
hostname Bldg-1
enable secret LMn789
banner motd #Unauthorized access to this device is prohibited!#
line console 0
password CDe123
login

line vty 0 15
password EFg456
login

service password-encryption

interface gigabitEthernet 0/0
ip address 10.1.0.254 255.255.255.0
no shutdown

interface gigabitEthernet 0/1
ip address 10.2.0.254 255.255.255.252
no shutd
no shutdown
end
wr
FL-1 Switch
enable
configure terminal

interface vlan 1
ip address 10.1.0.200 255.255.255.0
no shutdown
exit
ip default-gateway 10.1.0.254

ip domain-name school
hostname FL-1
crypto key generate rsa
1024
line vty 0 15
transport input ssh
login local
exit

username ops password ABC234
end
wr
