
11.9.3 Packet Tracer - VLSM Design and Implementation Practice (Answers)
Scenario 1 - Network Address: 10.11.48.0/24
Topology
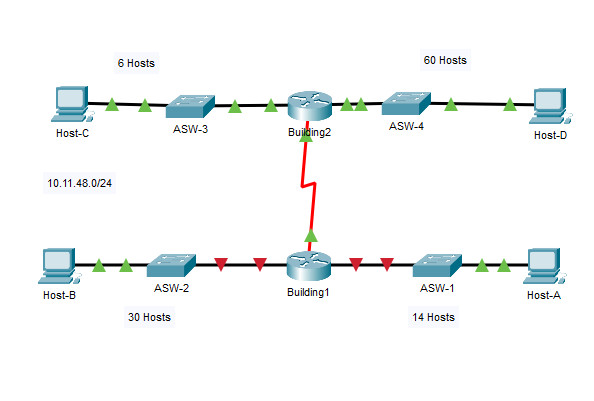
Addressing Table
| Device | Interface | Address | Subnet Mask | Default Gateway |
|---|---|---|---|---|
| Building1 | G0/0 | 10.11.48.97 | 255.255.255.240 | N/A |
| G0/1 | 10.11.48.65 | 255.255.255.224 | N/A | |
| S0/0/0 | 10.11.48.121 | 255.255.255.252 | N/A | |
| Building2 | G0/0 | 10.11.48.113 | 255.255.255.248 | N/A |
| G0/1 | 10.11.48.1 | 255.255.255.192 | N/A | |
| S0/0/0 | 10.11.48.122 | 255.255.255.252 | N/A | |
| ASW1 | VLAN 1 | 10.11.48.98 | 255.255.255.240 | 10.11.48.97 |
| ASW2 | VLAN 1 | 10.11.48.66 | 255.255.255.224 | 10.11.48.65 |
| ASW3 | VLAN 1 | 10.11.48.114 | 255.255.255.248 | 10.11.48.113 |
| ASW4 | VLAN 1 | 10.11.48.2 | 255.255.255.192 | 10.11.48.1 |
| Host-A | NIC | 10.11.48.110 | 255.255.255.240 | 10.11.48.97 |
| Host-B | NIC | 10.11.48.94 | 255.255.255.224 | 10.11.48.65 |
| Host-C | NIC | 10.11.48.118 | 255.255.255.248 | 10.11.48.113 |
| Host-D | NIC | 10.11.48.62 | 255.255.255.192 | 10.11.48.1 |
Objectives
- Part 1: Examine the Network Requirements
- Part 2: Design the VLSM Addressing Scheme
- Part 3: Assign IP Addresses to Devices and Verify Connectivity
Background
In this activity, you are given a /24 network address to use to design a VLSM addressing scheme. Based on a set of requirements, you will assign subnets and addressing, configure devices and verify connectivity.
Instructions
Part 1: Examine the Network Requirements
Step 1: Determine the number of subnets needed.
You will subnet the network address 10.11.48.0/24. The network has the following requirements:
- ASW-1 LAN will require 14 host IP addresses
- ASW-2 LAN will require 30 host IP addresses
- ASW-3 LAN will require 6 host IP addresses
- ASW-4 LAN will require 60 host IP addresses
How many subnets are needed in the network topology? 5
Step 2: Determine the subnet mask information for each subnet.
a. Which subnet mask will accommodate the number of IP addresses required for ASW-1?
255.255.255.240 /28
How many usable host addresses will this subnet support?
14 (10.11.48.97 - 10.11.48.110)
b. Which subnet mask will accommodate the number of IP addresses required for ASW-2?
255.255.255.224 /27
How many usable host addresses will this subnet support?
30 (10.11.48.65 - 10.11.48.94)
c. Which subnet mask will accommodate the number of IP addresses required for ASW-3?
255.255.255.248 /29
How many usable host addresses will this subnet support?
6 (10.11.48.113 - 10.11.48.118)
d. Which subnet mask will accommodate the number of IP addresses required for ASW-4?
255.255.255.192 /26
How many usable host addresses will this subnet support?
62 (10.11.48.1 - 10.11.48.62)
e. Which subnet mask will accommodate the number of IP addresses required for the connection between Building1 and Building2?
255.255.255.252 /30
Part 2: Design the VLSM Addressing Scheme
Step 1: Divide the 10.11.48.0/24 network based on the number of hosts per subnet.
a. Use the first subnet to accommodate the largest LAN.
b. Use the second subnet to accommodate the second largest LAN.
c. Use the third subnet to accommodate the third largest LAN.
d. Use the fourth subnet to accommodate the fourth largest LAN.
e. Use the fifth subnet to accommodate the connection between Building1 and Building2.
Step 2: Document the VLSM subnets.
Complete the Subnet Table, listing the subnet descriptions (e.g. ASW-1 LAN), number of hosts needed, then network address for the subnet, the first usable host address, and the broadcast address. Repeat until all addresses are listed.
Subnet Table
| Subnet Description | Number of Hosts Needed | Network Address/CIDR | First Usable Host Address | Last Usable Host Address | Broadcast Address |
|---|---|---|---|---|---|
| Host-D LAN | 60 | 10.11.48.0/26 | 10.11.48.1 | 10.11.48.62 | 10.11.48.63 |
| Host-B LAN | 30 | 10.11.48.64/27 | 10.11.48.65 | 10.11.48.94 | 10.11.48.95 |
| Host-A LAN | 14 | 10.11.48.96/28 | 10.11.48.97 | 10.11.48.110 | 10.11.48.111 |
| Host-C LAN | 6 | 10.11.48.112/29 | 10.11.48.113 | 10.11.48.118 | 10.11.48.119 |
| WAN Link | 2 | 10.11.48.120/30 | 10.11.48.121 | 10.11.48.122 | 10.11.48.123 |
Step 3: Document the addressing scheme.
a. Assign the first usable IP addresses to Building1 for the two LAN links and the WAN link.
b. Assign the first usable IP addresses to Building2 for the two LAN links. Assign the last usable IP address for the WAN link.
c. Assign the second usable IP addresses to the switches.
d. Assign the last usable IP addresses to the hosts.
Part 3: Assign IP Addresses to Devices and Verify Connectivity
Most of the IP addressing is already configured on this network. Implement the following steps to complete the addressing configuration.
Step 1: Configure IP addressing on the Building1 router LAN interfaces.
Building1(config)# interface gigabitethernet 0/0
Building1(config-if)# ip address 10.11.48.97 255.255.255.240
Building1(config-if)# no shutdown
Building1(config-if)# interface gigabitethernet 0/1
Building1(config-if)# ip address 10.11.48.65 255.255.255.224
Building1(config-if)# no shutdown
Step 2: Configure IP addressing on the ASW-3 switch, including the default gateway.
ASW3(config)# interface vlan 1
ASW3(config-if)# ip address 10.11.48.114 255.255.255.248
ASW3(config-if)# no shutdown
ASW3(config-if)# exit
ASW3(config)# ip default-gateway 10.11.48.113
Step 3: Configure IP addressing on Host-D, including the default gateway.
Step 4: Verify connectivity.
You can only verify connectivity from Building1, ASW-3, and Host-D. However, you should be able to ping every IP address listed in the Addressing Table.
Building1# ping 10.11.48.62
ASW3# ping 10.11.48.113
C:\> ping 10.11.48.97
Device Configs - Final
ROUTER Building1
! ==============================================================
!--- 11.9.3 Packet Tracer - VLSM Design and Implementation Practice
!--- ANSWER SCRIPT FOR ROUTER Building1 - SCENARIO 1 (network 10.11.48.0/24)
!--- Usage: copy this whole file and paste it into the Building1 terminal (start at the Building1> prompt). Every line beginning with "!" is a comment; IOS ignores it, so pasting a comment by accident is harmless.
!--- Note: this activity is randomized. Use this script only if your Addressing Table matches Scenario 1 (network 10.11.48.0/24).
! ==============================================================

enable
configure terminal

! --------------------------------------------------------------
!--- Part 3: Assign IP Addresses to Devices and Verify Connectivity.
! --------------------------------------------------------------

!--- Step 1: G0/0 - first usable address of the ASW1 (10.11.48.96/28) subnet.
interface gigabitethernet 0/0
 ip address 10.11.48.97 255.255.255.240
 no shutdown
 exit

!--- Step 1: G0/1 - first usable address of the ASW2 (10.11.48.64/27) subnet.
interface gigabitethernet 0/1
 ip address 10.11.48.65 255.255.255.224
 no shutdown
 exit

end

! --------------------------------------------------------------
!--- Save the configuration to NVRAM. (Press Enter when prompted for the destination filename.)
! --------------------------------------------------------------
copy running-config startup-config


! ==============================================================
!--- Verification:
!---   show ip interface brief  -> G0/0, G0/1 and S0/0/0 up/up with their addresses
!---   show ip route            -> the two LAN subnets are connected (C); the other LANs are learned dynamically
!---   ping 10.11.48.62         -> reaches Host-D (after Host-D is configured)
!--- Note: S0/0/0 and routing are already configured on both routers.
! ==============================================================
SWITCH ASW3
! ==============================================================
!--- 11.9.3 Packet Tracer - VLSM Design and Implementation Practice
!--- ANSWER SCRIPT FOR SWITCH ASW3 - SCENARIO 1 (network 10.11.48.0/24)
!--- Usage: copy this whole file and paste it into the ASW3 terminal (start at the ASW3> prompt). Every line beginning with "!" is a comment; IOS ignores it, so pasting a comment by accident is harmless.
!--- Note: this activity is randomized. Use this script only if your Addressing Table matches Scenario 1 (network 10.11.48.0/24).
! ==============================================================

enable
configure terminal

! --------------------------------------------------------------
!--- Part 3: Assign IP Addresses to Devices and Verify Connectivity.
! --------------------------------------------------------------

!--- Step 2: VLAN 1 - second usable address of the ASW3 (10.11.48.112/29) subnet; activate it.
interface vlan 1
 ip address 10.11.48.114 255.255.255.248
 no shutdown
 exit

!--- Step 2: default gateway - the Building2 G0/0 interface on this LAN.
ip default-gateway 10.11.48.113

end

! --------------------------------------------------------------
!--- Save the configuration to NVRAM. (Press Enter when prompted for the destination filename.)
! --------------------------------------------------------------
copy running-config startup-config


! ==============================================================
!--- Verification:
!---   show ip interface brief  -> Vlan1 up/up with 10.11.48.114
!---   ping 10.11.48.113        -> reaches the default gateway (Building2 G0/0)
!---   ping 10.11.48.110        -> reaches Host-A in the other building
! ==============================================================
Host-D
Download PDF & PKA files

11.9.3 Packet Tracer - VLSM Design and Implementation Practice - PDF 205.59 KB 14423 downloads
...
11.9.3 Packet Tracer - VLSM Design and Implementation Practice - PKA 344.15 KB 10746 downloads
...Scenario 2 - Network Address: 172.31.103.0/24
Topology
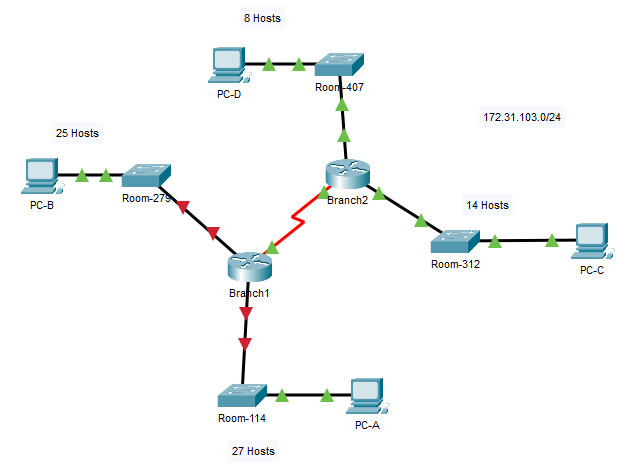
11.9.3 Packet Tracer - VLSM Design and Implementation Practice - TYPE 2
Addressing Table
| Device | Interface | Address | Subnet Mask | Default Gateway |
|---|---|---|---|---|
| Branch1 | G0/0 | 172.31.103.1 | 255.255.255.224 | N/A |
| G0/1 | 172.31.103.33 | 255.255.255.224 | N/A | |
| S0/0/0 | 172.31.103.97 | 255.255.255.252 | N/A | |
| Branch2 | G0/0 | 172.31.103.65 | 255.255.255.240 | N/A |
| G0/1 | 172.31.103.81 | 255.255.255.240 | N/A | |
| S0/0/0 | 172.31.103.98 | 255.255.255.252 | N/A | |
| Room-114 | VLAN 1 | 172.31.103.2 | 255.255.255.224 | 172.31.103.1 |
| Room-279 | VLAN 1 | 172.31.103.34 | 255.255.255.224 | 172.31.103.33 |
| Room-312 | VLAN 1 | 172.31.103.66 | 255.255.255.240 | 172.31.103.65 |
| Room-407 | VLAN 1 | 172.31.103.82 | 255.255.255.240 | 172.31.103.81 |
| PC-A | NIC | 172.31.103.30 | 255.255.255.224 | 172.31.103.1 |
| PC-B | NIC | 172.31.103.62 | 255.255.255.224 | 172.31.103.33 |
| PC-C | NIC | 172.31.103.78 | 255.255.255.240 | 172.31.103.65 |
| PC-D | NIC | 172.31.103.94 | 255.255.255.240 | 172.31.103.81 |
Objectives
- Part 1: Examine the Network Requirements
- Part 2: Design the VLSM Addressing Scheme
- Part 3: Assign IP Addresses to Devices and Verify Connectivity
Background
In this activity, you are given a /24 network address to use to design a VLSM addressing scheme. Based on a set of requirements, you will assign subnets and addressing, configure devices and verify connectivity.
Instructions
Part 1: Examine the Network Requirements
Step 1: Determine the number of subnets needed.
You will subnet the network address 172.31.103.0/24. The network has the following requirements:
- Room-114 LAN will require 27 host IP addresses
- Room-279 LAN will require 25 host IP addresses
- Room-312 LAN will require 14 host IP addresses
- Room-407 LAN will require 8 host IP addresses
How many subnets are needed in the network topology? 5
Step 2: Determine the subnet mask information for each subnet.
a. Which subnet mask will accommodate the number of IP addresses required for Room-114?
255.255.255.224 /27
How many usable host addresses will this subnet support?
30 (172.31.103.1 - 172.31.103.30)
b. Which subnet mask will accommodate the number of IP addresses required for Room-279?
255.255.255.224 /27
How many usable host addresses will this subnet support?
30 (172.31.103.33 - 172.31.103.62)
c. Which subnet mask will accommodate the number of IP addresses required for Room-312?
255.255.255.240 /28
How many usable host addresses will this subnet support?
14 (172.31.103.65 - 172.31.103.78)
d. Which subnet mask will accommodate the number of IP addresses required for Room-407?
255.255.255.240 /28
How many usable host addresses will this subnet support?
14 (172.31.103.81 - 172.31.103.94)
e. Which subnet mask will accommodate the number of IP addresses required for the connection between Branch1 and Branch2?
255.255.255.252 /30
Part 2: Design the VLSM Addressing Scheme
Step 1: Divide the 172.31.103.0/24 network based on the number of hosts per subnet.
a. Use the first subnet to accommodate the largest LAN.
b. Use the second subnet to accommodate the second largest LAN.
c. Use the third subnet to accommodate the third largest LAN.
d. Use the fourth subnet to accommodate the fourth largest LAN.
e. Use the fifth subnet to accommodate the connection between Branch1 and Branch2.
Step 2: Document the VLSM subnets.
Complete the Subnet Table, listing the subnet descriptions (e.g. Room-114 LAN), number of hosts needed, then network address for the subnet, the first usable host address, and the broadcast address. Repeat until all addresses are listed.
Subnet Table
| Subnet Description | Number of Hosts Needed | Network Address/CIDR | First Usable Host Address | Last Usable Host Address | Broadcast Address |
|---|---|---|---|---|---|
| PC-A LAN | 27 | 172.31.103.0/27 | 172.31.103.1 | 172.31.103.30 | 172.31.103.31 |
| PC-B LAN | 25 | 172.31.103.32/27 | 172.31.103.33 | 172.31.103.62 | 172.31.103.63 |
| PC-C LAN | 14 | 172.31.103.64/28 | 172.31.103.65 | 172.31.103.78 | 172.31.103.79 |
| PC-D LAN | 8 | 172.31.103.80/28 | 172.31.103.81 | 172.31.103.94 | 172.31.103.95 |
| WAN Link | 2 | 172.31.103.96/30 | 172.31.103.97 | 172.31.103.98 | 172.31.103.99 |
Step 3: Document the addressing scheme.
a. Assign the first usable IP addresses to Branch1 for the two LAN links and the WAN link.
b. Assign the first usable IP addresses to Branch2 for the two LAN links. Assign the last usable IP address for the WAN link.
c. Assign the second usable IP addresses to the switches.
d. Assign the last usable IP addresses to the hosts.
Part 3: Assign IP Addresses to Devices and Verify Connectivity
Most of the IP addressing is already configured on this network. Implement the following steps to complete the addressing configuration.
Step 1: Configure IP addressing on the Branch1 router LAN interfaces.
Branch1(config)# interface gigabitethernet 0/0
Branch1(config-if)# ip address 172.31.103.1 255.255.255.224
Branch1(config-if)# no shutdown
Branch1(config-if)# interface gigabitethernet 0/1
Branch1(config-if)# ip address 172.31.103.33 255.255.255.224
Branch1(config-if)# no shutdown
Step 2: Configure IP addressing on the Room-312 switch, including the default gateway.
Room-312(config)# interface vlan 1
Room-312(config-if)# ip address 172.31.103.66 255.255.255.240
Room-312(config-if)# no shutdown
Room-312(config-if)# exit
Room-312(config)# ip default-gateway 172.31.103.65
Step 3: Configure IP addressing on PC-D, including the default gateway.
Step 4: Verify connectivity.
You can only verify connectivity from Branch1, Room-312, and PC-D. However, you should be able to ping every IP address listed in the Addressing Table.
Branch1# ping 172.31.103.94
Room-312# ping 172.31.103.65
C:\> ping 172.31.103.1
Device Configs - Final
ROUTER Branch1
! ==============================================================
!--- 11.9.3 Packet Tracer - VLSM Design and Implementation Practice
!--- ANSWER SCRIPT FOR ROUTER Branch1 - SCENARIO 2 (network 172.31.103.0/24)
!--- Usage: copy this whole file and paste it into the Branch1 terminal (start at the Branch1> prompt). Every line beginning with "!" is a comment; IOS ignores it, so pasting a comment by accident is harmless.
!--- Note: this activity is randomized. Use this script only if your Addressing Table matches Scenario 2 (network 172.31.103.0/24).
! ==============================================================

enable
configure terminal

! --------------------------------------------------------------
!--- Part 3: Assign IP Addresses to Devices and Verify Connectivity.
! --------------------------------------------------------------

!--- Step 1: G0/0 - first usable address of the Room-114 (172.31.103.0/27) subnet.
interface gigabitethernet 0/0
 ip address 172.31.103.1 255.255.255.224
 no shutdown
 exit

!--- Step 1: G0/1 - first usable address of the Room-279 (172.31.103.32/27) subnet.
interface gigabitethernet 0/1
 ip address 172.31.103.33 255.255.255.224
 no shutdown
 exit

end

! --------------------------------------------------------------
!--- Save the configuration to NVRAM. (Press Enter when prompted for the destination filename.)
! --------------------------------------------------------------
copy running-config startup-config


! ==============================================================
!--- Verification:
!---   show ip interface brief  -> G0/0, G0/1 and S0/0/0 up/up with their addresses
!---   show ip route            -> the two LAN subnets are connected (C); the other LANs are learned dynamically
!---   ping 172.31.103.94       -> reaches PC-D (after PC-D is configured)
!--- Note: S0/0/0 and routing are already configured on both routers.
! ==============================================================
SWITCH Room-312
! ==============================================================
!--- 11.9.3 Packet Tracer - VLSM Design and Implementation Practice
!--- ANSWER SCRIPT FOR SWITCH Room-312 - SCENARIO 2 (network 172.31.103.0/24)
!--- Usage: copy this whole file and paste it into the Room-312 terminal (start at the Room-312> prompt). Every line beginning with "!" is a comment; IOS ignores it, so pasting a comment by accident is harmless.
!--- Note: this activity is randomized. Use this script only if your Addressing Table matches Scenario 2 (network 172.31.103.0/24).
! ==============================================================

enable
configure terminal

! --------------------------------------------------------------
!--- Part 3: Assign IP Addresses to Devices and Verify Connectivity.
! --------------------------------------------------------------

!--- Step 2: VLAN 1 - second usable address of the Room-312 (172.31.103.64/28) subnet; activate it.
interface vlan 1
 ip address 172.31.103.66 255.255.255.240
 no shutdown
 exit

!--- Step 2: default gateway - the Branch2 G0/0 interface on this LAN.
ip default-gateway 172.31.103.65

end

! --------------------------------------------------------------
!--- Save the configuration to NVRAM. (Press Enter when prompted for the destination filename.)
! --------------------------------------------------------------
copy running-config startup-config


! ==============================================================
!--- Verification:
!---   show ip interface brief  -> Vlan1 up/up with 172.31.103.66
!---   ping 172.31.103.65       -> reaches the default gateway (Branch2 G0/0)
!---   ping 172.31.103.30       -> reaches PC-A in the other building
! ==============================================================
PC-D
Download Packet Tracer file
11.9.3 Packet Tracer - VLSM Design and Implementation Practice - TYPE 2 . PKA 344.59 KB 5221 downloads
...Scenario 3 - Network Address: 192.168.72.0/24
Topology
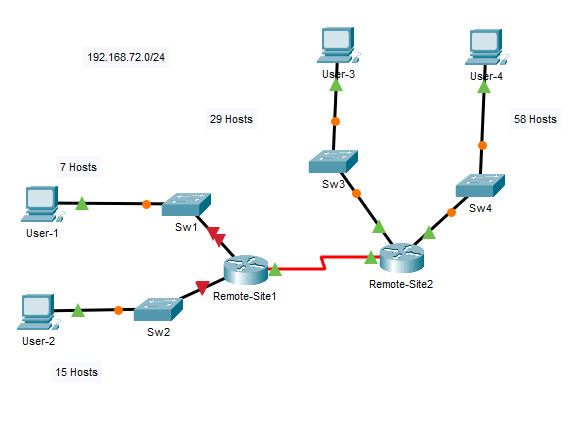
11.9.3 Packet Tracer - VLSM Design and Implementation Practice TYPE 3
Addressing Table
| Device | Interface | Address | Subnet Mask | Default Gateway |
|---|---|---|---|---|
| Remote-Site1 | G0/0 | 192.168.72.129 | 255.255.255.240 | N/A |
| G0/1 | 192.168.72.97 | 255.255.255.224 | N/A | |
| S0/0/0 | 192.168.72.145 | 255.255.255.252 | N/A | |
| Remote-Site2 | G0/0 | 192.168.72.65 | 255.255.255.224 | N/A |
| G0/1 | 192.168.72.1 | 255.255.255.192 | N/A | |
| S0/0/0 | 192.168.72.146 | 255.255.255.252 | N/A | |
| Sw1 | VLAN 1 | 192.168.72.130 | 255.255.255.240 | 192.168.72.129 |
| Sw2 | VLAN 1 | 192.168.72.98 | 255.255.255.224 | 192.168.72.97 |
| Sw3 | VLAN 1 | 192.168.72.66 | 255.255.255.224 | 192.168.72.65 |
| Sw4 | VLAN 1 | 192.168.72.2 | 255.255.255.192 | 192.168.72.1 |
| User-1 | NIC | 192.168.72.142 | 255.255.255.240 | 192.168.72.129 |
| User-2 | NIC | 192.168.72.126 | 255.255.255.224 | 192.168.72.97 |
| User-3 | NIC | 192.168.72.94 | 255.255.255.224 | 192.168.72.65 |
| User-4 | NIC | 192.168.72.62 | 255.255.255.192 | 192.168.72.1 |
Objectives
- Part 1: Examine the Network Requirements
- Part 2: Design the VLSM Addressing Scheme
- Part 3: Assign IP Addresses to Devices and Verify Connectivity
Background
In this activity, you are given a /24 network address to use to design a VLSM addressing scheme. Based on a set of requirements, you will assign subnets and addressing, configure devices and verify connectivity.
Instructions
Part 1: Examine the Network Requirements
Step 1: Determine the number of subnets needed.
You will subnet the network address 192.168.72.0/24. The network has the following requirements:
- Sw1 LAN will require 7 host IP addresses
- Sw2 LAN will require 15 host IP addresses
- Sw3 LAN will require 29 host IP addresses
- Sw4 LAN will require 58 host IP addresses
How many subnets are needed in the network topology? 5
Step 2: Determine the subnet mask information for each subnet.
a. Which subnet mask will accommodate the number of IP addresses required for Sw4?
255.255.255.192 /26
How many usable host addresses will this subnet support?
62 (192.168.72.1 - 192.168.72.62)
b. Which subnet mask will accommodate the number of IP addresses required for Sw3?
255.255.255.224 /27
How many usable host addresses will this subnet support?
30 (192.168.72.65 - 192.168.72.94)
c. Which subnet mask will accommodate the number of IP addresses required for Sw2?
255.255.255.224 /27
How many usable host addresses will this subnet support?
30 (192.168.72.97 - 192.168.72.126)
d. Which subnet mask will accommodate the number of IP addresses required for Sw1?
255.255.255.240 /28
How many usable host addresses will this subnet support?
14 (192.168.72.129 - 192.168.72.142)
e. Which subnet mask will accommodate the number of IP addresses required for the connection between Remote-Site1 and Remote-Site2?
255.255.255.252 /30
Part 2: Design the VLSM Addressing Scheme
Step 1: Divide the 192.168.72.0/24 network based on the number of hosts per subnet.
a. Use the first subnet to accommodate the largest LAN.
b. Use the second subnet to accommodate the second largest LAN.
c. Use the third subnet to accommodate the third largest LAN.
d. Use the fourth subnet to accommodate the fourth largest LAN.
e. Use the fifth subnet to accommodate the connection between Remote-Site1 and Remote-Site2.
Step 2: Document the VLSM subnets.
Complete the Subnet Table, listing the subnet descriptions (e.g. User-1 LAN), number of hosts needed, then network address for the subnet, the first usable host address, and the broadcast address. Repeat until all addresses are listed.
Subnet Table
| Subnet Description | Number of Hosts Needed | Network Address/CIDR | First Usable Host Address | Last Usable Host Address | Broadcast Address |
|---|---|---|---|---|---|
| User-4 LAN | 58 | 192.168.72.0/26 | 192.168.72.1 | 192.168.72.62 | 192.168.72.63 |
| User-3 LAN | 29 | 192.168.72.64/27 | 192.168.72.65 | 192.168.72.94 | 192.168.72.95 |
| User-2 LAN | 15 | 192.168.72.96/27 | 192.168.72.97 | 192.168.72.126 | 192.168.72.127 |
| User-1 LAN | 7 | 192.168.72.128/28 | 192.168.72.129 | 192.168.72.142 | 192.168.72.143 |
| WAN Link | 2 | 192.168.72.144/30 | 192.168.72.145 | 192.168.72.146 | 192.168.72.147 |
Step 3: Document the addressing scheme.
a. Assign the first usable IP addresses to Remote-Site1 for the two LAN links and the WAN link.
b. Assign the first usable IP addresses to Remote-Site2 for the two LAN links. Assign the last usable IP address for the WAN link.
c. Assign the second usable IP addresses to the switches.
d. Assign the last usable IP addresses to the hosts.
Part 3: Assign IP Addresses to Devices and Verify Connectivity
Most of the IP addressing is already configured on this network. Implement the following steps to complete the addressing configuration.
Step 1: Configure IP addressing on the Remote-Site1 router LAN interfaces.
Remote-Site1(config)# interface gigabitethernet 0/0
Remote-Site1(config-if)# ip address 192.168.72.129 255.255.255.240
Remote-Site1(config-if)# no shutdown
Remote-Site1(config-if)# interface gigabitethernet 0/1
Remote-Site1(config-if)# ip address 192.168.72.97 255.255.255.224
Remote-Site1(config-if)# no shutdown
Step 2: Configure IP addressing on the Sw3 switch, including the default gateway.
Sw3(config)# interface vlan 1
Sw3(config-if)# ip address 192.168.72.66 255.255.255.224
Sw3(config-if)# no shutdown
Sw3(config-if)# exit
Sw3(config)# ip default-gateway 192.168.72.65
Step 3: Configure IP addressing on User-4, including the default gateway.
Step 4: Verify connectivity.
You can only verify connectivity from Remote-Site1, Sw3, and User-4. However, you should be able to ping every IP address listed in the Addressing Table.
Remote-Site1# ping 192.168.72.62
Sw3# ping 192.168.72.65
C:\> ping 192.168.72.129
Device Configs - Final
ROUTER Remote-Site1
! ==============================================================
!--- 11.9.3 Packet Tracer - VLSM Design and Implementation Practice
!--- ANSWER SCRIPT FOR ROUTER Remote-Site1 - SCENARIO 3 (network 192.168.72.0/24)
!--- Usage: copy this whole file and paste it into the Remote-Site1 terminal (start at the Remote-Site1> prompt). Every line beginning with "!" is a comment; IOS ignores it, so pasting a comment by accident is harmless.
!--- Note: this activity is randomized. Use this script only if your Addressing Table matches Scenario 3 (network 192.168.72.0/24).
! ==============================================================

enable
configure terminal

! --------------------------------------------------------------
!--- Part 3: Assign IP Addresses to Devices and Verify Connectivity.
! --------------------------------------------------------------

!--- Step 1: G0/0 - first usable address of the Sw1 (192.168.72.128/28) subnet.
interface gigabitethernet 0/0
 ip address 192.168.72.129 255.255.255.240
 no shutdown
 exit

!--- Step 1: G0/1 - first usable address of the Sw2 (192.168.72.96/27) subnet.
interface gigabitethernet 0/1
 ip address 192.168.72.97 255.255.255.224
 no shutdown
 exit

end

! --------------------------------------------------------------
!--- Save the configuration to NVRAM. (Press Enter when prompted for the destination filename.)
! --------------------------------------------------------------
copy running-config startup-config


! ==============================================================
!--- Verification:
!---   show ip interface brief  -> G0/0, G0/1 and S0/0/0 up/up with their addresses
!---   show ip route            -> the two LAN subnets are connected (C); the other LANs are learned dynamically
!---   ping 192.168.72.62       -> reaches User-4 (after User-4 is configured)
!--- Note: S0/0/0 and routing are already configured on both routers.
! ==============================================================
SWITCH Sw3
! ==============================================================
!--- 11.9.3 Packet Tracer - VLSM Design and Implementation Practice
!--- ANSWER SCRIPT FOR SWITCH Sw3 - SCENARIO 3 (network 192.168.72.0/24)
!--- Usage: copy this whole file and paste it into the Sw3 terminal (start at the Sw3> prompt). Every line beginning with "!" is a comment; IOS ignores it, so pasting a comment by accident is harmless.
!--- Note: this activity is randomized. Use this script only if your Addressing Table matches Scenario 3 (network 192.168.72.0/24).
! ==============================================================

enable
configure terminal

! --------------------------------------------------------------
!--- Part 3: Assign IP Addresses to Devices and Verify Connectivity.
! --------------------------------------------------------------

!--- Step 2: VLAN 1 - second usable address of the Sw3 (192.168.72.64/27) subnet; activate it.
interface vlan 1
 ip address 192.168.72.66 255.255.255.224
 no shutdown
 exit

!--- Step 2: default gateway - the Remote-Site2 G0/0 interface on this LAN.
ip default-gateway 192.168.72.65

end

! --------------------------------------------------------------
!--- Save the configuration to NVRAM. (Press Enter when prompted for the destination filename.)
! --------------------------------------------------------------
copy running-config startup-config


! ==============================================================
!--- Verification:
!---   show ip interface brief  -> Vlan1 up/up with 192.168.72.66
!---   ping 192.168.72.65       -> reaches the default gateway (Remote-Site2 G0/0)
!---   ping 192.168.72.142      -> reaches User-1 in the other building
! ==============================================================
PC User-4
Download Packet Tracer (.pka) file:


