12.6.6 Packet Tracer – Configure IPv6 Addressing (Instructor Version)
4.4.6 Configure IPv6 Addressing
Instructor Note: Red font color or gray highlights indicate text that appears in the instructor copy only.
Topology
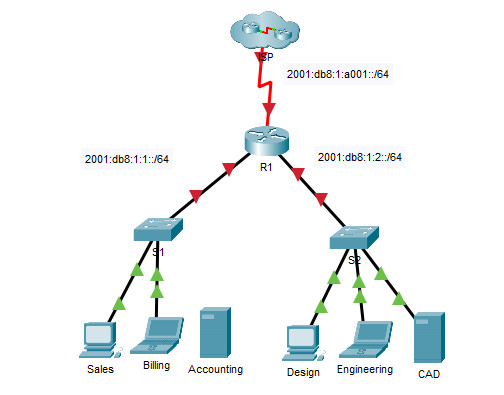
12.6.6 Packet Tracer – Configure IPv6 Addressing
Addressing Table
| Device | Interface | IPv6 Address/Prefix | Default Gateway |
|---|---|---|---|
| R1 | G0/0 | 2001:db8:1:1::1/64 | N/A |
| G0/0 | fe80::1 | ||
| G0/1 | 2001:db8:1:2::1/64 | N/A | |
| G0/1 | fe80::1 | ||
| S0/0/0 | 2001:db8:1:a001::2/64 | N/A | |
| S0/0/0 | fe80::1 | ||
| Sales | NIC | 2001:db8:1:1::2/64 | fe80::1 |
| Billing | NIC | 2001:db8:1:1::3/64 | fe80::1 |
| Accounting | NIC | 2001:db8:1:1::4/64 | fe80::1 |
| Design | NIC | 2001:db8:1:2::2/64 | fe80::1 |
| Engineering | NIC | 2001:db8:1:2::3/64 | fe80::1 |
| CAD | NIC | 2001:db8:1:2::4/64 | fe80::1 |
| ISP | S0/0/0 | 2001:db8:1:a001::1 | fe80::1 |
Objectives
Part 1: Configure IPv6 Addressing on the Router
Part 2: Configure IPv6 Addressing on Servers
Part 3: Configure IPv6 Addressing on Clients
Part 4: Test and Verify Network Connectivity
Background
In this activity, you will practice configuring IPv6 addresses on a router, servers, and clients. You will also practice verifying your IPv6 addressing implementation.
Part 1: Configure IPv6 Addressing on the Router
Step 1: Enable the router to forward IPv6 packets.
a. Click R1 and then the CLI tab. Press Enter.
b. Enter privileged EXEC mode.
c. Enter the ipv6 unicast-routing global configuration command. This command must be entered to enable the router to forward IPv6 packets.
R1(config)# ipv6 unicast-routing
Step 2: Configure IPv6 addressing on GigabitEthernet0/0.
a. Enter the commands necessary to move to interface configuration mode for GigabitEthernet0/0.
b. Configure the IPv6 address with the following command:
R1(config-if)# ipv6 address 2001:db8:1:1::1/64
c. Configure the link-local IPv6 address with the following command:
R1(config-if)# ipv6 address fe80::1 link-local
d. Activate the interface.
R1(config-if)# no shutdown
Step 3: Configure IPv6 addressing on GigabitEthernet0/1.
a. Enter the commands necessary to move to interface configuration mode for GigabitEthernet0/1.
b. Refer to the Addressing Table for the correct IPv6 address.
c. Configure the IPv6 address, the link-local address and activate the interface.
R1(config-if)#interface g0/1
R1(config-if)#ipv6 address 2001:db8:1:2::1/64
R1(config-if)#ipv6 address fe80::1 link-local
R1(config-if)#no shutdown
Step 4: Configure IPv6 addressing on Serial0/0/0.
a. Enter the commands necessary to move to interface configuration mode for Serial0/0/0.
b. Refer to the Addressing Table for the correct IPv6 address.
c. Configure the IPv6 address, the link-local address and activate the interface.
R1(config-if)#int s0/0/0
R1(config-if)#ipv6 address 2001:db8:1:a001::2/64
R1(config-if)#ipv6 address fe80::1 link-local
R1(config-if)#no shutdown

R1(config-if)#end
Step 5: Verify IPv6 addressing on R1.
It is good practice to verify addressing when it is complete by comparing configured values with the values in the addressing table.
a. Exit configuration mode on R1.
b. Verify the addressing configured by issuing the following command:
R1# show ipv6 interface brief
c. If any addresses are incorrect, repeat the steps above as necessary to make any corrections.
Note: To make a change in addressing with IPv6, you must remove the incorrect address or else both the correct address and incorrect address will remain configured on the interface.
Example:
R1(config-if)# no ipv6 address 2001:db8:1:5::1/64
d. Save the router configuration to NVRAM.
R1#copy running-config startup-config
Part 2: Configure IPv6 Addressing on the Servers
Step 1: Configure IPv6 addressing on the Accounting Server.
a. Click Accounting and click the Desktop tab > IP Configuration.
b. Set the IPv6 Address to 2001:db8:1:1::4 with a prefix of /64.
c. Set the IPv6 Gateway to the link-local address, fe80::1.
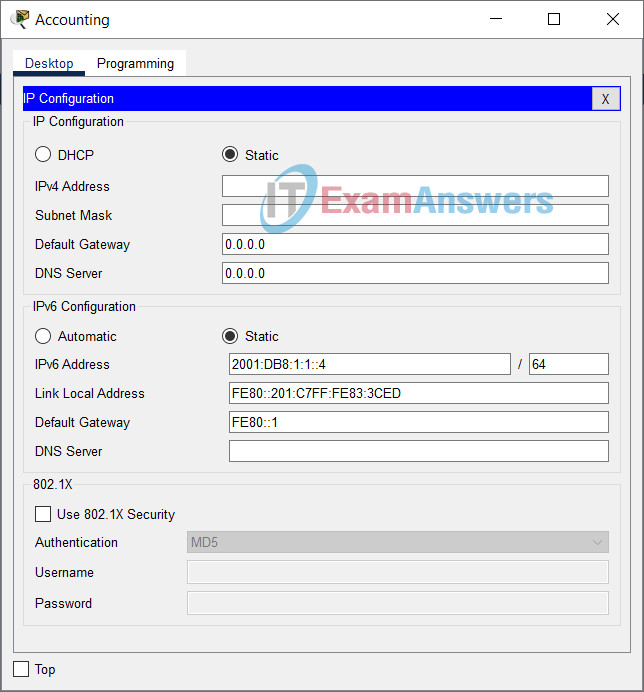
Configure IPv6 addressing on the Accounting Server
Step 2: Configure IPv6 addressing on the CAD Server.
Configure the CAD server with addresses as was done in Step 1. Refer to the Addressing Table for the addresses to use.
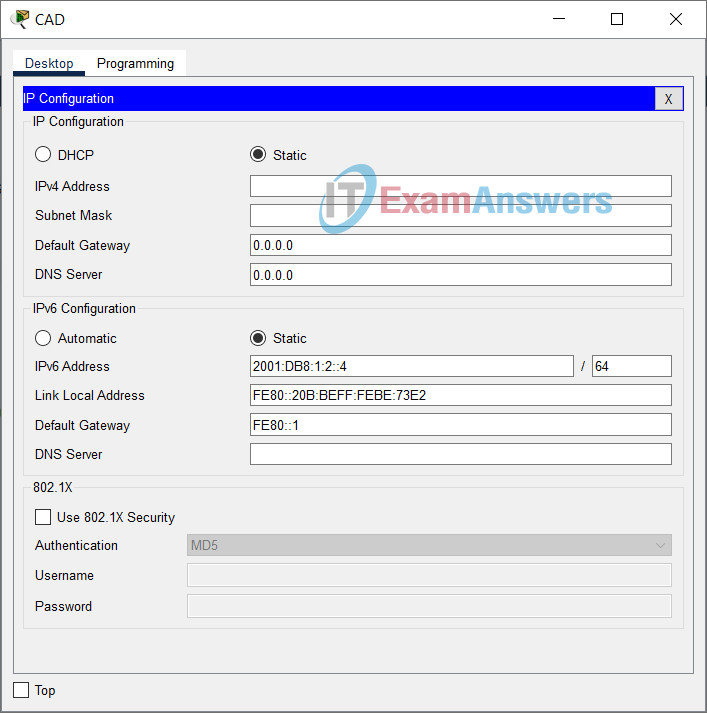
Configure IPv6 addressing on the CAD Server
Part 3: Configure IPv6 Addressing on the Clients
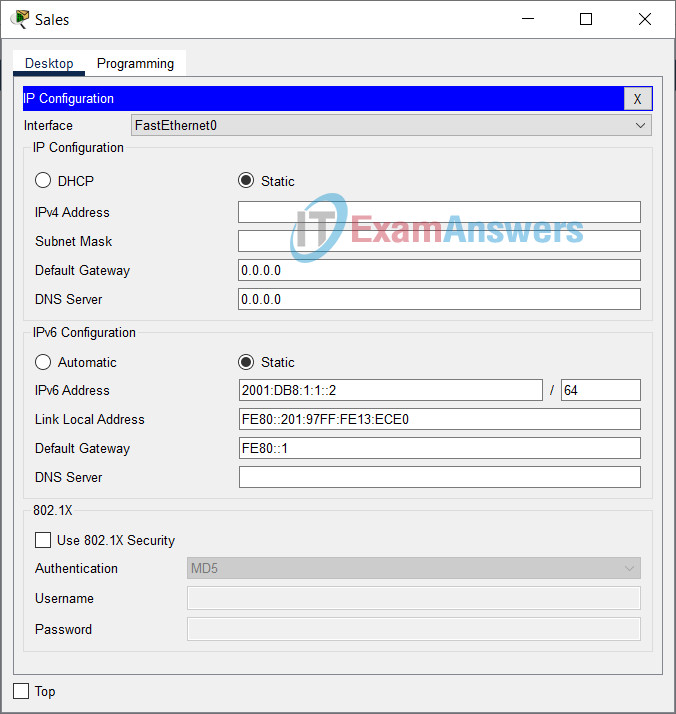
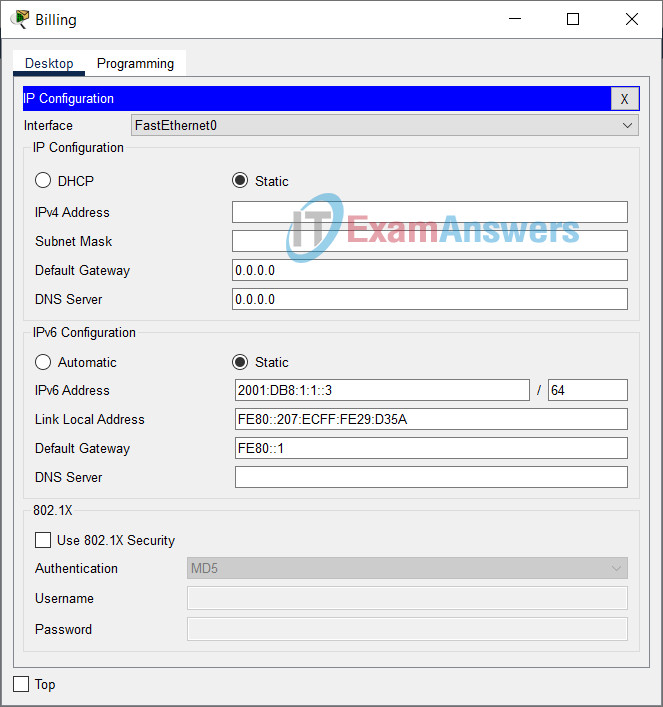
Step 1: Configure IPv6 addressing on the Sales and Billing Clients.
a. Click Billing and then select the Desktop tab followed by IP Configuration.
b. Set the IPv6 Address to 2001:db8:1:1::3 with a prefix of /64.
c. Set the IPv6 Gateway to the link-local address, fe80::1.
d. Repeat Steps 1a through 1c for Sales. Refer to the Addressing Table for the IPv6 address.
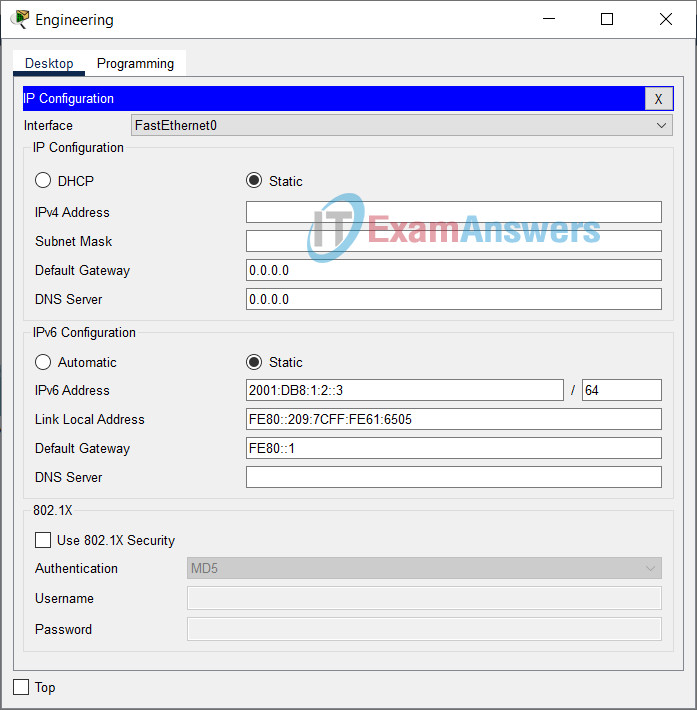
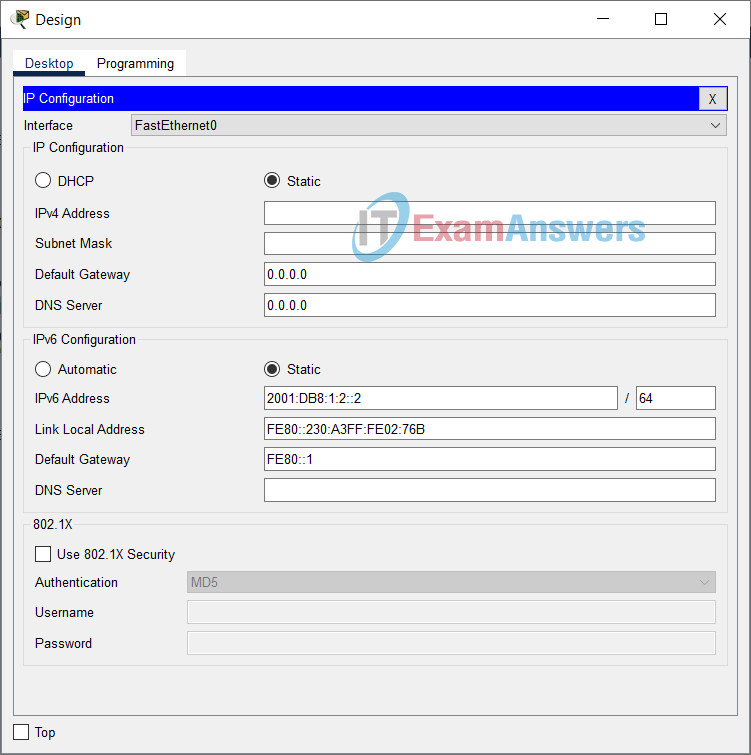
Step 2: Configure IPv6 Addressing on the Engineering and Design Clients.
a. Click Engineering and then select the Desktop tab followed by IP Configuration.
b. Set the IPv6 Address to 2001:db8:1:2::3 with a prefix of /64.
c. Set the IPv6 Gateway to the link-local address, fe80::1.
d. Repeat Steps 2a through 2c for Design. Refer to the Addressing Table for the IPv6 address.
Part 4: Test and Verify Network Connectivity
Step 1: Open the server web pages from the clients.
a. Click Sales and click the Desktop tab. Close the IP Configuration window, if necessary.
b. Click Web Browser. Enter 2001:db8:1:1::4 in the URL box and click Go. The Accounting website should appear.
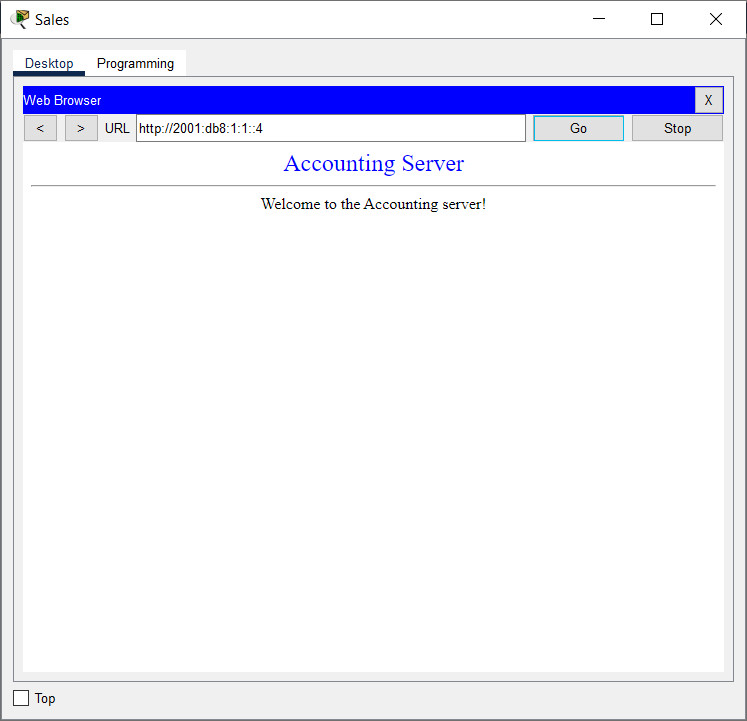
c. Enter 2001:db8:1:2::4 in the URL box and click Go. The CAD website should appear.

d. Repeat steps 1a through 1c for the rest of the clients.
Step 2: Ping the ISP.
a. Click on any client.
b. Click the Desktop tab > Command Prompt.
c. Test connectivity to the ISP by entering the following command:
PC> ping 2001:db8:1:a001::1
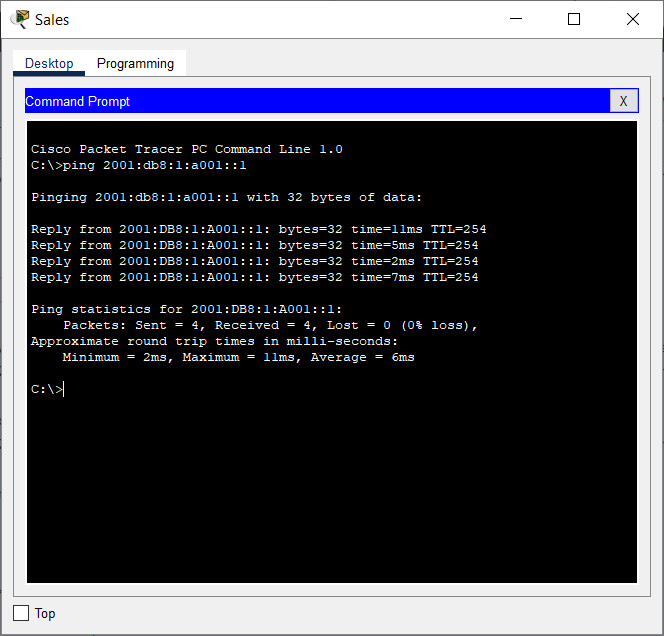
d. Repeat the ping command with other clients until full connectivity is verified.
Answers Key
R1
enable
config terminal
ipv6 unicast-routing

interface g0/0
ipv6 address 2001:db8:1:1::1/64
ipv6 address fe80::1 link-local
no shutdown

interface g0/1
ipv6 address 2001:db8:1:2::1/64
ipv6 address fe80::1 link-local
no shutdown

int s0/0/0
ipv6 address 2001:db8:1:a001::2/64
ipv6 address fe80::1 link-local
no shutdown
end
copy running-config startup-config

Serial0/0/0: Error: 2001:DB8:1:1::/64 is overlapping with 2001:DB8:1:1::/64 on GigabitEthernet0/0
Excellent & incredible working tool help. Thanks.