3.2.2.3 Lab – Setting up PL-App with a Raspberry Pi (Answers)
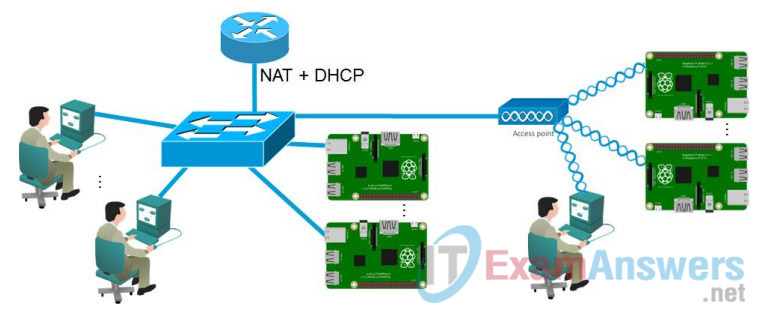
Lab Topology

Objectives
- Set up a Raspberry Pi board as a PL-App device
- Use PL-App Launcher to provision and discover PL-App devices
Background
Cisco Prototyping Lab is a set of hardware and software components that enable students and instructors to learn about, to prototype, and to model various IoT, digitization and data analytics solutions.
The hardware components are part of the Prototyping Lab Kit (PL-Kit). The PL-Kit is based on Open HW prototyping boards such as Raspberry Pi and Arduino and includes additional sensors, actuators, and electronic components. The PL-Kit can be used to build sophisticated prototypes of end to end IoT systems that can sense and actuate the real physical world, analyze and process the data at the fog layer, and connect to network and cloud systems.
The primary software component of the Prototyping Lab is the Prototyping Lab App (PL-App). The PL-App is a software platform running on a Raspberry Pi that exposes a web interface based on a concept of notebooks. A notebook is an interactive web page where content is distributed in what are called cells. The first cell type is called Markdown and is a cell that contains standard objects such as text, images, videos, etc. The second cell type is called Code cell and is a cell with executable code of different programming languages (the default is Python).
A notebook can be used as a lab where the explanatory text is placed with executable code and together create a scaffolded learning experience. The explanatory text guides the student through the learning experience, while hands on skills are acquired by modifying, examining and executing executable code. A notebook is also a great tool that can be used to prototype IoT systems, interconnect with existing cloud services using APIs, etc. In a notebook, application code can be split between multiple code cells, executing only the part of the code that is just being developed or troubleshot. Moreover, using markdown cells, documentation and explanatory text can be added between code cells to provide a clean, easy to understand Rapid Prototyping Interface.
The PL-App, together with the PL-Kit, are enablers for IoT, digitization, and data analytics learning and rapid prototyping inside of a classroom. PL-App provides a web-based environment to access the software and hardware resources of the Raspberry Pi, leveraging the concept of Jupyter Notebooks.
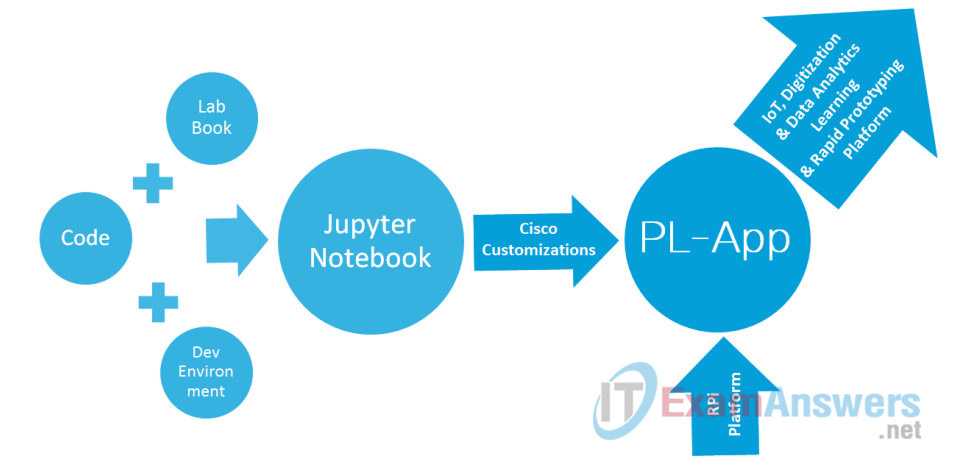
With PL-App, you can access existing IoT Fundamentals labs in the Course Materials folder, or write your own new applications directly on the board, execute them, and monitor the output from the board with various visualizations.
Once the setup is done, the Raspberry Pi and the Arduino connected to the Raspberry Pi can be controlled from the PL-App web interface.
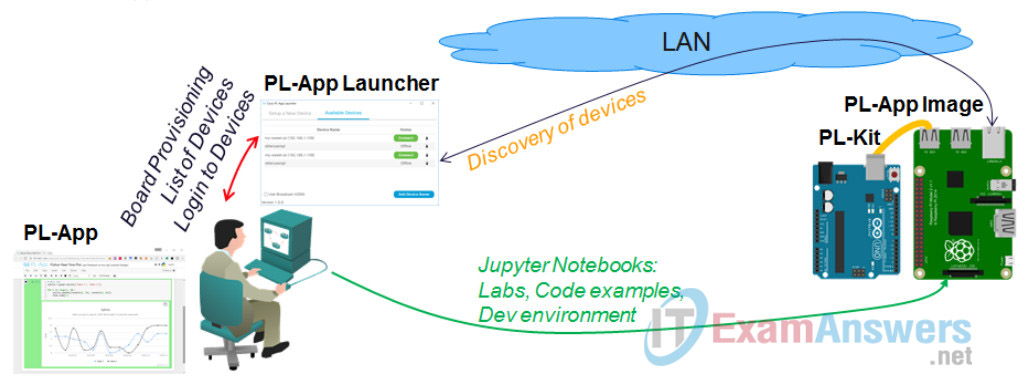
This lab provides a basic guideline to setup the initial configuration of the Raspberry Pi board together with a PL-App environment.
Required Resources
- Prototyping Lab Kit (PL-Kit)
- Prototyping Lab App (PL-App) Launcher application
- Prototyping Lab App (PL-App) Image file
- Wired Ethernet or Wi-Fi connection to the local-area network with DHCP
- Raspberry Pi with a power adapter
- Google Chrome or other modern web browser
Task 1: Set up the PL-App
Step 1: Download and Install the PL-App Launcher
a. Navigate to www.netacad.com in your web browser and enter your IoT Fundamentals class.
b. From the Student Resources page, download the PL-App Launcher application installer for your operating system.
c. After a successful download, install the PL-App Launcher application.
NOTE: Windows 7+ and Mac OS are supported.
d. After a successful installation, start the PL-App Launcher application. You should see the following screen with the Setup a New Device tab:
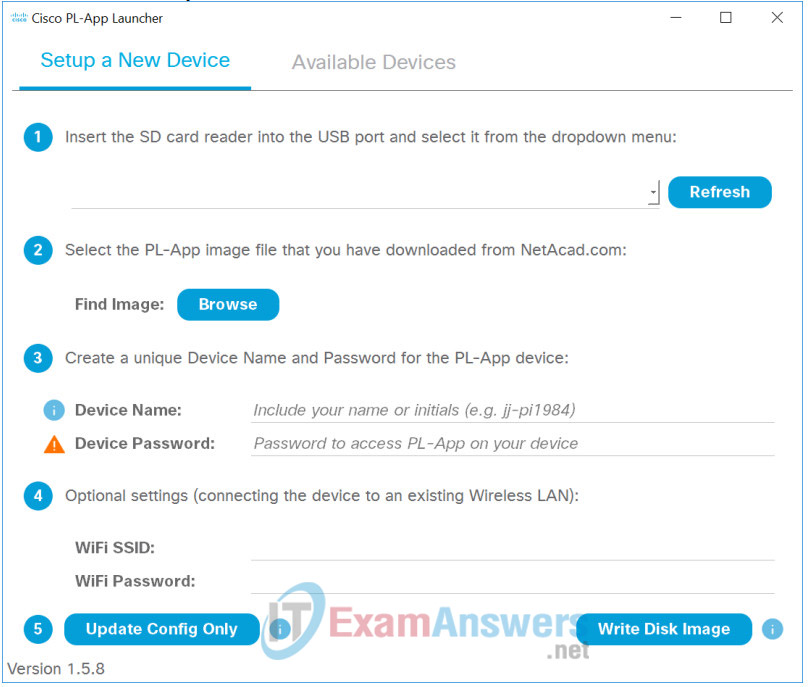
Step 2: Download and Install the PL-App Image.
a. Navigate to www.netacad.com in your web browser and enter your IoT Fundamentals class.
b. From the Student Resources page, download the PL-App image file. Although the PL-App image is a file with .zip extension, there is no need to unpack the ZIP file.
Note: the PL-App image file is about 900 MB and the download speed might vary based your Internet connection and its current use.
Instructor Note: In a class with multiple computers, consider distributing the PL-App image file with a USB memory stick or using a local FTP server.
Step 3: Setup a micro SD card with PL-App
a. Start the PL-App Launcher application. You should see the following screen with the Setup a New Device tab:

b. Locate a micro SD (µSD) card inside the PL-Kit that is at least 8 GB in size.
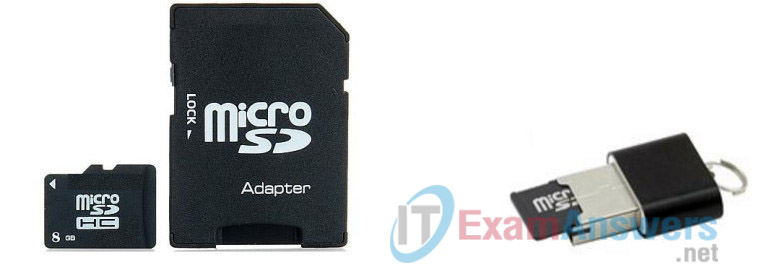
c. Insert the µSD card into your SD card reader or USB reader and insert it into your computer.
d. Determine the drive letter of the µSD card using the File Explorer:
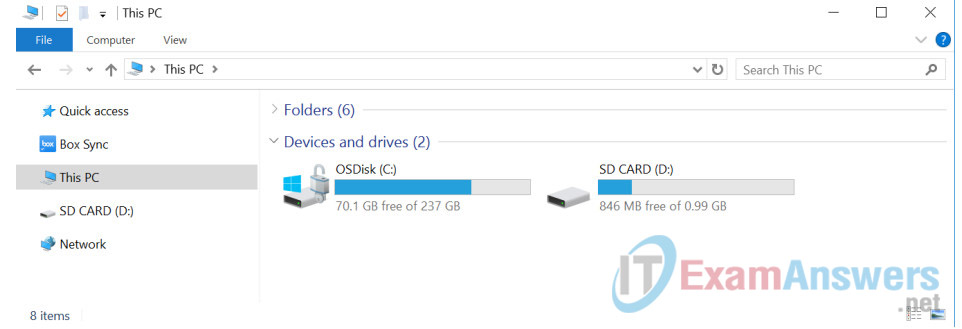
In this example, it is the D: drive on Windows.
e. In the PL-App Launcher, select the µSD Card Removable Drive, in this example select the [D:\] drive. If not present in the menu, click the Refresh button.
Be careful to select the correct drive; if you select the wrong drive, you can destroy your data on the selected disk drive.
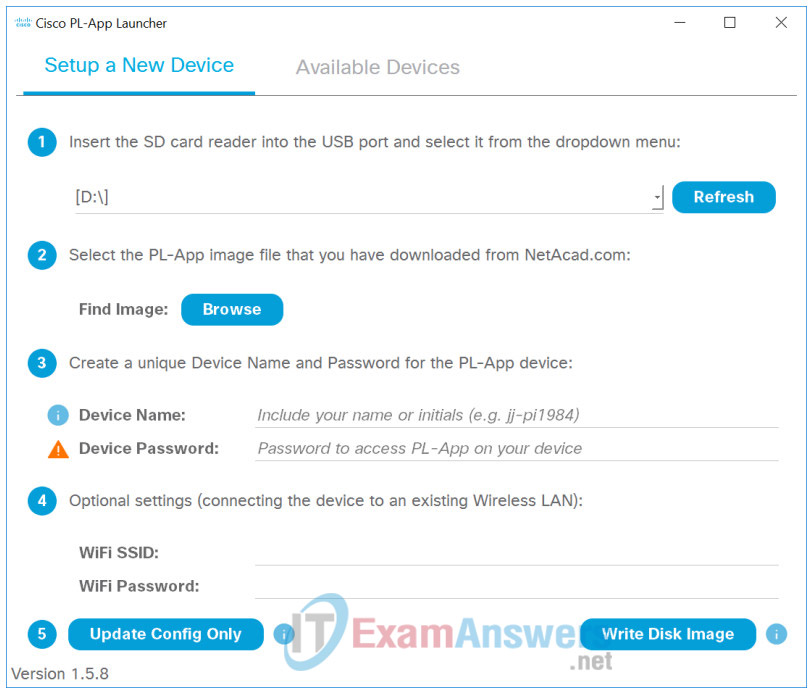
f. Click the Find Image: Browse button in the application and select the PL-App image zip file that you downloaded in the previous step.
g. To personalize the PL-App installation on the µSD card, enter the configurations section of the PLApp Launcher application and configure:
- Device Name – This is the name of the PL-App Raspberry Pi instance in your local-area network (LAN). Make sure the selected Device Name is unique on the LAN, otherwise naming problems might occur. For example you can use your name followed by a number, or your username, or initials (e.g. myname-myRPi1). The Device Name can contain letters (a-z), numbers (0-9) and dashes (-). The first character must be a letter.
- Device Password – This is a password that you will need to enter when accessing PL-App on the Raspberry Pi. The password is stored in its clear-text form on the µSD card. For security reasons, always use a unique password (i.e. never use the same password as your email, social media, netacad.com, etc.).
h. If your Raspberry Pi is to be connected to the network over Wi-Fi, enter the optional settings section and configure the following:
- WiFi SSID – The name of the Wi-Fi network to which to connect (e.g. ClassroomWiFi)
- WiFi Password – The WPA2 Pre-Shared Key (Wi-Fi password)
i. When your settings are correct, click the Write Disk Image button to overwrite all the data on the selected SD card removable drive and flash it with the PL-App image. This process will also write your configuration settings to the SD card in a file called chestnut.txt. Depending on the speed of your µSD card, this process might take 5-10 minutes to complete.
NOTE: If the µSD card has already been flashed with the PL-App image, and you only want to change the existing settings (e.g. Device Name, Wireless Settings, etc.), then click the Update Config Only button to update only the setup settings
j. When the µSD card setup is complete, use the File Explorer to verify the contents of the µSD card. You should see the µSD card drive name has changed to CISCO-PLAPP:
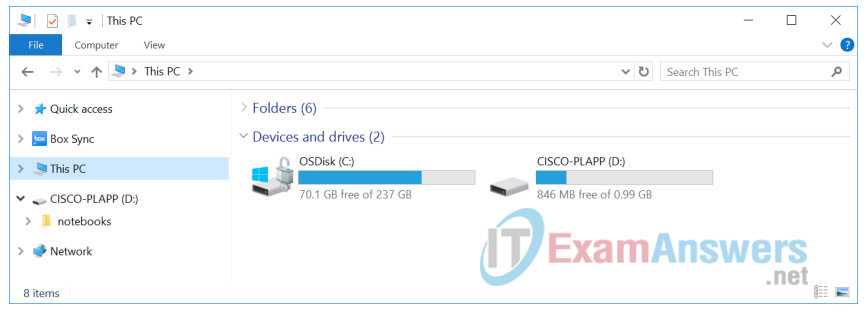
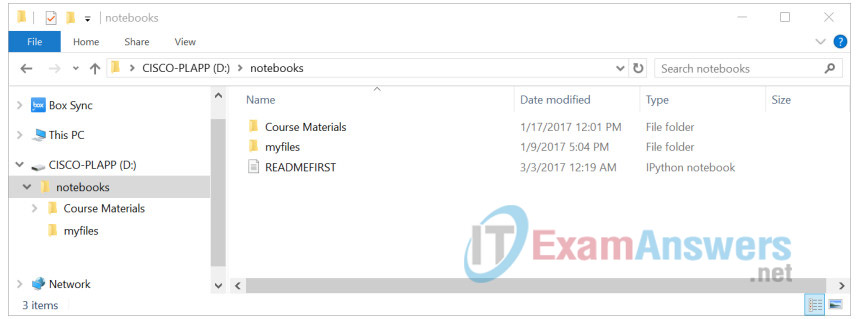
k. Explire the µSD card drive letter. You should see the notebooks folder and the chestnut.txt setup file:
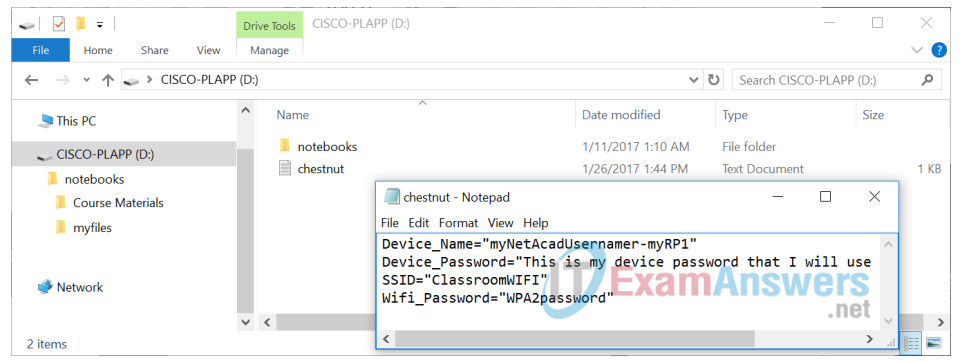
- The D:\chestnut.txt text file contains the setup information that was set using the Setup of the PL-App Launcher. If you need to change any of these settings, you can either use the PLApp Launcher with the Update Config Only button to update these settings and preserve all the other contents of the SD card, or edit this file manually.
- The D:\notebooks folder contains all the default lab notebook files that were bundled with the release of the PL-App image that was flashed on the µSD card using the PL-App Launcher. If you want the most recent, or unmodified, version of the lab notebooks, download the notebooks zip archive from the IoT Fundamentals Student Resources page and unpack it to this D:\notebooks folder (the drive letter D: might be different on your computer). You can also easily backup either your own notebook files, or the Course Materials by copying this notebooks folder to your computer.
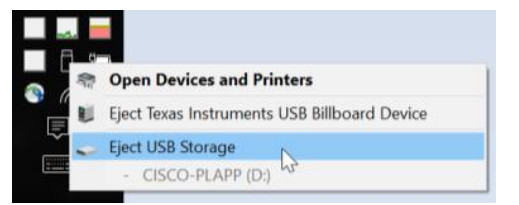
l. Before removing the µSD card from your computer, make sure to safely unmount it:
m. Remove the µSD card from your computer.
Alternate Step 3 for Advanced Linux users: Setup a µSD card with PL-App
The Linux guide is a command-line only guide for advanced users. Be very careful. Incorrect use of these tools might overwrite the data on your primary hard disk. All the existing contents of the µSD card will be overwritten in this step.
a. Change the current working directory to where you downloaded in the previous step the PL-App image zip file (e.g. PL-App-Image_CT_2017012601.zip). For example:
cd Downloads
b. Identify the device name of your µSD card (e.g. sdb):
sudo fdisk –l
c. Check if any of the µSD card partitions are mounted using the mount command and then unmount them.
d. Using dd, transfer the PL-App image to your µSD card (Use caution at this step. Selecting a wrong output file “of=” parameter can overwrite your own hard disk drive and your own data):
unzip -p -d chestnut.img PL-App-Image_CT_2017012601.zip | \
sudo dd bs=1M of=/dev/{SD card device name}

e.g. unzip -p -d chestnut.img PL-App-Image.zip | sudo dd bs=1M of=/dev/sdb
e. Wait for dd to complete. It might take 5-10 minutes without showing any output. Be patient.
f. Once completed, remove the µSD card USB reader, wait a second, and then plug it back to mount the newly created partition on it.
g. In the mounted µSD card partition (with FAT file system and 1 GB in size), create a new text file called chestnut.txt with the following contents:
Device_Name="{YOUR-NETACAD-USERNAME}-{YOUR-RPi-DEVICE-NAME}"
Device_Password="{YOUR-PL-App-PASSWORD}"
SSID="{YOUR-WIFI-SSID}"
Wifi_Password="{YOUR-WIFI-PASSWORD}"
e.g.
Device_Name="myNetAcadUsername-myRPi1"
Device_Password="this is my device password"
SSID="ClassroomWIFI"
Wifi_Password="WPA2password"
h. Unmount and remove the µSD card USB reader from your computer.
i. Make sure your Linux computer does support mDNS discovery of hostnames:
sudo apt-get install libnss-mdns
j. You will be able to access PL-APP on your Raspberry Pi connected to the same local-area network as your computer using http://${ Device_Name}.local/, e.g. http://myNetAcadUsername-myRPi1.local/
Step 4: Access PL-App on a Raspberry Pi
a. Enter the µSD card into your Raspberry Pi. The µSD card slot is on the back side of the board:
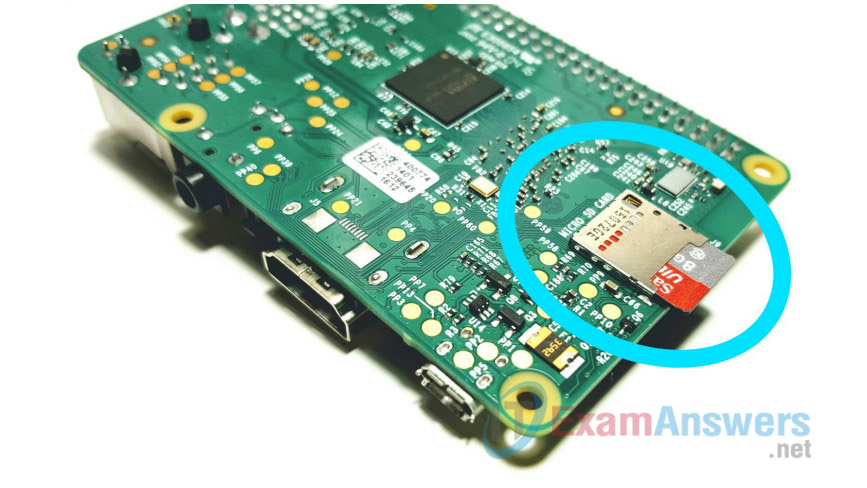
Before entering or removing the µSD card into your Raspberry Pi, make sure it is not powered on.
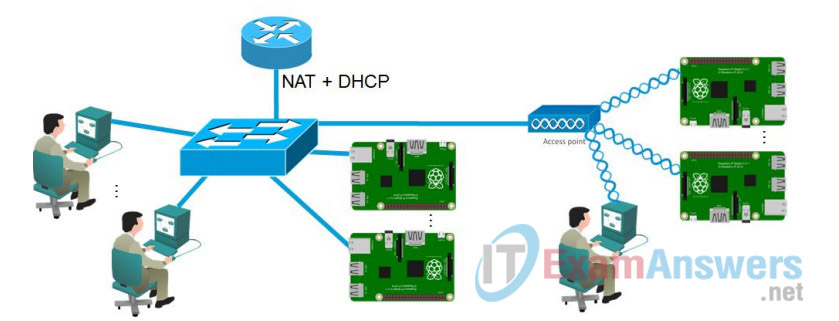
b. Connect the Raspberry Pi to the LAN. If you are using an Ethernet cable, connect the cable to the Raspberry Pi. If you are using Wi-Fi, make sure the signal from the access point is strong enough. Your computer and the Raspberry Pi must be in the same subnetwork for the PL-App Launcher discovery to work.
Note: For security reasons, it is recommended that PL-App devices be on a separate network, preferably wired that has no connection to the rest of the school network or has its own internet access (to complete the labs that require internet connectivity).
Instructor Note: The LAN must provide IP addresses to the Raspberry Pi devices using DHCP, and the network must not block multicast communications.
Recommended network topology for a class with PL-App:
c. Power on your Raspberry Pi by connecting the µUSB cable with a proper power supply that provides enough current to the Raspberry Pi board. The recommended PSU provides 2.5A to power the Raspberry Pi 3 Model B.
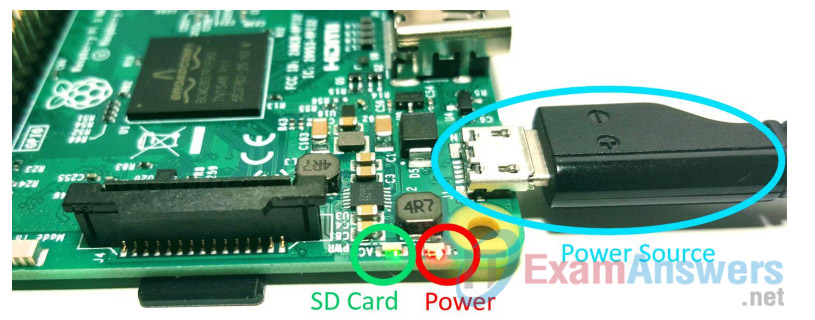
NOTE: The red Power LED must be always on. If the Power LED is blinking, or is off, the power source from the PSU is not providing enough power to the board.
d. Start the PL-App Launcher application. You should see the following screen with the Available Devices tab:
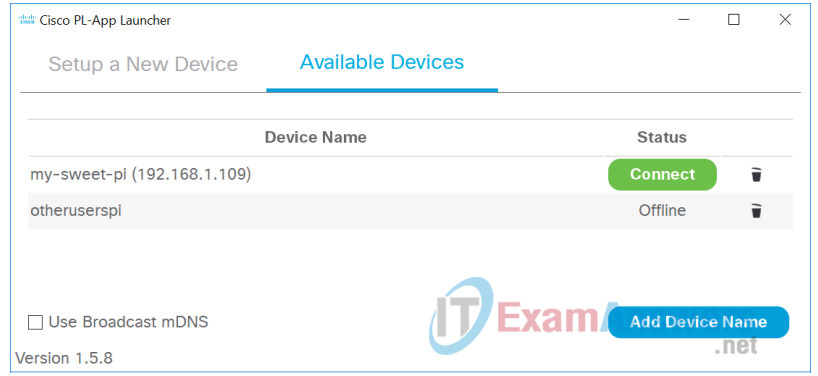
The Available Devices tab lists all the PL-App devices that have been set up on this computer with PL-App Launcher, or were manually added to the list using the Add Device Name button.
PL-App Launcher is continuously trying to discover the listed PL-App Raspberry Pi devices that are connected to the network. Once a device is discovered, its current IP address is shown in the list and a green Connect button becomes active. Clicking the green Connect button opens a new web browser connection for the selected PL-App device.
NOTE: The very first startup of a freshly written µSD card might take longer to become connected due to the initial setup at the boot-up process (expanding the file system of the µSD card, etc.)..
Instructor Note: The PL-App Launcher uses multicast DNS (mDNS, Bonjour) to discover the listed PL-App Raspberry Pi devices. Without mDNS routing configured, the discovery mechanism only works within the same subnet segment. If the network blocks multicast communication, PL-App Launcher will not be able to detect connected devices. In that case, try selecting the “Use broadcast mDNS” option in the PL-App Launcher to reserve multicast to broadcast packets.
e. Click the green Connect button of your device in PL-App Launcher to directly connect to the local PLApp web interface running on your Raspberry Pi device. You can use the PL-App based web interface to access existing labs and to write and install new applications, access the Linux shell interface, etc.
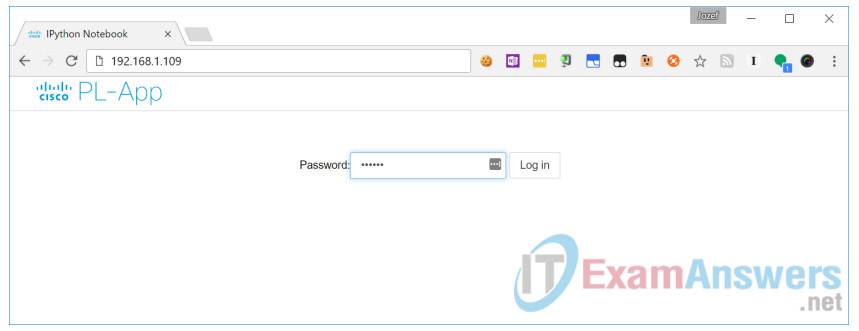
f. First. log in to the web interface of PL-App. Use the password you specified in PL-App Launcher in the setup process of the µSD card.
g. After a successful login, the PL-App directory browser opens the root directory of the notebooks:
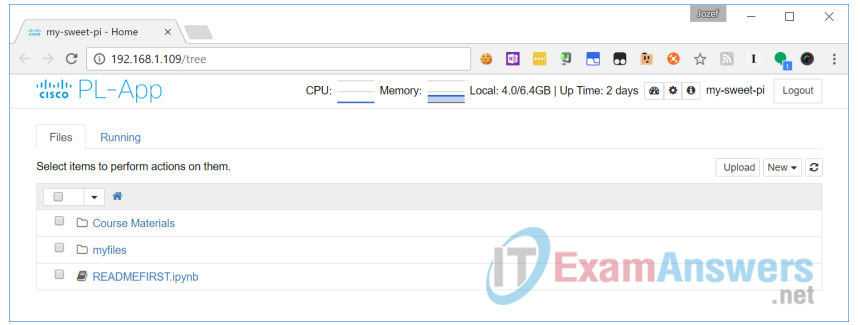
This is the PL-App’s representation of the notebooks folder that was created on the µSD card:
h. The basic structure of the folders in the root notebooks directory is as follows:
a. Course Materials: this folder contains Cisco authored labs in the form of Jupyter Notebooks.
b. myfiles: this folder is your space to create your own Jupyter Notebooks and other files.
Notes
Use this space to note what you learned in performing this exercise. The notes can include problems encountered, solutions applied, useful commands employed, alternate solutions, methods, processes, procedures, and communication improvements.
______________________________________________________
Appendix: Troubleshooting PL-App
a. Make sure the computer with PL-App meets the these criteria:
- i. On the same subnetwork as the PL-App Raspberry Pi
- ii. Not connected to VPN
b. If the onboard Red Power LED is anything but on (blinking, off, etc.), replace the PSU. The PSU is unable to provide enough power for the Raspberry Pi.
c. If the onboard green µSD card LED is constantly off or constantly on (more than 30 seconds perform these steps:
- i. Check the connection to the SD card in the SD card holder at the back side of the Raspberry Pi board.
- ii. Try to re-flash the µSD card with PL-App Launcher and the PL-App image.
- iii. Try to replace the µ`SD card (it might be broken).
d. Verify the µSD card drive on a computer. Check the chestnut.txt file in the root directory of the µSD card drive. Verify if the Device_Name specified in the chestnut.txt is matching the PL-App device name in the PL-App Launcher Devices tab.
e. If connecting with Wi-Fi, perform these steps:
- i. Verify the network name (SSID) and corresponding WPA2 password in chestnut.txt.
- ii. Try to connect to the network with an Ethernet cable (with the computer too).
- iii. Check if multicast is enabled on the Wi-Fi network.
f. If connecting with an Ethernet cable, perform these steps:
- i. Make sure multicast is not blocked or filtered.
- ii. Make sure DHCP is assigning IP addresses from the same subnetwork to the Raspberry Pi and the computer.
g. Try to connect to a different Raspberry Pi board.
h. Try to setup a lab topology separated from the rest of the production network with a topology similar to the following figure:
