
2.7.3 Packet Tracer - OSPF Multiarea Exploration - Physical Mode (Part 3) Answers
Objectives
- Part 1: Evaluate Network Operation of Single-Area OSPF
- Part 2: Evaluate Network Operation of Multiarea OSPF
- Part 3: Configure a New Area and Attach to Area 0 Through the Internet
Topology

Background / Scenario
Part 1: The Beginning
Casual Recording Company, based in Sao Paulo, Brazil, provides self-serve, mini-recording studios around the city so that anyone can rent a timeslot and record their songs by themselves. CRC began with a single-area OSPF network located in one building. This idea was very popular and consequently the business has grown, causing the company to expand into a branch office in a second building at the far end of the city. They continued to use single-area OSPF. You will evaluate the impact of the expanded network.
Part 2: Business is Booming
The IT department in CRC decided to migrate to a multiarea OSPF network. You will evaluate the impact and benefits derived from the change to determine if it was a good decision or not.
Part 3: CRC Expansion Continues
CRC has continued to grow and will open a new branch office in Montevideo, Uruguay. You will configure the Area Border Router for the new area and physically connect the branch office network to the corporate headquarters network through the internet.
Instructions
Part 3: Configure a New Area and Attach to Area 0 Through the Internet
In this part, CRC is still expanding and has decided to open another office in Montevideo, Uruguay. The internet link between Sao Paulo and Montevideo is a submarine cable. For more information, search the internet for pictures of "fiber links between Sao Paulo and Montevideo".
Step 1: Complete the physical cabling to connect Area 0 to Area 2.
a. You should now see an icon for Montevideo. If not, adjust the scroll bars so you can see both cities and the Internet/WAN.
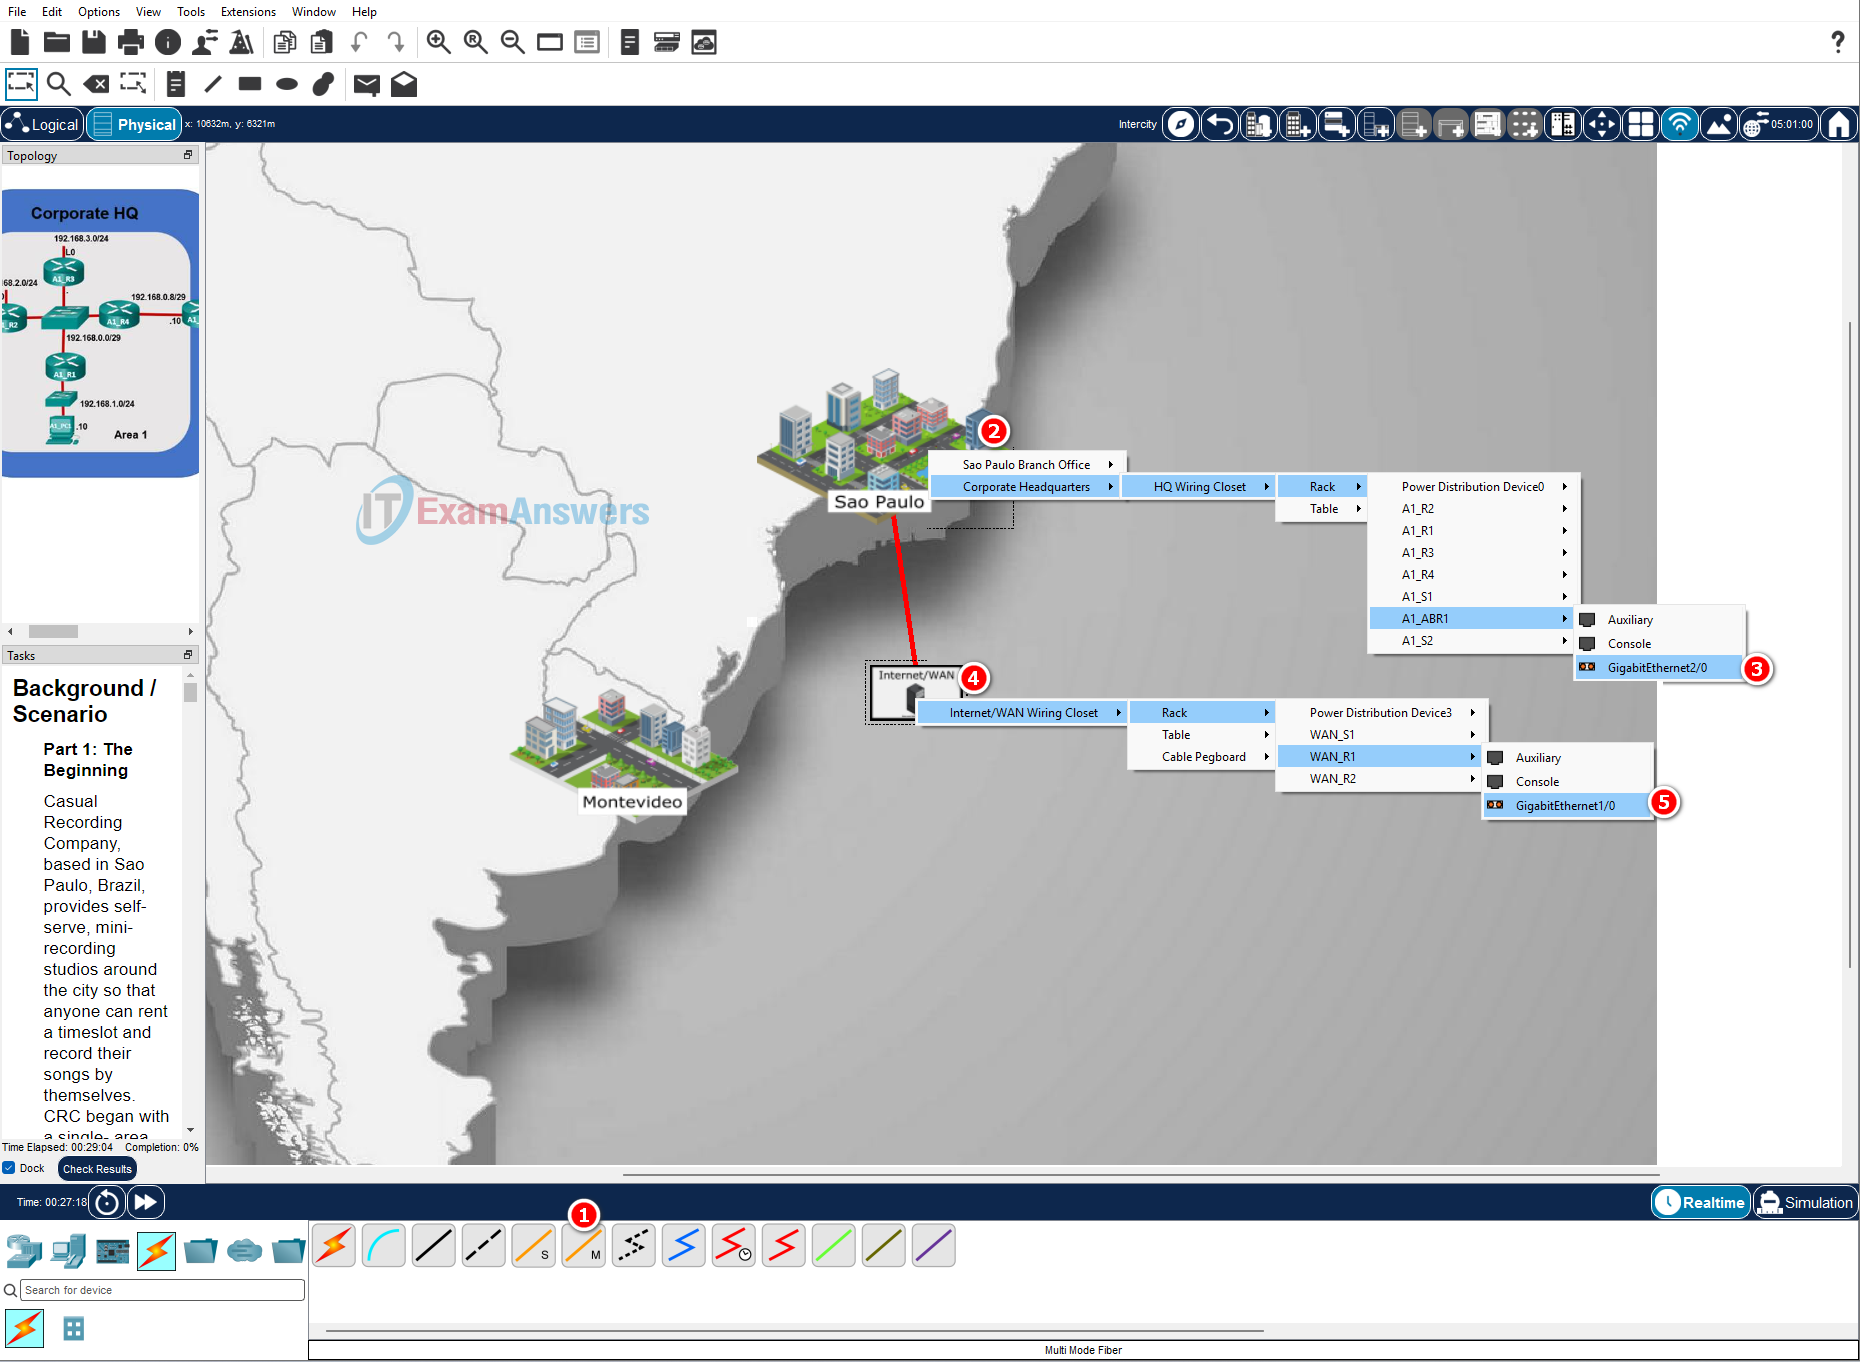
b. Click Connections in the Bottom Toolbar, and then click Fiber cable. Click Sao Paulo and select Corporate Headquarters > HQ Wiring Closet > Rack > A1_ABR1 > GigabitEthernet2/0. Next, click Internet/WAN > Internet/WAN Wiring Closet > Rack > WAN_R1 > GigabitEthernet1/0.
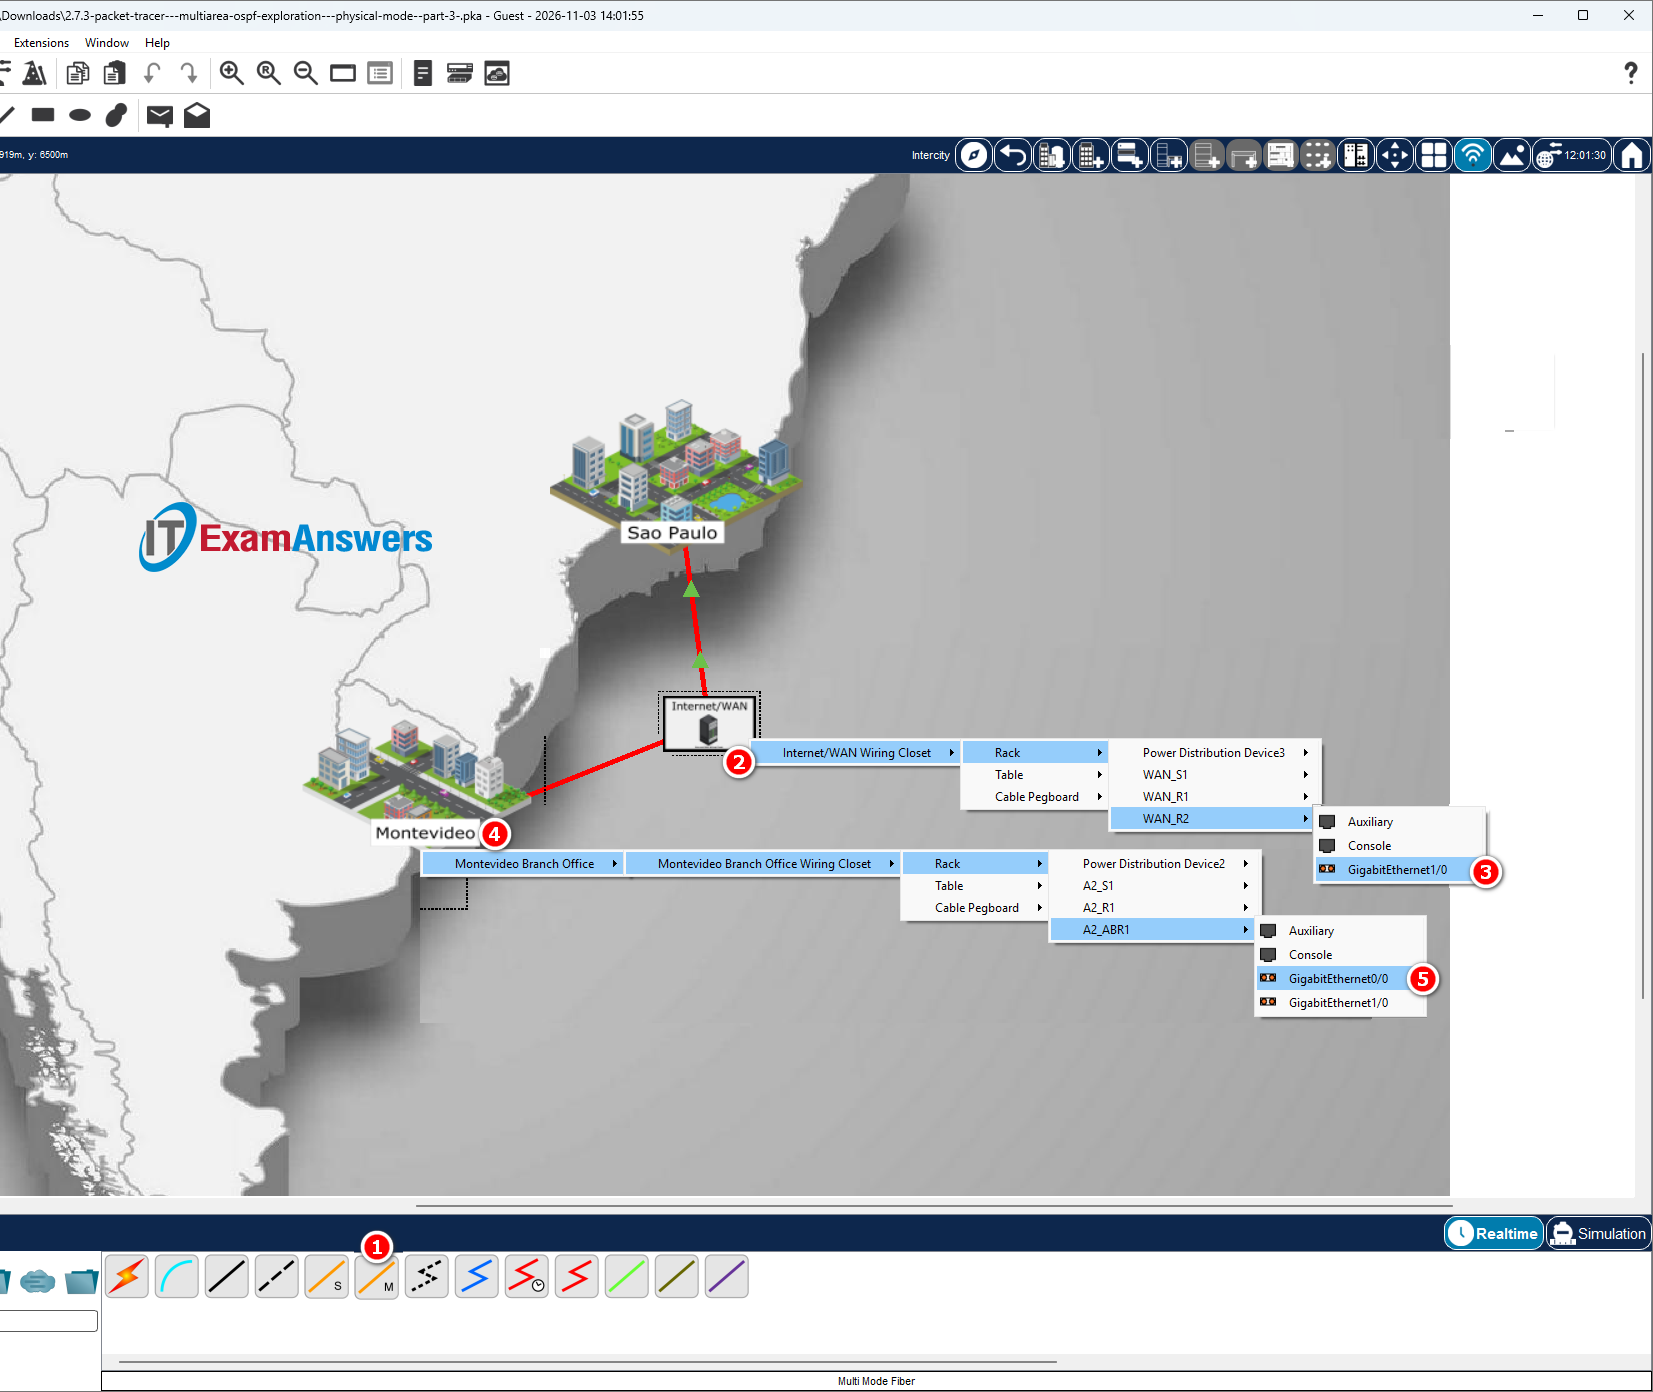
c. Select another fiber cable from the toolbar and, using the same procedure as above, click Internet/WAN > Internet/WAN Wiring Closet > Rack > WAN_R2 > GigabitEthernet1/0. Next, click Montevideo > Montevideo Branch Office > Montevideo Branch Office Wiring Closet > Rack > A2_ABR1 > GigabitEthernet0/0.
Step 2: Configure OSPF on router A2_ABR1.
A2_ABR1 is already configured, with the exception of OSPF. In this step, you will configure the router to be an area border router connecting Area 2 to the rest of the network.
a. Click Montevideo to enter city view. Notice there is a Branch Office building with the fiber link you just created.
b. Click Branch Office, and then the rack icon that represents the Branch Office Wiring Closet.
c. Click A2_ABR1, and then select the CLI tab.
d. Enable OSPF on router A2_ABR1 and set the router ID to 172.17.1.10.
A2_ABR1(config)# router ospf 1
A2_ABR1(config-router)# router-id 172.17.1.10
e. Configure the 192.168.32.0/30 network to be in Area 2 and the 172.17.1.8/30 network to be in Area 0.
A2_ABR1(config-router)# network 192.168.32.0 0.0.0.3 area 2
A2_ABR1(config-router)# network 172.17.1.8 0.0.0.3 area 0
f. Configure summarization on router A2_ABR1 so that it will advertise the summary network 192.168.32.0/19 into Area 0.
A2_ABR1(config-router)# area 2 range 192.168.32.0 255.255.224.0
Note: Your completion percentage should now be 100%. If not, refer to the previous commands and correct any that are in error before moving on to the next step.
Step 3: View the Area 2 summarized routes in Area 1 and Area 51.
You can use the Navigation Panel (Shift+N) in the blue tool bar at the top to quickly navigate to the wiring closets in Sao Paulo.
a. Navigate to the Sao Paulo HQ Wiring Closet. Click A1_ABR1, and then select the CLI tab. Issue the show ip route command. An interarea route to 192.168.32.0/19 should appear in the routing table:
A1_ABR1# show ip route
Codes: C - connected, S - static, I - IGRP, R - RIP, M - mobile, B - BGP
       D - EIGRP, EX - EIGRP external, O - OSPF, IA - OSPF inter area
       N1 - OSPF NSSA external type 1, N2 - OSPF NSSA external type 2
       E1 - OSPF external type 1, E2 - OSPF external type 2, E - EGP
       i - IS-IS, L1 - IS-IS level-1, L2 - IS-IS level-2, ia - IS-IS inter area
       * - candidate default, U - per-user static route, o - ODR
       P - periodic downloaded static route

Gateway of last resort is not set

O IA 10.0.0.0/8 [110/2] via 172.17.1.2, 00:53:40, GigabitEthernet0/0
     172.17.0.0/16 is variably subnetted, 4 subnets, 2 masks
C       172.17.1.0/30 is directly connected, GigabitEthernet0/0
C       172.17.1.4/30 is directly connected, GigabitEthernet2/0
O       172.17.1.8/30 [110/3] via 172.17.1.6, 00:04:23, GigabitEthernet2/0
O       172.17.1.128/25 [110/2] via 172.17.1.6, 00:26:14, GigabitEthernet2/0
     192.168.0.0/29 is subnetted, 2 subnets
O       192.168.0.0 [110/2] via 192.168.0.9, 00:53:30, GigabitEthernet1/0
C       192.168.0.8 is directly connected, GigabitEthernet1/0
O    192.168.1.0/24 [110/3] via 192.168.0.9, 00:53:30, GigabitEthernet1/0
     192.168.2.0/32 is subnetted, 1 subnets
O       192.168.2.1 [110/3] via 192.168.0.9, 00:53:30, GigabitEthernet1/0
     192.168.3.0/32 is subnetted, 1 subnets
O       192.168.3.1 [110/3] via 192.168.0.9, 00:53:30, GigabitEthernet1/0
O IA 192.168.32.0/19 [110/5] via 172.17.1.6, 00:04:13, GigabitEthernet2/0
b. Navigate to the Sao Paulo Branch Office Wiring Closet. Click A51_R2, and then select the CLI tab.
Issue the show ip route command. An interarea route to 192.168.32.0/19 should appear in the routing table:
A51_R2# show ip route
Codes: C - connected, S - static, I - IGRP, R - RIP, M - mobile, B - BGP
       D - EIGRP, EX - EIGRP external, O - OSPF, IA - OSPF inter area
       N1 - OSPF NSSA external type 1, N2 - OSPF NSSA external type 2
       E1 - OSPF external type 1, E2 - OSPF external type 2, E - EGP
       i - IS-IS, L1 - IS-IS level-1, L2 - IS-IS level-2, ia - IS-IS inter area
       * - candidate default, U - per-user static route, o - ODR
       P - periodic downloaded static route

Gateway of last resort is not set

     10.0.0.0/8 is variably subnetted, 11 subnets, 2 masks
O       10.10.0.0/30 [110/2] via 10.10.0.21, 00:55:16, GigabitEthernet2/0
O       10.10.0.4/30 [110/2] via 10.10.0.21, 00:55:16, GigabitEthernet2/0
                     [110/2] via 10.10.0.13, 00:55:16, GigabitEthernet3/0
O       10.10.0.8/30 [110/2] via 10.10.0.17, 00:55:16, GigabitEthernet1/0
                     [110/2] via 10.10.0.21, 00:55:16, GigabitEthernet2/0
C       10.10.0.12/30 is directly connected, GigabitEthernet3/0
C       10.10.0.16/30 is directly connected, GigabitEthernet1/0
C       10.10.0.20/30 is directly connected, GigabitEthernet2/0
C       10.20.0.0/24 is directly connected, Loopback0
C       10.20.1.0/24 is directly connected, Loopback1
C       10.20.2.0/24 is directly connected, Loopback2
C       10.20.3.0/24 is directly connected, Loopback3
C       10.20.4.0/24 is directly connected, GigabitEthernet4/0
     172.17.0.0/16 is variably subnetted, 4 subnets, 2 masks
O IA    172.17.1.0/30 [110/3] via 10.10.0.21, 00:55:16, GigabitEthernet2/0
O IA    172.17.1.4/30 [110/4] via 10.10.0.21, 00:28:45, GigabitEthernet2/0
O IA    172.17.1.8/30 [110/6] via 10.10.0.21, 00:21:43, GigabitEthernet2/0
O IA    172.17.1.128/25 [110/5] via 10.10.0.21, 00:28:00, GigabitEthernet2/0
O IA 192.168.0.0/19 [110/4] via 10.10.0.21, 00:31:52, GigabitEthernet2/0
O IA 192.168.32.0/19 [110/8] via 10.10.0.21, 00:05:59, GigabitEthernet2/0
Step 4: Test connectivity from Area 51 and Area 1 to Area 2.
a. Click A51_PC1 > Desktop tab > Command Prompt, and then ping A2_PC1.
C:\> ping 192.168.35.10

Pinging 192.168.35.10 with 32 bytes of data:

Request timed out.
Reply from 192.168.35.10: bytes=32 time<1ms TTL=120
Reply from 192.168.35.10: bytes=32 time<1ms TTL=120
Reply from 192.168.35.10: bytes=32 time<1ms TTL=120
b. Navigate to the Sao Paulo HQ Wiring Closet. Click A1_PC1 > Desktop tab > Command Prompt, and then ping A2_PC1.
It may take a moment to receive replies.
C:\> ping 192.168.35.10

Pinging 192.168.35.10 with 32 bytes of data:

Reply from 192.168.35.10: bytes=32 time<1ms TTL=121
Reply from 192.168.35.10: bytes=32 time<1ms TTL=121
Reply from 192.168.35.10: bytes=32 time=3ms TTL=121
Reply from 192.168.35.10: bytes=32 time<1ms TTL=121
Reflection Question
What are the benefits derived from using multiarea OSPF in a large multi-location company?
Multiarea OSPF is more efficient and scalable. It allows areas to advertise summarized networks to other areas. Summarization results in smaller routing tables, fewer SPF algorithm executions, and less flooding of LSAs on the entire network.
Quick Reference Summary
Only one device needs real CLI configuration in this entire Part 3 activity – A2_ABR1. Everything else is physical cabling (Connections toolbar) or show/ping verification. Use this table to jump straight to the answers without re-reading every step.
| Step | Where | Answer |
|---|---|---|
| Step 1 (physical, not CLI) | Connections toolbar > Fiber | A1_ABR1 G2/0 <-> WAN_R1 G1/0, and WAN_R2 G1/0 <-> A2_ABR1 G0/0 |
| Step 2 (the only real config) | A2_ABR1 |
A2_ABR1(config)# router ospf 1
A2_ABR1(config-router)# router-id 172.17.1.10
A2_ABR1(config-router)# network 192.168.32.0 0.0.0.3 area 2
A2_ABR1(config-router)# network 172.17.1.8 0.0.0.3 area 0
A2_ABR1(config-router)# area 2 range 192.168.32.0 255.255.224.0
Completion should read 100% after this. |
| Step 3 | A1_ABR1 > show ip route |
O IA 192.168.32.0/19 [110/5] via 172.17.1.6, GigabitEthernet2/0 |
| Step 3 | A51_R2 > show ip route |
O IA 192.168.32.0/19 [110/8] via 10.10.0.21, GigabitEthernet2/0 |
| Step 4 | A51_PC1 > ping 192.168.35.10 |
1 timeout, then succeeds |
| Step 4 | A1_PC1 > ping 192.168.35.10 |
Succeeds (may take a moment for first replies) |
| Reflection Question | — | Multiarea OSPF is more efficient and scalable. It allows areas to advertise summarized networks to other areas. Summarization results in smaller routing tables, fewer SPF algorithm executions, and less flooding of LSAs on the entire network. |
Device Configs - Final
ROUTER A2_ABR1
! ==============================================================
!--- 2.7.3 Packet Tracer - OSPF Multiarea Exploration - Physical Mode (Part 3)
!--- ANSWER SCRIPT FOR ROUTER A2_ABR1
!--- Usage: complete the fiber cabling of Step 1 first, then open the A2_ABR1 CLI tab and paste this whole file at the A2_ABR1> prompt. Every line beginning with "!" is a comment; IOS ignores it, so pasting a comment by accident is harmless.
! ==============================================================

enable
configure terminal

! --------------------------------------------------------------
!--- Part 3, Step 2: Configure OSPF on router A2_ABR1.
! --------------------------------------------------------------

!--- d. Enable OSPF and set the router ID to 172.17.1.10.
router ospf 1
 router-id 172.17.1.10
 exit

!--- e. 192.168.32.0/30 in Area 2 and 172.17.1.8/30 in Area 0 (A2_ABR1 becomes an ABR).
router ospf 1
 network 192.168.32.0 0.0.0.3 area 2
 network 172.17.1.8 0.0.0.3 area 0
 exit

!--- f. Advertise the Area 2 networks into Area 0 as one summary route 192.168.32.0/19.
router ospf 1
 area 2 range 192.168.32.0 255.255.224.0
 exit

end

! --------------------------------------------------------------
!--- Save the configuration to NVRAM. (Press Enter when prompted for the destination filename.)
! --------------------------------------------------------------
copy running-config startup-config


! ==============================================================
!--- Verification:
!---   show ip ospf neighbor        -> FULL adjacency in Area 0 (through the WAN) and in Area 2
!---   show ip route (A1_ABR1)       -> O IA 192.168.32.0/19
!---   ping 192.168.35.10 (A1_PC1)   -> replies from A2_PC1
!--- Note: the completion percentage should be 100% after this script and the Step 1 cabling.
! ==============================================================


