15.2.7 Packet Tracer – Logging Network Activity (Answers)
Instructor Note: Red font color or gray highlights indicate text that appears in the Instructor copy only.
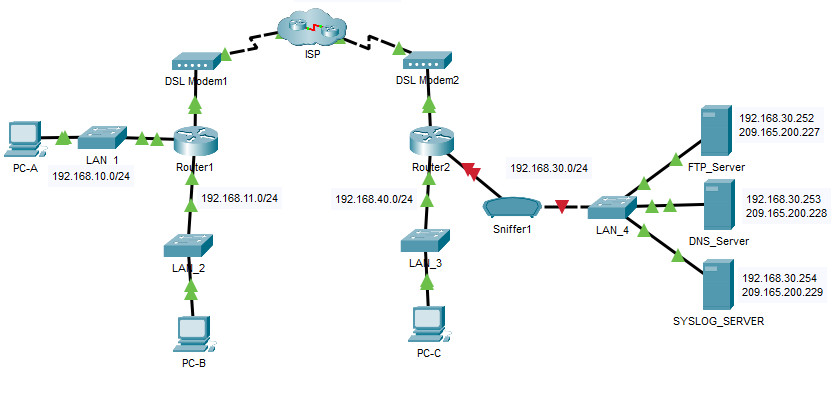
Topology

15.2.7 Packet Tracer – Logging Network Activity
Addressing Table
| Device | Private IP Address | Public IP Address |
|---|---|---|
| FTP_Server | 192.168.30.253 | 209.165.200.227 |
| SYSLOG_SERVER | 192.168.11.254 | 209.165.200.229 |
| Router2 | N/A | 209.165.200.226 |
Objectives
- Part 1: Create FTP traffic.
- Part 2: Investigate the FTP Traffic
- Part 3: View Syslog Messages
Background
In this activity, you will use Packet Tracer to sniff and log network traffic. You will view a security vulnerability in one network application, and view logged ICMP traffic with syslog.
Instructions
Part 1: Create FTP traffic.
Step 1: Activate the sniffing device.
a. Click on sniffer device Sniffer1.
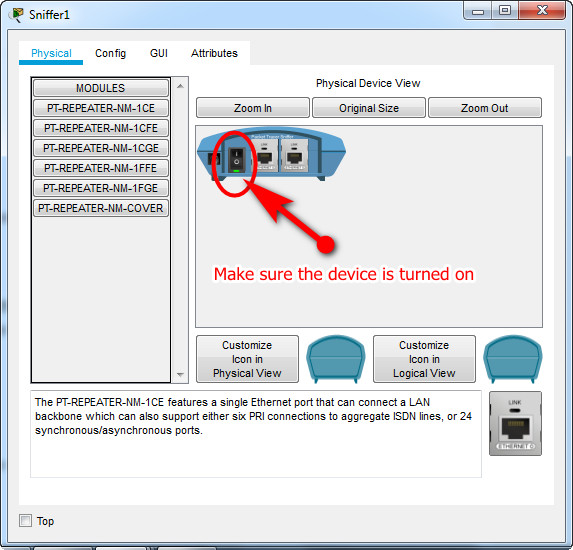
b. Go to the Physical tab and turn on the power to the sniffer.

c. Go to the GUI tab and turn the sniffer service on.
d. The FTP and syslog packets entering the sniffer from Router2 are being monitored.
Step 2: Remotely connect to the FTP server.
a. Click on PC-B and go to the desktop.
b. Click Command Prompt. From the command prompt, open an FTP session with FTP_SERVER using its public IP address. Help with the command line is available by typing ? at the prompt.
c. Enter the username of cisco and password of cisco to authenticate with the FTP_Server.
C:\>ftp 209.165.200.227
Trying to connect...209.165.200.227
Connected to 209.165.200.227
220- Welcome to PT Ftp server
Username:cisco
331- Username ok, need password
Password:
230- Logged in
(passive mode On)
ftp>
ftp>
ftp>
Step 3: Upload a file to the FTP server.
a. At the ftp> prompt, enter the command dir to view the current files stored on the remote FTP server.
b. Upload the clientinfo.txt file to the FTP server by entering the command put clientinfo.txt.
c. At the ftp> prompt, enter the command dir and verify that the clientinfo.txt file is now on the FTP server.
d. Enter quit at the FTP prompt to close the session.
ftp>dir

Listing /ftp directory from 209.165.200.227:
0   : asa842-k8.bin                                      5571584
1   : asa923-k8.bin                                      30468096
2   : c1841-advipservicesk9-mz.124-15.T1.bin             33591768
3   : c1841-ipbase-mz.123-14.T7.bin                      13832032
4   : c1841-ipbasek9-mz.124-12.bin                       16599160
5   : c1900-universalk9-mz.SPA.155-3.M4a.bin             33591768
6   : c2600-advipservicesk9-mz.124-15.T1.bin             33591768
7   : c2600-i-mz.122-28.bin                              5571584
8   : c2600-ipbasek9-mz.124-8.bin                        13169700
9   : c2800nm-advipservicesk9-mz.124-15.T1.bin           50938004
10  : c2800nm-advipservicesk9-mz.151-4.M4.bin            33591768
11  : c2800nm-ipbase-mz.123-14.T7.bin                    5571584
12  : c2800nm-ipbasek9-mz.124-8.bin                      15522644
13  : c2900-universalk9-mz.SPA.155-3.M4a.bin             33591768
14  : c2950-i6q4l2-mz.121-22.EA4.bin                     3058048
15  : c2950-i6q4l2-mz.121-22.EA8.bin                     3117390
16  : c2960-lanbase-mz.122-25.FX.bin                     4414921
17  : c2960-lanbase-mz.122-25.SEE1.bin                   4670455
18  : c2960-lanbasek9-mz.150-2.SE4.bin                   4670455
19  : c3560-advipservicesk9-mz.122-37.SE1.bin            8662192
20  : c3560-advipservicesk9-mz.122-46.SE.bin             10713279
21  : c800-universalk9-mz.SPA.152-4.M4.bin               33591768
22  : c800-universalk9-mz.SPA.154-3.M6a.bin              83029236
23  : cat3k_caa-universalk9.16.03.02.SPA.bin             505532849
24  : cgr1000-universalk9-mz.SPA.154-2.CG                159487552
25  : cgr1000-universalk9-mz.SPA.156-3.CG                184530138
26  : ir800-universalk9-bundle.SPA.156-3.M.bin           160968869
27  : ir800-universalk9-mz.SPA.155-3.M                   61750062
28  : ir800-universalk9-mz.SPA.156-3.M                   63753767
29  : ir800_yocto-1.7.2.tar                              2877440
30  : ir800_yocto-1.7.2_python-2.7.3.tar                 6912000
31  : pt1000-i-mz.122-28.bin                             5571584
32  : pt3000-i6q4l2-mz.121-22.EA4.bin                    3117390
ftp>
ftp>
ftp>put clientinfo.txt

Writing file clientinfo.txt to 209.165.200.227:
File transfer in progress...

[Transfer complete - 662 bytes]

662 bytes copied in 0.129 secs (5131 bytes/sec)
ftp>dir

Listing /ftp directory from 209.165.200.227:
0   : asa842-k8.bin                                      5571584
1   : asa923-k8.bin                                      30468096
2   : c1841-advipservicesk9-mz.124-15.T1.bin             33591768
3   : c1841-ipbase-mz.123-14.T7.bin                      13832032
4   : c1841-ipbasek9-mz.124-12.bin                       16599160
5   : c1900-universalk9-mz.SPA.155-3.M4a.bin             33591768
6   : c2600-advipservicesk9-mz.124-15.T1.bin             33591768
7   : c2600-i-mz.122-28.bin                              5571584
8   : c2600-ipbasek9-mz.124-8.bin                        13169700
9   : c2800nm-advipservicesk9-mz.124-15.T1.bin           50938004
10  : c2800nm-advipservicesk9-mz.151-4.M4.bin            33591768
11  : c2800nm-ipbase-mz.123-14.T7.bin                    5571584
12  : c2800nm-ipbasek9-mz.124-8.bin                      15522644
13  : c2900-universalk9-mz.SPA.155-3.M4a.bin             33591768
14  : c2950-i6q4l2-mz.121-22.EA4.bin                     3058048
15  : c2950-i6q4l2-mz.121-22.EA8.bin                     3117390
16  : c2960-lanbase-mz.122-25.FX.bin                     4414921
17  : c2960-lanbase-mz.122-25.SEE1.bin                   4670455
18  : c2960-lanbasek9-mz.150-2.SE4.bin                   4670455
19  : c3560-advipservicesk9-mz.122-37.SE1.bin            8662192
20  : c3560-advipservicesk9-mz.122-46.SE.bin             10713279
21  : c800-universalk9-mz.SPA.152-4.M4.bin               33591768
22  : c800-universalk9-mz.SPA.154-3.M6a.bin              83029236
23  : cat3k_caa-universalk9.16.03.02.SPA.bin             505532849
24  : cgr1000-universalk9-mz.SPA.154-2.CG                159487552
25  : cgr1000-universalk9-mz.SPA.156-3.CG                184530138
26  : clientinfo.txt                                     662
27  : ir800-universalk9-bundle.SPA.156-3.M.bin           160968869
28  : ir800-universalk9-mz.SPA.155-3.M                   61750062
29  : ir800-universalk9-mz.SPA.156-3.M                   63753767
30  : ir800_yocto-1.7.2.tar                              2877440
31  : ir800_yocto-1.7.2_python-2.7.3.tar                 6912000
32  : pt1000-i-mz.122-28.bin                             5571584
33  : pt3000-i6q4l2-mz.121-22.EA4.bin                    3117390
ftp>
ftp>quit
Part 2: Investigate the FTP Traffic
a. Click the Sniffer1 device and then click the GUI tab.
b. Click through some of the first FTP packets in the session. Be sure to scroll down to view the application layer protocol information in the packet details for each. (This assumes this is your first FTP session. If you have opened other sessions, clear the window and repeat the login and file transfer process.)
What is the security vulnerability presented by FTP?
The FTP username and password are transmitted in clear text.
What should be done to mitigate this vulnerability?
Use a secure file transfer protocol such as SFTP.
Part 3: View syslog Messages
Step 1: Remotely connect to Router2.
a. From the PC-B command line, telnet to Router2.
b. Use the username ADMIN and password CISCO for authentication.
c. Enter the following commands at the router prompt:
Router2# debug ip icmp
d. Type logout at the prompt to close the Telnet session.
Step 2: Generate and View the syslog Messages.
a. Click on the SYSLOG_SERVER device and go to the Services tab.
b. Click the SYSLOG service. Verify that the service is on. Syslog messages will appear here.
c. Go to host PC-B and open the Desktop tab.
d. Open the Command Prompt and ping Router2.
e. Go to host PC-A and open the Desktop tab.
f. Go to the Command Prompt and ping Router2.
g. On the syslog server investigate the logged messages.
h. There should be four messages from PC-A and four PC-B.
Can you tell which echo replies are for PC-A and PC-B from the destination addresses? Explain.
They should both have the same destination address because NAT is translating internal private addresses to a global public address.
Note: The HostName field in the syslog server display refers to the device that is the source of the syslog messages.
i. Ping Router2 from PC-C.
What will the destination address for the replies be?
The address will be the internal private address of PC-C.
