
9.3.4 Packet Tracer - Data Center Exploration - Physical Mode Answers
Objectives
- Part 1: Explore the Characteristics of a Small Data Center
- Part 2: Create a Plan for Expanding the Current Data Center
- Part 3: Configure the Data Center Devices to Expand the Capacity
Background / Scenario
Data centers are often referred to as the brain of an organization storing and analyzing data, providing communication both internally and to clients, and providing the tools necessary for research and development activities. The data center must be constructed in such a manner that it can securely and efficiently provide its full range of products and services regardless of what catastrophe occurs. There are many different systems that go into the construction of a data center but for this activity we shall concern ourselves only with the networking components.
Data centers can range in size from only a few servers to housing hundreds or even thousands of servers. Whatever the size, the data center must be constructed in an extremely organized manner to simplify management and troubleshooting of a complex environment. Another design characteristic is to make the data center more robust by using redundancy to eliminate any single point of failure. This could involve adding extra devices to provide physical redundancy and/or using technologies such as First Hop Redundancy Protocols (FHRPs) and link aggregation to provide logical redundancy.
In this Packet Tracer Physical Mode (PTPM) activity, most of the devices in the Toronto and Seattle data centers are already deployed and configured. You have just been hired to review the current deployment and to expand the capacity of the Data Center 1 in Toronto.

Instructions
Part 1: Explore the Characteristics of a Small Data Center
In Part 1, you will explore the characteristics of the existing data centers (DC).
Step 1: Explore the physical layout of the data centers.
a. How is the Branch Office physically connected to the data centers?


b. What logical configuration in the Branch Office provides redundancy?

c. How is Data Center 1 connected to Data Center 2?
Data Center 1 and Data Center 2 are connected through redundant fiber links (DC1A Router connects to DC2A Router and DC1B Router connects to DC2B Router.
d. How are the devices in Data Center 1 physically organized?
The devices are organized in an extremely logical manner into redundant racks so if any rack fails the redundant racks can compensate. One of the main design features of a data center is to standardize on equipment layout so that you have flexibility and are not limited by equipment layout.

e. Does the Data Center 2 equipment layout differ from Data Center 1?
No. Data Center 2 follows the same principles as Data Center 1 for equipment layout.
f. Why is the physical organization of the data center devices important?
The clear and consistent layout of redundant physical devices helps with data center flexibility, troubleshooting, and management. A logical equipment design prevents the equipment layout from limiting the usefulness and efficiency of the data center.
Step 2: Explore the naming and addressing conventions in both Data Center 1 and Data Center
2.
a. How are the devices named in the data centers?
Hint: Rack is abbreviated as R and Server is abbreviated as S.
Device naming in the DC are based on physical location and function.
b. How are the devices addressed in the data centers?
Device addressing is logically based on physical location. For example, racks 1-4 servers have the rack and position number as part of the IP address (third octet) so one can readily identify the location of the servers. For example, 172.16.12.1 identifies the server in rack 1, position 2 and 172.16.24.1 identifies the server in rack 2 position 4.Rack 0 is a multipurpose rack serving as the network substation so the servers follow a slightly different addressing scheme to allow for the required networking equipment.
c. Why is the naming and addressing of the data center devices important?
Data center flexibility, troubleshooting, and management are improved by the logical layout of device names and addresses as well as the physical placement of the devices. A logical naming and addressing scheme allows for future growth and does not place undue limits on the DC flexibility.
Step 3: Explore data center redundant layer 2 technology.
Examine DC1 R0 Switch A and DC1 R0 Switch B.
a. Navigate to the Data Center 1 Server Room in Toronto. From Rack_0, click DC1 R0 Switch A > CLI tab and DC1 R0 Switch B > CLI tab. Arrange the windows side by side.
b. What technology is used to provide redundancy and stability in their configuration?
The switches use EtherChannel configured with LACP.
DC1R0_SwitchA# show etherchannel
                Channel-group listing:
                ———————-

Group: 1
———-
Group state = L2
Ports: 2 Maxports = 16
Port-channels: 1 Max Port-channels = 16
Protocol:   LACP
c. What is the purpose of this technology?
This technology allows multiple physical links to function together as a logical trunk. This combines the link bandwidth but also provides redundancy should one of the physical links fail.
d. What is the total bandwidth over Port-channel1?
EtherChannel bundles multiple physical links into a logical channel. In this case it is bundled two 100 Mbps links into a 200 Mbps EtherChannel bundle.
DC1R0_SwitchA#show interfaces port-channel 1
Port-channel1 is up, line protocol is up (connected)
  Hardware is EtherChannel, address is 00e0.b0e2.7e45 (bia 00e0.b0e2.7e45)
  MTU 1500 bytes, BW 200000 Kbit, DLY 1000 usec,
     reliability 255/255, txload 1/255, rxload 1/255
  Encapsulation ARPA, loopback not set
  Keepalive set (10 sec)
  Half-duplex, 200Mb/s
e. What will happen if the FastEthernet 0/1 port on DC1 R0 Switch A fails and why?
If DC1 R0 Switch A FA0/1 fails, the connection to DC1 Master Switch A will remain active using the other link in the bundle (DC1 R0 Switch A FA0/2)
Step 4: Explore data center redundant Layer 3 technology.
Examine the DC1A_Router and DC1B_Router.
a. From Rack_0, click DC1A_Router > CLI tab and DC1B_Router > CLI tab. Arrange the windows side by side.
b. What technology is used to provide redundancy and stability in their configuration?
The data center routers are configured using an FHRP called Hot Standby Routing Protocol (HSRP).
DC1A_Router# show standby
FastEthernet0/0 – Group 1
  State is Active
    5 state changes, last state change 00:00:18
  Virtual IP address is 172.16.0.254
  Active virtual MAC address is 0000.0C07.AC01
    Local virtual MAC address is 0000.0C07.AC01 (v1 default)
  Hello time 3 sec, hold time 10 sec
    Next hello sent in 1.068 secs
  Preemption enabled
  Active router is local
  Standby router is 172.16.0.2
  Priority 100 (default 100)
  Group name is hsrp-Fa0/0-1 (default)
FastEthernet1/0 – Group 2
  State is Standby
    5 state changes, last state change 00:00:38
  Virtual IP address is 10.16.0.254
  Active virtual MAC address is 0000.0C07.AC02
    Local virtual MAC address is 0000.0C07.AC02 (v1 default)
  Hello time 3 sec, hold time 10 sec
    Next hello sent in 2.495 secs
  Preemption enabled
  Active router is 10.16.0.2
  Standby router is local
  Priority 50 (configured 50)
  Group name is hsrp-Fa1/0-2 (default)
c. What is the purpose of this technology?
This technology is used to provide redundant default gateways should part of the physical infrastructure fail.
d. Which router and interface will be used as the default gateway for the 172.16.0.0/16 network and why?
The default gateway for the 172.16.0.0/16 network is 172.16.0.254. HSRP is configured with a priority of 100 on the DC1A_Router FA0/0 interface so it is the active interface. The DC1B_Router FA0/0 is configured with a priority of 50 so it is the standby interface.
e. Which router and interface will be used as the default gateway for the 10.16.0.0/16 network and why?
The default gateway for the 10.16.0.0/16 network is 10.16.0.254. HSRP is configured with a priority of 100 on the DC1B_Router FA1/0 interface so it is the active interface. The DC1A_Router FA0/1 is configured with a priority of 50 so is in standby.
Part 2: Create a Plan for Expanding the Current Data Center
In Part 2, you will create a plan for adding a new rack of equipment to the current data centers.
Step 1: Determine what equipment is required to add one new rack of equipment to both Data Center 1 and Data Center 2.
From your review of the two current data centers in Part 1, determine the equipment required to add a new rack of equipment to Data Center 1. When scaling the infrastructure of a data center construction, it is important to standardize construction and configuration whenever possible.
a. What new switches are required? How should they be connected? What should their names be?
The current equipment racks all consist of two (2) Cisco 2960 switches connected to the Master Switches in Rack_0. For consistency, name the switches DC1R5_SwitchA and DC1R5_SwitchB. These switches are connected back to DC1 Master Switch A and DC1 Master Switch B respectively.
b. How are the R5 switches connected to the R0 switches?
DC1R5_SwitchA ports FA0/1 and FA0/2 are connected to DC1 Master Switch A ports FA 0/23 and Fa0/24 respectively. DC1R5_SwitchB ports FA0/1 and FA0/2 are connected to DC1 Master Switch B ports FA 0/23 and Fa0/24 respectively. The links from DC1R5_SwitchA to R0 Master Switch A are bundled together and the links from DC1R5_Switch B to R0 Master Switch B are bundled together using an LACP EtherChannel bundle.
c. How many servers should be added to Rack_5? How should they be configured and with what addresses?
To maintain consistency with the existing DC, a total of six servers should be added to Rack_5. These servers should have two FA NICs installed. FA0 should be configured with the 172.16.RS.1/16 address, the DG of 172.16.0.254, and the DNS address 172.16.1.1. FA1 should be configured with the address 10.16.RS.1/16, the default gateway address 10.16.0.254, and the DNS address 10.16.1.1. R = Rack (5) and S = Server (1-6)
d. How should the servers be connected to the network?
To maintain consistency with the existing DC, R5S1-6 FA0 should be connected to DC1R5_SwitchA FA0/13-23 and R5S1-6 FA1 should be connected to DC1R5_SwitchB FA0/13-23.
e. How would the above information change for adding a new rack to DC2?
In DC2 device names should contain DC2 instead of DC1 and the addresses change to 172.30.RS.1/16 with a DG of 172.30.0.254 and 10.30.RS.1/16 with a DG of 10.30.0.254 where R=Rack (5) and S=Server (1-6).
Part 3: Configure the Data Center Devices to Expand the Data Center Capacity
In Part 3, you will install and configure the equipment for the new rack in DC1 (Toronto). Use the information from Part 2 for specifics.
Step 1: Install the required equipment in Rack_5
a. Drag two 2960 switches to the top of Rack_5.
b. Drag six servers to Rack_5.

c. Click the first server in Rack_5 and, under MODULES, click and drag a second PT-HOST-NM-1CFE interface to the open slot. Click the Power button below the second interface.

Insert the PT-HOST-NM-1CFE interface into the open slot and turn on the power for Server 1
d. Click the Config tab and set the display name DC1-R5S1. Close the server window.

Set the display name to DC1-R5S1.
e. Repeat Step1c and 1d for the other five servers, incrementing the server number as necessary (DC1- R5S2, DC1-R5S3, and so on).
Step 2: Configure IP addressing for the servers in Rack_5.
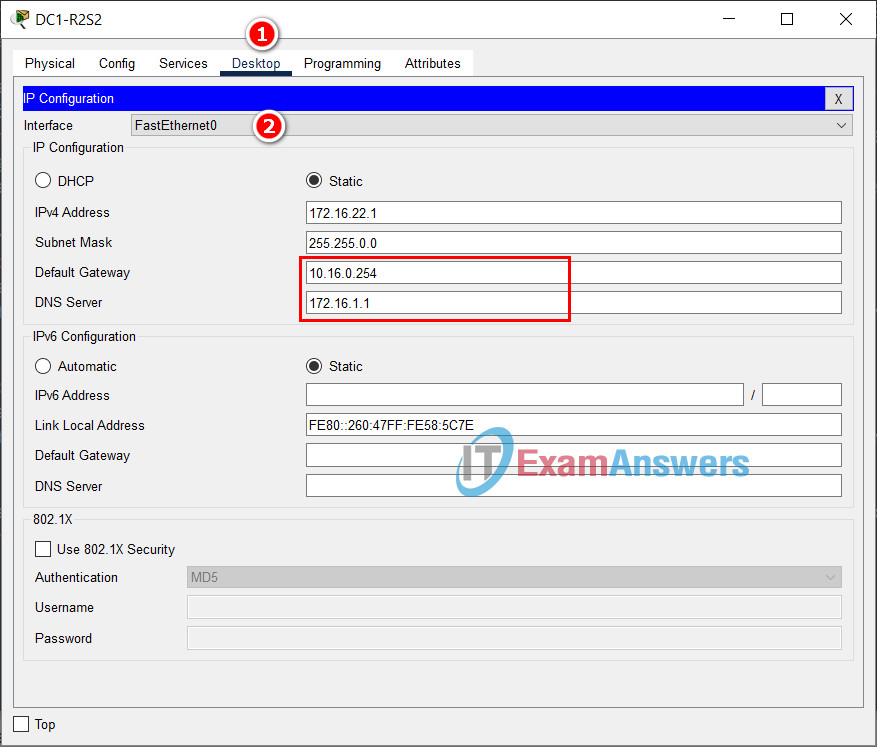
a. What is the FastEthernet0 default gateway and DNS address for all servers in Data Center 1?
Default gateway 172.16.0.254 and DNS address 172.16.1.1
To identify these addresses, click on any server. Go to the Desktop tab --> Select Interface FastEthernet0.
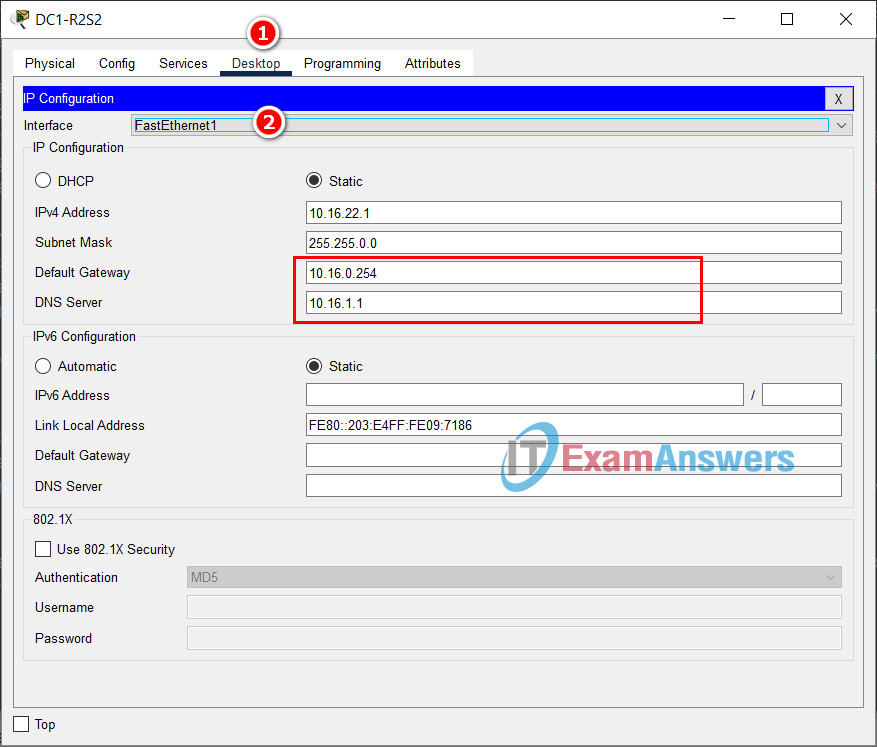
b. What is the FastEthernet1 default gateway and DNS address for all servers in Data Center 1?
Default gateway 10.16.0.254 and DNS address 10.16.1.1
To identify these addresses, click on any server. Go to the Desktop tab --> Select Interface FastEthernet1.
c. In conformance with the addressing scheme of servers in Rack_0 through Rack_4, complete the following Addressing Table for the servers in Rack_5.
| Server | Interface | IP address | Subnet Mask | Default Gateway | DNS Address |
|---|---|---|---|---|---|
| DC1-R5S1 | FastEthernet | 172.16.51.1 | 255.255.0.0 | 172.16.0.254 | 172.16.1.1 |
| FastEthernet1 | 10.16.51.1 | 255.255.0.0 | 10.16.0.254 | 10.16.1.1 | |
| DC1-R5S2 | FastEthernet | 172.16.52.1 | 255.255.0.0 | 172.16.0.254 | 172.16.1.1 |
| FastEthernet1 | 10.16.52.1 | 255.255.0.0 | 10.16.0.254 | 10.16.1.1 | |
| DC1-R5S3 | FastEthernet | 172.16.53.1 | 255.255.0.0 | 172.16.0.254 | 172.16.1.1 |
| FastEthernet1 | 10.16.53.1 | 255.255.0.0 | 10.16.0.254 | 10.16.1.1 | |
| DC1-R5S4 | FastEthernet | 172.16.54.1 | 255.255.0.0 | 172.16.0.254 | 172.16.1.1 |
| FastEthernet1 | 10.16.54.1 | 255.255.0.0 | 10.16.0.254 | 10.16.1.1 | |
| DC1-R5S5 | FastEthernet | 172.16.55.1 | 255.255.0.0 | 172.16.0.254 | 172.16.1.1 |
| FastEthernet1 | 10.16.55.1 | 255.255.0.0 | 10.16.0.254 | 10.16.1.1 | |
| DC1-R5S6 | FastEthernet | 172.16.56.1 | 255.255.0.0 | 172.16.0.254 | 172.16.1.1 |
| FastEthernet1 | 10.16.56.1 | 255.255.0.0 | 10.16.0.254 | 10.16.1.1 |
d. Using your documentation, configure IP addressing for the servers in Rack_5. Be sure to configure both interfaces. Click the server, and then the Config tab. Configure the default gateway and DNS server in Global Settings. Use the dropdown menu next to Interfaces to switch interfaces. Then click FastEthernet0 under INTERFACES to configure the IP address and subnet mask. Repeat for FastEthernet1.
Note: Due to the limitation of Packet Tracer server simulation, you will be warned about the default gateway addresses and the 2nd DNS address. Click OK to these messages and continue. In addition, only the FastEthernet0 DNS address is graded and only the FastEthernet1 default gateway address is graded.
Step 3: Configure the display name and hostname for the switches in Rack_5.
Note: Make sure your display and host names conform to the standard. Packet Tracer will grade your connections and configuration as incorrect if your display names are incorrect.
a. Click the first switch in Rack_5, and then the Config tab.
b. Set the Display Name to DC1 Rack 5 Switch A and Hostname to DC1R5_SwitchA.

c. Click the second switch in Rack_5, and then the Config tab.
d. Set the Display Name to DC1 Rack 5 Switch B and Hostname to DC1R5_SwitchB.

Step 4: Connect cables for the Rack 5 equipment.
Note: Make sure your connections conform to the pattern established in the other racks. Packet Tracer will grade your connection as incorrect if you connect to the wrong switch port.
a. For each server, connect a copper straight-through cable from the FastEthernet0 port to the correct port on DC1R5_SwitchA and a copper straight-through cable from the FastEthernet1 port to the correct port on DC1R5_SwitchB.
Hint: Complete both connections for DC1-R5S1 before proceeding down the rack.

b. Connect a copper straight-through cable from the FastEthernet0/1 port of DC1 Rack 5 Switch A to the FastEthernet0/23 port of DC1 Master Switch A and from the FastEthernet0/2 port of DC1 Rack 5 Switch A to the FastEthernet0/24 port of DC1 Master Switch A.
Note: After connecting to the Rack_5 switch, use the bottom scroll bar to scroll to the left to connect to the appropriate Rack_0 master switch.

c. Connect a copper straight-through cable from the FastEthernet0/1 port of DC1 Rack 5 Switch B to the FastEthernet0/23 port of DC1 Master Switch B and from the FastEthernet0/2 port of DC1 Rack 5 Switch B to the FastEthernet0/24 port of DC1 Master Switch B.

Step 5: Configure LACP between DC1 Master Switch A and DC1 Rack 5 Switch A.
DC1 Master Switch A:
DC1_MasterSwitchA(config)# interface range f0/23-24
DC1_MasterSwitchA(config-if-range)# switchport mode trunk
DC1_MasterSwitchA(config-if-range)# switchport trunk native vlan 99
DC1_MasterSwitchA(config-if-range)# channel-group 6 mode active
Creating a port-channel interface Port-channel 6

DC1_MasterSwitchA(config-if-range)# no shutdown
DC1 Rack 5 Switch A:
DC1R5_SwitchA(config)# interface range f0/1-2
DC1R5_SwitchA(config-if-range)# switchport mode trunk
DC1R5_SwitchA(config-if-range)# switchport trunk native vlan 99
DC1R5_SwitchA(config-if-range)# channel-group 1 mode passive
Creating a port-channel interface Port-channel 1

DC1R5_SwitchA(config-if-range)# no shutdown
Step 6: Repeat the above to aggregate the appropriate ports between DC1R5_SwitchB and DC1_MasterSwitchB.
DC1 Master Switch B:
DC1_MasterSwitchB(config)# interface range f0/23-24
DC1_MasterSwitchB(config-if-range)# switchport mode trunk
DC1_MasterSwitchB(config-if-range)# switchport trunk native vlan 99
DC1_MasterSwitchB(config-if-range)# channel-group 6 mode active
Creating a port-channel interface Port-channel 6

DC1_MasterSwitchB(config-if-range)# no shutdown
DC1 Rack 5 Switch B:
DC1R5_SwitchB(config)# interface range f0/1-2
DC1R5_SwitchB(config-if-range)# switchport mode trunk
DC1R5_SwitchB(config-if-range)# switchport trunk native vlan 99
DC1R5_SwitchB(config-if-range)# channel-group 1 mode passive
Creating a port-channel interface Port-channel 1

DC1R5_SwitchB(config-if-range)# no shutdown
Step 7: Verify that the ports have been aggregated.
What protocol is Po1 using for link aggregation? Which ports are aggregated to form Po1 on
DC1R5_SwitchB? Record the command used to verify.
Po1 is using LACP and F0/1 and F0/2 are aggregated to form Po1.
DC1R5_SwitchB# show etherchannel summary
Flags:  D – down        P – bundled in port-channel
        I – stand-alone s – suspended
        H – Hot-standby (LACP only)
        R – Layer3      S – Layer2
        U – in use      f – failed to allocate aggregator

        M – not in use, minimum links not met
        u – unsuitable for bundling
        w – waiting to be aggregated
        d – default port


Number of channel-groups in use: 1
Number of aggregators:           1

Group  Port-channel  Protocol    Ports
——+————-+———–+———————————————–
1      Po1(SU)         LACP      Fa0/1(P)    Fa0/2(P)
Reflection Questions
1. What is a data center?
Answers will vary. A data center is a physical facility where corporate computers, network, storage, and other IT equipment that support business operations reside. The computers in a data center contain or facilitate business-critical applications, services, and data. Many organizations have multiple data centers based on geographic and business requirements.
2. What benefits does a data center provide for an organization?
Answers will vary. A data center consolidates IT resources allowing centralized management, optimization, and maximum utilization of resources. It minimizes unnecessary duplication and wasted resources.
3. Why is redundancy important in a data center?
Answers will vary. Redundancy is used to eliminate a single point of failure and maximize data center uptime.
4. What elements of a data center should incorporate redundancy?
Answers will vary. All components in a data center should incorporate redundant design principles. Servers and IT devices should incorporate redundant components such as power supplies, hard disk drives, and memory. Servers and network devices such as switches, network cabling, power feeds, and cooling should also incorporate redundancy. Network technology that incorporates redundancy such as EtherChannel and HSRP should be incorporated whenever possible.
5. What is the importance of EtherChannel in a data center environment?
Answers will vary. EtherChannel allows multiple physical links to be treated as a single channel and treated as a single instance of STP thus combining their bandwidth. It also provides for redundancy so if one link in an EtherChannel bundle fails the others remain active.
Device Configs - Final
DC1 MASTER SWITCH A
! ==============================================================
!--- 9.3.4 Packet Tracer - Data Center Exploration - Physical Mode
!--- ANSWER SCRIPT FOR DC1 MASTER SWITCH A (existing switch - incremental config only)
!--- Usage: from the console (or a Telnet/SSH session, if already reachable) on DC1 Master Switch A, enter privileged EXEC mode with "enable", then paste this whole file. Every line beginning with "!" is a comment; IOS ignores it, so pasting a comment by accident is harmless. This switch already exists with racks 1-4 connected - this script only adds the new Rack 5 uplink.
!--- Group number CONFIRMED via the real running-config: channel-groups 1-5 are already fully in use (F0/13-22, two ports each), F0/23-24 are completely unconfigured, and VLAN 99 is the native VLAN used consistently across every existing Port-channel. Channel-group 6 on F0/23-24 is the correct next assignment.
! ==============================================================

enable
configure terminal

! --------------------------------------------------------------
!--- Step 5/6: Bundle F0/23-24 into a new LACP EtherChannel toward DC1 Rack 5 Switch A
! --------------------------------------------------------------

!--- Trunk first and tag the native VLAN, THEN shut the ports down before handing them to a channel-group - this order avoids EtherChannel Misconfig Guard putting them into err-disabled state (the same precaution used in the earlier EtherChannel labs in this course). "active" actively negotiates LACP; Rack 5 Switch A's own "passive" (its own script) is a compatible pair.
interface range FastEthernet0/23 - 24
 switchport mode trunk
 switchport trunk native vlan 99
 shutdown
 channel-group 6 mode active
 no shutdown

!--- The logical Port-channel interface needs its own settings too, separate from the physical members - confirmed by the real running-config, where Port-channel1 through Port-channel5 all carry both of these same two lines.
interface port-channel 6
 switchport trunk native vlan 99
 switchport mode trunk

end

! --------------------------------------------------------------
!--- Operational habit (not explicitly required by this lab): save to NVRAM. (Press Enter when prompted for the destination filename.)
! --------------------------------------------------------------
copy running-config startup-config

! ==============================================================
!--- Verification:
!---   DC1_MasterSwitchA# show etherchannel summary -> Po6 shows LACP with Fa0/23(P) Fa0/24(P)
! ==============================================================
DC1 MASTER SWITCH B
! ==============================================================
!--- 9.3.4 Packet Tracer - Data Center Exploration - Physical Mode
!--- ANSWER SCRIPT FOR DC1 MASTER SWITCH B (existing switch - incremental config only)
!--- Usage: from the console (or a Telnet/SSH session, if already reachable) on DC1 Master Switch B, enter privileged EXEC mode with "enable", then paste this whole file. Every line beginning with "!" is a comment; IOS ignores it, so pasting a comment by accident is harmless. This switch already exists with racks 1-4 connected - this script only adds the new Rack 5 uplink.
!--- Group number CONFIRMED via the real running-config: channel-groups 1-5 are already fully in use (F0/13-22, two ports each), F0/23-24 are completely unconfigured, and VLAN 99 is the native VLAN used consistently across every existing Port-channel. Channel-group 6 on F0/23-24 is the correct next assignment.
! ==============================================================

enable
configure terminal

! --------------------------------------------------------------
!--- Step 6: Bundle F0/23-24 into a new LACP EtherChannel toward DC1 Rack 5 Switch B
! --------------------------------------------------------------

!--- Same shutdown-before-channel-group precaution as Master Switch A. "active" here, matched by Rack 5 Switch B's "passive" (its own script) - a compatible LACP pair.
interface range FastEthernet0/23 - 24
 switchport mode trunk
 switchport trunk native vlan 99
 shutdown
 channel-group 6 mode active
 no shutdown

interface port-channel 6
 switchport trunk native vlan 99
 switchport mode trunk

end

! --------------------------------------------------------------
!--- Operational habit (not explicitly required by this lab): save to NVRAM. (Press Enter when prompted for the destination filename.)
! --------------------------------------------------------------
copy running-config startup-config

! ==============================================================
!--- Verification:
!---   DC1_MasterSwitchB# show etherchannel summary -> Po6 shows LACP with Fa0/23(P) Fa0/24(P)
! ==============================================================
DC1 RACK 5 SWITCH A
! ==============================================================
!--- 9.3.4 Packet Tracer - Data Center Exploration - Physical Mode
!--- ANSWER SCRIPT FOR DC1 RACK 5 SWITCH A (brand-new switch)
!--- Usage: from the console on this switch, enter privileged EXEC mode with "enable", then paste this whole file. Every line beginning with "!" is a comment; IOS ignores it, so pasting a comment by accident is harmless.
!--- Reminder: the Packet Tracer DISPLAY NAME ("DC1 Rack 5 Switch A") is set separately in the GUI per Step 3 and is NOT the same thing as the IOS hostname below - Packet Tracer grades both, so don't skip the GUI rename.
! ==============================================================

enable
configure terminal

! --------------------------------------------------------------
!--- Step 3: Set the hostname (separate from the Packet Tracer display name set in the GUI)
! --------------------------------------------------------------

hostname DC1R5_SwitchA

! --------------------------------------------------------------
!--- Step 5: Bundle F0/1-2 into a new LACP EtherChannel toward DC1 Master Switch A
! --------------------------------------------------------------

!--- Trunk first and tag the native VLAN, THEN shut the ports down before handing them to a channel-group - avoids EtherChannel Misconfig Guard err-disabling them. "passive" only responds to Master Switch A's "active" (its own script) - a compatible LACP pair.
interface range FastEthernet0/1 - 2
 switchport mode trunk
 switchport trunk native vlan 99
 shutdown
 channel-group 1 mode passive
 no shutdown

!--- The logical Port-channel interface needs its own settings too, separate from the physical members - confirmed by Master Switch A's real running-config, where every existing Port-channel carries both of these same two lines.
interface port-channel 1
 switchport trunk native vlan 99
 switchport mode trunk

end

! --------------------------------------------------------------
!--- Operational habit (not explicitly required by this lab): save to NVRAM. (Press Enter when prompted for the destination filename.)
! --------------------------------------------------------------
copy running-config startup-config

! ==============================================================
!--- Verification:
!---   DC1R5_SwitchA# show etherchannel summary -> Po1 shows LACP (not PAgP - see the discrepancy note in chat) with Fa0/1(P) Fa0/2(P)
! ==============================================================
DC1 RACK 5 SWITCH B
! ==============================================================
!--- 9.3.4 Packet Tracer - Data Center Exploration - Physical Mode
!--- ANSWER SCRIPT FOR DC1 RACK 5 SWITCH B (brand-new switch)
!--- Usage: from the console on this switch, enter privileged EXEC mode with "enable", then paste this whole file. Every line beginning with "!" is a comment; IOS ignores it, so pasting a comment by accident is harmless.
!--- Reminder: the Packet Tracer DISPLAY NAME ("DC1 Rack 5 Switch B") is set separately in the GUI per Step 3 and is NOT the same thing as the IOS hostname below - Packet Tracer grades both, so don't skip the GUI rename.
! ==============================================================

enable
configure terminal

! --------------------------------------------------------------
!--- Step 3: Set the hostname (separate from the Packet Tracer display name set in the GUI)
! --------------------------------------------------------------

hostname DC1R5_SwitchB

! --------------------------------------------------------------
!--- Step 6: Bundle F0/1-2 into a new LACP EtherChannel toward DC1 Master Switch B
! --------------------------------------------------------------

!--- Same shutdown-before-channel-group precaution as Switch A. "passive" only responds to Master Switch B's "active" (its own script) - a compatible LACP pair.
interface range FastEthernet0/1 - 2
 switchport mode trunk
 switchport trunk native vlan 99
 shutdown
 channel-group 1 mode passive
 no shutdown

interface port-channel 1
 switchport trunk native vlan 99
 switchport mode trunk

end

! --------------------------------------------------------------
!--- Operational habit (not explicitly required by this lab): save to NVRAM. (Press Enter when prompted for the destination filename.)
! --------------------------------------------------------------
copy running-config startup-config

! ==============================================================
!--- Verification:
!---   DC1R5_SwitchB# show etherchannel summary -> Po1 shows LACP (not PAgP - see the discrepancy note in chat) with Fa0/1(P) Fa0/2(P)
! ==============================================================


