13.3.3.6 Lab – Configure Users and Groups in Windows
Instructor Note: Red font color or gray highlights indicate text that appears in the Instructor copy only.
Introduction
In this lab, you will create users and groups and delete users using the Local Users and Groups Manager. You will also assign group and user permission to folders.
Recommended Equipment
- A computer with Windows installed
Instructions
Part 1: Create New Users
New users can be created individually or you can create a list of new users and groups with the Local Users and Groups Manager.
Step 1: Access Local Users and Groups Manager.
In this step, log on the computer using an account with administrative privileges provided by the instructor. In this lab, the initial user ITEUser is used and Studentxx and Staffxx accounts will be created.
a. Click Control Panel > in the small icons view, click Administrative Tools > click Computer Management. Click Local Users and Groups.
b. In the Local Users and Groups Manager, select the Users folder.
Question:
What are the names of the accounts listed?
Answers will vary. The Administrator and Guest accounts are included in all the answers.
c. Select the Groups folder. Name five groups from the list.
Answers will vary. Some of the Groups in the list are: Administrators, Backup Operators, Guests, Power Users, and Users.
d. Click the Users folder. Right-click your account and select Properties. Click the Member Of tab.
Question:
Which group does your account belong to?
Answers will vary. The account should be a member of the Administrators Group because the user is logged into an account with administrative privileges.
e. Click OK to close the Properties window.
Step 2: Create new users.
In this step, you will create a few more local users using the Local Users and Groups Manager.
a. In the Local Users and Groups window with the Users folder selected, click Action > New User.
b. In the New User window, enter Student01 as a new user name and cisco12345 as the password. If desired, provide a full name and description for the user. Click Create.
Question:
What is Student01 required to do when logging in the first time?
Change password.
c. Create users Student02, Staff01, and Staff02 or a list of user names provided by the instructor. Use cisco12345 as the password for these users. Unselect User must change password at next logon for each user. Click Close when finished creating all the users.

d. Double-click Student01. Unselect the User must change password at next logon.
Question:
What group does User01 belong to?
Users.
e. Click OK.
f. Click the Groups folder. Double-click the Users group.
From the description, can the members of the Users group make system wide changes? What can the Users group do on the computer?
Who are the group members?
The members of the Users group cannot make system wide changes, but they can run most applications on the local computer.
g. Click OK to continue.
Step 3: Verify user and group permissions.
The permission for the Users group allows the members to run most applications on the local computer. The group member inherited the permission when they joined the group during the creation of the account. These members cannot make any system-wide changes. In this step, you will try to create another new user as a member of the Users group and use Internet Explorer to navigate to www.cisco.com.
a. Log off the computer.
b. Log on as any member of the Users group.
c. Navigate to the Local Users and Groups Manager. Click Users.
d. Create a new user account using the name Test and password cisco12345.
Question:
Were you successful in creating the new account? Explain.
Access is denied. As a member of the Users group, you cannot create a new user account because the creation of user account affects the entire computer.
e. Navigate to www.cisco.com using a web browser.
Question:
Were you able to navigate to www.cisco.com? Explain.
Yes. You can run most applications as allowed by the permissions for a member of the Users group.
Part 2: Create New Groups
In this part, you will create new groups named ITEStudent and ITEStaff and add members to the group. You will also create folders and assign permissions.
Step 1: Create new groups.
a. Log off the computer. Log on to the computer using an account with administrative privileges. In this example, the account ITEUser has administrative privileges.
b. Navigate to the Local Users and Groups Manager.
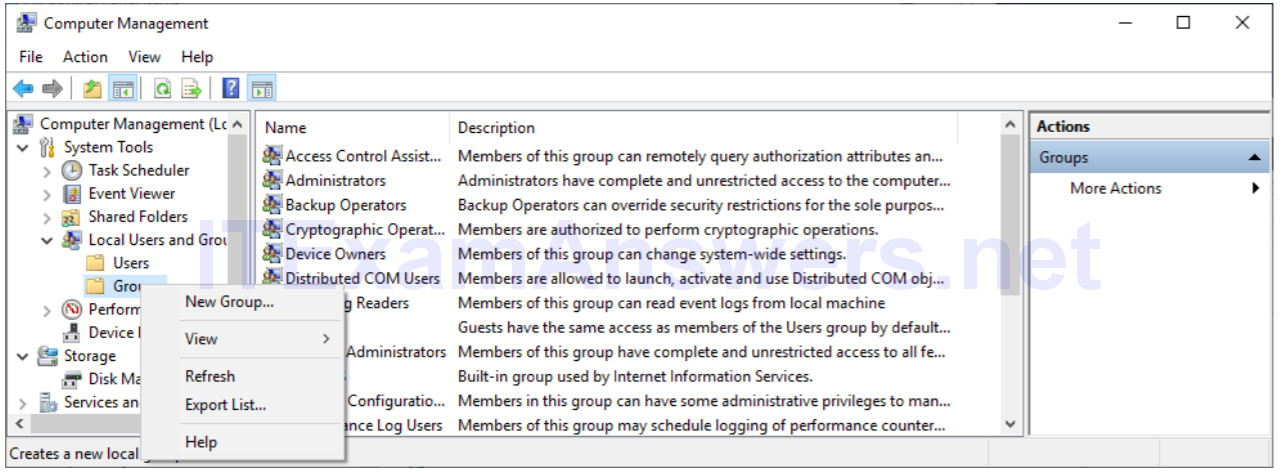
c. Right-click the Groups folder and select New Group.

d. Enter ITEStaff as the group name. Click Add to add users to this group.
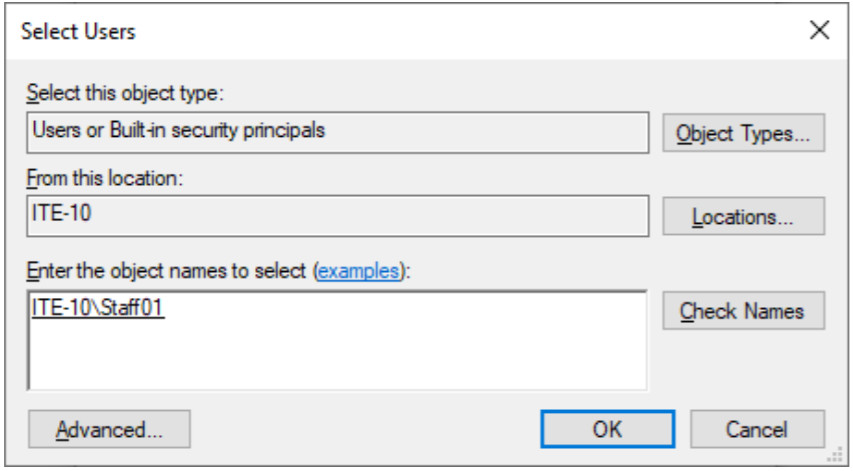
e. In the Select Users window, enter Staff01 under the heading Enter the object names to select. Click Check Names to verify the object was entered correctly. Click OK to add Staff01 to the group ITEStaff. Repeat this procedure to add Staff02 to the group ITEStaff.

f. Click Create to complete the group creation process.
g. Repeat the same procedure to add users Student01 and Student02 to the group ITEStudent. Click Create. Click Close when finished with new group creation.
h. Click Users and double-click each of the four users and verify they are members of the correct groups by clicking the Member Of tab. Click Cancel to close each user after verification.
Step 2: Assign group permissions to folders.
a. Create folders named Staff and Students in the C:\ drive.
b. Select and then right-click the Students folder and select Properties.
c. Select the Security tab. Click Edit to change the permission for this folder.
d. Click Add to add group permission to this folder.
e. In the Select Users or Groups window, enter ITEStaff under the heading Enter the object names to select. Click Check Names for verification. Click OK to continue.
Question:
With the group ITEStaff highlighted, what can the members do in this folder?
The members of the ITEStaff group have read & execute, list folder contents, and read permissions.
f. Repeat the same procedure to add permissions for the group ITEStudent. In addition, the members of this group should have full control of this folder.
Question:
Which additional checkbox would you select?
You would select the Full Control checkbox.
g. Click OK to continue. Click OK to close the Properties window.
h. Select the Staff folder. Right-click the folder and select Properties.
i. Click the Security tab to add group permission as follows:
- Allow the group ITEStaff Full control.
- Deny Full control for the group ITEStudent
j. Click OK. Click Yes when prompted to deny permission to a group.
k. Click OK to close the Properties window.
Part 3: Modify User and Group Permissions
In this part, you will verify the results of the group permission on the folders Staff and Students. You will also modify user and group permissions.
Step 1: Verify and modify folder permissions.
a. Log off the computer. Log on the computer as Student02.
b. Navigate to the folder C:\Students. Create a folder named Student02 and create a text document in the folder.
Question:
Were you successful? Explain.
Yes. As a user in the group ITEStudent, Student02 has full control in this folder.
c. Navigate to the folder C:\Staff. Create a folder named Student02 and place a text file in the folder.
Question:
Were you successful? Explain.
No. As a user in the group ITEStudent, Student02 has no permission to access this folder. A user with administrative privilege needs to grant you access to this folder.
d. Now log off the computer and log on as Student01.
e. Navigate to C:\. Can you place a text file in the Staff folder? Can you modify the text file in folder Student02? Explain. (Note: A reboot may be necessary for Windows 8.1 to enable the change in file and folder permission.)
No and Yes. As a user in the group ITEStudent, Student01 has no access to the Staff folder, but the user has full control in the Students folder, including files and folders created by other group members.
f. Create a new folder named Student01 in the folder C:\Students and create a text document in the folder.
g. To prevent the user Student02 and other ITEStudent group members from modifying this folder and its content, right-click the folder Student01 and select Properties.
h. In the Security tab, click Edit.
i. Add the user Student01 with Full control permission to this folder. Select Full Control under the Allow column.
j. Select the group ITEStudent. Select the Modify checkbox under the Deny column to prevent other ITEStudent group members from modifying this folder and its content. Click OK. Click Yes in the Windows Security window when prompted. Click OK to close the Properties window.
k. Log off the computer and log on as Student02.
l. Navigate to the folder C:\Students.
Question:
Are you able to access the content in the Student01 and Student02 folders? Explain.
No and Yes. As a user in the group ITEStudent, Student02 still has access to Student02 folder, but there is no access to Student01 folder.
m. Log off the computer and logon as Staff01.
n. Navigate to the folder C:\.
Question:
Were you able to access the content in the folders Staff, Student\Student01 and Student\Student02?
Yes. As a user in the group ITEStaff, Staff01 has all the content in C:\Staff and C:\Student. The group permission did not deny write access to the Student’s folders.
Step 2: Disable a user account.
At this time, the user account Staff02 is not being used. In this step, you will disable this account.
a. Log off the computer and log on as ITEUser or an account with administrative privileges.
b. Navigate to the Local Users and Groups Manager.
c. Select the Users folder. Double-click Staff02.
d. Check Account is disabled.
e. Click OK to continue.
f. Log off the computer.
Question:
Can you log on as Staff02? Explain.
No. Because the account has been disabled, Staff02 is not listed and you are unable to log on as Staff02.
Step 3: Clean up.
In this step, you will delete the users, groups, files, and folders created in this lab.
a. Log on using an account with administrative privileges.
b. Navigate to C:\ and delete the folders Staff and Student.
c. Navigate to the Local Users and Groups Manager.
d. Select Users.
e. Right-click Staff01 and select Delete. Click Yes to confirm the user deletion. Repeat this for Staff02, Student01, and Student02.
f. Select Groups.
g. Right-click ITEStaff and select Delete. Click Yes to confirm the group deletion. Repeat this for ITEStudent.
Reflection Questions
1. How would you give administrative privileges on the local computer to all the members of ITEStaff?
The members of the group ITEStaff inherits local administrative privileges when it is added to the built-in group Administrator. To change group permission, navigate to Control Panel > Administrative Tools > Computer Management > Local Users and Groups > right-click Add to Group. Click Add to add ITEStaff to the group Administrator.
2. How would you deny access to a file for everyone except the owner?
In the file properties window, give full control to the owner and explicitly deny all access to other groups and users.
