8.1.3.9 Lab – Share Resources in Windows (Answers)
Introduction
In this lab, you will create and share a folder, set permissions for the shares, create a Homegroup and a Workgroup to share resources, and map a network drive.
Due to Windows Vista lack of Homegroup support, networks running Windows Vista or earlier must be configured as a Workgroup before resources can be easily shared. When working with Windows 7 or later, Homegroup is recommended.
In Part 1 of this lab, you will configure the computers to share resources by verifying that the computer that is sharing the resources is in the Home or Private network.
Part 2 of this lab focuses on Windows 7 and 8; you will create and share a folder, set permission for the shared folder, create a Homegroup and map a network drive. Part 3 of this lab focuses on Workgroup using Windows Vista or later.
Note: The steps for sharing a folder, setting permissions for the shared folders and mapping network drives are similar for Windows 7 and Vista; they will be only be shown for Windows 7, as a result of this similarity.
Recommended Equipment
- 2 or more computers running Windows Vista, 7 or 8 that are connected to each, either directly or through a switch.
To better identify which steps are performed on which computer, the lab will refer to them as computer01, computer02, or both. Switch to the other computer only when directed to do so within the instructions.
Two users were created for this lab: User1 was created on computer01, and User2 was created on computer02.
Answers Note: You will need to provide a unique Workgroup name to each set of computers for Part 3. Example Group#, where # is 1, 2, etc.
Part 1: Setting up Windows for Sharing
In this part, you will set up Windows computer for sharing. In order for the computer to share its resources using the default sharing setting provided by Windows, the network settings need to be set to private network.
Step 1: Set up Windows 8.1 for sharing.
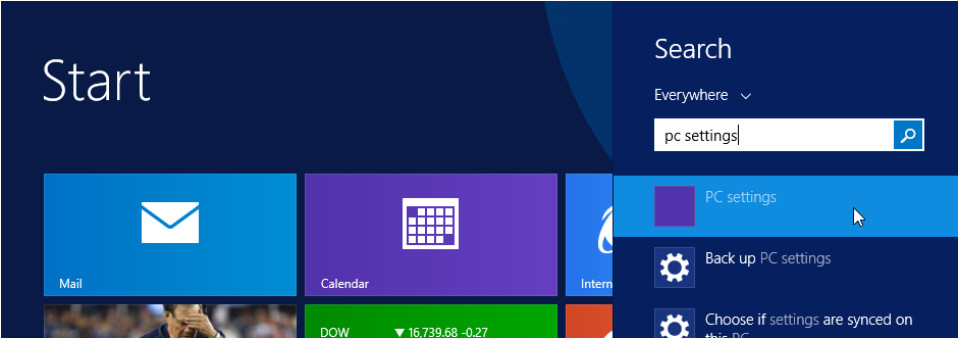
a. Before you can share files and folders in Windows 8.1, set the network connection to Private. On computer01, follow the path:
Start Screen > type pc settings > click PC Settings
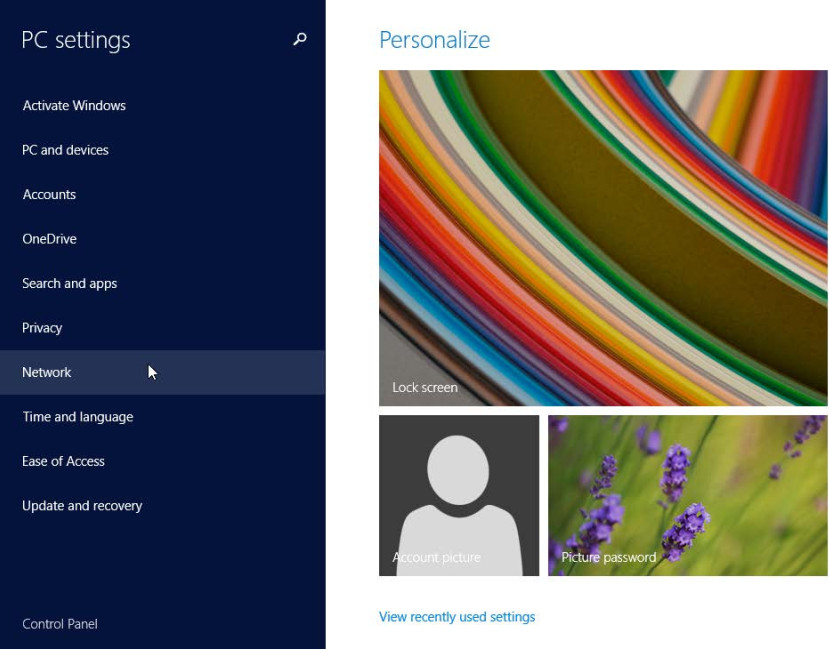
b. The PC Settings window opens. Select Network.
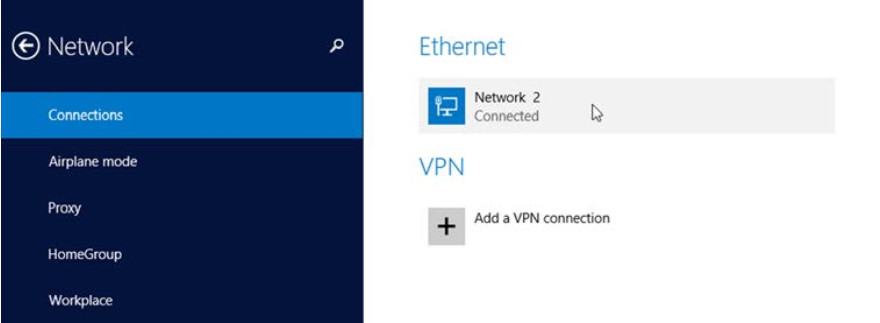
c. The Network window opens. Select Connections > the network connection you want to change.
d. Under Find devices and content, turn the Find PCs, devices and content on this network… switch to On.

e. To confirm the chosen network connection is now set to Private, open the Network and Sharing Center by following the path:
Control Panel > Network and Sharing Center
The network should now be listed as Private.
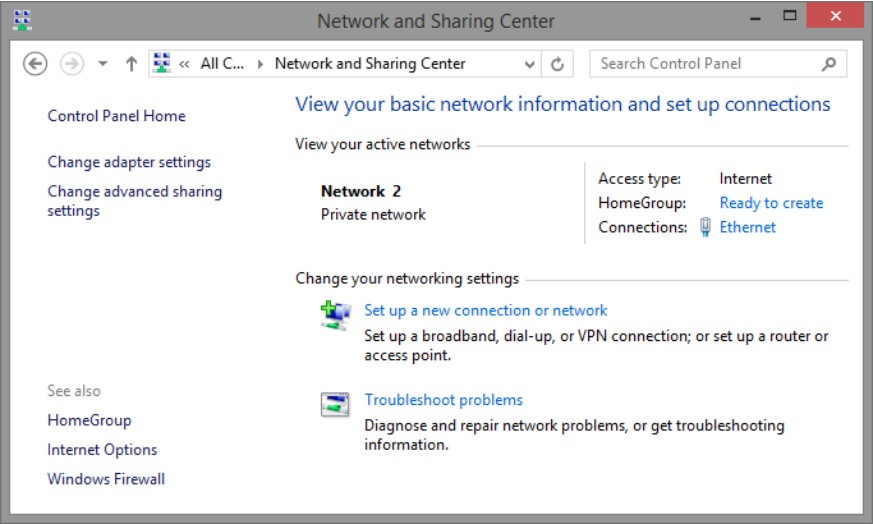
Now that the network connection setting is set to Private network, you should be able to share resources with other Windows computers in the same private network.
Step 2: Set up Windows 8.0 for sharing.
a. For Windows 8, click the network icon ![]() in the bottom right of the desktop. The Networks side bar opens.
in the bottom right of the desktop. The Networks side bar opens.
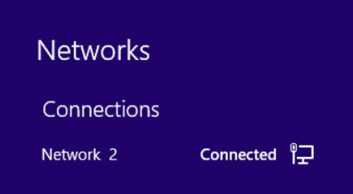
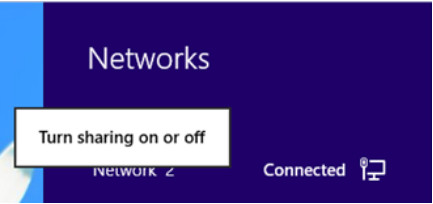
b. Right-click the desired network name and click Turn sharing on or off.
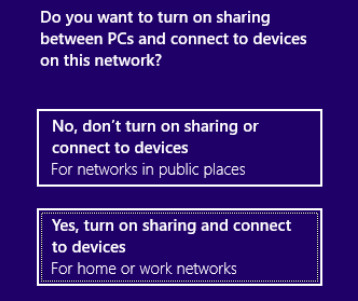
c. Click Yes, turn on sharing and connect to devices to turn on sharing.
d. Navigate to the Control Panel > Network and Sharing Center > Verify that you are in private network.
Step 3: Change the network type to Home Network in Windows 7.
a. On computer01, click Start > Control Panel > Network and Sharing Center > Click Public network, Work network or Home network.
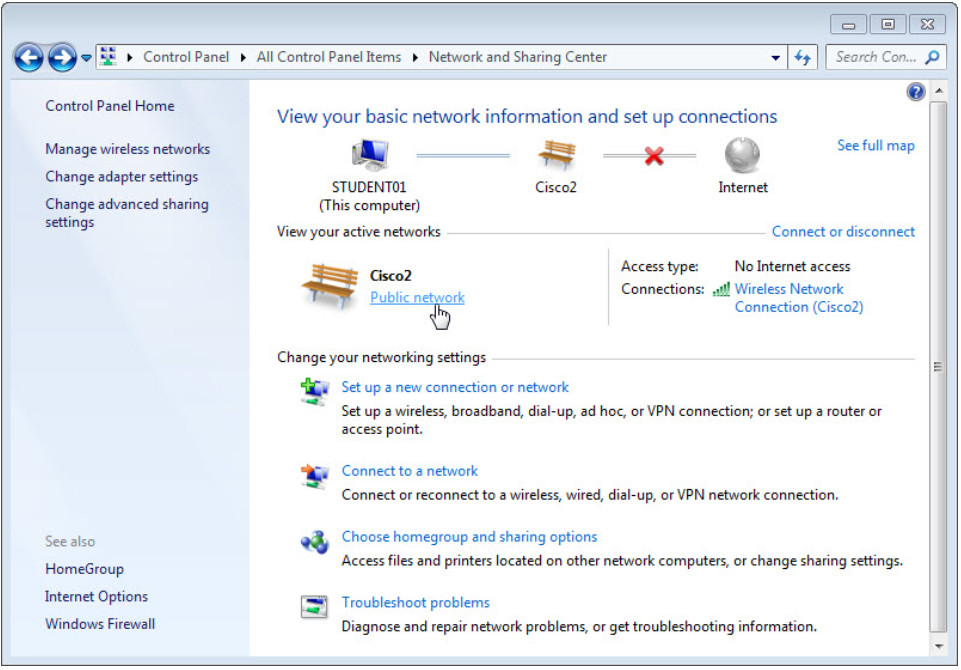
b. The Set Network Location window opens. Click Home network. If it is already set to Home network, click Cancel to continue.
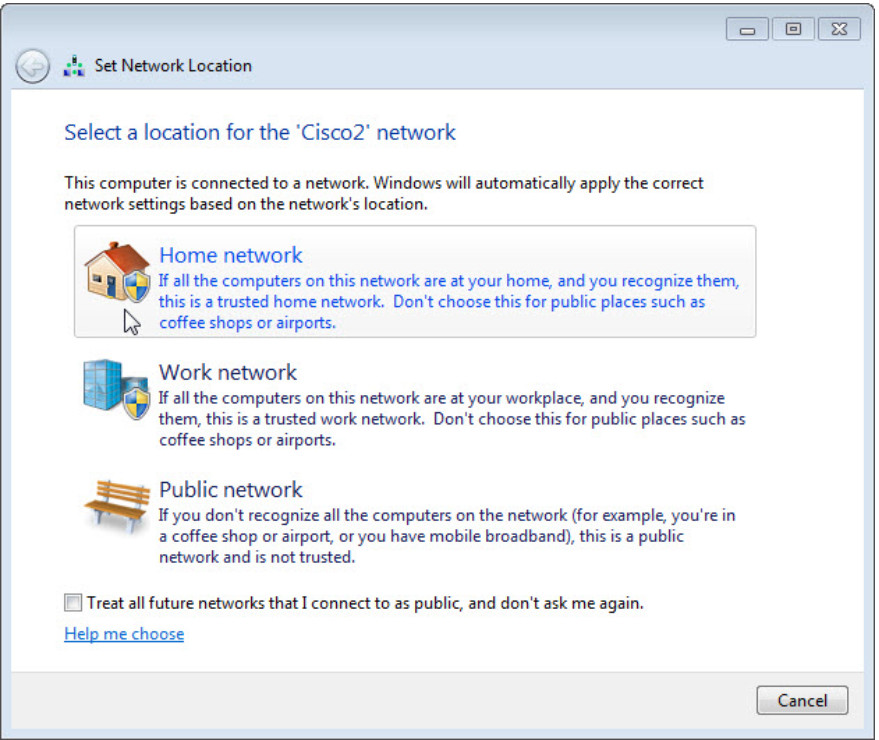
c. Click Close. Verify that the network location is set to Home network.
d. If the Create a Homegroup window displays, click Cancel for now. A homegroup will be created later in the lab.
Step 4: Change the network type to private network in Windows Vista.
a. On the Windows Vista computer, click Start > Control Panel > Network and Sharing Center.
b. Click Customize to set network settings.
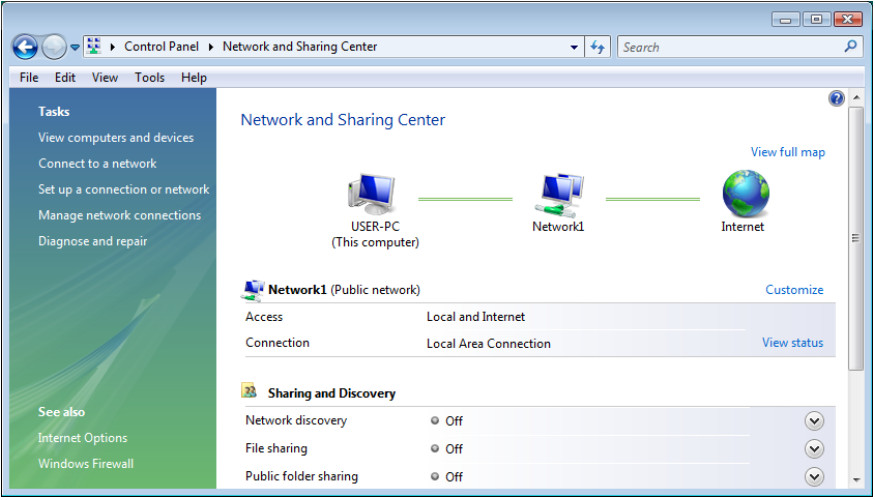
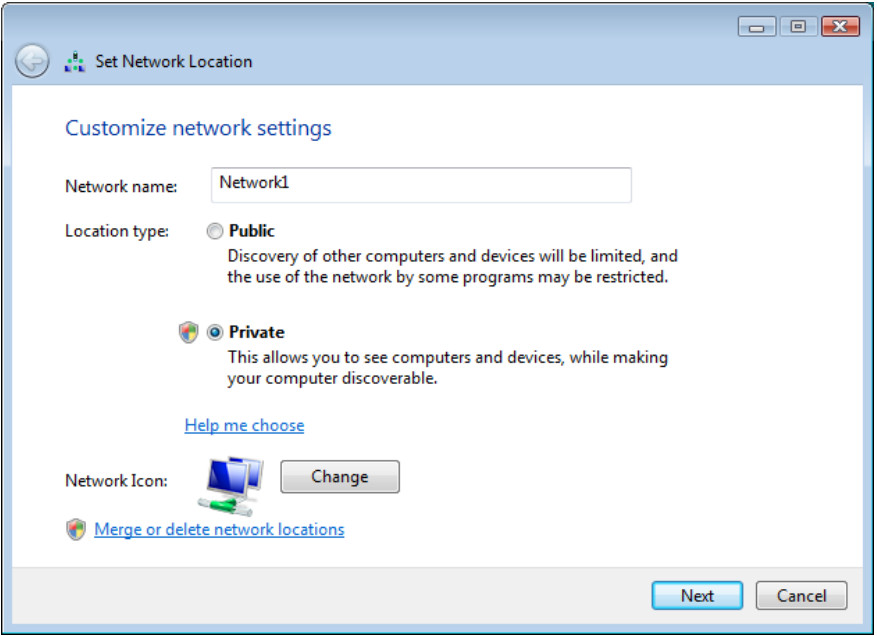
c. Click Private to allow network discovery. Click Next. Click OK and click Close.
Part 2: Sharing Resources in Windows 7 and 8
Step 1: Prepare to share a folder in Windows.
a. On computer01, click Start > Control Panel > Folder Options.
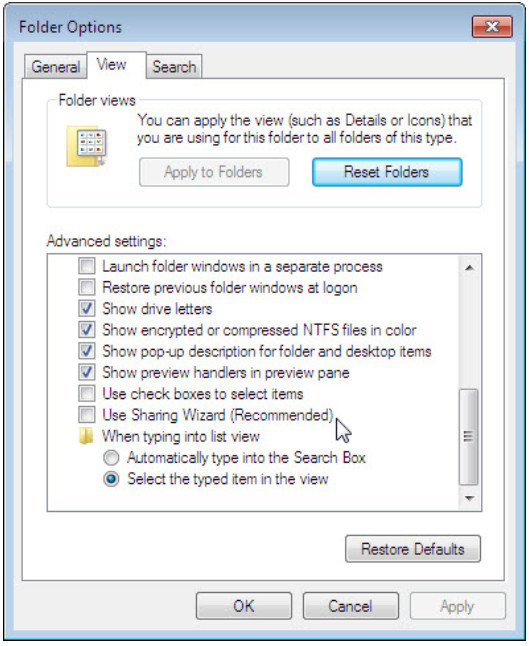
b. Click the View tab. Uncheck the Use Sharing Wizard (Recommended) checkbox, and then click OK.
Step 2: Create the Folder to be Shared.
a. On computer01, right-click any empty area on the Desktop, and then choose New > Folder.
b. Name the folder Example.
c. Open Notepad and type This is an example document.
d. Save the file in the Example folder with the name Brief, and then close Notepad.
Step 3: Share the Folder.
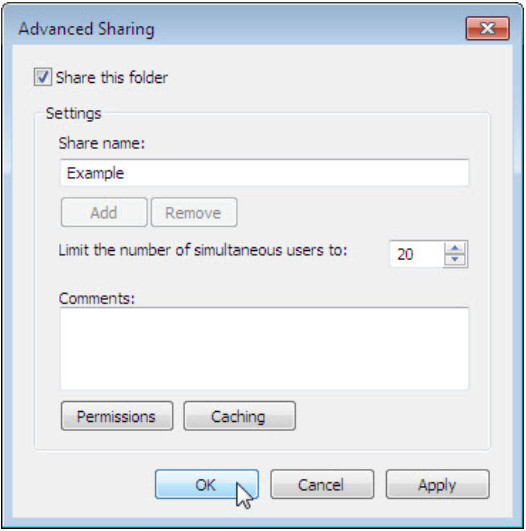
a. On computer01, right-click the Example folder, and then choose Properties > select the Sharing Tab > click Advanced Sharing.
b. Select the Share this folder checkbox, and then click OK. Click Close to close the Example Properties window.
c. On the computer with the shared folder, click Start > Control Panel > System.
What is the name of the computer?
computer01. Answers may vary.
Step 4: Access a Shared Folder on a Remote Computer.
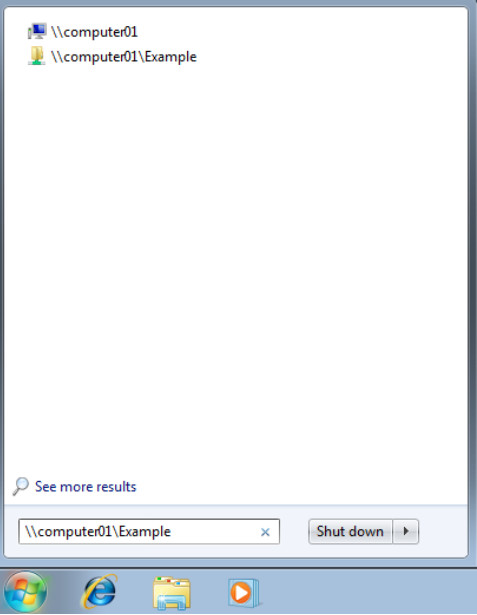
a. On computer02, choose Start > Search programs and files. Type \\computer01\Example. Notice that computer01 is the name of the computer with the Example folder, and then press Enter. In windows 8, navigate to the Start screen, and type \\computer01\Example and press Enter.
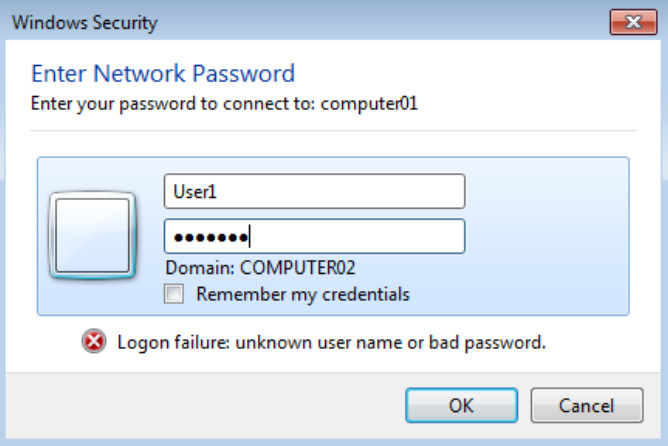
Due to security, it may be necessary to enter a username and password before computer01\Example can be accessed from computer02. If this happens, make sure to enter the username and password for computer01, the computer that is sharing the resource. In the example window below, the username User1, a user created only in computer01, was used to gain access to the resources shared by computer01.
When you have successfully accessed the resource shared by computer01, the content in the folder Example is displayed.
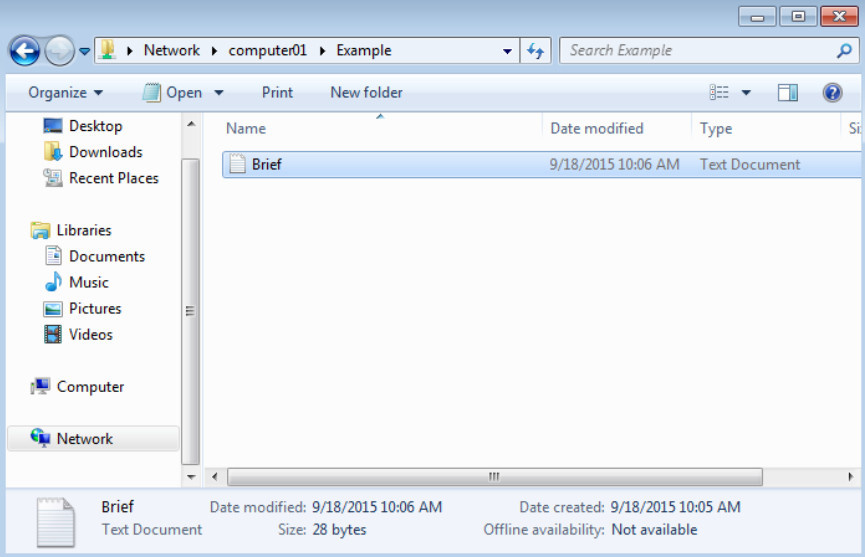
Can you open the Brief file?
Yes
Can you delete the Brief file? What happens?
No. The Access is denied window opens.
b. Click Cancel.
Step 5: Change the permissions of a shared folder.
a. Return to computer01, the computer with the shared folder.
b. Right-click the Example folder, and then choose Properties > select the Sharing tab > click Advanced Sharing > click Permissions.
What are the default permissions?
Everyone has Read permissions.
What needs to be changed to allow any remote users to make changes in the Example folder?
Everyone should also have Change and Full Control permissions.
c. Allow Everyone to change the contents of the Example folder by checking the box on the Allow column and Change row. Click OK to close the Permissions window. Click OK to close the Advanced Sharing window. Click Close to Example Properties window.
d. Go back to computer02 and open the Example folder again by following the path:
e. Start Screen > type \\computer01\Example > press Enter.
Can you open the Brief file?
Yes
Can you delete the Brief file? What happens?
Yes. Access is granted this time.
f. Close all open windows on both computer01 and computer02.
g. Go back to computer01 and delete the shared folder.
Step 6: Map a Network Drive.
a. On computer02, open Windows Explorer or File Explorer in Windows 8 by clicking the Folder icon ![]() in the Taskbar.
in the Taskbar.
b. In the Windows Explorer window or File Explorer window in Windows 8, right-click Network > select Map network drive.
c. Set the Drive to “S” and then click Browse…
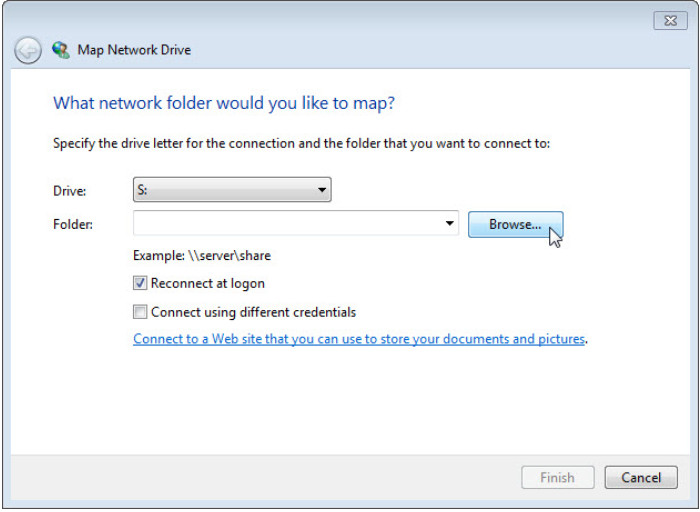
d. When the window is populated, expand the other computer and select User1 > OK.
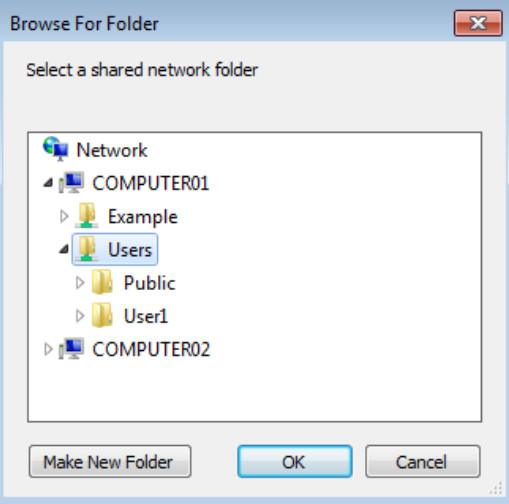
Note: If the window is not populated, make sure Network Discovery is turned on. To turn on Network Discovery, go to Control Panel > Network and Sharing Center > Change advanced sharing settings > select Turn on Network Discovery in the current profile.
e. The What network folder would you like to map? screen opens. Click Finish.
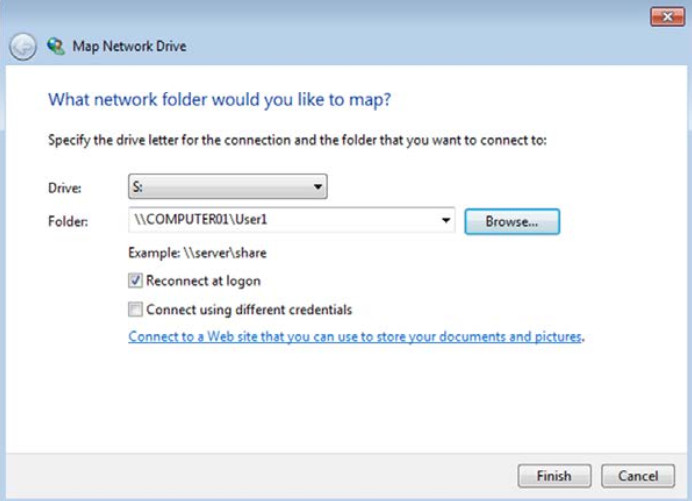
f. Close all open windows.
g. Click Start > Computer in Windows 7 and 8.0.
Note: Click Start > This PC in Windows 8.1.
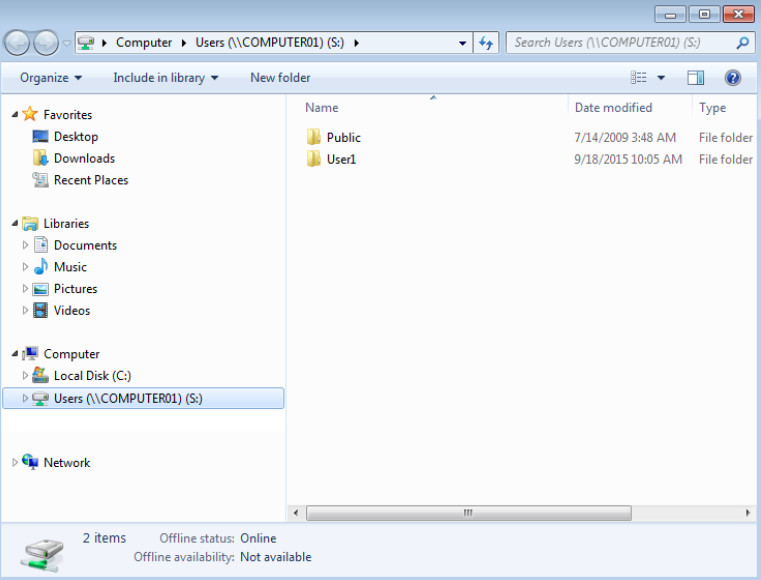
Which Network Location drive do you see?
Answer may vary but locations on computer01 should be visible.
Step 7: Create a Homegroup.
In this step, a Homegroup is created if there is no homegroup available on the network.
a. On computer01, click Start > Control Panel > HomeGroup. Click Create a homegroup.
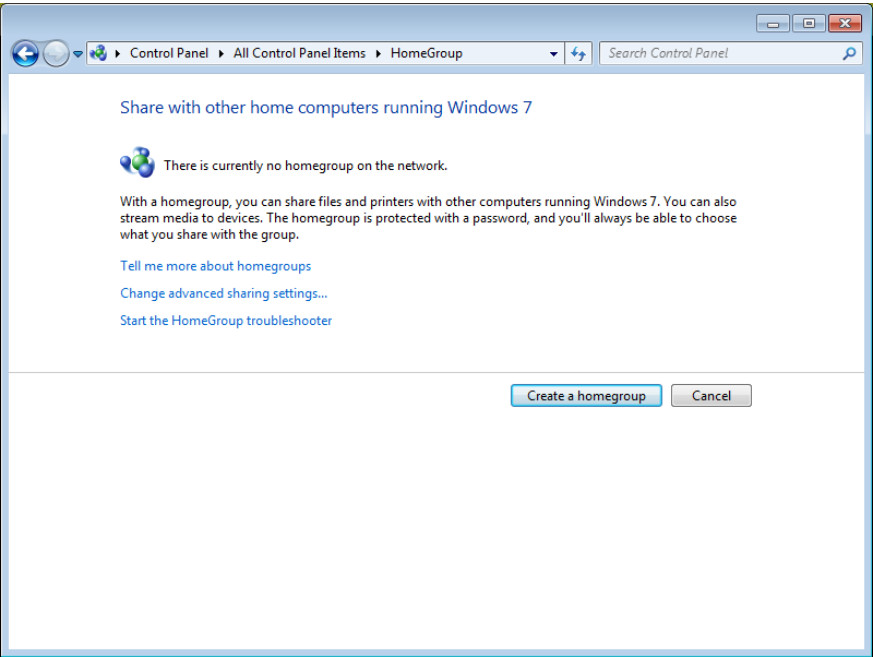
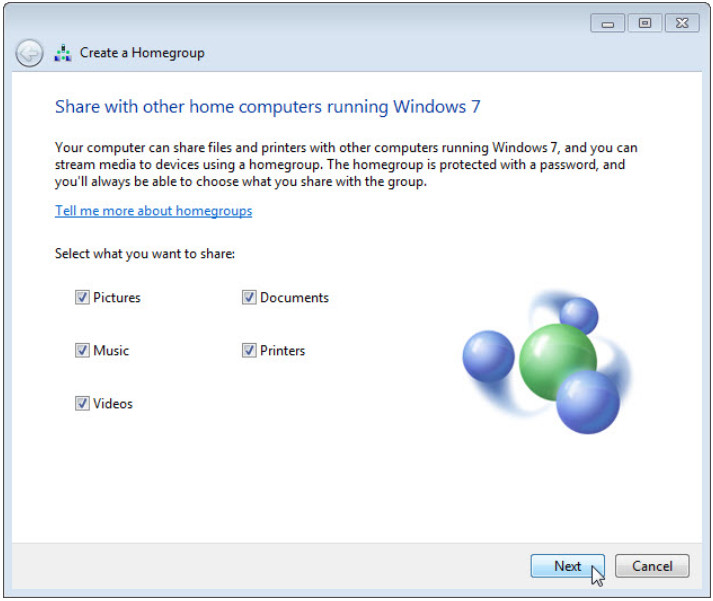
b. Make sure Documents is checked, and then click Next.
c. Record the Homegroup password. Notice it is case sensitive.
Passwords will vary.
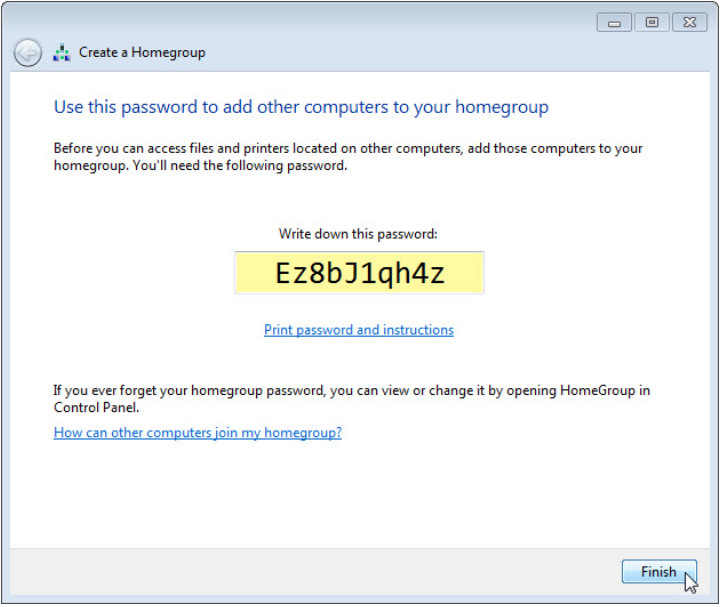
d. Click Finish.
Step 8: Verify the availaibility of a Homegroup.
a. On computer02, click Start > Control Panel > HomeGroup.
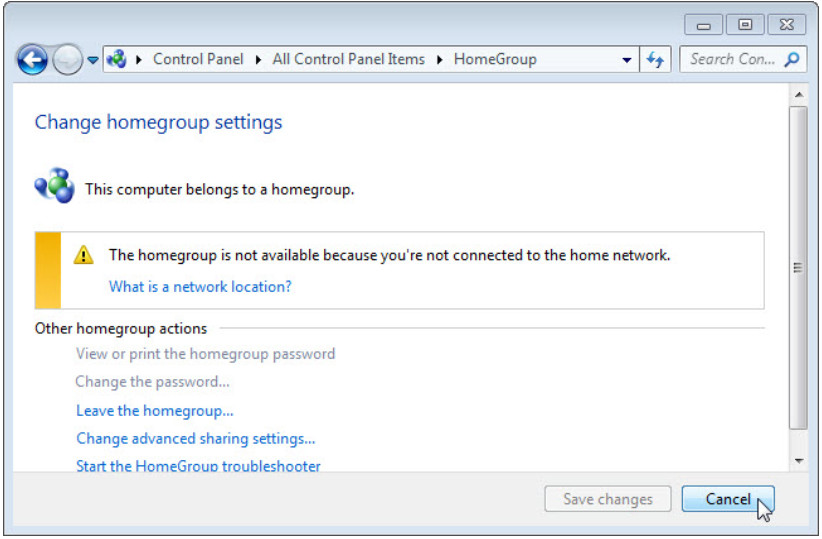
Why is Homegroup not available?
The computer is not connected to the home network.
If a Homegroup is not available, click What is a network location? to change your Network Type in Windows 7 in the Change homegroup settings. Select Home network. Click Close.
In Windows 8.0, click Change network location to change the Network Type in the Change homegroup settings. Click Yes, turn on sharing and connect to devices.
In Windows 8.1, click Change network location to change the Network Type in the Change homegroup settings. Click Yes.
Step 9: Join the Homegroup.
a. On computer02, click Start > Control Panel > HomeGroup. Click Join now. Click Next again for Windows 8.
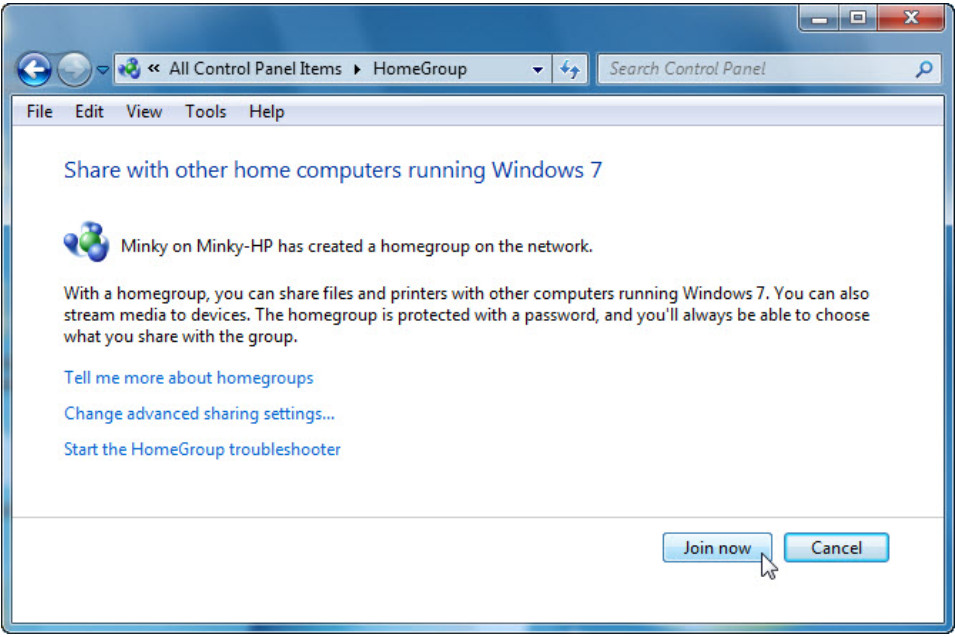
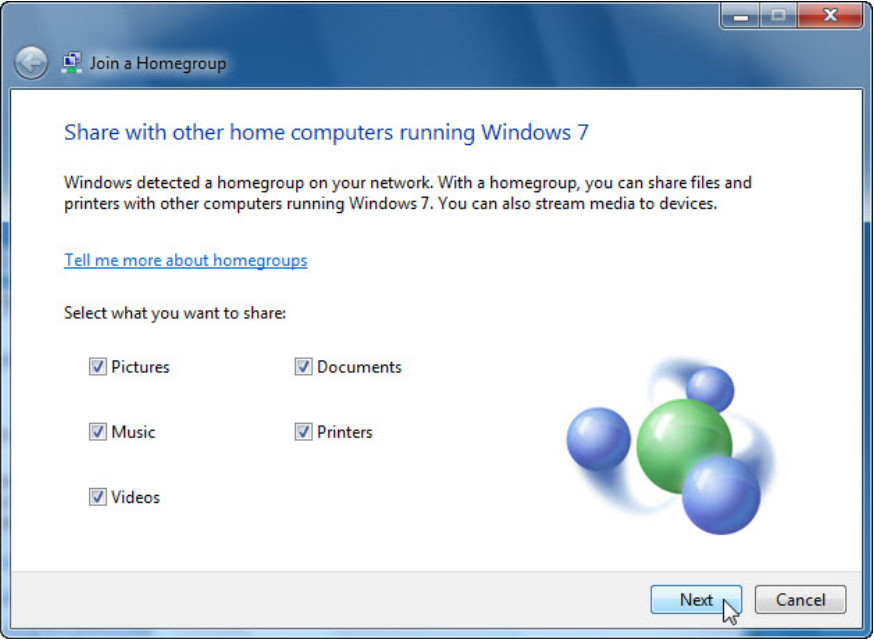
b. Make sure Documents is checked or the permission is set to Shared, and then click Next.
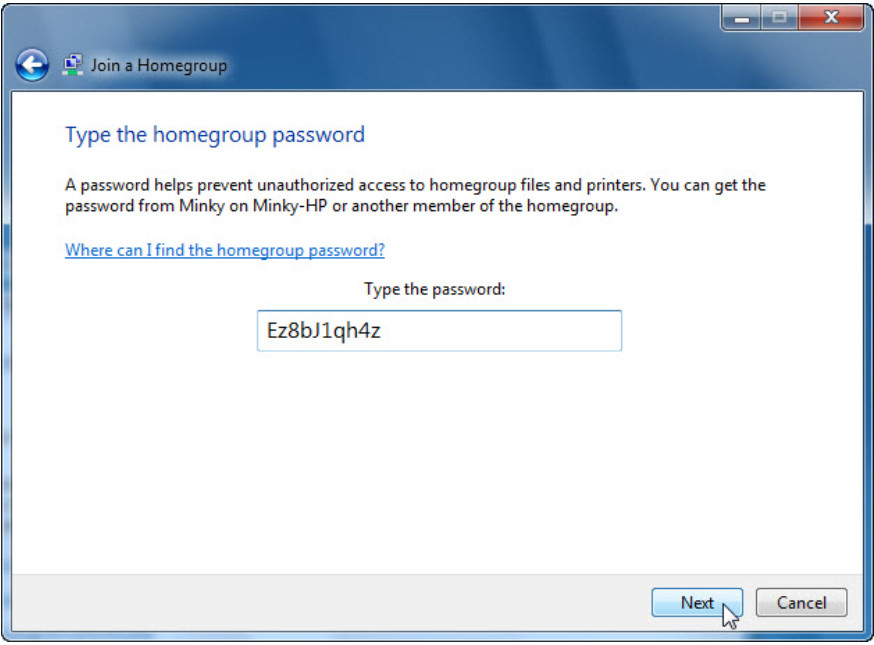
c. Enter the password you recorded when the Homegroup was created and click Next.
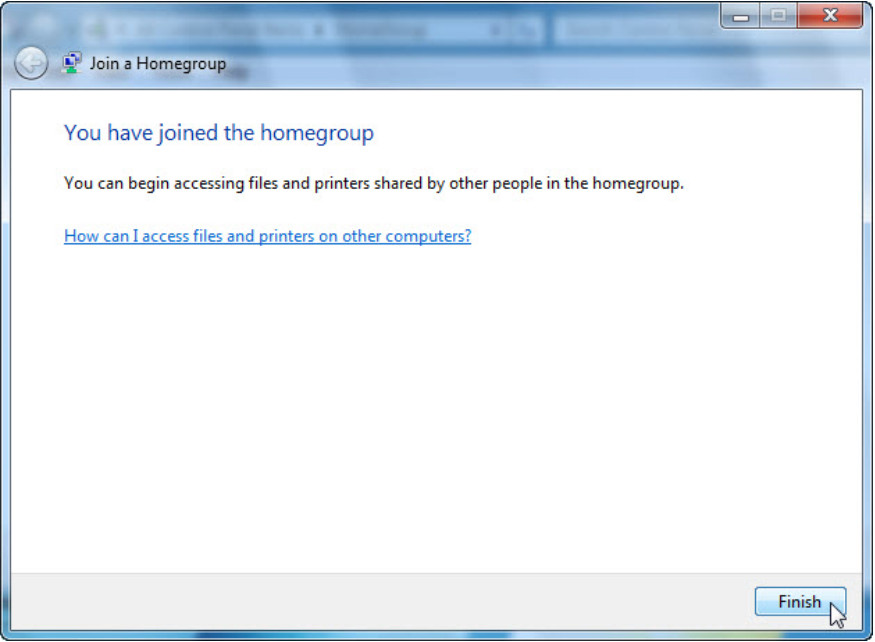
d. Click Finish.
Step 10: Create Folders and Files to be shared within a Homegroup.
a. On both computers, click Start > Documents.
b. On computer01, create a folder, in Document library, called Computer01.
c. On computer02, create a folder, in Document library, called Computer02.
Note: For Windows 8.1, create folders in This PC > Documents, called Computer01 and Computer02.
d. For both computers, open Notepad and type the following text: “This file is shared in a homegroup”. Next, save the file as MyFile1 in the folder you just created on computer01 and MyFile2 in the folder you just created on computer02.
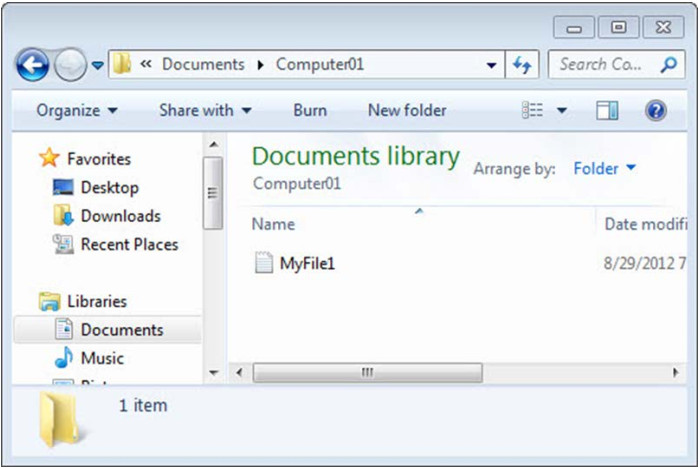
e. Close all open windows.
Step 11: Add Homegroup and Network Shortcuts to Start Menu For Windows 7.
On both computers, complete the following if it is not already configured on the computer.
a. Right-click Start > Properties > Start Menu tab > Customize.
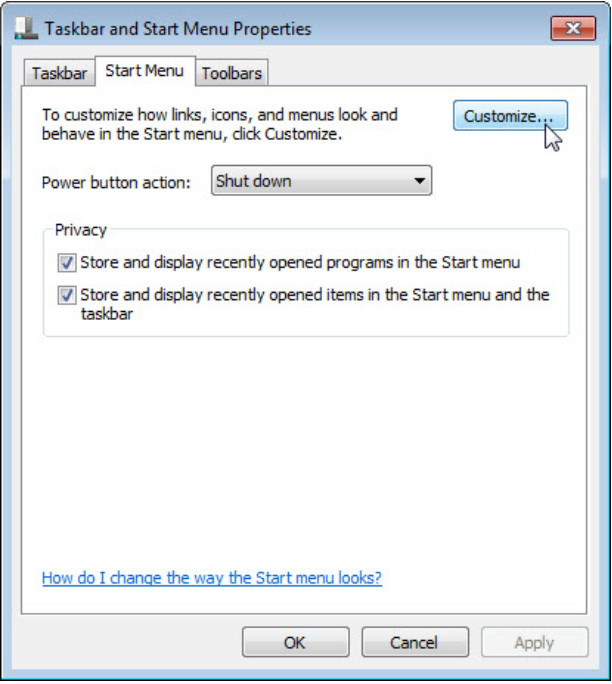
b. Scroll down until you see both the Homegroup and Network items.
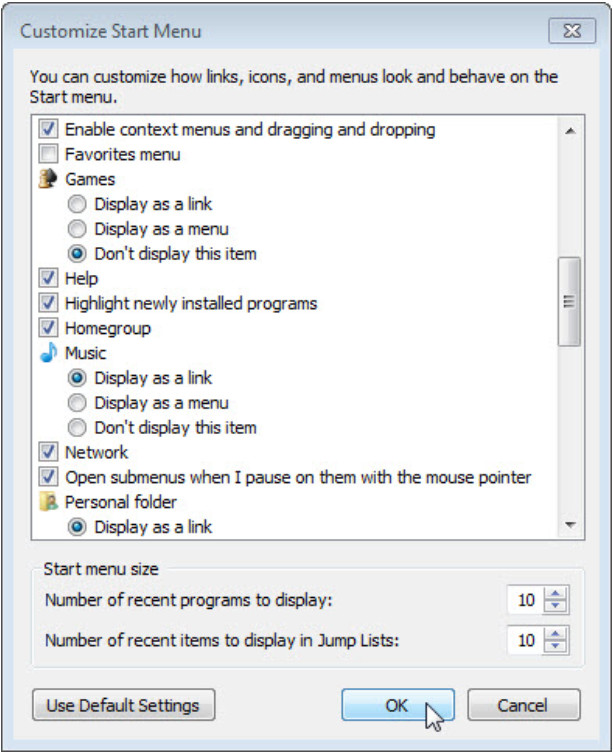
c. Check both Homegroup and Network, if this is not already done, and then click OK > OK.
Step 12: Access Resources via Homegroup.
a. On computer02, click Start then the Homegroup icon in the start menu.
Locate the Homegroup icon, click the expand arrow next to the other computer name, click Documents, and then double-click Computer01.
In Windows 8, open File Explorer and locate Homegroup in the left panel.
You should be able to read the file, but can you delete the file located on the other computer?
No
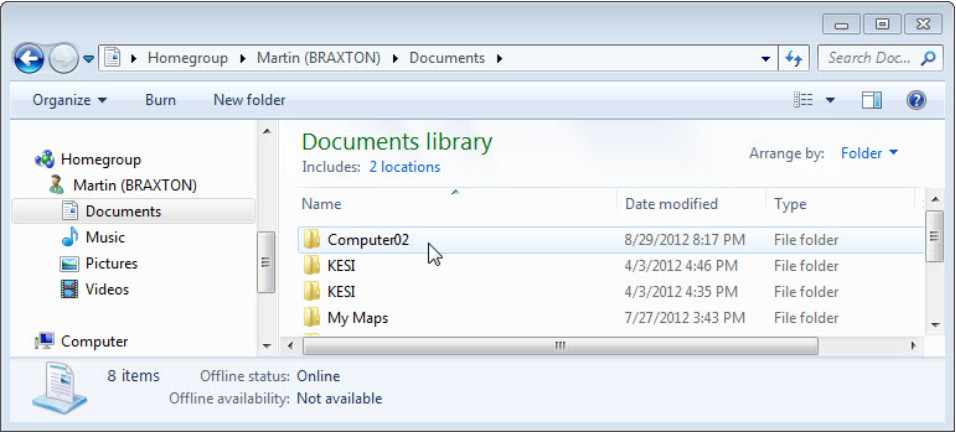
b. Right-click on MyFile1 > Properties > Security tab > select HomeUsers.
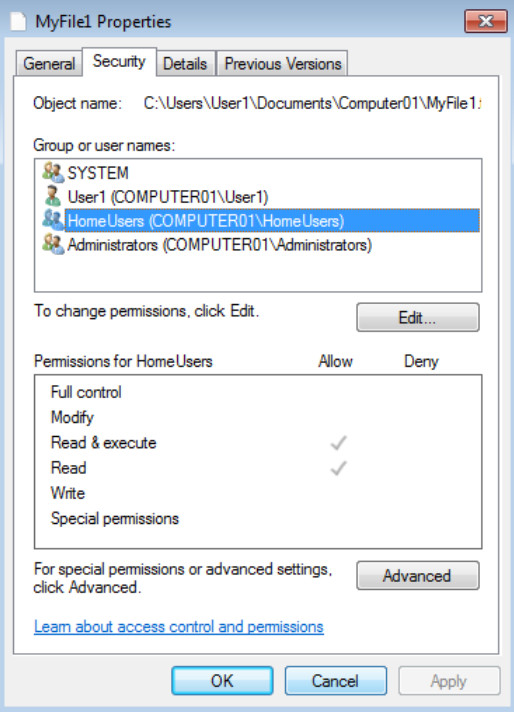
What are the Permissions for HomeUsers?
Read & execute, and Read
c. Click Cancel.
d. Close all open windows.
Step 13: Clean Up.
On both computers, return configurations to the following settings:
a. Delete all folders and files created on the computer.
b. Leave the Homegroup by following the path:
Start > Control Panel > Homegroup > Leave the homegroup > Leave the homegroup > Finish.
c. Set the network location type back to Public network.
For Windows 7, Control Panel > Network and Sharing Center > click Home network > click Public network.
For Windows 8.0, click the Network icon in the bottom right of the desktop > right-click the desired network > click Turn sharing on or off > click No, don’t turn on sharing or connect to devices.
For Windows 8.1, Start > PC Settings > Network > Connections > Click desired network name > Turn off sharing.
d. Check the box Use sharing Wizard (Recommended). The checkbox can be found at:
Start > Control Panel > Folder Options > View tab.
e. Delete any mapped drives by following the path:
Start > right-click Network > Disconnect network drive > select network drive > OK.
Part 3: Creating or Joining a Workgroup
Step 1: Create or Join a Workgroup.
Workgroup name: GROUP#, where # is a number used to make the name unique within the class environment. Feel free to allow the students to pick a name on their own.
Workgroup is the name of Microsoft’s term for peer-to-peer local area network.
To create or join a Workgroup, you will need a Workgroup name. Ask your instructor for the Workgroup name to be used.
What is the Workgroup name?
The Workgroup name provided by the Answers. GROUP#
a. On both computers, click Start > Control Panel > System. Click Change settings.
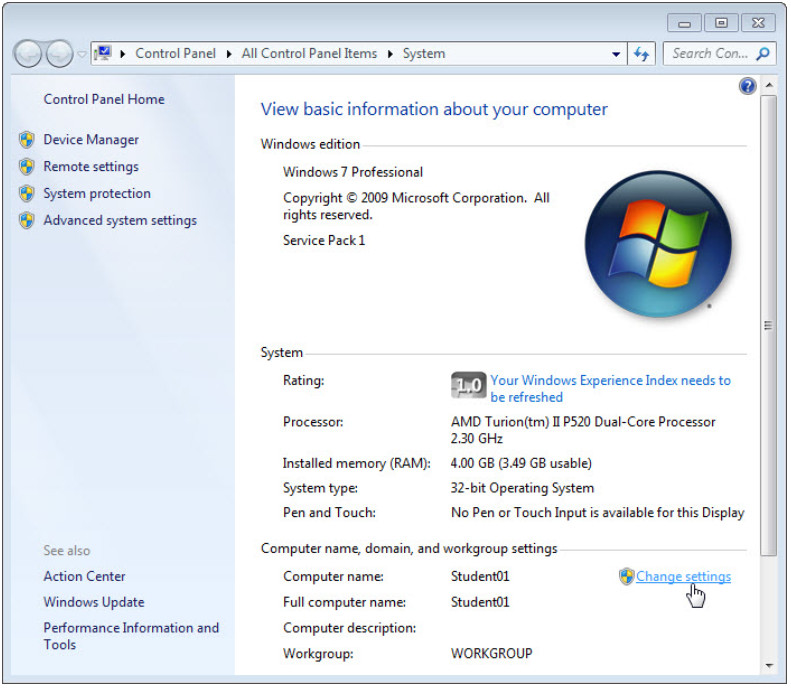
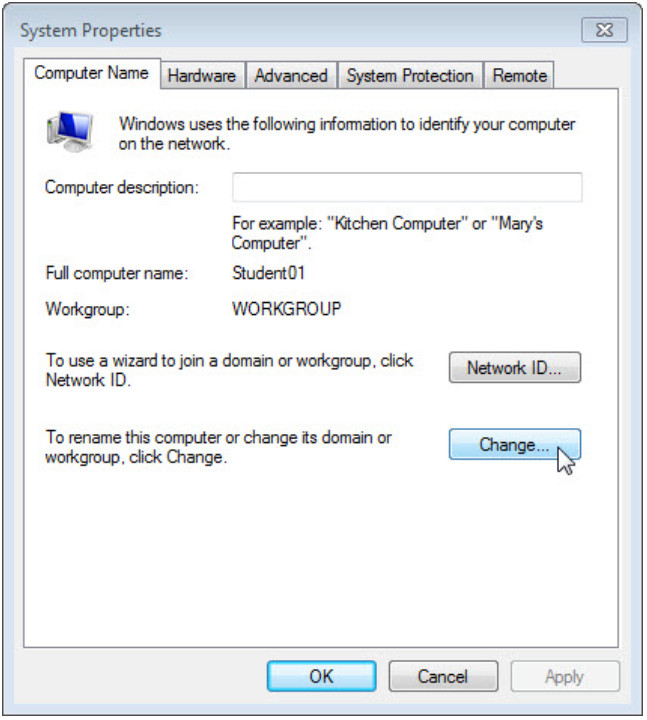
b. The System Properties window opens. Click Change…
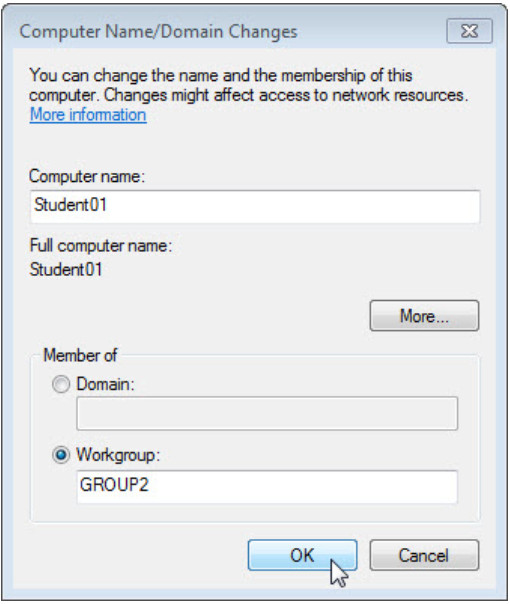
c. In the Computer Name/Domain Change window, make sure Workgroup is selected and type GROUP#, where # is the group number assigned by the instructor. Click OK.
d. Click OK when the Welcome to the GROUP# workgroup screen opens.
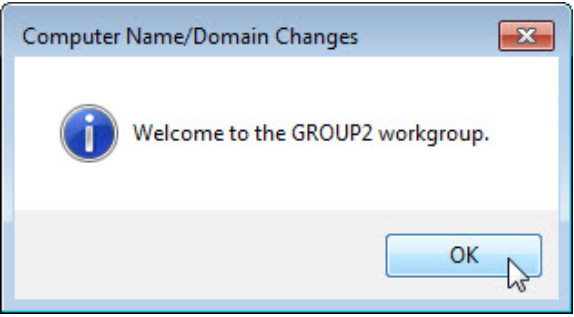
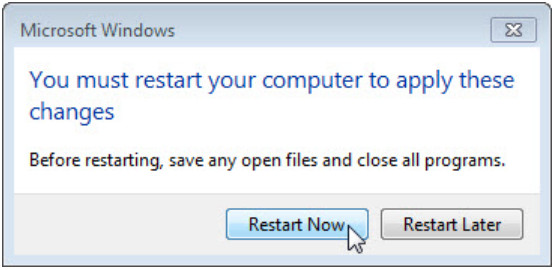
e. Click OK and then Restart Now to restart the computer.
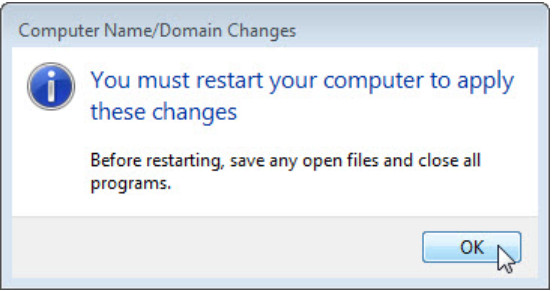
f. Click Close in the System Properties window. Click Restart Now to restart the computer.
Step 2: Verify access to network resources.
After the restarting both computers, you will verify that the computers can access the shared resources within the workgroup.
a. On both computers, click Start > Control Panel > System.
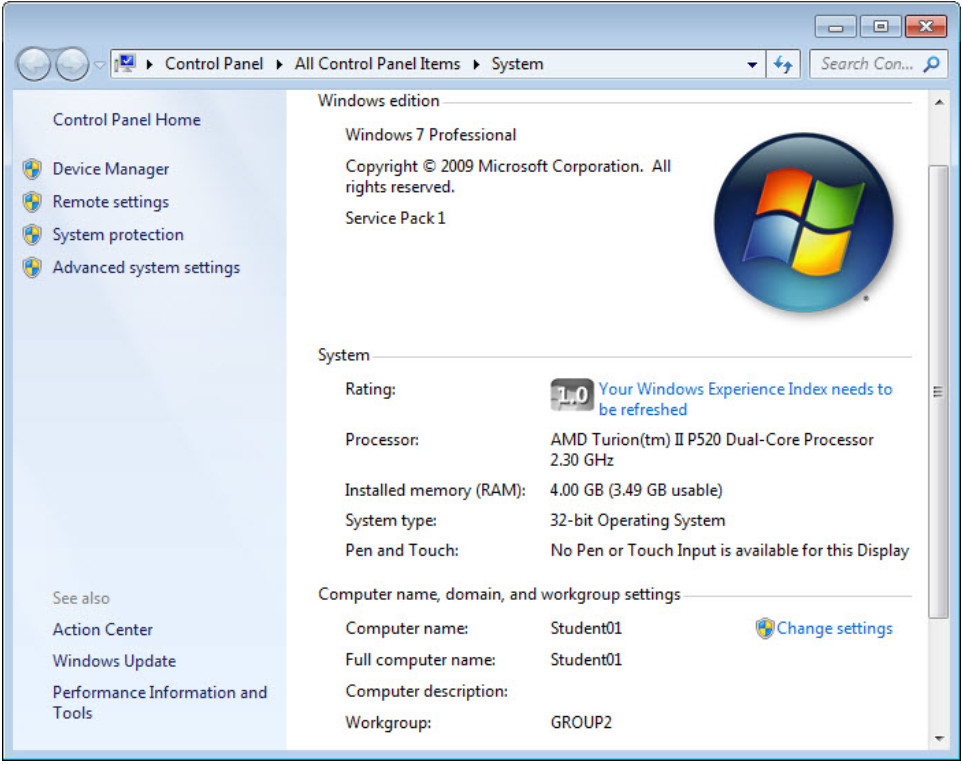
What is the workgroup name for the computer?
Answers may vary. GROUP2
b. Close the System window.
c. In computer01, open the Windows Explorer in Windows Vista and 7 or File Explorer in Windows 8, click Network to locate the resources in computer02. Enter the user credentials for computer01 if prompted.
Step 3: Clean up.
Change the workgroup to the default Workgroup.
Start > Control Panel > System > Click Change settings > Click Change > Type Workgroup in the Workgroup field > click OK and restart the computer.
