7.3.2.6 Lab – Build and Test Network Cables (Answers)
Introduction
In this lab, you will build and test straight-through and crossover Unshielded Twisted-Pair (UTP) Ethernet network cables.
Note: With a straight-through cable, the color of wire used by pin 1 on one end is the same color used by pin 1 on the other end, and similarly for the remaining seven pins. The cable will be constructed using either TIA/EIA T568A or T568B standards for Ethernet. This determines which color wire is to be used on each pin. Straight-through cables are normally used to connect a host directly to a router, switch, or a wall plate in an office area.
With a crossover cable, the second and third pairs on the connector at one end of the cable are reversed at the other end. The pin-outs for the cable are the T568A standard on one end and the T568B standard on the other end. Crossover cables are normally used to connect switches or they can be used to connect two hosts directly together.
Recommended Equipment
- Two 2 to 3 ft. (0.6 to 0.9 meter) lengths of UTP cable, Category 5 or 5e
- A minimum of four RJ-45 connectors (more may be needed if mis-wiring occurs)
- An RJ-45 crimping tool
- Two computers with operating systems installed.
- Wire cutters
- Wire stripper
- Ethernet wire map tester
- Ethernet cable meter (optional)
- Ethernet certification meter (optional)
Wire Diagrams

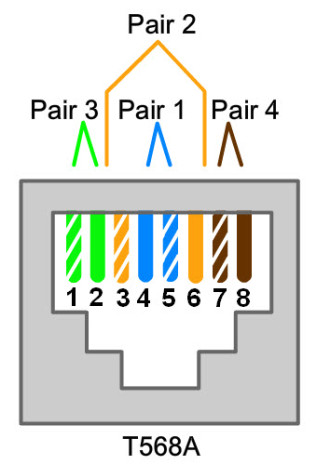
| T568A Wiring Standard | |||
|---|---|---|---|
| Pin No. | Pair No. | Wire Color | Function |
| 1 | 3 | White/Green | Transmit |
| 2 | 3 | Green | Transmit |
| 3 | 2 | White/Orange | Receive |
| 4 | 1 | Blue | Not used |
| 5 | 1 | White/Blue | Not used |
| 6 | 2 | Orange | Receive |
| 7 | 4 | White/Brown | Not used |
| 8 | 4 | Brown | Not used |

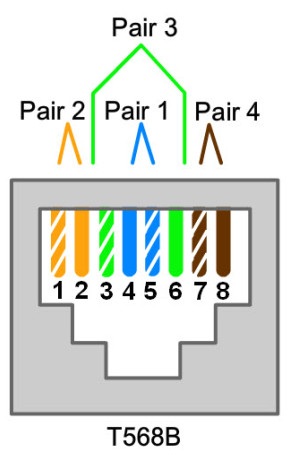
| T568B Wiring Standard | |||
|---|---|---|---|
| Pin No. | Pair No. | Wire Color | Function |
| 1 | 2 | White/Orange | Transmit |
| 2 | 2 | Orange | Transmit |
| 3 | 3 | White/Green | Receive |
| 4 | 1 | Blue | Not used |
| 5 | 1 | White/Blue | Not used |
| 6 | 3 | Green | Receive |
| 7 | 4 | White/Brown | Not used |
| 8 | 4 | Brown | Not used |
Step 1: Obtain and prepare the cable.
a. Determine the length of cable required. This could be the distance from a computer to a switch or between a device and an RJ-45 outlet jack. Add 12 in. (30.5 cm.) to the total distance. The TIA/EIA standard states the maximum length is 16.4 ft. (5 m). Standard Ethernet cable lengths are usually 2 ft (0.6 m.), 6 ft. (1.8 m.), or 10 ft. (3m).
Which length of cable did you choose and why did you choose this length?
Answers may vary.
b. Cut a piece of cable to the desired length. Stranded UTP cable is commonly used for patch cables (the cables between an end network device such as a PC and an RJ-45 connector) because it is more durable when bent repeatedly. It is called stranded because each of the wires within the cable is made up of many strands of fine copper wire, rather than a single solid wire. Solid wire is used for cable runs that are between the RJ-45 jack and a wiring closet.
c. Using wire strippers, remove 2 in (5 cm.) of the cable jacket from both ends of the cable.
Step 2: Prepare and insert the wires.
a. Determine which wiring standard will be used. Circle the standard.
T568A T568B
b. Locate the correct table or figure from the Wire Diagrams based on the wiring standard used.
c. Spread the cable pairs and arrange them roughly in the desired order based on the standard chosen.
d. Untwist a short length of the pairs and arrange them in the exact order needed by the standard, moving left to right starting with pin 1. It is very important to untwist as little as possible. The twists are important because they provide noise cancellation.
e. Straighten and flatten the wires between your thumb and forefinger.
f. Ensure the cable wires are still in the correct order as the standard.
g. Cut the cable in a straight line to within 0.5 to .75 in. (1.25 to 1.9 cm.) from the edge of the cable jacket. If it is longer than this, the cable will be susceptible to crosstalk (the interference of bits from one wire with an adjacent wire).
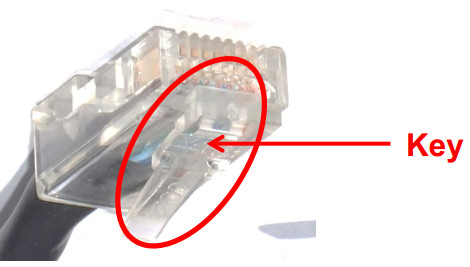
h. The key (the prong that sticks out from the RJ-45 connector) should be on the underside pointing downward when inserting the wires. Ensure the wires are in order from left to right starting with pin 1. Insert the wires firmly into the RJ-45 connector until all wires are pushed to the end of the connector.

Step 3: Inspect, crimp, and re-inspect the connector.
a. Visually inspect the cable and ensure the right colors are aligned to the correct pins.
b. Visually inspect the end of the connector. The eight wires should be pressed firmly against the end of the RJ-45 connector. Some of the cable jacket should be inside the first portion of the connector. This provides strain relief for the cable. If the cable jacket is not far enough inside the connector, it may eventually cause the cable to fail.
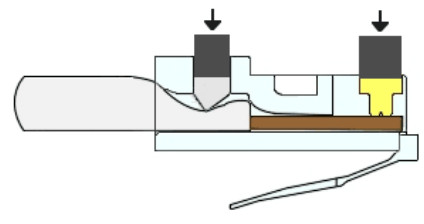
c. If everything is correctly aligned and inserted properly, place the RJ-45 connector and cable into the crimper. The crimper will push two plungers down on the RJ-45 connector.

d. Visually re-inspect the connector. If improperly installed, cut the end off and repeat the process.
Step 4: Terminate the other cable end.
a. Attach an RJ-45 connector to the other end of the cable.
b. Visually re-inspect the connector. If improperly installed, cut the end off and repeat the process.
Which standard is used for patch cables in your school?
Answers may vary.
Step 5: Test the cable with a wiremap tester.
Turn on the tester and plug the cable into the jacks labeled with the wiring standard you used.
Note: If the tester does not have different jacks for different standards, refer to the documentation of the tester to determine how to test your cable.
All green lights on both parts of the tester should sequence to indicate that each wire is terminated correctly and in the proper order.
Any other lights indicate a wiring fault. Refer to the documentation of the tester to find which type of fault the cable has.
What did the lights indicate when you connected your cable? Write down the faults and pairs where the faults occurred if your cable did not pass.
Answers may vary, good, open, short, reversal, transposed pairs, etc.
Step 6: Test the cable using a cable meter or cable certification meter (Optional).
Answers Note: If you have a cable meter or certification meter, you may choose to demonstrate how these devices are used.
If your lab has a cable meter or cable certification meter, use it to validate your findings from the wiremap tester. If possible, use the meter to determine the exact length of the cable.
What were the findings from the cable meter or cable certification meter?
____________________________________
Step 7: Connect a computer using the cable.
a. Connect a PC to another computer, router, or switch.
b. Visually check the LED status lights on the NIC. If they are on (usually green or amber) the cable is functional.
c. Open a command prompt on one of the computers.
d. Type ipconfig.
e. Write down the default gateway IP address.
Answers may vary.
From the command prompt, type ping default gateway IP address. If the cable is functional, the ping should be successful (provided that no other network problem exists and the default gateway router is connected and functional).
Was the ping successful?
The ping should be successful. If not, verify the default gateway IP address and repeat the lab as necessary.
If the ping fails, repeat the lab.
Step 8: Build the crossover cable.
Build a cable using the T568A wiring standard on one end and the T568B wiring standard on the other.
How are these wiring standards different?
Pairs 2 and 3 are reversed
Step 9: Test the crossover cable.
Turn on the tester and plug the ends of the cable into the same wiring standard indicated on both parts of the tester. This is the same procedure as testing a straight-through cable.
What does the tester indicate?
Answers may vary. For a correctly created cable, pairs 2 and 3 are shown as transposed at one end of the cable.
If possible, test the crossover cable using a cable meter or cable certification meter. What does the meter indicate about the cable?
____________________________________
