
Lab - CML Setup (Answers)
Topology

Background / Scenario
The objective of this lab is to install, configure, and validate a fully functional instance of Cisco Modeling Labs (CML-Free) on a local workstation. The lab will use VMware Workstation Pro or VMware Fusion as the virtualization hypervisor. You will access the CML via a web browser to create, test and simulate network topologies.
- Part 1: Software Download
- Part 2: CML Setup
- Part 3: Build Your First Topology
Required Resources
- Latest version of VMware Fusion (Mac Intel models only) or Workstation Pro (PC)
- Free version of Cisco Modeling Labs (CML) 2.9 or later (CML does not function in M series chips)
Instructions
Part 1: Software Download
Step 1: Download VMware Fusion Pro (Mac) or Workstation (PC)
a. Navigate to broadcom.com. Log in or register for a new account in the Support Portal to access free Broadcom resources.
b. After you have logged in, select My Downloads in the left panel. Select the HERE link to list the available free software.
c. Select VMware Workstation Pro for Windows-based or Linux-based PCs or VMware Fusion for Intelbased and Apple silicon Macs.
Note: At the time of this writing, VMware Fusion is not available for the M-series Macs.
d. Select the latest version for your operating system. Select the link to review the Terms and Conditions. When completed, return to the download page and select the checkbox to agree to the Terms and Conditions.
e. Select the Download icon. Fill out the form and agree to the Trade Compliance and Download Conditions. to complete the download. Select the Download icon again to initiate the download.
Step 2: Download the free Cisco Modeling Labs server.
a. Navigate to cisco.com. Select Log in to log in or register for a new account. To complete your Cisco profile, select your username and then Manage profile.
Note: Your new Cisco Account can be on a compliance hold for a few hours. During this time, you will not be able to edit your profile or access Cisco services.
b. To complete your company profile, select Personal. You must enter Your Company Details. If you do not work a company, you can enter Self for company name and your home address for the Site Address.
c. Navigate back to cisco.com. Log in again, if necessary. Find and select the Downloads link. In the Select a Product field, enter Modeling Labs. Select Modeling Labs in the results page.
d. Select CML-Free. Download the files cml2_f-x.x.x-amd64-x.ova and refplat-yyyymmdd-free-iso.zip, where x.x.x is the version number and yyyymmdd is timestamp in the filename. At the time of this writing, the ova filename is cml2_f_2.9.1-7_amd64-7.ova and the zip filename is refplat-20250616-free-iso.zip. Select each Download icon and accept the General Terms Agreement to download the files.
e. Unzip the zip file to a folder for installation in a later step.
Part 2: CML Setup
Step 1: Install VMware Workstation Pro or Fusion.
a. Locate the VMware Workstation Pro or Fusion installation file and open it.
b. Follow the instructions in the wizard to install the application.
Step 2: Set up the Virtual Machine.
a. Start VMware Workstation Pro or Fusion.
b. Select Open a Virtual Machine and select the ova file you downloaded. Select Import. Rename your VM if desired.
c. After importing the ova successfully, DO NOT select Power on this virtual machine. Select Edit virtual machine settings for the Virtual Machine (VM).
d. In the Virtual Machine Settings dialog window, select CD/DVD (IDE) to connect an iso file to the VM. Select the checkbox Connect at power on.
Select Use ISO Image file: Select Browse… Find and select the refplat iso file. The filename at the time of this writing is refplat-20250616-free.iso. No other settings in the Hardware tab need to be changed.
e. Use Host-only or NAT for the Network Adapter to receive an IP address from the built-in DHCP server to interact with the VM via a web browser locally.
Bridged – The virtual machine connects directly to the same network as your computer and behaves like a separate physical device.
NAT (Network Address Translation) – The virtual machine shares your computer’s network connection and can access the internet, but other devices on the network can’t see it directly.
Host-only – The virtual machine can only communicate with your computer and other host-only VMs, with no internet or external network access.
f. Select Play or Power on this virtual machine to start the VM.
Step 3: Set up the CML-Free Server.
a. Press enter when prompted with <Continue>. Follow the instructions in the setup wizard. You will need to accept the EULA by pressing A for Accept EULA.
b. At this time, the setup will proceed with standalone all-in-one deployment. Accept the default hostname provided for you.
c. You will now define the password for the first user, sysadmin. Use the down arrow key to move between each field. Create a complex password of at least 8 characters consisting of at least one upper case, one digit, and one punctuation. Enter the same password in the Confirm field. Record the password for the sysadmin user. Press tab to move to the navigation options and select Continue.
d. Complete the same process for the admin user.
The sysadmin account allows access to the CML controller and the admin account provides access to the CML server to create a topology.
e. Press enter when prompted with <Continue> to Use DHCP to configure IPv4 address. Press enter again to accept the defaults in the next window. Next, Confirm the configuration.
f. When the settings are configured, press enter when prompted with <Continue>. It will take a few minutes for the CML-Free setup to finish.
g. When setup is complete, open a web browser and navigate to the IP address shown on the VMware screen to Access the CML UI. Accept the security risk, if you are prompted, and continue.
h. To log in, enter the username admin and the password that you set earlier.
Note: Do not close the VMware application.
Part 3: Build Your First Network Topology
In the free version of CML, you are limited to a total of 5 running nodes simultaneously. The External Connector and Unmanaged Switch nodes do not count against the node count limit. Therefore, you can start any 5 nodes and an unlimited number of Unmanaged Switches and/or External Connectors in the topology, providing you have enough available resources to support your VM.
Step 1: Create a new lab topology.
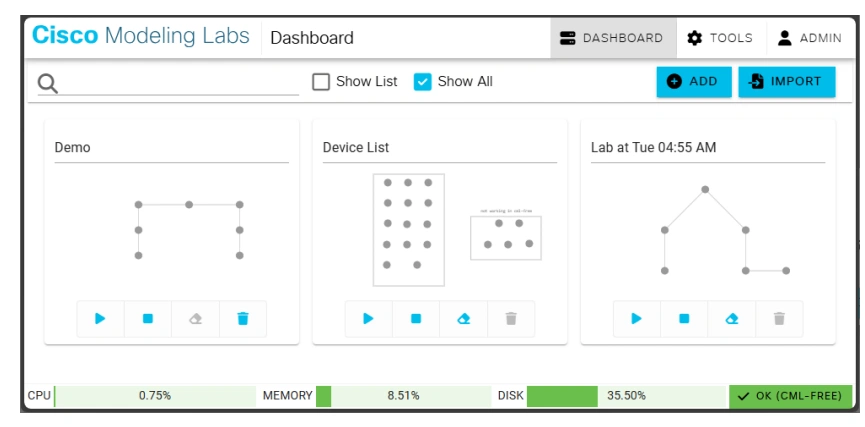
The Dashboard and the Workbench are the primary pages while working with the labs. The Dashboard provides access to the labs either created or imported by you and shows a summary of the state of each lab.
The Workbench is where you can edit each lab. At top of each page, there is a menu bar provides easy access to navigation controls, user menu and any additional actions in the current lab.
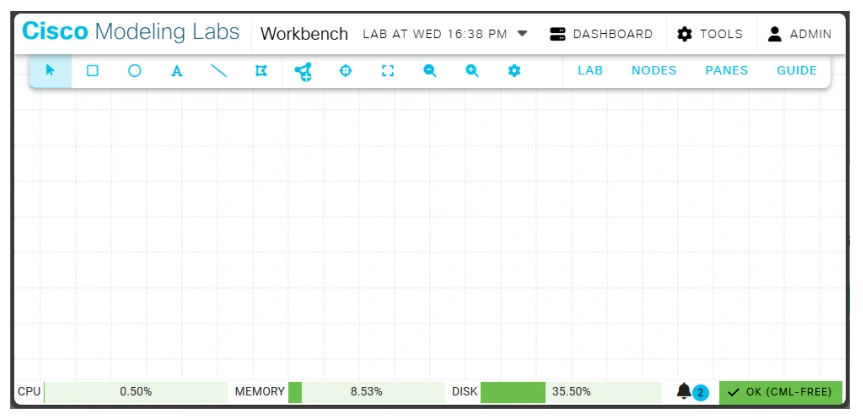
a. After logging into the CML UI successfully, click ADD in the Dashboard to start a new lab.
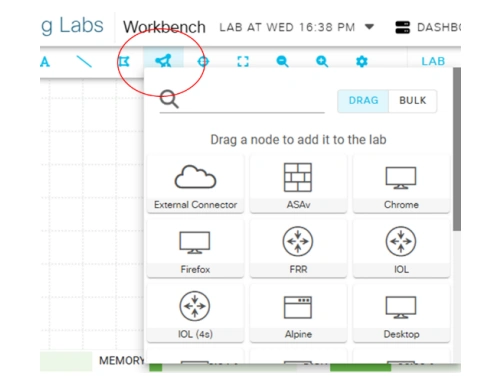
b. In the blank Workbench, click Add Nodes. Drag and drop 2 IOL and 2 IOL-L2 onto the page.
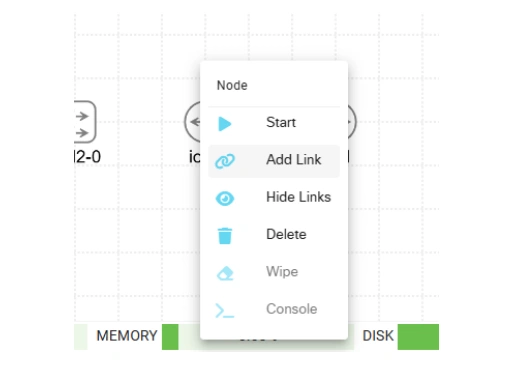
c. Connect the newly added the devices by right-clicking the device > Add Link. Click the target device.
d. Click Create Link after reviewing the source and target interfaces to create the link.
iol-l2-0 <-----> iol-0 <-----> iol-1 <-----> io1-l2-1
Step 2: Configure the devices via the console.
a. From the CML menu, click LAB > Start Lab.
b. After all the devices have been booted, as indicated by the check mark next to the device, right-click the device and select Console. Click OPEN CONSOLE to access the console.
c. From the console, you can configure the devices now. Enter commands, such as show version or configure the hostname.
d. Save the configurations by using the copy running-config startup-config command as you would when using physical devices.
e. To save the configuration that will persist after restarting a lab, select the desired device and click FETCH in the PANES window. The saved configuration will be loaded to the device when the lab restarts.
If you choose to export your lab to a different CML server, click LAB > Download Lab to save a yaml file that can be used to import the lab to a different CML server.
f. When finished, you can stop the lab by clicking LAB > Stop Lab to free up CPU or Memory resources.
Step 3: Further Exploration
While advanced topologies with more than five nodes cannot be fully replicated in CML-Free, you are encouraged to complete lab activities originally designed for Cisco classroom hardware by adapting them to CML-free. This process helps you develop the critical skill of creating a digital twin of a real physical network that allows you to safely experiment with designs and configurations. Furthermore, the experimentation can also strengthen your troubleshooting skills. For example,
- Recreate portions of a larger network: break a complex topology into smaller pieces using only 5 nodes, such as core only
- Focus on configuration depth: compare dynamic versus static routing protocols to observe the behavior differences
- Experiment with scenarios: observe network behavior after removing routes or misconfigure VLANs and practice troubleshooting using show and debug commands.
- Documentation: clear network documentation enables accurate deployment, faster troubleshooting, and reduced network downtime.
- Test validation, no assumption: use commands, such as ping, traceroute, and show commands after every major change to reinforce cause-and-effect understanding.
- Leverage snapshots and saved configs: VM snapshots and downloaded labs allow you to experiment and roll back without rebuilding the labs from scratch.
Furthermore, the official CML documentation and tools are available to you from the CML UI. Click TOOLS to access the available documentation and tools. The official CML documentation allows you to better understand features, node types, and best practices.
You are also encouraged to join the Cisco Learning Network community for CML. This community provide the opportunity to connect with other learners and professionals to ask questions and share tips and tricks.
