A few things to keep in mind while completing this activity:
- Do not use the browser Backbutton or close or reload any Exam windows during the exam.
- Do not close Packet Tracer when you are done. It will close automatically.
- Click the Submit Assessmentbutton to submit your work.
Addressing Table

Note: All device console passwords are cisco. All device enable passwords are class.
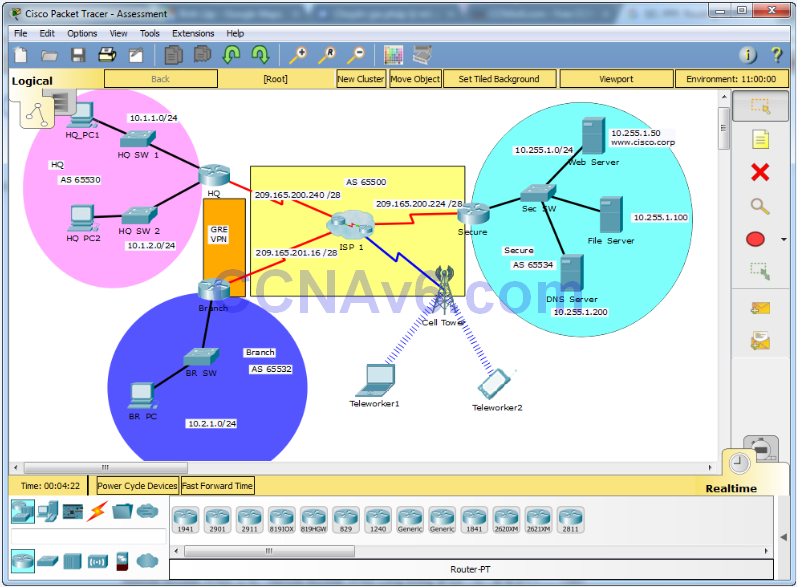
Step 1 Configure HDLC on router Secure.
Configure the WAN link from router Secure to ISP_1 using HDLC encapsulation.
Step 2 Configure PPP to connect HQ to ISP_1.
Configure the WAN link from router HQ to ISP_1 using PPP encapsulation and CHAP authentication.
- Create a user ISP_1 with the password of cisco123.
Step 3 Configure eBGP routing.
a. Configure router HQ with eBGP routing.
- Configure HQ to peer with ISP_1.
- Add only HQ 10.1.1.0/24 internal network to BGP.
b. Configure router Branch with eBGP routing.
- Configure Branch to peer with ISP_1.
- Add the Branch internal network to BGP
Step 4 Configure GRE Tunneling.
a. Configure router HQ with a tunnel interface to send IP traffic over GRE to Branch.
- Configure Tunnel 1 with appropriate addressing information.
- Configure the tunnel source with the local exit interface.
- Configure the tunnel destination with the appropriate endpoint IP address.
b. Configure router Branch with a tunnel interface to send IP traffic over GRE to HQ.
- Configure Tunnel 1 with appropriate addressing information.
- Configure the tunnel source with the local exit interface.
- Configure the tunnel destination with the appropriate endpoint IP address.
Step 5 Configure OSPF Routing.
The Branch LAN must have connectivity to the HQ LAN. Configure OSPF across the GRE tunnel.
- Configure OSPF process 10 on the Branch router.
- Backup should advertise the LAN network via OSPF.
- Backup should be configured to form an adjacency HQ over the GRE tunnel.
- Disable OSPF updates on appropriate interface(s).
Step 6 Configure OSPF Routing.
The HQ LAN must have connectivity to the Branch LAN. Configure OSPF across the GRE tunnel.
- Configure OSPF process 10 on the HQ router.
- HQ should advertise both LAN networks via OSPF.
- HQ should be configured to form an adjacency with Branch over the GRE tunnel.
- Disable OSPF updates on appropriate interface(s).
Step 7 Connectivity.
a. Verify full connectivity from Main_PC1 to the Web_Server in the Secure network.
b. Verify full connectivity from Teleworker1 to Web_Server in the Secure network.
A few things to keep in mind while completing this activity:
- Do not use the browser Backbutton or close or reload any Exam windows during the exam.
- Do not close Packet Tracer when you are done. It will close automatically.
- Click the Submit Assessmentbutton to submit your work.
Addressing Table
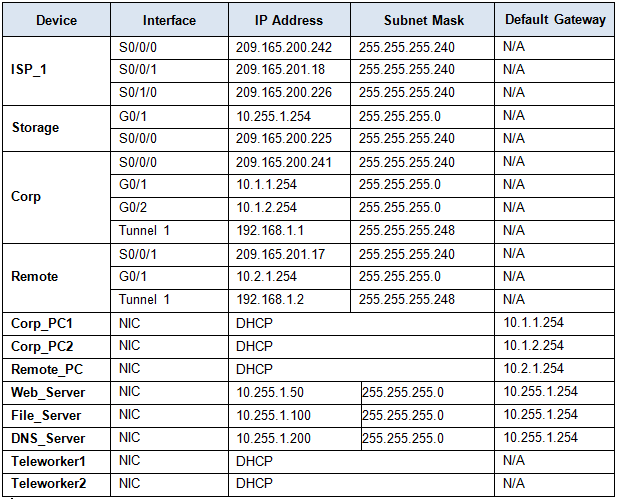
Note: All device console passwords are cisco. All device enable passwords are class.
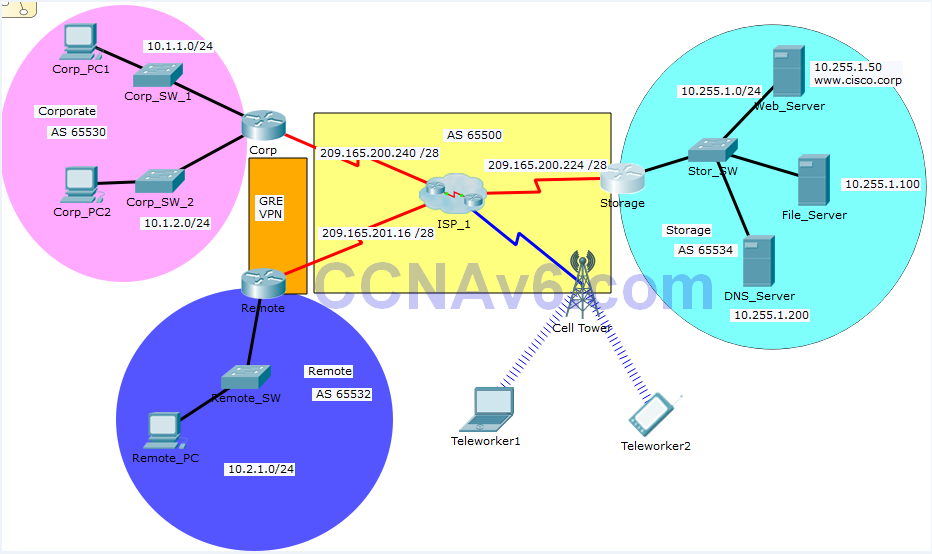
Step 1 Configure HDLC on router Storage.
Configure the WAN link from router Storage to ISP_1 using HDLC encapsulation.
Step 2 Configure PPP to connect Corp to ISP_1.
Configure the WAN link from router Corp to ISP_1 using PPP encapsulation and CHAP authentication.
- Create a user ISP_1 with the password of cisco123.
Step 3 Configure eBGP routing.
a. Configure router Corp with eBGP routing.
- Configure Corp to peer with ISP_1.
- Add only Corp 10.1.1.0/24 internal network to BGP.
b. Configure router Remote with eBGP routing.
- Configure Remote to peer with ISP_1.
- Add the Remote internal network to BGP
Step 4 Configure GRE Tunneling.
a. Configure router Corp with a tunnel interface to send IP traffic over GRE to Remote.
- Configure Tunnel 1 with appropriate addressing information.
- Configure the tunnel source with the local exit interface.
- Configure the tunnel destination with the appropriate endpoint IP address.
b. Configure router Remote with a tunnel interface to send IP traffic over GRE to Corp.
- Configure Tunnel 1 with appropriate addressing information.
- Configure the tunnel source with the local exit interface.
- Configure the tunnel destination with the appropriate endpoint IP address.
Step 5 Configure OSPF Routing.
The Remote LAN must have connectivity to the Corp LAN. Configure OSPF across the GRE tunnel.
- Configure OSPF process 10 on the Remote router.
- Backup should advertise the LAN network via OSPF.
- Backup should be configured to form an adjacency Corp over the GRE tunnel.
- Disable OSPF updates on appropriate interface(s).
Step 6 Configure OSPF Routing.
The Corp LAN must have connectivity to the Remote LAN. Configure OSPF across the GRE tunnel.
- Configure OSPF process 10 on the Corp router.
- Corp should advertise both LAN networks via OSPF.
- Corp should be configured to form an adjacency with Remote over the GRE tunnel.
- Disable OSPF updates on appropriate interface(s).
Step 7 Connectivity.
a. Verify full connectivity from Main_PC1 to the Web_Server in the Storage network.
b. Verify full connectivity from Teleworker1 to Web_Server in the Storage network.
A few things to keep in mind while completing this activity:
- Do not use the browser Backbutton or close or reload any Exam windows during the exam.
- Do not close Packet Tracer when you are done. It will close automatically.
- Click the Submit Assessmentbutton to submit your work.
Addressing Table
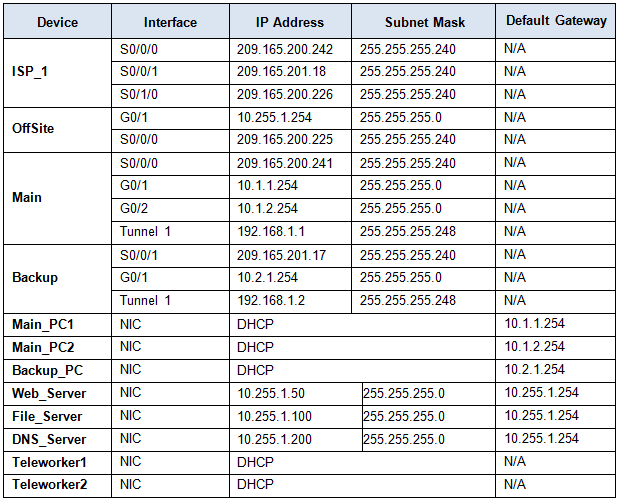
Note: All device console passwords are cisco. All device enable passwords are class.
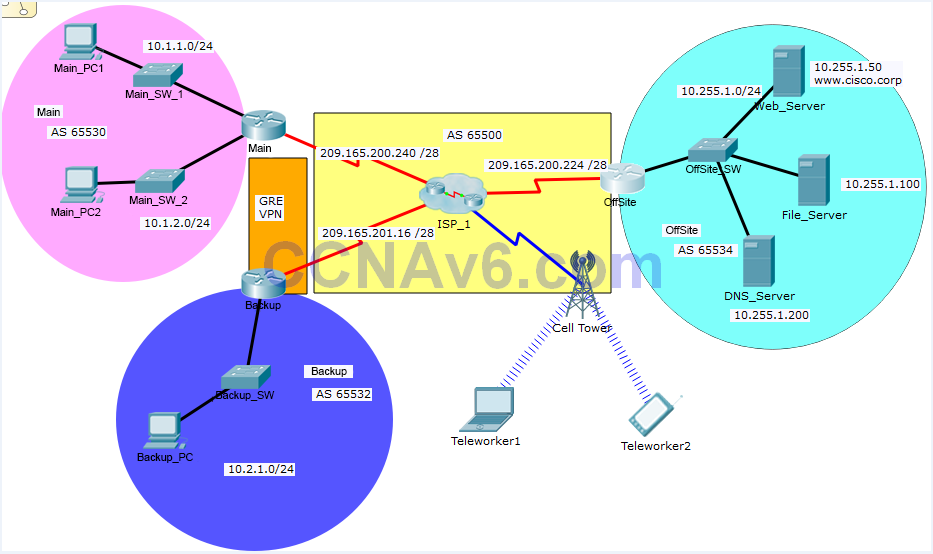
Step 1 Configure HDLC on router OffSite.
Configure the WAN link from router OffSite to ISP_1 using HDLC encapsulation.
Step 2 Configure PPP to connect Main to ISP_1.
Configure the WAN link from router Main to ISP_1 using PPP encapsulation and CHAP authentication.
- Create a user ISP_1 with the password of cisco123.
Step 3 Configure eBGP routing.
a. Configure router Main with eBGP routing.
- Configure Main to peer with ISP_1.
- Add only Main 10.1.1.0/24 internal network to BGP.
b. Configure router Backup with eBGP routing.
- Configure Backup to peer with ISP_1.
- Add the Backup internal network to BGP
Step 4 Configure GRE Tunneling.
a. Configure router Main with a tunnel interface to send IP traffic over GRE to Backup.
- Configure Tunnel 1 with appropriate addressing information.
- Configure the tunnel source with the local exit interface.
- Configure the tunnel destination with the appropriate endpoint IP address.
b. Configure router Backup with a tunnel interface to send IP traffic over GRE to Main.
- Configure Tunnel 1 with appropriate addressing information.
- Configure the tunnel source with the local exit interface.
- Configure the tunnel destination with the appropriate endpoint IP address.
Step 5 Configure OSPF Routing.
The Backup LAN must have connectivity to the Main LAN. Configure OSPF across the GRE tunnel.
- Configure OSPF process 10 on the Backup router.
- Backup should advertise the LAN network via OSPF.
- Backup should be configured to form an adjacency Main over the GRE tunnel.
- Disable OSPF updates on appropriate interface(s).
Step 6 Configure OSPF Routing.
The Main LAN must have connectivity to the Backup LAN. Configure OSPF across the GRE tunnel.
- Configure OSPF process 10 on the Main router.
- Main should advertise both LAN networks via OSPF.
- Main should be configured to form an adjacency with Backup over the GRE tunnel.
- Disable OSPF updates on appropriate interface(s).
Step 7 Connectivity.
a. Verify full connectivity from Main_PC1 to the Web_Server in the OffSite network.
b. Verify full connectivity from Teleworker1 to Web_Server in the OffSite network.


Great job, but the pkt file doesn’t work it says the file not compatible with this version (i tried both 7.0 & 7.2.1)
Please uninstall PT and reinstall PT latest version: https://itexamanswers.net/cisco-packet-tracer-for-windows-linux-macos.html
it’s work now thanks (:
La mejor pagina <3
plz allow downlaload option
Updated, please check again! Thanks
Obrigado !
Excellent Package, i love this site
Great work