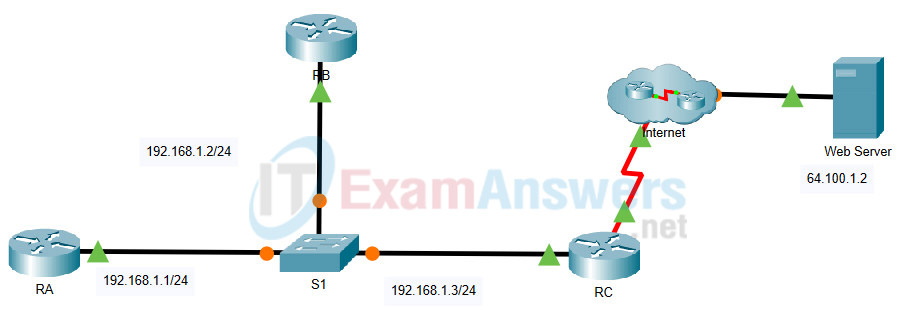
7.2.2 Packet Tracer – Implement OSPFv2 Advanced Features (Answers)
Topology

7.2.2 Packet Tracer – Implement OSPFv2 Advanced Features
Instructor Note: Red font color or gray highlights indicate text that appears in the instructor copy only.
Addressing Table
| Device | Interface | IP Address | Subnet Mask |
|---|---|---|---|
| RA | G0/0 | 192.168.1.1 | 255.255.255.0 |
| RB | G0/0 | 192.168.1.2 | 255.255.255.0 |
| RC | G0/0 | 192.168.1.3 | 255.255.255.0 |
| S0/0/0 | 209.165.200.225 | 255.255.255.252 |
Scenario
In this Packet Tracer activity, your focus is OSPFv2 advanced configurations. IP addressing has been configured for all devices. You will configure OSPFv2 routing with passive interfaces and default route propagation. You will modify the OSPFv2 configuration by adjusting the OSPF timers. You will also secure OSPF routing updates with MD5 authentication. Finally, you will verify your configurations and test connectivity between end devices.
Instructions
Requirements
– Use the following requirements to configure OSPFv2 routing on RA and RB:
- OSPFv2 routing requirements:
- Process ID 1
- Configure the network address for each interface under OSPF
- OSPF priority set to 150 on the LAN interface of RA
- OSPF priority set to 100 on the LAN interface of RB
- Set the hello interval to 5
- Set the dead interval to 20
- Configure MD5 authentication for area 0. Use a key of Area0pa55.
– Use the following requirements to configure RC OSPFv2 routing:
- OSPFv2 routing requirements:
- Process ID 1
- Network address for the LAN interface
- Set all interfaces to passive by default, but allow OSPF updates on the active LAN interface
- Set the router to distribute default routes
- Configure a directly attached default route to the Internet
- OSPF priority set to 50 on the LAN interface
- Set the hello interval to 5
- Set the dead interval to 20
- Configure MD5 authentication for area 0. Use a key of Area0pa55.
Note: Issue the clear ip ospf process command on RC if the default route does not propagate.
– Verify your configurations and test connectivity
- OSPF neighbors should be established and routing tables should be complete.
- RA should be the DR. RB should be the BDR.
- All three routers should be able to ping the web server.
Answer Scripts
Router RA
en
conf t
interface GigabitEthernet0/0
 ip ospf hello-interval 5
 ip ospf dead-interval 20
 ip ospf priority 150
 ip ospf authentication message-digest
 ip ospf message-digest-key 1 md5 Area0pa55
router ospf 1
 network 192.168.1.0 0.0.0.255 area 0
 area 0 authentication message-digest
end
Router RB
en
conf t
interface GigabitEthernet0/0
 ip ospf hello-interval 5
 ip ospf dead-interval 20
 ip ospf priority 100
 ip ospf authentication message-digest
 ip ospf message-digest-key 1 md5 Area0pa55
router ospf 1
 network 192.168.1.0 0.0.0.255 area 0
 area 0 authentication message-digest
end
Router RC
en
conf t
interface GigabitEthernet0/0
 ip ospf hello-interval 5
 ip ospf dead-interval 20
 ip ospf priority 50
 ip ospf authentication message-digest
 ip ospf message-digest-key 1 md5 Area0pa55
router ospf 1
 passive-interface default
 no passive-interface GigabitEthernet0/0
 network 192.168.1.0 0.0.0.255 area 0
 default-information originate
 area 0 authentication message-digest
ip route 0.0.0.0 0.0.0.0 Serial0/0/0
end
