23.2.1 Packet Tracer – Logging Network Activity (Answers)
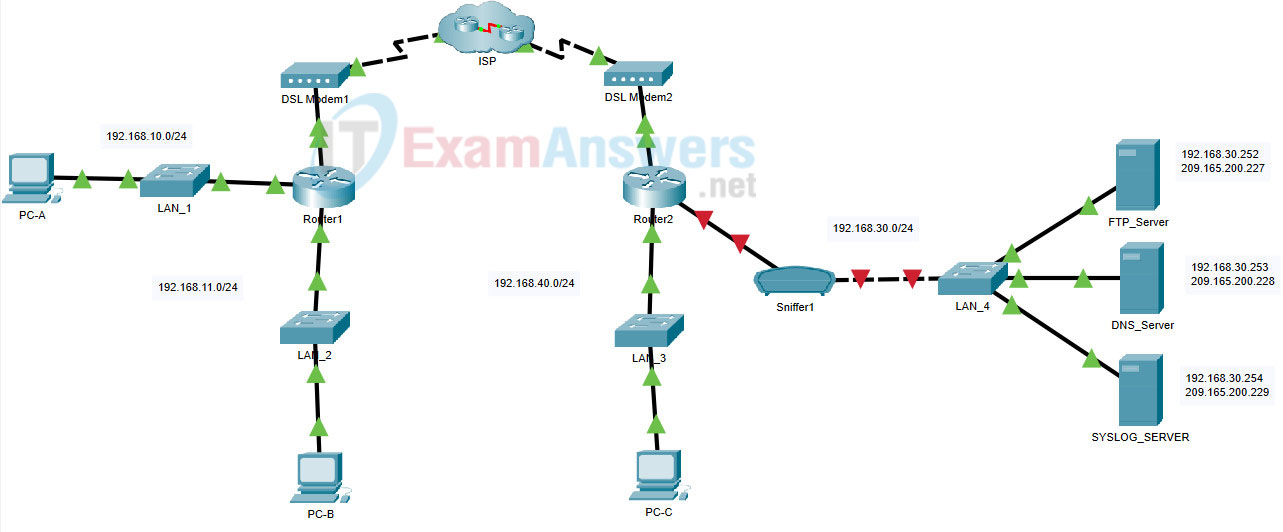
Topology

23.2.1 Packet Tracer – Logging Network Activity
Addressing Table
| Device | Private IP Address | Public IP Address |
|---|---|---|
| FTP_Server | 192.168.30.253 | 209.165.200.227 |
| SYSLOG_SERVER | 192.168.11.254 | 209.165.200.229 |
| Router2 | N/A | 209.165.200.226 |
Objectives
- Part 1: Create FTP traffic
- Part 2: Investigate the FTP Traffic
- Part 3: View Syslog Messages
Background / Scenario
In this activity, you will use Packet Tracer to sniff and log network traffic. You will view a security vulnerability in one network application, and view logged ICMP traffic with syslog.
Instructions
Part 1: Create FTP traffic
Step 1: Activate the sniffing device.
a. Click on sniffer device Sniffer1.
b. Go to the Physical tab and turn on the power to the sniffer.
c. Go to the GUI tab and turn the sniffer service on.
d. The FTP and syslog packets entering the sniffer from Router2 are being monitored.
Step 2: Remotely connect to the FTP server.
a. Click on PC-B and go to the desktop.
b. Click Command Prompt. From the command prompt, open an FTP session with FTP_SERVER using its public IP address. Help with the command line is available by typing ? at the prompt.
c. Enter the username of cisco and password of cisco to authenticate with the FTP_Server.
Step 3: Upload a file to the FTP server.
a. At the ftp> prompt, enter the command dir to view the current files stored on the remote FTP server.
b. Upload the clientinfo.txt file to the FTP server by entering the command put clientinfo.txt.
c. At the ftp> prompt, enter the command dir and verify that the clientinfo.txt file is now on the FTP server.
d. Enter quit at the FTP prompt to close the session.
Part 2: Investigate the FTP Traffic
a. Click the Sniffer1 device and then click the GUI tab.
b. Click through some of the first FTP packets in the session. Be sure to scroll down to view the application layer protocol information in the packet details for each. (This assumes this is your first FTP session. If you have opened other sessions, clear the window and repeat the login and file transfer process.)
What is the security vulnerability presented by FTP?
The FTP username and password are transmitted in clear text.
What should be done to mitigate this vulnerability?
Use a secure file transfer protocol such as SFTP.
Part 3: View syslog Messages
Step 1: Remotely connect to Router2.
a. From the PC-B command line, telnet to Router2.
b. Use the username ADMIN and password CISCO for authentication.
c. Enter the following commands at the router prompt:
Router2# debug ip icmp
d. Type logout at the prompt to close the Telnet session.
Step 2: Generate and View the syslog Messages.
a. Click on the SYSLOG_SERVER device and go to the Services tab.
b. Click the SYSLOG service. Verify that the service is on. Syslog messages will appear here.
c. Go to host PC-B and open the Desktop tab.
d. Open the Command Prompt and ping Router2.
e. Go to host PC-A and open the Desktop tab.
f. Go to the Command Prompt and ping Router2.
g. On the syslog server investigate the logged messages.
h. There should be four messages from PC-A and four PC-B.
Can you tell which echo replies are for PC-A and PC-B from the destination addresses? Explain.
They should both have the same destination address because NAT is translating internal private addresses to a global public address.
Note: The HostName field in the syslog server display refers to the device that is the source of the syslog messages.
i. Ping Router2 from PC-C.
What will the destination address for the replies be?
The address will be the internal private address of PC-C.
