
15.2.1 Packet Tracer - Configure and Verify NTP (Answers)
Topology
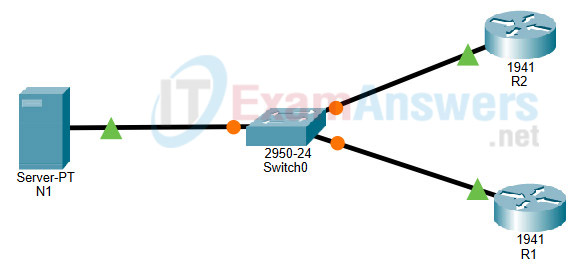
15.2.1 Packet Tracer - Configure and Verify NTP
Addressing Table
| Device | Interface | IP Address | Subnet Mask |
|---|---|---|---|
| N1 | NIC | 209.165.200.225 | 255.255.255.0 |
| R1 | G0/0 | 209.165.200.226 | 255.255.255.0 |
| R2 | G0/0 | 209.165.200.227 | 255.255.255.0 |
Objectives
In this activity, you will configure NTP on R1 and R2 to allow time synchronization.
Background / Scenario
Network Time Protocol (NTP) synchronizes the time of day among a set of distributed time servers and clients. While there are a number of applications that require synchronized time, this lab will focus on correlating events that are listed in the system log and other time-specific events from multiple network devices. NTP uses the User Datagram Protocol (UDP) as its transport protocol. All NTP communications use Coordinated Universal Time (UTC).
An NTP server usually receives its time from an authoritative time source, such as an atomic clock attached to a time server. The NTP server then distributes this time across the network. NTP is extremely efficient. No more than one packet per minute is necessary to synchronize two devices to within a millisecond of each other.
Instructions
Step 1: NTP Server
a. Server N1 is already configured as the NTP Server for this topology. Verify its configuration under Services > NTP.
b. From R1, ping N1 (209.165.200.225) to verify connectivity. The ping should be successful.
c. Repeat the ping to N1 from R2 to verify connectivity to N1.
Step 2: Configure the NTP Clients
Cisco devices can be configured to refer to an NTP server to use to synchronize their clocks. It is important to keep time consistent among all devices. Configure R1 and R2 as NTP clients so their clocks are synchronized. Both R1 and R2 will use N1 server as their NTP server.
a. Check the current NTP and clock settings as shown below:
R1# show ntp status
%NTP is not enabled.
R1# show clock detail
*0:1:53.745 UTC Mon Mar 1 1993
Time source is hardware calendar
b. Configure R1 and R2 as NTP Clients. Use the ntp server command to specify an NTP server, as shown below:
R1# conf t
R1(config)# ntp server 209.165.200.225
c. Repeat this configuration on R2.
Step 3: Verify NTP settings
a. Check the clocks on R1 and R2 again to verify that they are synchronized:
R1# show clock detail
12:7:18.451 UTC Sat Oct 12 2019
Time source is NTP
Note: When working on physical routers, allow a few minutes before R1 and R2 clocks are synchronized. With Packet Tracer you can use the Fast Forward Time button to speed up synchronization.
Execute the same command on R2.
Question:
Are the clocks synchronized?
Yes. R1 and R2 have the same time as N1.
b. Check the NTP status and NTP associations by using the following commands to verify NTP operation and configuration.
R1# show ntp status
Clock is synchronized, stratum 2, reference is 209.165.200.225
<Output omitted>

R1# show ntp associations

address         ref clock       st   when     poll    reach  delay          offset            disp
*~209.165.200.225127.127.1.1     1    11       32      377    9.00           4.00              0.24
 * sys.peer, # selected, + candidate, - outlyer, x falseticker, ~ configured
Device Configs - Final
ROUTER R1
! ==============================================================
!--- 15.2.1 Packet Tracer - Configure and Verify NTP
!--- ANSWER SCRIPT FOR ROUTER R1
!--- Usage: copy this whole file and paste it into the R1 terminal (start at the R1> prompt). Every line beginning with "!" is a comment; IOS ignores it, so pasting a comment by accident is harmless.
!--- Scope: IP addressing is already configured on R1 and R2, and server
!--- N1 is already set up as the NTP server, per the activity's own
!--- Background note - this script only makes R1 an NTP client.
! ==============================================================

enable
configure terminal

! --------------------------------------------------------------
!--- Step 2b: Point R1 at N1 as its NTP server, so R1's clock
!--- synchronizes to it automatically instead of running off its own
!--- unset hardware calendar (which starts at "Mon Mar 1 1993").
! --------------------------------------------------------------

ntp server 209.165.200.225

end

! --------------------------------------------------------------
!--- Save the configuration to NVRAM. (Press Enter when prompted for the destination filename.)
! --------------------------------------------------------------
copy running-config startup-config


! ==============================================================
!--- Verification:
!---   show clock detail       -> "Time source is NTP" (was "hardware calendar" before); use Packet Tracer's
!---     Fast Forward Time button if it hasn't synchronized yet
!---   show ntp status         -> "Clock is synchronized, stratum 2, reference is 209.165.200.225"
!---   show ntp associations   -> "*~209.165.200.225 ..." - the "*" marks it as the selected sys.peer
!--- Note: no functional errors found versus the lab's own Instructions -
!--- a single "ntp server 209.165.200.225" is all Step 2 asks for.
! ==============================================================
ROUTER R2
! ==============================================================
!--- 15.2.1 Packet Tracer - Configure and Verify NTP
!--- ANSWER SCRIPT FOR ROUTER R2
!--- Usage: copy this whole file and paste it into the R2 terminal (start at the R2> prompt). Every line beginning with "!" is a comment; IOS ignores it, so pasting a comment by accident is harmless.
!--- Scope: IP addressing is already configured on R1 and R2, and server
!--- N1 is already set up as the NTP server, per the activity's own
!--- Background note - this script only makes R2 an NTP client.
! ==============================================================

enable
configure terminal

! --------------------------------------------------------------
!--- Step 2c: Repeat R1's configuration on R2 - same NTP server (N1),
!--- so both routers converge on the same synchronized time.
! --------------------------------------------------------------

ntp server 209.165.200.225

end

! --------------------------------------------------------------
!--- Save the configuration to NVRAM. (Press Enter when prompted for the destination filename.)
! --------------------------------------------------------------
copy running-config startup-config


! ==============================================================
!--- Verification:
!---   show clock detail       -> "Time source is NTP", matching R1's clock
!---   show ntp status         -> "Clock is synchronized, stratum 2, reference is 209.165.200.225"
!---   show ntp associations   -> "*~209.165.200.225 ..." - the "*" marks it as the selected sys.peer
!--- Note: no functional errors found versus the lab's own Instructions -
!--- R2 uses the exact same "ntp server 209.165.200.225" command as R1.
! ==============================================================

