Access Control List (ACL) is a security feature that allows you to filter the network traffic based on configured statements. An ACL can be used to filter either inbound or outbound traffic on an interface. Once you applied an access list on a router, the router examine every packet moving from interface to another interface in the specified direction and takes the appropriate action.
Types of ACL
An ACL can be either of the following two types.
Standard access lists
A Standard access list can use only the source IP address in an IP packet to filter the network traffic. Standard access lists are typically used permit or deny an entire system or network. They cannot be used to filter individual protocol or services such as FTP and Telnet.
Extended access lists
Extended access lists use the source and destination IP addresses. They can be used to filter specific protocol or service.
An ACL can be configured using either a number or a name. If you decide to use a name to configure an ACL it is referred as Named ACL.
Let’s see how to configure ACL
1. We will use the following topology to configure ACL. Create the following topology in Cisco Packet Tracer.
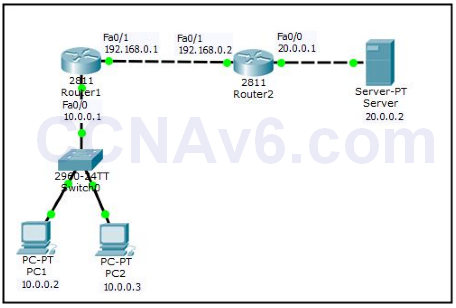
2. Once you have created the preceding topology, configure the appropriate IP addresses as mentioned in the topology. To do so, execute the following commands on Router1.
Router1( config)# int fa0/ 0
Router1( config-if)# ip add 10.0.0.1 255.0.0.0
Router1( config-if)# no shut
Router1( config-if)# exit

Router1( config)# int fa0/ 1
Router1( config-if)# ip add 192.168.0.1 255.255.255.0
Router1( config-if)# no shut
Router1( config-if)# exit
3. Once you have configured appropriate IP addresses, use a routing method such as RIP. To do so, execute the following commands on Router1.
Router1( config)# router rip
Router1( config-router)# network 192.168.0.0
Router1( config-router)# network 10.0.0.0
 Router1( config-router)# exit
Router1( config)#
4. Next, move on to Router2 and execute the following commands to configure IP addresses and the RIP routing protocol.
Router2( config)# int fa0/ 0
Router2( config-if)# ip add 20.0.0.1 255.0.0.0
Router2( config-if)# no shut
Router2( config-if)# exit

Router2( config)# int fa0/ 1
Router2( config-if)# ip add 192.168.0.2 255.255.255.0
Router2( config-if)# no shut
Router2( config-if)# exit

Router2( config)# router rip
Router2( config-router)# network 192.168.0.0
Router2( config-router)# network 20.0.0.0
Router2( config-router)# exit
5. After configuring IP addresses on routers, configure IP addresses on PC0, PC1, and Server.
6. Now, open the Command Prompt on PC0 and type ping 20.0.0.2 you should be able to ping successfully. Save the topology as it will be used to demonstrate the next exercises.
Now, you have configured the appropriate IP addresses and routing on your network topology. Before configuring an ACL, we would like to explain the command syntaxes used to configure it. As discussed earlier you either use the numbered ACL method or Named ACL method.
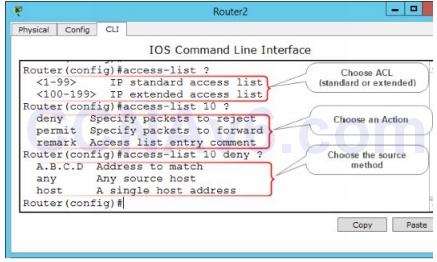
7. The following figure shows the command syntax used to configure an ACL.
Configure Standard ACL
Let’s see how to configure Standard ACL. In this demonstration, we will restrict host 10.0.0.2 from accessing Router2. To do so, perform the following steps:
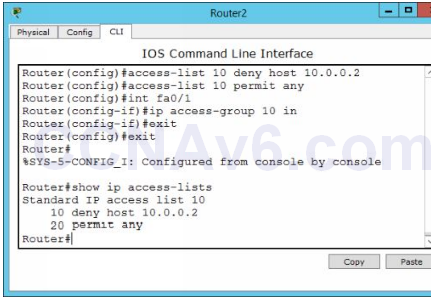
1. First, execute the following command to deny host 10.0.0.2.
Router2( config)# access-list 10 deny host 10.0.0.2
2. Once you deny a host on a router, the router will deny all the hosts until you explicitly define the permitted hosts. In the following command we will permit all the hosts.
Router2( config)# access-list 10 permit any
3. Next, switch to the interface on which you want to apply the ACL, in this case Fa0/ 1, and define the direction (inbound or outbound) of traffic that you want to filter. In this case, we will filter the incoming packets towards Router2. To do so execute the following commands.
Router2( config)# int fa0/ 1
Router2( config-if)# ip access-group 10 in
Router2( config-if)# exit
Router2( config)# exit
4. Once you applied an ACL on a router, execute the following command to view the applied ACLs.
Router2# show ip access-lists
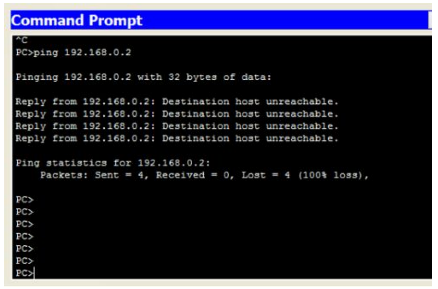
5. Next, open the Command Prompt of PC0, try to ping 192.168.0.2, you should not be able to ping, as shown in the following figure.
6. Now, you have tested your ACL configuration. Now, remove the ACL configuration so the next exercise could be performed. To remove the configured ACL, execute the following command on Router2.
Router2( config)# no access-list 10 deny host 10.0.0.2
7. Try to ping again from PC0 to Router2, this time you should be able ping successfully, because you have removed the applied ACL.
Configure Extended ACL.
In the previous exercise, we have discussed the basics of Access Control Lists (ACLs) and how to configure standard ACL. In this exercise, we will explain how to configure Extended ACL on Cisco routers. We assume that you have loaded the previous topology and the standard ACL configuration are removed.
Syntax to configure an Extended ACL.
1. Once you have done the TCP/ IP and routing configuration, let’s have a look at the syntax used to configure an Extended ACL on Cisco routers.
Router( config)# access-list < an ACL number from 100-199 > < select an action > < select a protocol or service > < source address > < destination address > < port number > < packet condition >
2. If the preceding syntax does not help you, let’s have a look at the syntax in detail. The following figure shows the syntax to select the action, protocol, and source address.
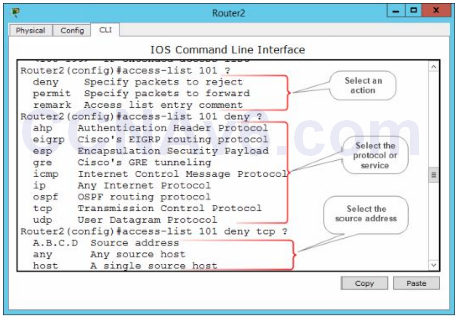
3. The following figure shows the syntax to select the destination address and packet filter method.
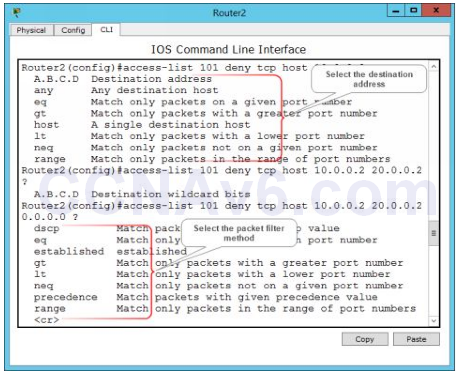
4. The following figure shows the syntax to select the port number.
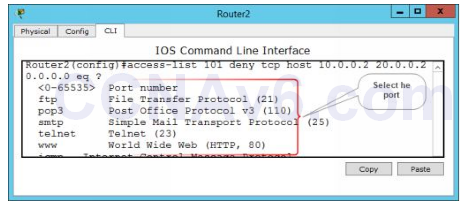
Let’s begin the configuration
To configure Extended Access Control List, we will use the following network topology. In this example, we will deny the host 10.0.0.2 from accessing the Web server (20.0.0.2).
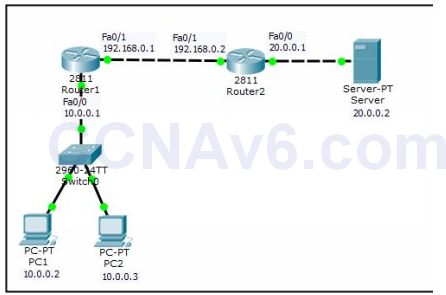
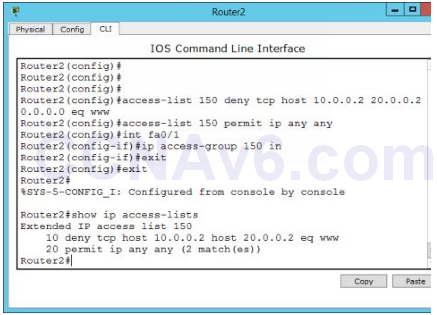
1. In order to prevent host 10.0.0.2 to access the Web server (20.0.0.2), you need to execute the following commands.
Router2( config)# access-list 150 deny tcp host 10.0.0.2 host 20.0.0.2 0.0.0.0 eq www
Router2( config)# access-list 150 permit ip any any
Router2( config)# int fa0/ 1
Router2( config-if)# ip access-group 150 in
Router2( config-if)# exit
Router2( config)# exit
2. Once you applied an ACL on the desired interface, execute the following command to view the configured access lists.
Router2# show ip access-lists
3. The following figure shows how to configure an extended ACL on cisco router.
Verify Access Control List Configuration.
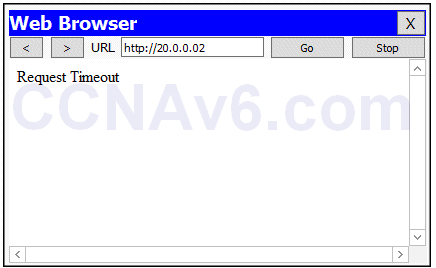
1. To verify your configuration, open the Web browser on PC0, type http:// 20.0.0.2 and press Enter. You should not be able to access the Web server, as shown in the following figure.
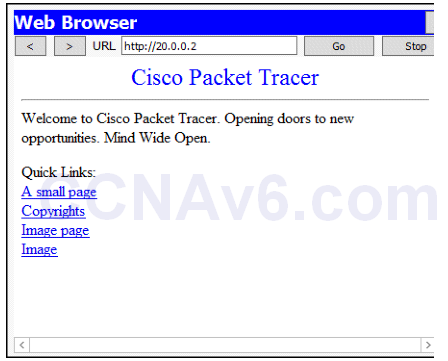
2. Now move on to PC2 and try to access Web server, this time you should be able to access Web server. This is because we have not prevented PC2 to access Web server.
3. Now, you have configured and verified the Extended ACL, you can remove the configured ACL. To do so, execute the following command on Router2.
Router2( config)# no access-list 150 deny tcp host 10.0.0.2 host 20.0.0.2 eq www
4. Close the Cisco Packet tracer.

please share the topology circuit (pkt file)
thank 209 2020