Enabling SSH on Cisco routers and switches
Imagine you are a network administrator in a large organization with number of switches and routers. To configure a switch or router on a far off location, there are two choices. One is to go near the switch or router to configure it.
This looks good but imagine how much trouble it is to go near each and every device to configure it. The second and easy option is the remote configuration of the switch or router.
Remote configuration of a switch/ router can be done using telnet or ssh protocols. But using telnet has a disadvantage. It sends data in plain text. So if you happen to type a username and password for authentication with the switch from a remote location, it will be passed in plain text and anyone sniffing on the network can easily find out your login credentials. This is a big security risk. To overcome this problem, we should use ssh protocol for remote configuration of the switch or router. SSH protocol is as same as telnet but it uses encryption during the communication. This makes it difficult for hackers to detect the credentials. Let’s see how to enable ssh on Cisco routers and switches using IOS.
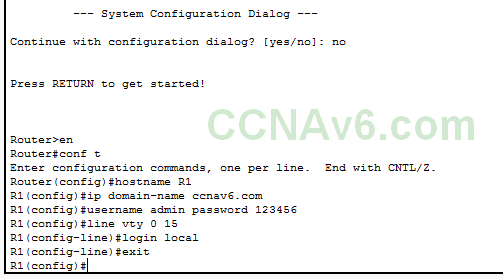
Here I am using a router.

The command “conf t” enables global configuration mode of the switch or router. The “hostname R1” command changes the default name of router to R1. The name of the router is used to generate names for the keys by the ssh protocol. So it is necessary to change the default name of the router. The “ip domain-name ccnav6.com” command sets the domain name for the router. The domain name is also needed for setting name for encryption keys. ( ccnav6.com is a fictional domain name I used. you can use your own domain name ). It’s time to set login credentials on the router. The “username admin password 123456” command sets the username and password to admin and 123456 respectively. The “line vty 0 15” command selects the vty lines from 0 to 15 for line configuration.
The “login local” command sets the login to local router. The “exit” command takes us out of the line configuration mode to global configuration mode. it’s time to generate ssh keys.

The “crypto key generate rsa” command generates the cryptographic keys using Rivest Shamir Adlemann algorithm. You will be prompted to enter the number of bits in the modulus. Setting it too low will be too easy to crack. Setting it too high will be time consuming. I set it to 1024. Let’s see the information about ssh protocol we enabled on the router.

The “show ip ssh” command does this. The reason for prepending this command with “do” is that the “show ip ssh” is a privileged exec mode command and cannot be executed in global configuration mode. We can also see from the information displayed that the authentication timeout has been set to 120 seconds and authentication retries are set to three. Let’s change them. The command “ip ssh time-out 60” command changes authentication time-out to 60 seconds. The command “ip ssh authentication-retries” command is used to change the authentication retries. Finally we will have to set ssh as input transport protocol on vty access lines.

The “line vty 0 15” command selects all the vty lines. The “transport input ssh” command sets ssh as a input transport protocol. The “exit” command as already said takes us out of the line configuration mode. We have successfully enabled ssh protocol on our router.
Let’s once again see the information about the ssh we just enabled using “do show ip ssh”.

