Etherchannel is a technique that allows you to combine multiple Ethernet switch ports in to a single logical port. Thus help you to combine bandwidth of all port and provide redundancy in case of a single port failure. This technique is also known as NIC Teaming, Link Aggregation, or Ethernet Bridging.
PAgP vs LACP
You can use any of the following methods to implement the Etherchannel technique:
1. PAgP stand for Port Aggregation Protocol. It is the Cisco-proprietary negotiation protocol.
2. LACP stand for Link Aggregation Control Protocol. It is an open standard negotiation protocol.
3. Static; it does not require any protocol and the negotiation between Ethernet ports are done manually.
In this demonstration, we will discuss how to configure Etherchannel between two Cisco switches.
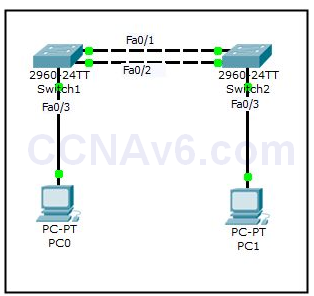
In order to configure Etherchannel, you should use at least two Ethernet ports. To complete this lab exercise, we will use Fa0/ 1 and Fa0/ 2 interfaces of both switches, as shown in the following figure. Create the following topology in Cisco Packet Tracer.

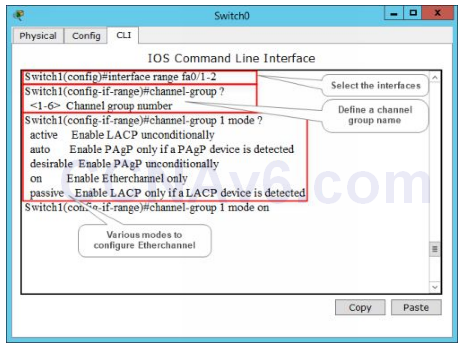
Before configuring Etherchannel, let’s have a look at the commands used to configure it. The following figure shows the commands used to configure the Etherchannel technique.

Step By Step Etherchannel Configuration
1. Execute the following command to define the interfaces that you want to include in the Etherchannel mode.
Switch1( config)# interface range fa0/ 1-2
2. Next, execute the following commands to define a channel group name and the Etherchannel mode. In this command we will use “on” (static) mode.
Switch1( config-if-range)# channel-group 1 mode on
Switch1( config-if-range)# exit
3. Next, execute the following commands to switch to the port channel that you have created and define the mode of interface, in this case trunk mode.
Switch1( config)# interface port-channel 1
Switch1( config-if)# switchport mode trunk
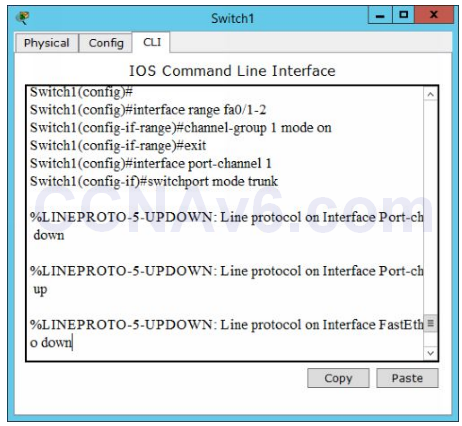
4. The following figure displays the configuration of Switch1.

5. Once you have configured Switch1, move on to Switch2 and execute the following commands:
Switch2( config)# interface range fa0/ 1-2
Switch2( config-if-range)# channel-group 1 mode on
Switch2( config-if-range)# exit
Switch2( config)# interface port-channel 1
Switch2( config-if)# switchport mode trunk
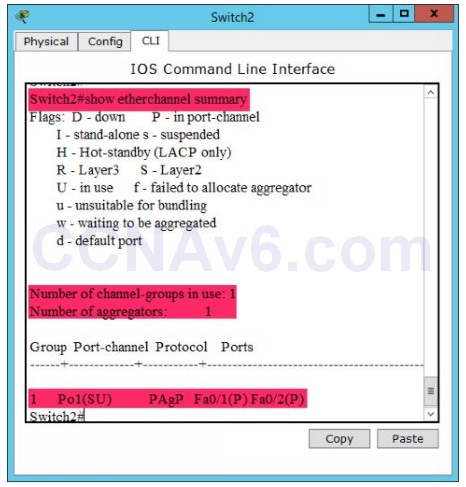
6. To verify the configuration, execute the following command:
Switch2# show etherchannel summary

7. In the preceding figure, you can see that Etherchannel has been configured between on Fa0/ 1 and Fa0/ 2 interfaces of Switch1 and Switch2.
