3.1.4 Packet Tracer – Investigating a VLAN Implementation Answers
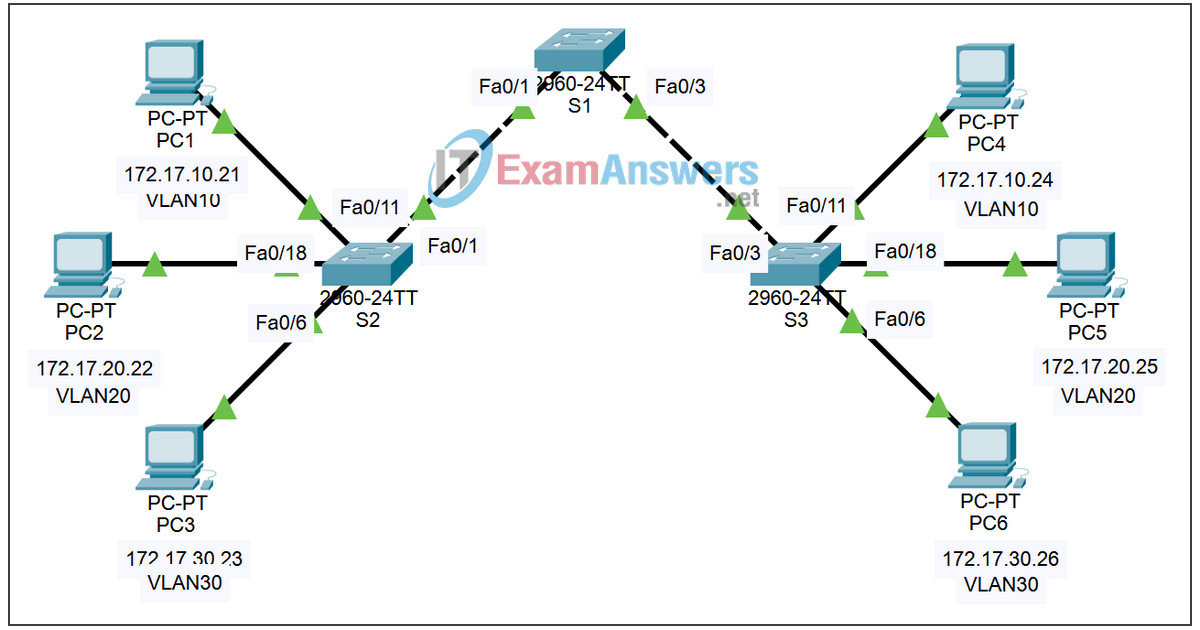
Topology

Learning Objectives
- Observe broadcast traffic in a VLAN implementation
- Observe broadcast traffic without VLANs
Introduction
This activity opens with completion at 100%. The purpose of the activity is to observe how broadcast traffic is forwarded by the switches when VLANs are configured and when VLANs are not configured.
Task 1: Observe Broadcast Traffic in a VLAN Implementation
Step 1: Ping from PC1 to PC6.
Wait for all the link lights to turn to green. To accelerate this process, switch back and forth between Simulation and Reatime mode.
Use the Add Simple PDU tool. Click PC1 and then PC6. Click the Capture/Forward button to step through the process. Observe the ARP requests as they traverse the network.
In normal operation, when a switch receives a broadcast frame on one of its ports, it forwards the frame out all other ports. Notice that S2 only sends the ARP request out Fa0/1 to S1. Also notice that S3 only sends the ARP request out Fa0/11 to PC4. PC1 and PC4 both belong to VLAN 10. PC6 belongs to VLAN 30. Because broadcast traffic is contained within the VLAN, PC6 never receives the ARP request from PC1. And because PC4 is not the destination, it discards the ARP request. The ping from PC1 fails, because PC1 never receives an ARP reply.
Step 2. Ping from PC1 to PC4.
Use the Add Simple PDU tool. Click PC1 and then PC4. Observe the ARP requests as they traverse the network. PC1 and PC4 both belong to VLAN 10, so the path of the ARP request is the same as before. Because PC4 is the destination, it replies to the ARP request. PC1 is then able to send the ping with the destination MAC address for PC4.
Task 2: Observe Broadcast Traffic without VLANs
Step 1. Clear the configurations on all three switches and delete the VLAN database.
On all three switches, enter user EXEC mode with the password cisco. Then enter privileged EXEC mode with the password class.
To observe broadcast traffic without VLANs, erase the configuration and delete the VLAN database on each switch. The commands for S1 are shown here.
S1#erase startup-config
Erasing the nvram filesystem will remove all configuration files! Continue? [confirm]
[OK]
Erase of nvram: complete
%SYS-7-NV_BLOCK_INIT: Initialized the geometry of nvram
S1#delete vlan.dat
Delete filename [vlan.dat]? Enter
Delete flash:/vlan.dat? [confirm] Enter
Step 2. Reload the switches.
S1#reload
Proceed with reload? [confirm]Enter
Wait for all the link lights to return to green. To accelerate this process, switch back and forth between Simulation and Reatime mode.
Step 3. Click Capture/Forward to send ARP request and pings.
After the switches reload and the link lights return to green, the network is ready to forward your ARP and ping traffic. Click the Capture/Forward button to step through the process. Notice that the switches now forward the ARP requests out all ports, except the port on which the ARP request was received. This default action of switches is why VLANs can improve network performance. Broadcast traffic is contained within each VLAN.
Notice that the ping from PC1 to PC6 still fails. Why? What is required for this ping to succeed?
