Section 14 Tasks
- Read today’s lesson notes (below)
- Review yesterday’s lesson notes
- Complete today’s lab
- Read the ICND1 cram guide
- Spend 15 minutes on the subnetting.org website
Dynamic Host Configuration Protocol (DHCP) is used by hosts to gather initial configuration information, which includes parameters such as IP address, subnet mask, and default gateway, upon boot up. Since each host needs an IP address to communicate in an IP network, DHCP eases the administrative burden of manually configuring each host with an IP address.
Domain Name System (DNS) maps host names to IP addresses, enabling you to type “www.in60days.com” into your web browser instead of the IP address of the server on which the site is hosted.
Today you will learn about the following:
- DHCP operations
- Configuring DHCP
- Troubleshooting DHCP issues
- DNS operations
- Configuring DNS
- Troubleshooting DNS issues
This lesson maps to the following CCNA syllabus requirement:
- Configure and verify DHCP (IOS router)
- Configure router interfaces to use DHCP
- DHCP options
- Excluded addresses
- Lease time
DHCP Functionality
DHCP Operations
DHCP simplifies network administrative tasks by automatically assigning IP information to hosts on a network. This information can include IP addresses, subnet masks, and default gateways, and is usually assigned when the host boots up.
When the host first boots up, if it has been configured to use DHCP (which most hosts are), it will send a Broadcast message asking for IP information to be allocated. The Broadcast will be heard by the DHCP server and the information will be relayed.
Farai says – “This is assuming that they are on the same subnet. If they are not, then see the ip helper-address
command below.”
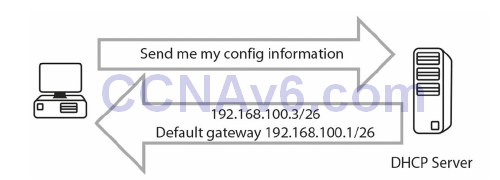
Figure 14.1 – Host Requests IP Configuration Information
DHCP actually uses UDP ports 67 and 68 to communicate over the network, and, of course, actual servers are usually used as DHCP servers, although routers can also perform this role, if required. Routers can also be configured to obtain their IP address from a DHCP server, if required, although this is rarely done. The command to configure this is:
Router(config-if)#ip address dhcp
DHCP states for clients are as follows:
- Initialising
- Selecting
- Requesting
- Bound
- Renewing
- Rebinding
DHCP servers can be configured to give an IP address to a host for a specified period called the lease time. This can be for hours or days. You can and should reserve IP addresses which cannot be allocated to hosts on the network. These IP addresses will already be in use on router interfaces or for servers. If you fail to do this, you may see duplicate IP address warnings on your network because the DHCP server has allocated your address to a host.
The full DHCP request and assign process can be seen in Figure 14.2 below:
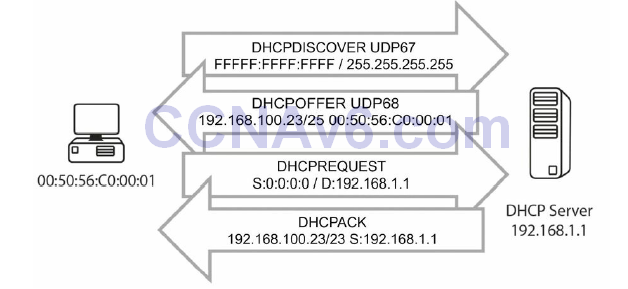
Figure 14.2 – DHCP Request and Allocation Process
1. DHCP Discover packet: When a device boots up and it is configured to obtain an address via DHCP, it sends a Broadcast sourced from UDP port 68 (bootpc) out to UDP port 67 (bootps). The packet will reach every device on the network, including any possible DHCP servers located there.
DHCP Offer packet: The DHCP servers on the local network see the broadcasted Discover message sent by the client and send back a response (DHCP Offer packet) using UDP source port bootps 67 and destination port bootpc 68, also in the form of a Broadcast address, because the client still doesn’t have an IP address so it cannot receive Unicast packets.
2. DHCP Request packet: Once the client workstation receives an offer made by the DHCP server, it will send a Broadcast (to let all DHCP servers learn that it has accepted an offer from a server) DHCP Request message to a specific DHCP server, again using UDP source port bootpc 68 and destination port bootps 67. The client might have received offers from multiple DHCP servers, but it only needs a single IP address so it must choose a DHCP server (based on an identifier), and this is usually done on a “first-come, firstserved” basis.
3. DHCP ACK packet: The DHCP server sends another Broadcast message to confirm the IP
address allocation to that specific client, again using UDP source port bootps 67 and
destination port bootpc 68.
DHCP Reservations
A DHCP server can be configured to provide IP addresses in a number of different ways, including:
- Dynamic allocation
- Automatic allocation
- Static allocation
A very common approach to assigning addresses via the DHCP server is using a dynamic allocation process, in which the DHCP server is configured with a big pool of IP addresses and assigns one of them to clients based on their requests. When the device lease period expires or the device leaves the network, the particular IP address is handed back to the DHCP server, and then it can be assigned to another client.
Another method for assigning IP addresses using a DHCP server is called automatic allocation, which is a very similar process to dynamic allocation but using this approach, the DHCP server tries to keep a list of all the past assignments, and if an “old” client requests an IP address, it will be assigned the same one as before (i.e., the previous time it requested an IP address). Automatic allocation is a less efficient way of assigning IP addresses, but if you have a very large pool of IP addresses available, this is a very smart way to almost guarantee clients will get the same IP address every time they get active in a network.
Static allocation of IP addresses by a DHCP server implies defining the MAC addresses that you expect to see on the network and manually assigning a unique IP address for each of them, thus administratively building a MAC-to-IP association table. This is commonly used in a server environment because servers must use predictable IP addresses in order to be accessed.
DHCP Scopes
Network administrators who want to configure a DHCP server also need to configure DHCP scopes as part of this process. A scope is a grouping of IP addresses for a particular section of the network. Each subnet usually has its own scope.
A scope can also be a contiguous pool of addresses available for allocation by the DHCP server. Most servers also offer the functionality of excluding some addresses from the pool in order to avoid allocating them dynamically to clients. The excluded addresses are usually those IP addresses manually assigned to servers (and network devices) in the network.
Inside the defined DHCP scopes you can configure a number of parameters, such as:
- IP address range
- Subnet mask
- Lease duration
- Default gateway
- DNS server
- WINS server
Depending on the DHCP server used, you might be able to create different scopes with different parameters, usually associated with different subnets.
DHCP Leases
One of the major advantages offered by DHCP is the ability to lease an IP address, meaning assigning it on a temporary basis. Usually when a client leaves the network, that particular assigned IP address becomes free and can be allocated to another device by the DHCP server.
DHCP leases are related to every DHCP allocation and define for how long a user is allowed to use an allocated IP address. This parameter is usually administratively configured inside the DHCP scope. Whenever a client reboots it will have to ask the DHCP server again for an IP address. The DHCP server is usually configured to re-allocate the same address and extend the lease for the specific client.
Workstations can also manually release the IP address, for example, in these situations:
- The device is turned off indefinitely
- The device moves to another subnet (e.g, to a wireless network from a wired network)
The leasing process has a number of timers associated with it, so you can be sure that you are always going to have an IP address that is updated on every network device. The two important DHCP timers are as follows:
- Renewal (T1) timer (default 50% of the lease time): Whenever a workstation obtains an IP address, this timer starts up, and when 50% of the lease time has been reached, the DHCP client will try to renew its lease with the original DHCP server.
- Rebinding (T2) timer (default: 87.5% of the lease time): This second timer is used in situations in which the DHCP server does not answer or confirm the allocation extension after the renewal timer expires. This timer states that if 7/8ths of the lease time has passed, the client will try to find (send a DHCP Request) other DHCP servers which might be able to provide a DHCP address.
By having the lease process in place and correlated to the timers presented above, you can be assured that you will always have an IP address in a timely manner without any downtime associated with this and will automatically have a way to build redundancy into the DHCP process.
The T1 and T2 timers are presented in relation to the lease time in Figure 14.3 below:
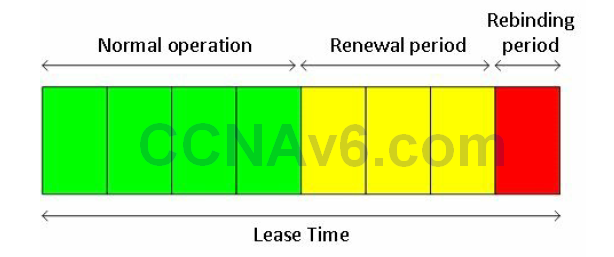
Figure 14.3 – DHCP Lease Timers
DHCP Options
In DHCP, there is a special field available that helps extend the capabilities of this automatic configuration process. You can put many different configuration options inside this field, which are also present in the DHCP RFC.
NOTE: BOOTP options were called “vendor extensions.”
DHCP offers 256 option values, from which only 254 are usable because 0 is the pad option and 255 is the end option. Many DHCP options are commonly known parameters used often, including:
- Subnet mask
- Domain name server
- Domain name
Through the years, additional DHCP options have been added, especially for VoIP use, such as the following:
- Option 129: call server IP address
- Option 135: HTTP proxy for phone-specific applications
All of these options are configured directly on the DHCP server, but not all DHCP servers offer the ability to set DHCP options. If network administrators would like to use these features, they should utilise an enterprise-level DHCP server. When using small routers as DHCP servers for home offices, there may be no benefit from such functionalities.
Configuring DHCP
DHCP Servers on Cisco Routers
The first step is enabling the DHCP service on the router. This is done using the service dhcp command, as exemplified below:
Router#configure terminal
Enter configuration commands, one per line. End with CNTL/Z.
Router(config)#service dhcp
The next step is to create a DHCP pool which defines the IP address pool that will be allocated to clients. In this example, pool name “SUBNET_A” will offer IP addresses from the 192.168.1.0/24 range:
Router(config)#ip dhcp pool SUBNET_A
Router(dhcp-config)#network 192.168.1.0 255.255.255.0
Router(dhcp-config)#default-router 192.168.1.1
Router(dhcp-config)#dns-server 8.8.8.8
Router(dhcp-config)#domain-name Network+
Router(dhcp-config)#lease 30
The DHCP Pool Configuration mode is also the place where you can configure other DHCP options. In the configuration output above, the following parameters were configured:
- Default gateway: 192.168.1.1 (the router interface assigned to the network it serves as a
DHCP server) - DNS server: 8.8.8.8
- Domain name: Network+
- Lease time: 30 days
If needed, you can also configure some excluded addresses from the 192.168.1.0/24 range. Let’s say you want to exclude the router interface IP address (192.168.1.1) and the 192.168.1.250 to 192.168.1.255 address range, from which you would manually assign addresses to servers in your network. This is done using the configuration below:
Router(config)#ip dhcp excluded-address 192.168.1.1
Router(config)#ip dhcp excluded-address 192.168.1.250 192.168.1.255
To verify the clients currently served by the router DHCP server, you can use the commands below:
Router#show ip dhcp binding
Bindings from all pools not associated with VRF:
IP address   Client-ID/  Lease expiration  Type  Hardware address/
192.168.1.2  Mar 02 2014 12:07 AM     Automatic 0063.6973.636f.2d63
In the output above, a single client was served by the DHCP server and was assigned the first non-excluded IP address from the DHCP scope: 192.168.1.2. You can also see the lease expiration date and the device MAC address.
DHCP Clients on Cisco Routers
In addition to DHCP server functionality, Cisco IOS routers also permit configuring the interfaces as DHCP clients. This means that interfaces will require an address using the standard DHCP process, and any server present on the specific subnet can allocate the IP addresses.
The commands to configure a router interface as a DHCP client are as follows:
Router(config)#int FastEthernet0/0
Router(config-if)#ip address dhcp
Once a DHCP server allocates an IP address, the following notification (which includes the address and mask) will be visible on the router console:
*Mar 1 00:29:15.779: %DHCP-6-ADDRESS_ASSIGN: Interface FastEthernet0/0 assigned DHCP
address 10.10.10.2, mask 255.255.255.0, hostname Router
The DHCP allocation method can be observed with the show ip interface brief command:
Router#show ip interface brief
Interface        IP-Address   OK? Method  Status                Protocol
FastEthernet0/0  10.10.10.2   YES  DHCP   up up
FastEthernet0/1  unassigned   YES  unset  administratively down down
DHCP Packet Analysis
In order to practically understand the topics presented in this module, some traffic captures on the devices involved in the examples above will be generated. After the DHCP server is configured and the client workstation boots up, the four-step DHCP process occurs, as can be observed in the screenshot below:

Figure 14.4 – DHCP Four-Step Process
The DHCP Discover packet components can be observed below:
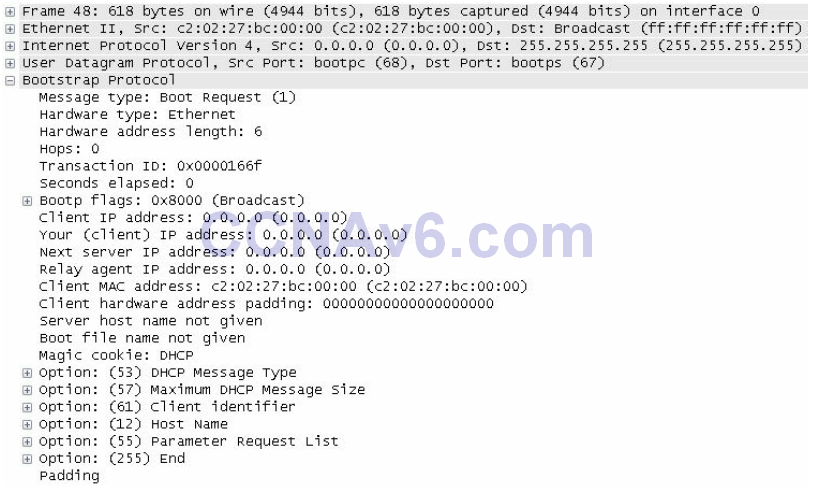
Figure 14.5 – DHCP Discover Packet
As you can see in the screenshot, the packet was sent by the client who broadcasted it on the network (destination 255.255.255.255). You can also see the message type “Boot Request (1).” The next packet is the DHCP Offer packet, presented below:
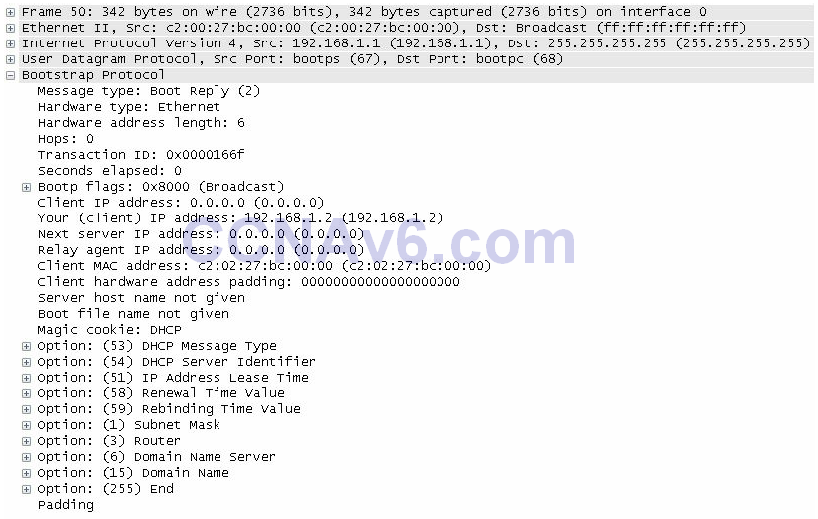
Figure 14.6 – DHCP Offer Packet
This packet was sent by the server (source IP: 192.168.1.1) to the Broadcast address (destination: 255.255.255.255) and it contains the proposed IP address (192.168.1.2). You can also see the message type “Boot Reply (2).”
The third packet is the DHCP Request:
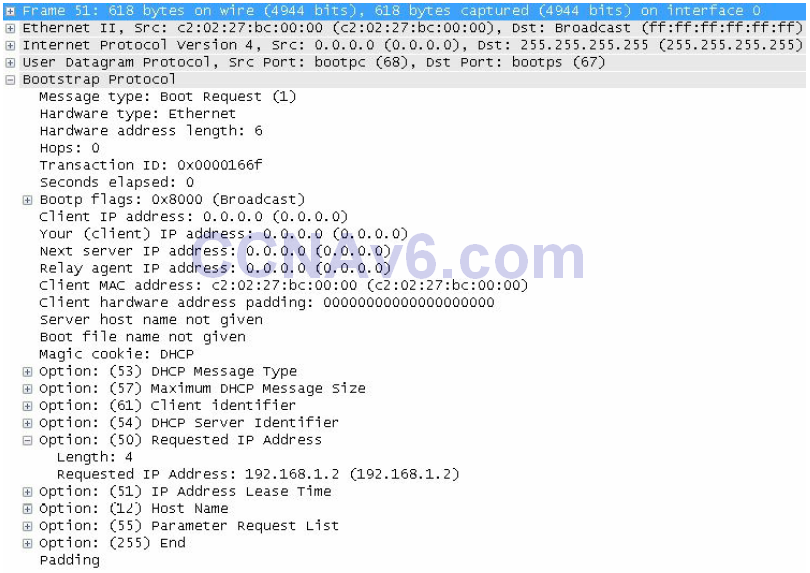
Figure 14.7 – DHCP Request Packet
The DHCP Request packet is sent by the client to the Broadcast address. You can see the message type “Boot Request (1).” This packet is similar to the initial DHCP Discover packet but contains a very important field, which is Option 50: Requested IP Address (192.168.1.2). This is exactly the same IP address offered by the DHCP server in the DHCP Offer packet, and the client confirms it and accepts it.
The last packet in the DHCP allocation process is the DCHP ACK packet sent by the server:
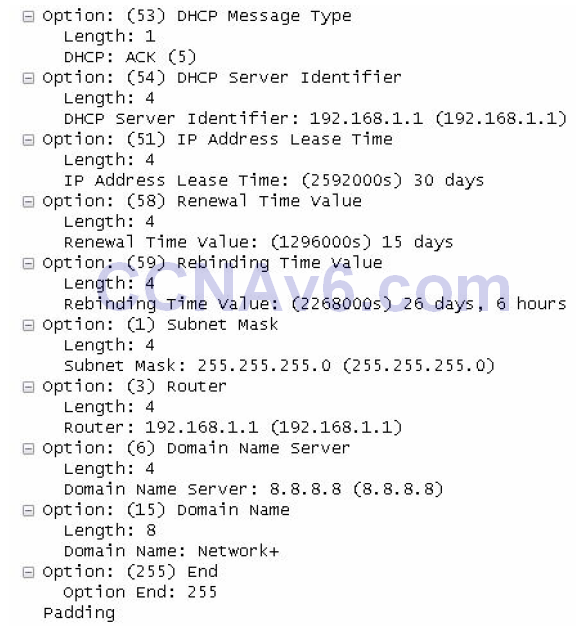
Figure 14.8 – DHCP ACK Options Packet
This packet is sourced by the DHCP server and broadcasted on the network; it also contains some extra fields as seen in the screenshot above:
- DHCP Server Identifier: the DHCP server IP address (192.168.1.1)
- All of the options configured on the router:
- Lease time: 30 days (and the derived renewal time and rebinding time values discussed earlier)
- Subnet mask: 255.255.255.0
- Default gateway (router): 192.168.1.1
- DNS server: 8.8.8.8
- Domain name: Network+
Troubleshooting DHCP Issues
As with NAT, DHCP issues are almost always due to an error in the configuration (jokingly referred to as a Layer 8 issue, meaning somebody messed up).
The service dhcp command is turned on by default, but sometimes it has been manually disabled by a network administrator for some reason. (I’ve seen network administrators call Cisco with urgent routing issues on their network after they entered the no ip routing command on their router – seriously!)
DHCP packets need to be permitted through your router if you are using a server on another subnet to administer DHCP configurations. DHCP uses Broadcast messages as part of its process (which routers won’t forward), so the IP address of the DHCP server needs to be added to the router to allow it to forward the Broadcast message as a Unicast packet. The command ip helper-address achieves this. This is another exam-favourite question!
You can also use the following debug commands as part of your troubleshooting process:
debug ip dhcp server events
debug ip dhcp server packet
Please ensure that you type out ALL of these commands onto a router. There is no way on Earth that you will remember them by reading them on a page. Try out the configurations, make mistakes, post questions, break it on purpose (not on a live network), and fix it again.
DNS Operations
DNS maps hostnames to IP addresses (not the other way around). This allows you to browse a web address from your web browser instead of the server IP address.
DNS uses UDP port 53 when a host or a router wants to resolve a domain name to an IP address (or vice versa). TCP port 53 is used between two DNS servers when they want to sync or share their databases.
Configuring DNS
If you want to permit your router to find a DNS server on the web, then use the command ip name-server 1.1.1.1, or the relevant IP address of the server.
You can also set a hostname to the IP address table on your router to save time or to make it easier to remember which device to ping or connect to, as shown in the output below:
Router(config)#ip host R2 192.168.1.2
Router(config)#ip host R3 192.168.1.3
Router(config)#exit
Router#ping R2
Router#pinging 192.168.1.2
!!!!!
Troubleshooting DNS Issues
A default command on the router configuration will be ip domain-lookup. If this command has been disabled, then DNS won’t work. Sometimes router administrators disable it because when you mistype a command you have to wait several seconds while the router performs a lookup. You can turn off DNS lookups with the following command:
Router(config)#no ip domain-lookup
Access control lists often block DNS, so this is another possible cause of problems. You can debug DNS on the router with the debug domain command.
Section 14 Questions
- DHCP simplifies network administrative tasks by automatically assigning _______ to hosts on a network.
- DHCP uses UDP ports _______ and _______.
- What are the six DHCP states for clients?
- Which command will prevent IP addresses 192.168.1.1 to 192.168.1.10 from being used in the pool?
- Which command will set a DHCP lease of 7 days, 7 hours, and 7 minutes?
- Which command will enable the router to forward a DHCP Broadcast as a Unicast?
- DNS uses UDP port _______.
- Which command will set a DNS server address of 192.168.1.1 on your router?
- If the _______ _______-_______ command has been disabled on your router, then DNS won’t work.
- Which command will debug DNS packets on your router?
Section 14 Answers
- IP information (IP addresses).
- 67 and 68.
- Initialising, Selecting, Requesting, Bound, Renewing, and Rebinding.
- The ip dhcp excluded-address 192.168.1.1 192.168.1.10 command.
- The lease 7 7 7 command under DHCP Pool Configuration mode.
- The ip helper-address command.
- 53.
- The ip name-server 192.168.1.1 command.
- ip domain-lookup.
- The debug domain command.
Section 14 Labs
DHCP on a Router Lab
Topology

Purpose
Learn how routers can be used as DHCP servers.
Walkthrough
1. If you are using your home PC or laptop, set the network adapter to obtain the IP address
automatically. You can also set this in Packet Tracer. Connect the PC to your router
Ethernet port with a crossover cable.
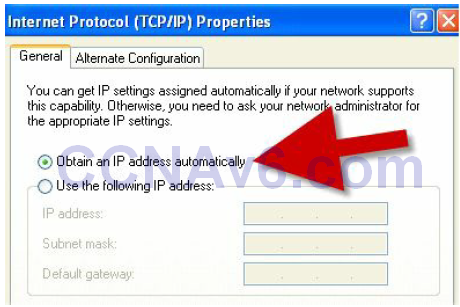
2. Add the IP address 172.16.1.1 255.255.0.0 to your router interface. Please see previous labs
if you can’t remember how to do this. Make sure you no shut it.
3. Configure your DHCP pool. Then, configure a lease of 3 days, 3 hours, and 5 minutes for your address. Lastly, exclude all the addresses from 1 to 10 from being assigned to hosts. Presume that these are already in use for other servers or interfaces.
Router#conf t
Router(config)#ip dhcp pool 60days
Router(dhcp-config)#network 172.16.0.0 255.255.0.0
Router1(dhcp-config)#lease 3 3 5 ← command won’t work on Packet Tracer
Router1(dhcp-config)#exit
Router(config)#ip dhcp excluded-address 172.16.1.1 172.16.1.10
Router(config)#
4. Issue an ipconfig /all command to check whether an IP address has been assigned to your PC. You may need to issue an ipconfig /renew command if an old IP address is still in use.
PC>ipconfig /all
Physical Address................: 0001.C7DD.CB19
IP Address......................: 172.16.0.1
Subnet Mask.....................: 255.255.0.0
Default Gateway.................: 0.0.0.0
DNS Servers.....................: 0.0.0.0
5. If you wish, you can go back into the DHCP pool and add a default gateway and a DNS server address, which will also be set on the host PC.
Router(config)#ip dhcp pool 60days
Router(dhcp-config)#default-router 172.16.1.2
Router(dhcp-config)#dns-server 172.16.1.3
PC>ipconfig /renew
IP Address......................: 172.16.0.1
Subnet Mask.....................: 255.255.0.0
Default Gateway.................: 172.16.1.2
DNS Server......................: 172.16.1.3
DNS on a Router Lab
Work this lab on a router that has some kind of connectivity to the Internet. Make sure it can ping a public IP address, like 8.8.8.8, which is a Google DNS server. Configure this as a name server:
ip name-server 8.8.8.8
Then try to resolve public website names, for example, by pinging www.cisco.com.
