Packet Tracer – Configuring Basic EIGRP with IPv6 (Instructor Version)
Instructor Note: Red font color or Gray highlights indicate text that appears in the instructor copy only.
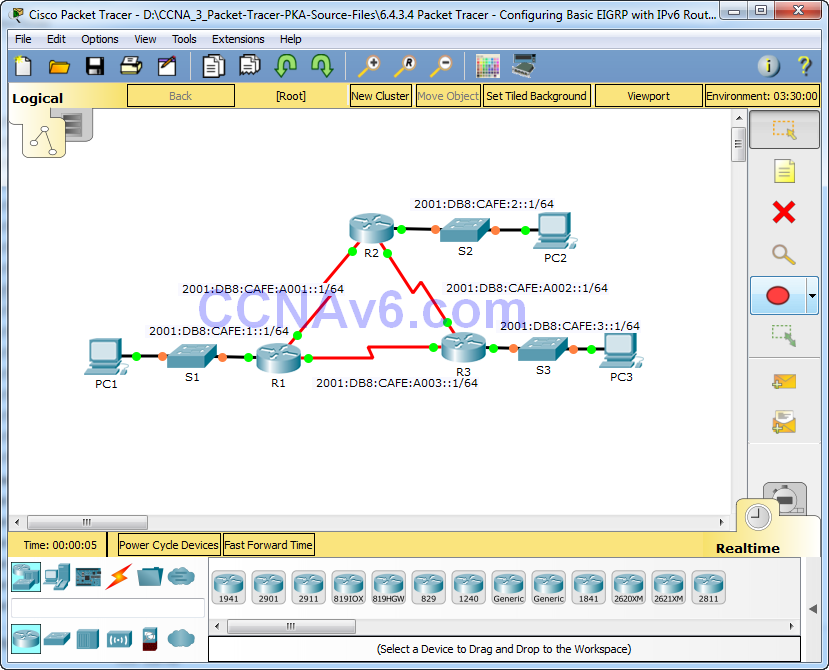
Topology

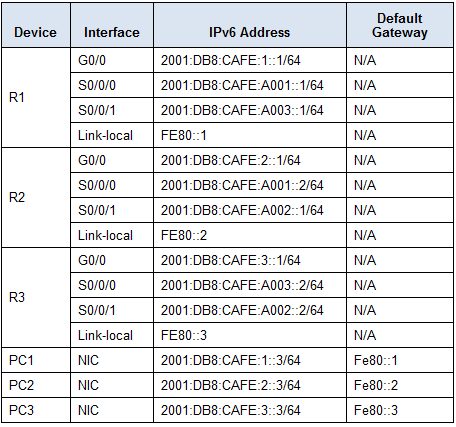
Addressing Table

Objectives
Part 1: Configure EIGRP for IPv6 Routing
Part 2: Verify IPv6 EIGRP for IPv6 Routing
Scenario
In this activity, you will configure the network with EIGRP routing for IPv6. You will also assign router IDs, configure passive interfaces, verify the network is fully converged, and display routing information using show commands.
EIGRP for IPv6 has the same overall operation and features as EIGRP for IPv4. There are a few major differences between them:
EIGRP for IPv6 is configured directly on the router interfaces.
With EIGRP for IPv6, a router-id is required on each router or the routing process will not start.
The EIGRP for IPv6 routing process uses a “shutdown” feature.
Part 1: Configure EIGRP for IPv6 Routing
Step 1: Enable IPv6 routing on each router.
R1(config)# ipv6 unicast-routing

R2(config)# ipv6 unicast-routing

R3(config)# ipv6 unicast-routing
Step 2: Enable EIGRP for IPv6 routing on each router.
The IPv6 routing process is shutdown by default. Issue a command that will enable EIGRP for IPv6 routing in R1, R2 and R3.
Enable the EIGRP process on all routers and use 1 as the Autonomous System number.
R1(config)# ipv6 router eigrp 1
R1(config-rtr)# no shutdown

R2(config)# ipv6 router eigrp 1
R2(config-rtr)# no shutdown

R3(config)# ipv6 router eigrp 1
R3(config-rtr)# no shutdown
Step 3: Assign a router ID to each router.
The router IDs are as follows:
- R1: 1.1.1.1
- R2: 2.2.2.2
- R3: 3.3.3.3
R1(config-rtr)# eigrp router-id 1.1.1.1

R2(config-rtr)# eigrp router-id 2.2.2.2

R3(config-rtr)# eigrp router-id 3.3.3.3
Step 4: Using AS 1, configure EIGRP for IPv6 on each interface.
R1(config)# int g0/0
R1(config-if)# ipv6 eigrp 1
R1(config)# int s0/0/0
R1(config-if)# ipv6 eigrp 1
R1(config)# int s0/0/1
R1(config-if)# ipv6 eigrp 1

R2(config)# int g0/0
R2(config-if)# ipv6 eigrp 1
R2(config)# int s0/0/0
R2(config-if)# ipv6 eigrp 1
R2(config)# int s0/0/1
R2(config-if)# ipv6 eigrp 1

R3(config)# int g0/0
R3(config-if)# ipv6 eigrp 1
R3(config)# int s0/0/0
R3(config-if)# ipv6 eigrp 1
R3(config)# int s0/0/1
R3(config-if)# ipv6 eigrp 1
Part 2: Verify EIGRP for IPv6 Routing
Step 1: Examine neighbor adjacencies.
Use the command show ipv6 eigrp neighbors to verify that the adjacency has been established with its neighboring routers. The link-local addresses of the neighboring routers are displayed in the adjacency table.
Step 2: Examine the IPv6 EIGRP routing table.
Use the show ipv6 route command to display the IPv6 routing table on all routers. EIGRP for IPv6 routes are denoted in the routing table with a D.
Step 3: Verify the parameters and current state of the active IPv6 routing protocol processes.
Use the command show ipv6 protocols to verify the configured parameter.
Step 4: Verify end-to-end connectivity.
PC1, PC2, and PC3 should now be able to ping each other. If not, troubleshoot your EIGRP configurations.
