RIP stands for Routing Information Protocol that is a distance-vector routing protocols. It uses hop count metric to calculate the best routing path. RIP is an open standard protocol means it can be used on any router. Since it supports only 15 hops hence it is used for small networks. There are two versions of RIP: RIPv2 and RIPv2. RIPv2 has some additional features. The basic features of RIPv1 and RIPv2 are same. The following table lists the basic differences between the RIPv1 and RIPv2 routing protocols.
| Sr. No. | Feature | RIPv1 | RIPv2 |
| 1 | CIDR and VLSM | Does not support | Support |
| 2 | Authentication | Does not support | Support |
| 3 | Discontinuous network | Does not support | Support |
To perform this exercise, first you need to create a network topology.
To do so, load the Topology that you have created in the previously in Packet Tracer and add a new router. Set the routers name as mentioned in the following figure. Connect the new router named Router3 to Router2 using the FastEthernet (in short, Fa) interfaces. For this, you need to use the cross-over cable.
First, we would like to explain the IP addresses configured for this topology. The following table lists the IP addresses used on the devices used in this topology.
| Sr. No. | Device | Interface | IP Address |
| 1 | Router1 | Fa0/ 1 | 10.0.0.1/ 8 |
| S1/ 0 | 192.168.1.1/ 24 | ||
| 2 | Router2 | S1/ 0 | 192.168.1.1/ 24 |
| Fa0/ 0 | 20.0.0.1/ 8 | ||
| Fa0/ 1 | 150.150.150.1/ 24 | ||
| 3 | Router3 | Fa0/ 0 | 150.150.150.2/ 24 |
| 4 | Switch1 | N/ A | |
| 5 | Switch2 | N/ A | |
| 6 | PC0 | Fa0 | 10.0.0.2/ 8 |
| 7 | PC1 | Fa0 | 10.0.0.3/ 8 |
| 8 | PC2 | Fa0 | 20.0.0.2/ 8 |
| 9 | PC3 | Fa0 | 20.0.0.3/ 8 |
The following figure shows the topology that we are going to use for this exercise.
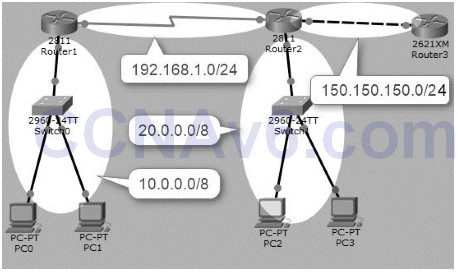
Configure IP Addresses
Since, you are using Basic Topology, in which, the fa0/ 0 and serial1/ 0 interfaces of Router1 and Router2 are already configured with the appropriate IP addresses. You just need to configure IP addresses on the fa0/ 1 interfaces on Router2 and Rourer3. To do so, you need to perform the following steps:
1. On Router2, configure the 150.150.150.1/ 24 IP address on the fa0/ 1 interface.
Router2( config)# interface fa0/ 1
Router2( config-if)# ip add 150.150.150.1 255.255.255.0
Router2( config-if)# no shut
2. On Router3, configure the 150.150.150.1.2/ 24 IP address on the fa0/ 1 interface.
Router( config)# hostname Router3
Router3( config)# interface fa0/ 1
Router3( config-if)# ip add 150.150.150.2 255.255.255.0
Router3( config-if)# no shut
Configuring RIPv1
Once you have configured the IP addresses on Router2 and Router3, configure the RIPv1 routing protocol.
1. On Router1, execute the following commands to configure RIPv1 routing protocol:
Router1( config)# router rip
Router1( config-router)# network 10.0.0.0
Router1( config-router)# network 192.168.1.0
Router1( config-router)# exit
Router1( config)#
2. On Router2, execute the following commands to configure RIPv1 routing protocol:
Router2( config)# router rip
Router2( config-router)# network 20.0.0.0
Router2( config-router)# network 192.168.1.0
Router2( config-router)# network 150.150.150.0
Router2( config-router)# exit
Router2( config)#
3. On Router3, execute the following commands to configure RIPv1 routing protocol:
Router3( config)# router rip
Router3( config-router)# network 150.150.150.0
Router3( config-if)# exit
Router3( config)# do show ip route
4. Verify the routes learned by the RIP protocol.
5. The following figure shows the RIP routing table of Router2 (hostname Router3). You can see that the routes are added through the RIP protocol.
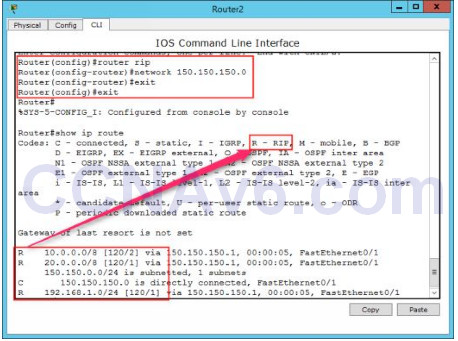
Verifying RIPv1 Configuration
1. To verify and test the RIPv1 configuration, you can use the following commands:
Use the show ip protocols command on Router3 to verify which routing protocol is configured.
Router3# show ip protocols
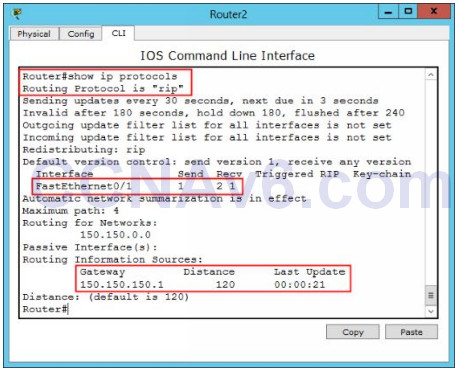
2. To view the RIP messages being sent and received, use the debug ip rip command.
Router3# debug ip rip
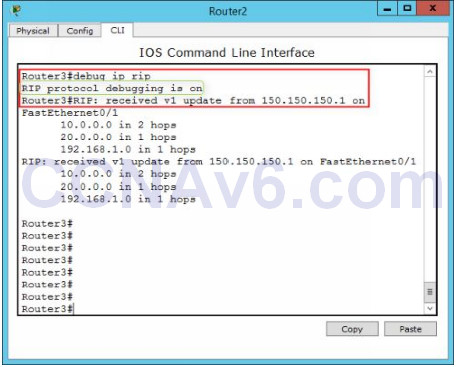
3. To stop the debugging process, type the undebug all command.
Router3# undebug all
Configuring RIPv2
The configuration process of the RIPv2 protocol is similar to configuring RIPv1 protocol. To configure the RIPv2 routing protocol, you just need to type version 2 command before executing the network command. To configure the RIPv2 protocol, execute the following command on each router.
1. On Router1, execute the following commands.
Router1( config)# router rip
Router1( config-router)# version 2
2. On Router2, execute the following commands.
Router2( config)# router rip
Router2( config-router)# version 2
3. On Router3, execute the following commands.
Router3( config)# router rip
Router3( config-router)# version 2
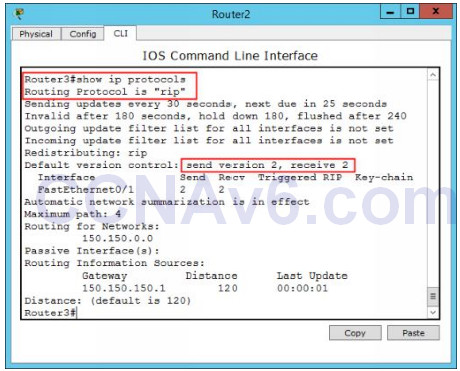
4. Once you have executed the preceding commands, execute the following command on each router, and verify the configuration:
Router# show ip rip protocols
Removing the RIP Routing
To remove the routes learned by the RIP protocol, execute the following commands on each router:
1. On Router1, execute the following commands.
Router1( config)# router rip
Router1( config-router)# no network 10.0.0.0
Router1( config-router)# no network 192.168.1.0
Router1( config-router)# exit
Router1( config)# exit
Router1# clear ip route *
2. On Router2, execute the following commands.
Router2( config)# router rip
Router2( config-router)# no network 20.0.0.0
Router2( config-router)# no network 192.168.1.0
Router2( config-router)# no network 150.150.150.0
Router2( config-router)# exit
Router1( config)# exit
Router1# clear ip route *
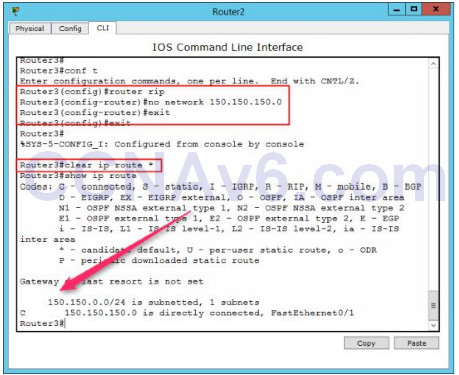
3. On Router3, execute the following commands.
Router3( config)# router rip
Router3( config-router)# no network 150.150.150.0
Router3( config-router)# exit
Router1( config)# exit
Router1# clear ip route *
4. Now, execute the show ip route command and verify that the routes, learned by RIP protocol, have been deleted as shown in the following figure.
Preparing Topology for the Next Exercise
Once, you have deleted the routes learned by the RIP protocol on each router, save the configuration changes.
1. To save the configuration changes permanently, execute the following command on each router.
Router1# copy running startup
Router2# copy running startup
Router3# copy running startup
2. On Packet Tracer, click File, select Save As. In the File name text box, type Routing Topology, and then click Save to save this topology.
