Section 9 Tasks
• Read today’s lesson notes (below)
• Complete today’s lab
• Read the ICND1 cram guide
• Spend 15 minutes on the subnetting.org website
Along with subnetting and VLSM, access control lists (ACLs) are one of the bugbear subjects for new Cisco students. Among the problems are learning the IOS configuration commands, understanding ACL rules (including the implicit “deny all” rule), and learning the port numbers and protocol types.
Like any subject, you should take the learning process one step at a time, apply every command you see here to a router, and do lots and lots of labs.
Today you will learn about the following:
• ACL basics
• Standard, extended, and named ACLs
• ACL rules
• Wildcard masks
• ACL configuration
• Troubleshooting ACLs
This module maps to the following CCNA syllabus requirements:
• Describe the types, features, and applications of ACLs
° Standard
° Sequence numbers
° Editing
° Extended
° Named
° Numbered
° Log option
° Configure and verify ACLs in a network environment
ACL Basics
The point of ACLs is to filter the traffic which passes through your router. I don’t know of any network which should permit any traffic type to enter or leave it.
As well as filtering traffic, ACLs can be used to reference NAT pools, to filter your debugging commands, and with route maps (this is outside of the CCNA syllabus requirements). Depending upon the type of ACL you configure, you can filter traffic based on source network or IP addresses, destination network or IP addresses, protocols, or port numbers. You can apply ACLs to any router interface, including your Telnet ports.
The three main types of ACLs are as follows:
• Standard numbered
• Extended numbered
• Standard or extended named
Standard numbered ACLs are the most basic form of ACL you can apply to the router. While they are the easiest to configure, they have the most limited range of filters available. They can only filter based on the source IP address or network. The way to recognise a standard ACL is by the number which precedes the configuration lines; these numbers will be from 1 to 99.
Extended numbered ACLs allow far more granularity but can be trickier to configure and troubleshoot. They can filter a destination or source IP address or network, a protocol type, and a port number. The numbers you can use to configure extended ACLs are 100 to 199, inclusive.
Named ACLs allow you to associate a list of filters with a name rather than a number. This makes them easier to identify in router configurations. Named ACLs can actually be either extended or standard; you choose which at the initial configuration line of the ACL.
For success in the CCNA exam, and to make it as a new Cisco engineer, you need to understand the following:
• Port numbers
• ACL rules
• Command syntax for ACLs
Port Numbers
You simply must know the common port numbers by heart if you want to pass the CCNA exam and to work on live networks. Looking up common port numbers isn’t an option when you have customers watching what you are doing. Here are the most common port numbers you will encounter and will need to know:
TABLE 9.1 – Common CCNA Port Numbers

Access Control List Rules
This is one of the hardest parts to understand. I’ve never seen a complete list of rules written down in one Cisco manual. Some refer to them generally or explain some of them, but then miss others completely. The difficulty is that the rules always apply but (until now) you found them only by trial and error. Here are the rules you need to know:
ACL Rule 1 – Use only one ACL per interface per direction.
This makes good sense. You wouldn’t want to have several ACLs doing different things on the same interface. Simply configure one ACL which does everything you need it to, rather than spreading out filters over two or more lists. I could have added “per protocol” to the above rule because you could have an IPX access control list, but IP is really the only protocol in use in modern networks.

Figure 9.1 – One ACL per Interface per Direction
ACL Rule 2 – The lines are processed top-down.
Some engineers become confused when their ACL doesn’t perform as expected. The router will look at the top line of the ACL, and if it sees a match, it will stop there and will not examine the other lines. For this reason, you need to put the most specific entries at the top of the ACL. For example, take the ACL blocking host 172.16.1.1:
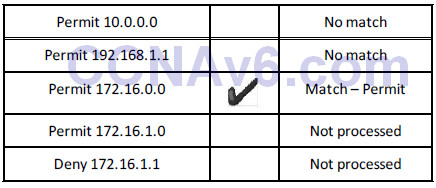
In the example above, you should have put the Deny 172.16.1.1 line at the top, or at least above the Permit 172.16.0.0 statement.
ACL Rule 3 – There is an implicit “deny all” at the bottom of every ACL.
This catches many engineers out. There is an invisible command at the bottom of every ACL. This command is set to deny all traffic which hasn’t been matched yet. The only way to stop this command coming into effect is to configure a “permit all” at the bottom manually. For example, take an incoming packet from IP address 172.20.1.1:
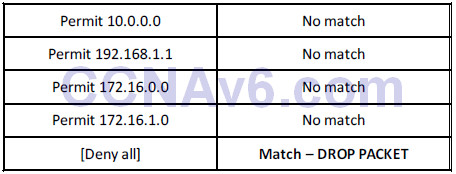
You actually wanted the packet to be permitted by the router, but instead it denies it. The reason is the implicit “deny all,” which is a security measure.
ACL Rule 4 – The router can’t filter self-generated traffic.
This can cause confusion when doing testing before implementing your ACL on a live network. A router won’t filter traffic it generated itself. This is demonstrated in Figure 9.2 below:
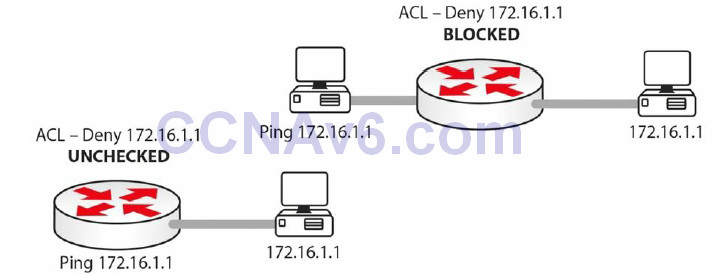
Figure 9.2 – ACL Testing with Self-Generated Traffic
ACL Rule 5 – You can’t edit a live ACL.
In fact, until IOS 12.4 you could only edit a named ACL, not standard or extended ACLs. This was a limitation of ACL architecture. Before IOS 12.4, if you wanted to edit a standard or extended ACL, you had to follow these steps ( I used list 99 as an example):
1. Stop ACL traffic on the interface with the no ip access-group 99 in command.
2. Copy and paste the ACL into Notepad and edit it there.
3. Go into ACL mode and paste in the new ACL.
4. Apply the ACL to the interface again.
Here are the steps on a live router:
ACL created and applied to interface:
Router>en
Router#conf t
Enter configuration commands, one per line. End with CNTL/Z.
Router(config)#access-list 1 permit 172.16.1.1
Router(config)#access-list 1 permit 172.16.2.1
Router(config)#interface FastEthernet0/0
Router(config-if)#ip access-group 1 in
Take off the active interface:
Router(config)#int FastEthernet0/0
Router(config-if)#no ip access-group 1 in
Router(config-if)#^Z
Show the ACLs. Copy and paste into Notepad and make the changes:
Router#show run ← or show ip access lists
access-list 1 permit host 172.16.1.1
access-list 1 permit host 172.16.2.1
You actually need to add an exclamation mark in-between each line of configuration (if you are pasting it in) to tell the router to do a carriage return:
access-list 1 permit host 172.16.1.1
!
access-list 1 permit host 172.16.2.2
The lines being pasted into the router configuration are shown below. Delete the previous ACL and then paste in the new version:
Router#conf t
Enter configuration commands, one per line. End with CNTL/Z.
Router(config)#no access-list 1
Router(config)#access-list 1 permit host 172.16.1.1
Router(config)#!
Router(config)#access-list 1 permit host 172.16.2.2
Router(config)#exit
Router#
%SYS-5-CONFIG_I: Configured from console by console
show ip access
Router#show ip access-lists
Standard IP access list 1
  permit host 172.16.1.1
  permit host 172.16.2.2
Router#
Router(config)#int FastEthernet0/0
Router(config-if)#ip access-group 1 in ← reapply to the interface
The commands above may not work if you are using Packet Tracer. Also, please do try these commands on a router because they are exam topics. Bear in mind that you should disable the ACL on the interface (so it’s no longer live) before you edit it in order to avoid strange or unpredictable behaviour. I’ll show you how to edit live ACLs on IOS 12.4 and later shortly.
ACL Rule 6 – Disable the ACL on the interface.
Many engineers, when they want to test or deactivate the ACL for a while, will actually delete it altogether. This isn’t necessary. If you want to stop the ACL from working, simply remove it from the active interface it is applied to:
 Router(config)#int FastEthernet0/0
Router(config-if)#no ip access-group 1 in
Router(config-if)#^Z
ACL Rule 7 – You can reuse the same ACL.
I’ve seen this often on live networks. You will usually have the same ACL policy throughout your network. Rather than configuring several ACLs, simply refer to the same ACL and apply it to as many interfaces as you require. Figure 9.3 below illustrates this concept:

Figure 9.3 – You Can Reuse an ACL
ACL Rule 8 – Keep them short!
The basic rule with ACLs is to keep them short and focused. Many novice Cisco engineers stretch their ACL over many lines when, with some thought, it could be tightened to just a few lines of configuration. I’ve mentioned previously that you want your most specific lines of configuration on top. This is good practice and saves CPU cycles on the router. Good ACL configuration skills come with knowledge and practise.
ACL Rule 9 – Put your ACL as close to the source as possible.
Cisco documentation advises us to put an EXTENDED ACL as close to the SOURCE as possible and STANDARD ACL as close to the DESTINATION as possible, because that will prevent unnecessary overhead but will still allow any “legitimate” traffic.

Figure 9.4 – Put Your ACL Close to the Source
Farai says – “The official Cisco advice is EXTENDED as close to the SOURCE as possible and STANDARD as close to the DESTINATION as possible.”
Wildcard Masks
Wildcard masks are essential to learn because they are used as part of command line configuration in ACLs and some routing protocols. They exist because there has to be a way to tell the router which parts of an IP address or network address you want to match.
The matching is done at the binary level, but you can easily configure wildcard masks using the same notation you use for subnet masks. A binary 1 tells the router to ignore the digit and a 0 means match the digit.
The easy way to perform wildcard masking for the CCNA exam is simply to ensure that you add a number to the subnet mask to give you a total of 255. So, if your subnet mask in one octet was 192, you would add 63 to it to make 255. If it was 255, you would add 0. Take a look at the examples below:
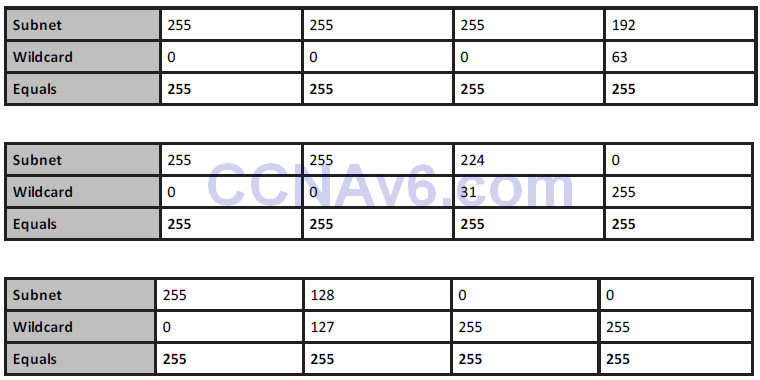
You need to enter a wildcard mask if you want your ACL to match a subnet or an entire network. For example, if you wanted to match 172.20.1.0 255.255.224.0, you would enter the following:
Router(config)#access-list 1 permit 172.20.1.0 0.0.31.255
Matching subnet 192.200.1.0 255.255.255.192 would require the following:
Router(config)#access-list 1 permit 192.200.1.0 0.0.0.63
Be careful when applying network statements with OSPF, which also requires a wildcard mask.
The same principle applies when you have a network with two host bits, as you will need to enter an ACL to match these. For example, matching subnet 192.168.1.0 255.255.255.252 or /30, you will need to enter the following:
Router(config)#access-list 1 permit 192.168.1.0 0.0.0.3
I have left off some configuration, as I just want to show the relevant part. This will match hosts 1 and 2 on the 192.168.1.0 network. If you wanted to match hosts 5 and 6 on the 192.168.1.4/30 network, you would enter the following:
Router(config)#access-list 1 permit 192.168.1.4 0.0.0.3
Read through the subnetting and VLSM notes to understand this concept further. It is important!
Configuring Access Control Lists
As with any skill, repetition makes mastery. As I’ve said before, you must type on a router every example I give, do as many labs as possible, and then make up your own examples. You need to be fast and you need to be accurate, both in the exam and in the real world.
The standard and extended ACLs presented in the next sections are numbered ACLs. These represent the classic way of configuring ACLs. Named ACLs are the other way of configuring ACLs and they are presented in a subsequent section.
Standard ACLs
Standard numbered ACLs are the easiest to configure, so this is the best place to start. Standard ACLs can only filter based on a source network or IP address.

Figure 9.5 – Incoming Packet with Source and Destination
In Figure 9.5 above, the incoming packet has a source and destination address, but your standard ACL will only look at the source address. Your ACL would permit or deny this source address (see Figure 9.6):
Router(config)#access-list 1 permit host 172.16.1.1
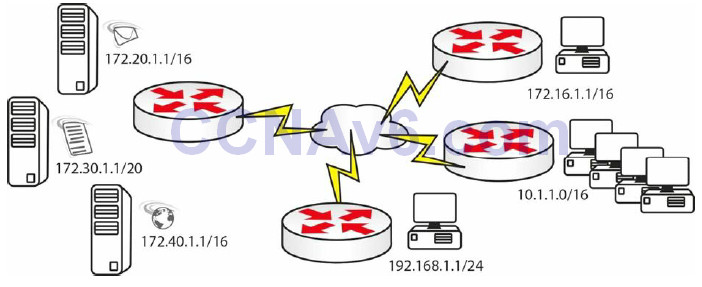
Figure 9.6 – Network with Multiple Hosts/Networks
Router(config)#access-list 1 permit host 172.16.1.1
Router(config)#access-list 1 permit host 192.168.1.1
Router(config)#access-list 1 permit 10.1.0.0 0.0.255.255
This would be applied to the server side router. Remember that there will be an implicit “deny all” at the end of this list, so all other traffic will be blocked.
Extended ACLs
Far more granularity is built into extended numbered ACLs; however, this makes them trickier to configure. You can filter source or destination networks, ports, protocols, and services.
Generally, you can look at the configuration syntax for extended ACLs, as follows:
access list# permit/deny [service/protocol] [source network/IP] [destination network/IP]
[port#]
For example:
access-list 101 deny tcp 10.1.0.0 0.0.255.255 host 172.30.1.1 eq telnet
access-list 100 permit tcp 10.1.0.0 0.0.255.255 host 172.30.1.1 eq ftp
access-list 100 permit icmp any any
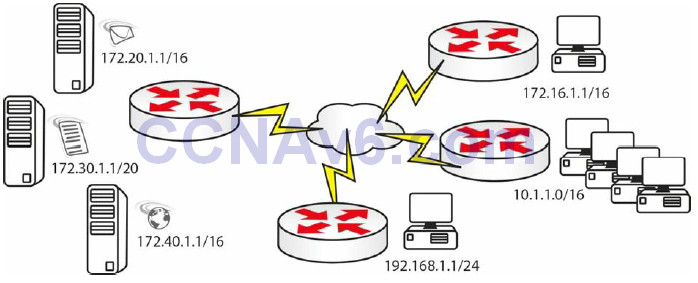
Figure 9.7 – Blocking Server Access Example
An ACL you could configure for the network above, featuring e-mail, web, and file servers, would be as follows (applied on the server side):
access-list 100 permit tcp host 172.16.1.1 host 172.20.1.1 eq smtp
access-list 100 permit tcp 10.1.0.0 0.0.255.255 host 172.30.1.1 eq ftp
access-list 100 permit tcp host 192.168.1.1 host 172.40.1.1 eq www
Or, it could be the next ACL, if you had different requirements:
access-list 101 deny icmp any 172.20.0.0 0.0.255.255
access-list 101 deny tcp 10.1.0.0 0.0.255.255 host 172.30.1.1 eq telnet
Or, it could be as follows:
access-list 102 permit tcp any host 172.30.1.1 eq ftp established
The [established] keyword tells the router to permit the traffic only if it was originated by hosts on the inside. The three-way handshake flags (ACK or RST bit) will indicate this.
Named ACLs
Unlike numbered ACLs, named ACLs can be easily identified based on their descriptive name, and this is useful especially in large configurations. They were introduced to add flexibility and ease of management of ACLs. Named ACLs can be considered more of a configuration enhancement, as it does not modify the core ACL structure (it just modifies the way we refer to an ACL).
The syntax is similar to the numbered ACLs, with the major difference of using names instead of numbers to identify ACLs. Just like in the case of numbered ACLs, you can configure standard or extended named ACLs.
Another difference when configuring named ACLs is that you always have to use the ip accesslist command, unlike with numbered ACLs, where you could also use the simple access-list command.
Router(config)#access-list ?
   <1-99>            IP standard access list
   <100-199>         IP extended access list
   <1100-1199>       Extended 48-bit MAC address access list
   <1300-1999>       IP standard access list (expanded range)
   <200-299>         Protocol type-code access list
   <2000-2699>       IP extended access list (expanded range)
   <700-799>         48-bit MAC address access list
   dynamic-extended  Extend the dynamic ACL absolute timer
   rate-limit        Simple rate-limit specific access list
Router(config)#ip access-list ?
   extended    Extended access list
   log-update  Control access list log updates
   logging     Control access list logging
   resequence  Resequence access list
   standard    Standard access list
R1(config)#ip access-list standard ?
   <1-99>       Standard IP access-list number
   <1300-1999>  Standard IP access-list number (expanded range)
   WORD         Access-list name
R1(config)#ip access-list extended ?
   <100-199>    Extended IP access-list number
   <2000-2699>  Extended IP access-list number (expanded range)
   WORD         Access-list name
Named ACLs have a slightly different syntax than the other types of ACLs do (standard numbered and extended numbered). You can also edit live named ACLs, which is a useful feature. You simply need to tell the router that you want to configure a named ACL, and whether you want it to be standard or extended. You can also edit numbered ACLs with later IOS releases, so please check the documentation for your platform.
When creating a named ACL using the ip access-list command, Cisco IOS will place you in the ACL configuration mode where you can enter or remove ACL entries (denied or permitted access conditions). Figure 9.8 below shows an example of a named ACL, followed by the corresponding output:
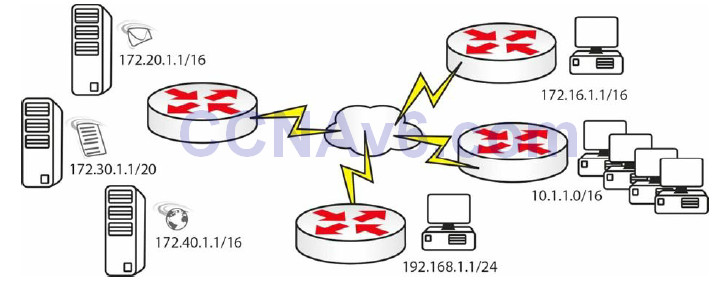
Figure 9.8 – Named ACL
Router(config)#ip access-list extended BlockWEB
Router(config-ext-nacl)#?
Ext Access List configuration commands:
  <1-2147483647>  Sequence Number
  default         Set a command to its defaults
  deny            Specify packets to reject
  dynamic         Specify a DYNAMIC list of PERMITs or DENYs
  evaluate        Evaluate an access list
  exit            Exit from access-list configuration mode
  no              Negate a command or set its defaults
  permit          Specify packets to forward
  remark          Access list entry comment
Router(config-ext-nacl)#deny tcp any any eq 80
Router(config-ext-nacl)#permit ip any any
Named ACL verification can be done using the following commands:
• show ip access-lists: shows all ACLs created on the device.
• show ip access-lists <acl_name>: shows a particular named ACL
Router(config)#do show ip access-lists
Standard IP access list test
       30 permit 10.1.1.1
       20 permit 192.168.1.1
       15 permit 172.20.1.1
       10 permit 172.16.1.1
To learn how you can add or delete ACL entries in a named ACL, please refer to the “ACL Sequence Numbers” section below.
Applying ACLs
In order to come into effect, you must apply your ACL to an interface or router port. I say this because I’ve seen many novice Cisco engineers type the ACL and then wonder why it isn’t working! Or they configure it but apply the wrong ACL number or name to the interface.
If you are applying an ACL to a line, you have to specify it with the access-class command, and to an interface, it is the ip access-group command. Why Cisco have you do this, I will never know!
Here are three examples of ACLs being applied to a port or interface.
Interface:
Router(config)#int FastEthernet0/0
Router(config-if)#ip access-group 101 in
Line:
Router(config)#line vty 0 15
Router(config-line)#access-class 101 in
Interface:
Router(config)#int FastEthernet0/0
Router(config-if)#ip access-group BlockWEB in
ACL Sequence Numbers
With 12.4 onwards, you can see that Cisco IOS adds sequence numbers to each ACL entry. So now I can create an access control list and then remove a line from it.
Router(config)#ip access-list standard test
Router(config-std-nacl)#permit 172.16.1.1
Router(config-std-nacl)#permit 192.168.1.1
Router(config-std-nacl)#permit 10.1.1.1
Router(config-std-nacl)#
Router(config-std-nacl)#exit
Router(config)#exit
Router#
*Jun 6 07:38:14.155: %SYS-5-CONFIG_I: Configured from console by console access
Router#show ip access-lists
Standard IP access list test
       30 permit 10.1.1.1
       20 permit 192.168.1.1
       10 permit 172.16.1.1
Note that the sequence numbers are not displayed in the router running configuration. In order to see them you have to issue a show [ip] access-list command.
Add an ACL Line
To add a new ACL line, you can simply enter the new sequence number and then the ACL statement. The example below shows how you can add line 15 to your existing ACL:
Router#conf t
Enter configuration commands, one per line. End with CNTL/Z.
Router(config)#ip access
Router(config)#ip access-list standard test
Router(config-std-nacl)#15 permit 172.20.1.1
Router(config-std-nacl)#
Router(config-std-nacl)#do show ip access
Router(config-std-nacl)#do show ip access-lists
Standard IP access list test
       30 permit 10.1.1.1
       20 permit 192.168.1.1
       15 permit 172.20.1.1
       10 permit 172.16.1.1
Router(config-std-nacl)#
Remove an ACL Line
To remove an ACL line, you can simply enter the no <seq_number> command, like in the example below where line 20 is deleted:
Router#conf t
Enter configuration commands, one per line. End with CNTL/Z.
Router(config)#ip access
Router(config)#ip access-list standard test
Router(config-std-nacl)#no 20
Router(config-std-nacl)#
Router(config-std-nacl)#do show ip access
Router(config-std-nacl)#do show ip access-lists
Standard IP access list test
       30 permit 10.1.1.1
       15 permit 172.20.1.1
       10 permit 172.16.1.1
Router(config-std-nacl)#
Resequence an ACL
To resequence an ACL, you can use the ip access-list resequence <acl_name> <starting_seq_number> <step_to_increment> command. The behaviour of this command can be examined in the example below:
Router(config)#ip access-list resequence test 100 20
Router(config)#do show ip access-lists
Standard IP access list test
       100 permit 10.1.1.1
       120 permit 172.20.1.1
       140 permit 172.16.1.1
Router(config-std-nacl)#
The resequence command created new sequence numbers, starting from 100, and incremented them by 20 for each new ACL line.
ACL Logging
By default, ACL entries that are matched by packets traversing a router interface create incremental counters that can be analysed using the show ip access-lists command, as can be seen in the example below:
Router#show ip access-lists
Extended IP access list test
     10 deny tcp any any eq 80 (10 matches)
     20 permit ip any any (56 matches)
If you need more detailed information about the traffic that is being matched by the ACL entries, you can configure the log or log-input parameters to the relevant ACL entries.
Router(config)#ip access-list extended test
Router(config)#no 10
Router(config)#10 deny tcp any any eq 80 log
Router#show ip access-lists
Extended IP access list test
    10 deny tcp any any eq 80 log
    20 permit ip any any (83 matches)
In the configuration sample above, ACL logging for test ACL entry 10 is configured. When a packet hits that ACL entry, the ACL counters will continue to increase but the router will also generate a log message that contains details about the specific ACL hit:
%SEC-6-IPACCESSLOGP: list test denied tcp 10.10.10.2(24667) -> 10.10.10.1(80), 1 packet
If you need even more details about the transaction, you can replace the log paramter with the log-input parameter,as you can see in the example below:
Router(config)#ip access-list extended test
Router(config)#no 10
Router(config)#10 deny tcp any any eq 80 log-input
Router#show ip access-lists
Extended IP access list test
    10 deny tcp any any eq 80 log-input
    20 permit ip any any (125 matches)
When the specific ACL entry is hit, a more detailed log message is generated by the router, which includes the incoming interface and the source MAC address:
%SEC-6-IPACCESSLOGP: list test denied tcp 10.10.10.2(14013) (FastEthernet0/0 00aa.aabb.ccdd) -> 10.10.10.1(80), 1 packet
ACL logging can be very useful for troubleshooting to see what exactly is dropped/permitted, but one thing must be noted for real-world situations (this is beyond the scope of the CCNA exam): ACL entries that contain [log] or [log-input] keyword are process-switched by the router (as opposed to being CEF-switched, which is the default in modern routers – this will be covered later in the book). This requires more router CPU cycles, which can become a problem if there is a lot of traffic that is hitting the logged ACL entry.
Using ACLs to Limit Telnet and SSH Access
Besides filtering the traffic on an interface level, ACLs can be associated with many other device features, including filtering traffic on VTY lines. In a previous module, you learned how you can configure Telnet or SSH acsess to a device (e.g., router or switch) using the line vty command.
Sometimes you may not want to accept all Telnet/SSH connections to or from the device. In order to manipulate this you must define an ACL that defines the type of traffic that will be allowed or denied on the VTY line. The ACL can be numbered or named. You associate the ACL to the VTY line using the access-class <acl> [in|out] command.
The following example defines an ACL permitting Telnet traffic from host 10.10.10.1, which will then be applied inbound to the VTY lines:
Router(config)#ip access-list extended VTY_ACCESS
Router(config-ext-nacl)#permit tcp host 10.10.10.1 any eq telnet
Router(config-ext-nacl)#deny tcp any any
Router(config-ext-nacl)#exit
Router(config)#
Router(config)#line vty 0 4
Router(config-line)# access-class VTY_ACCESS in
Router(config-line)#
You can verify the configuration using the following commands:
Router#show run | sect line vty
line vty 0 4
access-class VTY_ACCESS in
.....
Troubleshooting and Verifying ACLs
I think that with an understanding of the configuration commands and rules you should be fine with access control lists. If your ACL isn’t working, first check that there is basic IP connectivity by pinging. Then check whether you have applied your ACL, that there are no typos, and whether you need to allow any IP traffic to pass (remember the implicit “deny all”). Some of the most important verification steps in the ACL troubleshooting process include:
• Verifying the ACL statistics
• Verifying the permitted networks
• Verifying the ACL interface and direction
Verifying the ACL Statistics
After you have successfully configured an ACL and applied it to an interface, it is very important to have a method by which you can verify the correct behaviour of the ACL, especially how many times an ACL entry has been used (hit). Based on the number of hits, you can adjust your filtering policy or you can enhance your ACLs to improve the overall security. Based on your needs, you can verify the ACL statistics on a global level or per interface (starting with IOS 12.4).
Global ACL Statistics
Global ACL statistics can be verifyied using the show ip access-list or show access-list commands, which can refer to a numbered or a named ACL:
Router#show ip access-lists
Extended IP access list test
    10 deny tcp any any eq 80 (10 matches)
    20 permit ip any any (56 matches)
This method may not provide very specific information in situations in which you apply the same ACL on different interfaces, as it offers overall statistics.
Per Interface ACL Statistics
In situations where you want to examine per interface ACL hits, either inbound or outbound, you can use the show ip access-list interface <interface_number> [in|out] command, as illustrated below:
Router#show ip access-list interface FastEthernet0/1 in
Extended IP access list 100 in
    10 permit ip host 10.10.10.1 any (5 matches)
    30 permit ip host 10.10.10.2 any (31 matches)
If no direction is specified, any input or output ACL applied to the specific interface is displayed. This feature is also called “ACL Manageability” and is available starting with IOS 12.4.
Verifying the Permitted Networks
Sometimes, especially in large environments where you have to configure many ACLs, you can make typo errors when configuring the ACL entries and this can lead to wrong traffic flows being blocked on different interfaces. In order to verify the correct ACL entries (permit and deny statements) you can use either the show run | section access-list or the show ip access-list commands, as described in previous sections.
Verifing the ACL Interface and Direction
One common error when applying an ACL to an interface is applying it in the wrong direction, meaning inbound instead of outbound and outbound instead of inbound. This can cause a lot of issues, both from a functionality and security perspective. One of the first steps you should take in an ACL troubleshooting process is verifying that the ACL is applied to the correct interface and in the correct direction.
Multiple commands exist to verify this, including the show run and the show ip access-list interface <interface> [in|out] commands.
Section 9 Questions
1. You can have a named, extended, and standard ACL on one incoming interface. True or
false?
2. You want to test why your ping is blocked on your Serial interface. You ping out from the
router but it is permitted. What went wrong? (Hint: See ACL Rule 4.)
3. Write a wildcard mask to match subnet mask 255.255.224.0.
4. What do you type to apply an IP access control list to the Telnet lines on a router?
5. How can you verify ACL statistics per interface (name the command)?
6. How do you apply an ACL to an interface?
Section 9 Answers
1. False. You can only configure a single ACL on an interface per direction.
2. A router won’t filter traffic it generated itself.
3. 0.0.31.255.
4. access-class.
5. Issue the show ip access-list interface command.
6. Issue the ip access-group <ACL_name> [in|out] command.
Section 9 Labs
Standard ACL Lab
Topology

Purpose
Learn how to configure a standard ACL.
Walkthrough
1. Configure the network above. Add a static route on each router so any traffic for any network leaves the Serial interface. You are doing this because, though not a routing lab, you still need the traffic to route. Add .1 to the Router A Serial interface and .2 to the Router B Serial interface.
RouterA(config)#ip route 0.0.0.0 0.0.0.0 s0/1/0
RouterB(config)#ip route 0.0.0.0 0.0.0.0 s0/1/0
2. Configure a standard ACL on Router A permitting the 192.168.1.0/10 network. By default, all other networks will be blocked.
RouterA(config)#access-list 1 permit 192.168.1.0 0.0.0.63
RouterA(config)#int Serial0/1/0
RouterA(config-if)#ip access-group 1 in
RouterA(config-if)#exit
RouterA(config)#exit
RouterA#
3. Test the ACL by pinging from Router B, which by default will use the 10.0.0.1 address.
RouterB#ping 10.0.0.1
Type escape sequence to abort.
Sending 5, 100-byte ICMP Echos to 10.0.0.1, timeout is 2 seconds:
UUUUU
Success rate is 0 percent (0/5)
4. Test another ping, but source it from 192.168.1.1 and this should work.
RouterB#ping
Protocol [ip]:
Target IP address: 10.0.0.1
Repeat count [5]:
Datagram size [100]:
Timeout in seconds [2]:
Extended commands [n]: y
Source address or interface: 192.168.1.1
Type of service [0]:
Set DF bit in IP header? [no]:
Validate reply data? [no]:
Data pattern [0xABCD]:
Loose, Strict, Record, Timestamp, Verbose[none]:
Sweep range of sizes [n]:
Type escape sequence to abort.
Sending 5, 100-byte ICMP Echos to 10.0.0.1, timeout is 2 seconds:
Packet sent with a source address of 192.168.1.1
!!!!!
Success rate is 100 percent (5/5), round-trip min/avg/max = 31/31/32 ms
Extended ACL Lab
Topology

Purpose
Learn how to configure an extended ACL.
Walkthrough
1. Configure the network above. Add a static route on Router B so any traffic for any network leaves the Serial interface. You are doing this because, though not a routing lab, you still need the traffic to route.
RouterB(config)#ip route 0.0.0.0 0.0.0.0 s0/1/0
2. Add an extended ACL to Router A. Permit Telnet traffic to your Loopback interface only. Remember to permit Telnet also.
RouterA(config)#access-list 100 permit tcp any host 172.20.1.1 eq 23
RouterA(config)#int s0/1/0
RouterA(config-if)#ip access-group 100 in
RouterA(config-if)#line vty 0 15
RouterA(config-line)#password cisco
RouterA(config-line)#login
RouterA(config-line)#^Z
RouterA#
The ACL line above is number 100, which tells the router it is extended. What you want to allow uses TCP. It is allowing TCP from any network destined for host 172.20.1.1 on the Telnet port, which is 23. When you issue a show run command, the router actually replaces the port number with the name, as illustrated below:
access-list 100 permit tcp any host 172.20.1.1 eq telnet
3. Now test a Telnet from Router B. First, Telnet to the Serial interface on Router A, which should be blocked. Then test the Loopback interface.
RouterB#telnet 10.0.0.1
Trying 10.0.0.1 ...
% Connection timed out; remote host not responding
RouterB#telnet 172.20.1.1
Trying 172.20.1.1 ...Open
User Access Verification
Password: ←password won’t show when you type it
RouterA> ←Hit Control+Shift+6 together and then let go and press the X key to quit.
NOTE: We will be covering ACLs in other labs, but you really need to know these cold. For this reason, try other TCP ports, such as 80, 25, etc. In addition, try UDP ports, such as 53. You won’t be able to test them easily without a PC attached to Router B.
Going further, mix up the IP addresses, permitting Telnet (in this example) to the Serial interface but not the Loopback interface. Then put an ACL on Router B instead. I can’t overemphasise how important this is. If you need to wipe the ACL, you can simply type the following:
RouterA(config)#no access-list 100
Named ACL Lab
Topology

Purpose
Learn how to configure a named ACL.
Walkthrough
1. Configure the network above. Add a static route on each router so any traffic for any network leaves the Serial interface. You are doing this because, though not a routing lab, you still need the traffic to route.
RouterA(config)#ip route 0.0.0.0 0.0.0.0 s0/1/0
RouterB(config)#ip route 0.0.0.0 0.0.0.0 s0/1/0
2. Add an extended named ACL on Router B. Permit pings from host 172.20.1.1 but no other hosts or networks.
RouterB(config)#ip access-list extended blockping
RouterB(config-ext-nacl)#permit icmp host 172.20.1.1 any RouterB(config-ext-nacl)#exit
RouterB(config)#int s0/1/0
RouterB(config-if)#ip access-group blockping in
RouterB(config-if)#
3. Now test the ACL with pings from the Serial interface on Router A and the Loopback interface (which should work).
RouterA#ping 192.168.1.1
Type escape sequence to abort.
Sending 5, 100-byte ICMP Echos to 192.168.1.1, timeout is 2 seconds:
UUUUU
Success rate is 0 percent (0/5)
RouterA#ping
Protocol [ip]:
Target IP address: 192.168.1.1
Repeat count [5]:
Datagram size [100]:
Timeout in seconds [2]:
Extended commands [n]: y
Source address or interface: 172.20.1.1
Type of service [0]:
Set DF bit in IP header? [no]:
Validate reply data? [no]:
Data pattern [0xABCD]:
Loose, Strict, Record, Timestamp, Verbose[none]:
Sweep range of sizes [n]:
Type escape sequence to abort.
Sending 5, 100-byte ICMP Echos to 192.168.1.1, timeout is 2 seconds:
Packet sent with a source address of 172.20.1.1
!!!!!
Success rate is 100 percent (5/5), round-trip min/avg/max = 31/34/47 ms
NOTE: You need to understand which service is which, as well as which port numbers various services use. Otherwise, you will really struggle to configure an ACL. This ACL is pretty straightforward and can be achieved with one line. If you had routing protocols running, then they would need to be permitted.
To permit RIP, specify the following:
access-list 101 permit udp any any eq rip
To permit OSPF, specify the following:
access-list 101 permit ospf any any
To permit EIGRP, specify the following:
access-list 101 permit eigrp any any
