Objectives
Upon completion of this chapter, you will be able to answer the following questions:
- What is the history of the Windows operating system?
- What is the architecture of Windows and its operation?
- How do you configure and monitor Windows?
- How is Windows kept secure?
Key Terms
This chapter uses the following key terms. You can find the definitions in the Glossary.
Disk Operating System (DOS)
MS-DOS
vulnerability
Windows Defender
encryption
firewall
hardware abstraction layer (HAL)
kernel
File Allocation Table (FAT)
Extended FAT (exFAT)
Hierarchical File System Plus (HFS+)
Extended File System (EXT)
New Technology File System (NTFS)
Alternate Data Streams (ADSs)
Partition Boot Sector
Master File Table (MFT)
System Files
Basic Input-Output System (BIOS)
Unified Extensible Firmware Interface (UEFI)
master boot record (MBR)
Boot Configuration Database (BCD)
Kernel Mode Code Signing (KMCS)
Session Manager Subsystem (SMSS)
processes
thread
services
registry
domain
domain controllers (DCs)
command line interface (CLI)
PowerShell
Windows Management Instrumentation (WMI)
Task Manager page 49Resource Monitor
Server Message Block (SMB)
netstat
Event Viewer
Introduction (2.0)
From its humble beginnings over 30 years ago in 1985, the Windows operating system has seen many iterations; from Windows 1.0 to today’s current desktop version, Windows 10, and server version, Windows Server 2016.
This chapter covers some of the basic concepts of Windows, including how the operating system works and the tools used to secure Windows endpoints.
Class Activity 2.0.1.2: Identify Running Processes
In this lab, you will use TCP/UDP Endpoint Viewer, a tool in Sysinternals Suite, to identify any running processes on your computer.
Windows Overview (2.1)
In this section, you will learn about Window’s history, architecture, and operations.
Windows History (2.1.1)
In this topic, you will learn about the beginnings of Windows, the history of Windows versions, the Windows graphical user interface (GUI), and Windows vulnerabilities.
Disk Operating System (2.1.1.1)
The first computers did not have modern storage devices such as hard drives, optical drives, or flash storage. The first storage methods used punch cards, paper tape, magnetic tape, and even audio cassettes.
Floppy disk and hard disk storage requires software to read from, write to, and manage the data that they store. A Disk Operating System (DOS) is an operating system that the computer uses to enable these data storage devices to read and write files. The DOS provides a file system which organizes the files in a specific way on the disk. MS-DOS is a DOS created by Microsoft. MS-DOS used a command line as the interface for people to create programs and manipulate data files, as shown in Figure 2-1.
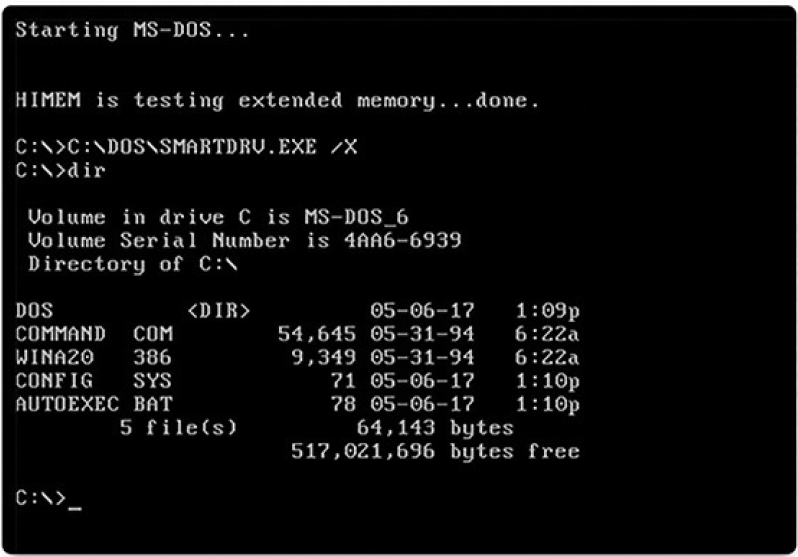
With MS-DOS, the computer had a basic working knowledge of how to access the disk drive and load the operating system files directly from the disk as part of the boot process. When it was loaded, MS-DOS could easily access DOS because it was built into the operating system.
Early versions of Windows consisted of a GUI that ran over MS-DOS, with the first being Windows 1.0 in 1985. The disk operating system still controlled the computer and its hardware. A modern operating system like Windows 10 is not considered a disk operating system. It is built on Windows NT, which stands for “New Technology.” The operating system itself is in direct control of thecomputer and its hardware. NT is an OS with support for multiple user processes. This is much different than the single-process, single-user MS-DOS.
Today, anything that used to be accomplished through the command line interface of MS-DOS can be accomplished in the Windows GUI. You can still experience what it was like to use MS-DOS by opening a command window, but what you see is no longer MS-DOS, it is a function of Windows. To experience a little of what it was like to work in MS-DOS, open a command window by typing cmd in Windows Search and pressing Enter. These are some commands that you can use:
- dir: Shows a listing of all the files in the current directory (folder)
- cd directory: Changes the directory to the indicated directory
- cd..: Changes the directory to the directory above the current directory
- cd\: Changes the directory to the root directory (often C:)
- copy: Copies files to another location
- del: Deletes one or more files
- find: Searches for text in files
- mkdir: Creates a new directory
- ren: Renames a file
- help: Displays all the commands that can be used, with a brief description
- help command: Displays extensive help for the indicated command
Windows Versions (2.1.1.2)
Since 1993, there have been more than 20 releases of Windows that are based on the NT operating system. Most of these versions were for use by the general public and businesses because of the file security offered by the file system that was used by the NT OS. Businesses also adopted NT OS-based Windows operating systems. This is because many editions were built specifically for the workstation, professional, server, advanced server, and datacenter server, to name just a few of the many purpose-built versions.
Beginning with Windows XP, a 64-bit edition was available. The 64-bit operating system was an entirely new architecture. It had a 64-bit address space instead of a 32-bit address space. This is not simply twice the amount of spacebecause these bits are binary numbers. While 32-bit Windows can address a little less than 4 GB of RAM, 64-bit Windows can theoretically address 16.8 million terabytes. When the OS and the hardware all support 64-bit operation, extremely large data sets can be used. These large data sets include very large databases, scientific computing, and manipulation of high-definition digital video with special effects. In general, 64-bit computers and operating systems are backward-compatible with older, 32-bit programs, but 64-bit programs cannot be run on older, 32-bit hardware.
With each subsequent release of Windows, the operating system has become more refined by incorporating more features. Windows 7 was offered with six different editions, Windows 8 was offered with as many as four different editions, and Windows 10 is offered with eight different editions! Each edition not only offers different capabilities, but also different price points. Microsoft has said that Windows 10 is the last version of Windows, that Windows has become a service rather than just an OS. They say that rather than purchasing new operating systems, users will just update Windows 10 instead.
Table 2-1 lists the popular modern versions of Windows.
Table 2-1 Modern Windows Versions
| OS Version | Editions |
|---|---|
| Windows 7 | Starter, Home Basic, Home Premium, Professional, Enterprise, Ultimate |
| Windows Server 2008 R2 | Foundation, Standard, Enterprise, Datacenter, Web Server, HPC Server, Itanium-Based Systems |
| Windows Home Server 2011 | None |
| Windows 8 | Windows 8, Windows 8 Pro, Windows 8 Enterprise, Windows RT |
| Windows Server 2012 | Foundation, Essentials, Standard, Datacenter |
| Windows 8.1 | Windows 8.1, Windows 8.1 Pro, Windows 8.1 Enterprise, Windows RT 8.1 |
| Windows Server 2012 R2 | Foundation, Essentials, Standard, Datacenter |
| Windows 10 | Home, Pro, Pro Education, Enterprise, Education, IoT Core, Mobile, Mobile Enterprise |
| Windows Server 2016 | Essentials, Standard, Datacenter, Multipoint Premium Server, Storage Server, Hyper-V Server |
Windows GUI (2.1.1.3)
Windows has a graphical user interface (GUI) for users to work with data files and software. The GUI has a main area that is known as the Desktop, shown in Figure 2-2. The Desktop can be customized with various colors and background images. Windows supports multiple users, so each user can customize the Desktop to their liking. The Desktop can store files, folders, shortcuts to locations and programs, and applications. The Desktop also has a recycle bin icon, where files are stored when the user deletes them. Files can be restored from the recycle bin or the recycle bin can be emptied of files, which truly deletes them.
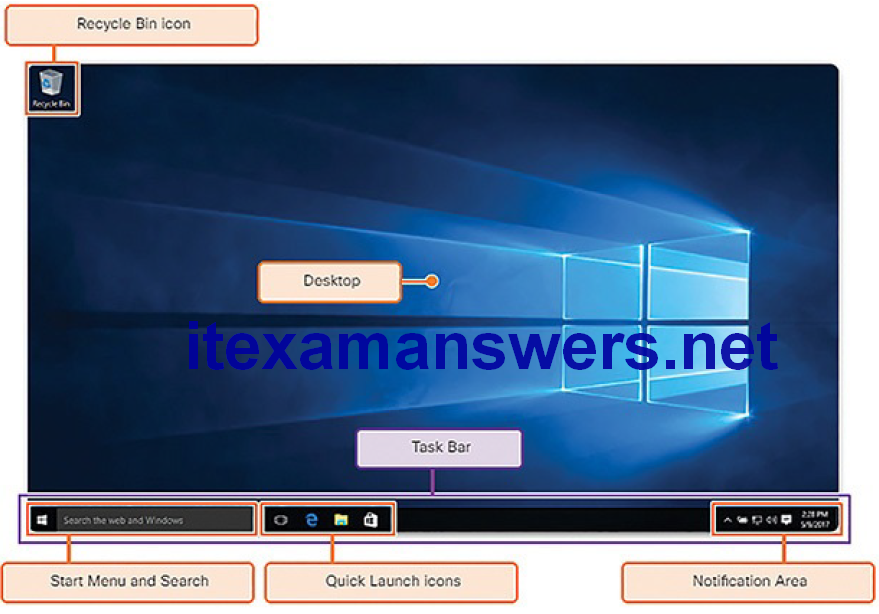
Figure 2-2 Windows 10 GUI
At the bottom of the desktop is the Task Bar. The Task Bar has three areas that are used for different purposes. At the left is the Start menu. It is used to access all of the installed programs, configuration options, and the search feature. At the center of the Task Bar, users place quick launch icons that run specific programs or open specific folders when they are clicked. Finally, on the right of the Task Bar is the notification area. The notification area shows, at a glance, the functionality of many different programs and features. For example, a blinking envelope icon may indicate new email, or a network icon with a red “x” may indicate a problem with the network.
Often, right-clicking an icon will bring up additional functions that can be used.
This list is known as a Context Menu, shown in Figure 2-3. There are Context Menus for the icons in the notification area, and also for quick launch icons, system configuration icons, and for files and folders. The Context Menu provides many of the most commonly used functions by just clicking. For example, the Context Menu for a file will contain such items as Copy, Delete, Share, and Print. To open folders and manipulate files, Windows uses Windows
File Explorer, also shown in Figure 2-3.
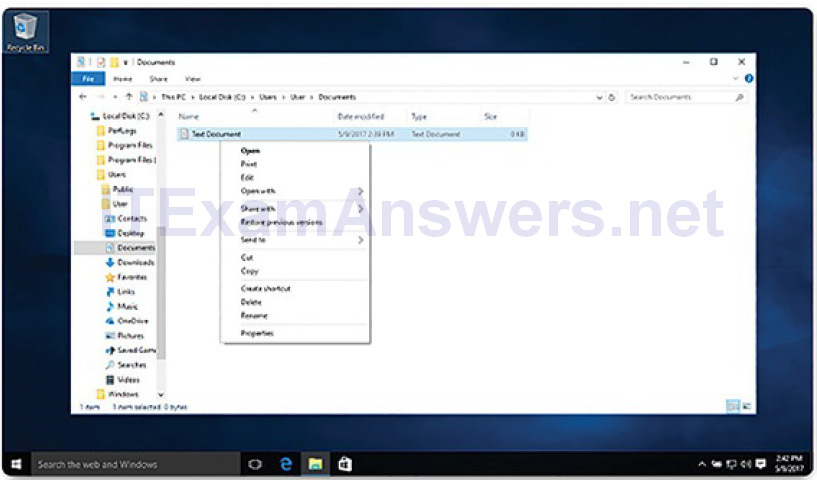
Figure 2-3 Windows File Explorer
Windows File Explorer is a tool used to navigate the entire file system of a computer, including multiple storage devices and network locations. Using Windows File Explorer, you can easily create folders, copy files and folders, and move them around to different locations and devices. Basically, the tool has two main windows. The one on the left allows quick navigation to storage devices, parent folders, and child folders. The one on the right shows the content of the location that is selected in the left pane.
Operating System Vulnerabilities (2.1.1.4)
Operating systems consist of millions of lines of code. Installed software can also contain millions of lines of code. With all this code comes vulnerabilities. A vulnerability is some flaw or weakness that can be exploited by an attacker to reduce the viability of a computer’s information. To take advantage of an operating system vulnerability, the attacker must use a technique or a tool to exploit the vulnerability. The attacker can then use the vulnerability to get the computer to act in a fashion outside of its intended design. In general, the goal isto gain unauthorized control of the computer, change permissions, or manipulate data.
These are some common Windows OS security recommendations:
- Virus or malware protection: By default, Windows uses Windows Defender. Windows Defender provides a suite of protection tools built into the system. If Windows Defender is turned off, the system becomes more vulnerable to attacks and malware.
- Unknown or unmanaged services: There are many services that run behind the scenes. It is important to make sure that each service is identifiable and safe. With an unknown service running in the background, the computer can be vulnerable to attack.
- Encryption: When data is not encrypted, it can easily be gathered and exploited. This is important not only for desktop computers, but especially mobile devices.
- Security policy: A good security policy must be configured and followed. Many settings in the Windows Security Policy control can prevent attacks.
- Firewall: By default, Windows uses Windows Firewall to limit communication with devices on the network. Over time, rules may no longer apply. For example, a port may be left open that should no longer be readily available. It is important to review firewall settings periodically to ensure that the rules are still applicable and remove any that no longer apply.
- File and share permissions: These permissions must be set correctly. It is easy to just give the “Everyone” group Full Control, but this allows all people to do what they want to all files. It is best to provide each user or group with the minimum necessary permissions for all files and folders.
- Weak or no password: Many people choose weak passwords or do not use a password at all. It is especially important to make sure that all accounts, especially the Administrator account, have a very strong password.
- Login as Administrator: When a user logs in as an administrator, any program that they run will have the privileges of that account. It is best to log in as a Standard User and only use the Administrator password to accomplish certain tasks.
Windows Architecture and Operations (2.1.2)
In this topic, you will learn about the Windows hardware abstraction layer, user mode, kernel mode, file system, boot process, startup, shutdown, processes, threads, services, memory allocation, handles, and registry.
Hardware Abstraction Layer (2.1.2.1)
Windows computers use many different types of hardware. The operating system can be installed on a computer off of the shelf, or a computer built from the ground up. When the operating system is installed, it must be isolated from differences in hardware. The basic Windows architecture is shown in Figure 2-4.
A hardware abstraction layer (HAL) is code that handles all of the communication between the hardware and the kernel. The kernel is the core of the operating system and has control over the entire computer. It handles all of the input and output requests, memory, and all of the peripherals connected to the computer.
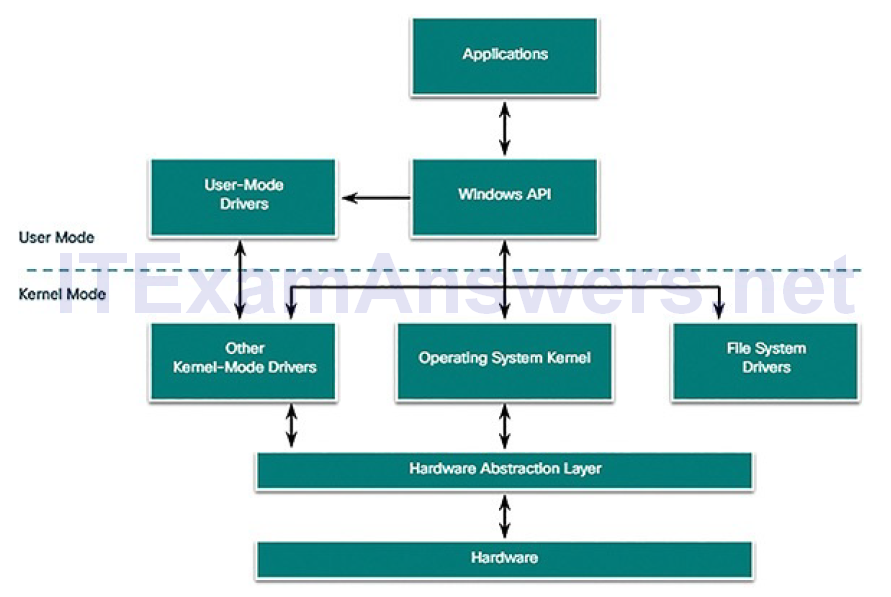
Figure 2-4 Basic Windows Architecture
In some instances, the kernel still communicates with the hardware directly, so it is not completely independent of the HAL. The HAL also needs the kernel to perform some functions.
User Mode and Kernel Mode (2.1.2.2)
There are two different modes in which a CPU operates when the computer has Windows installed: user mode and kernel mode. Installed applications run in user mode, and operating system code runs in kernel mode. Code that is executing in kernel mode has unrestricted access to the underlying hardware and is capable of executing any CPU instruction. Kernel mode code also can reference any memory address directly. Generally reserved for the most trusted functions of the OS, crashes in code running in kernel mode stop the operation of the entire computer. Conversely, programs such as user applications run in user mode and have no direct access to hardware or memory locations. User mode code must go through the operating system to access hardware resources.
Because of the isolation provided by user mode, crashes in user mode are restricted to the application only and are recoverable. Most of the programs in Windows run in user mode. Device drivers, pieces of software that allow the operating system and a device to communicate, may run in either kernel or user mode, depending on the driver.
All of the code that runs in kernel mode uses the same address space. Kernel-mode drivers have no isolation from the operating system. If an error occurs with the driver running in kernel mode, and it writes to the wrong address space, the operating system or another kernel-mode driver could be adversely affected. In this respect, the driver might crash, causing the entire operating system to crash.
When user mode code runs, it is granted its own restricted address space by the kernel, along with a process created specifically for the application. The reason for this functionality is mainly to prevent applications from changing operating system code that is running at the same time. By having its own process, that application has its own private address space, rendering other applications unable to modify the data in it. This also helps to prevent the operating system and other applications from crashing if that application crashes.
Windows File Systems (2.1.2.3)
A file system is how information is organized on storage media. Some filesystems may be a better choice to use than others, depending on the type of media that will be used. These are the file systems that Windows supports:
- File Allocation Table (FAT): This is a simple file system supported by many different operating systems. FAT has limitations to the number of partitions, partition sizes, and file sizes that it can address, so it is not usually used for hard drives (HDs) or solid state drives (SSDs) anymore. Both FAT16 and FAT32 are available to use, with FAT32 being the most common because it has many fewer restrictions than FAT16.
- Extended FAT (exFAT): This is an extended version of FAT that has even fewer restrictions than FAT32, but is not supported very well outside of the Windows ecosystem.
- Hierarchical File System Plus (HFS+): This file system is used on macOS X computers and allows much longer filenames, file sizes, and partition sizes than previous file systems. Although it is not supported by Windows without special software, Windows is able to read data from HFS+ partitions.
- Extended File System (EXT): This file system is used with Linux-based computers. Although it is not supported by Windows, Windows is able to read data from EXT partitions with special software.
- New Technology File System (NTFS): This is the most commonly used file system when installing Windows. All versions of Windows and Linux support NTFS, while macOS X computers can only read an NTFS partition (they can write to an NTFS partition after installing special drivers).
NTFS is the most widely used file system for Windows for many reasons. NTFS supports very large files and partitions; it is very compatible with other operating systems. NTFS is also very reliable and supports recovery features. Most importantly, it supports many security features. Data access control is achieved through security descriptors. These security descriptors contain file ownership and permissions all the way down to the file level. NTFS also tracks many timestamps to track file activity. Sometimes referred to as MACE, the timestamps Modify, Access, Create, and Entry Modified are often used in forensic investigations to determine the history of a file or folder. NTFS also supports file system encryption to secure the entire storage media.
Alternate Data Streams
NTFS stores files as a series of attributes, such as the name of the file, or a timestamp. The data which the file contains is stored in the attribute $DATA, and is known as a data stream. By using NTFS, you can connect Alternate Data Streams (ADSs) to the file. This is sometimes used by applications that are storing additional information about the file. The ADS is an important factor when discussing malware. This is because it is easy to hide data in an ADS. An attacker could store malicious code within an ADS that can then be called from a different file.
In the NTFS file system, a file with an ADS is identified after the filename and a colon, for example, Testfile.txt:ADSdata. This filename indicates an ADS called ADSdata is associated with the file called Testfile.txt. An example of ADS is shown in Example 2-1.
Example 2-1 Alternate Data Stream
C:\ADS> echo "Alternative Data Here" > Textfile.txt:ADS

C:\ADS> dir
Volume in drive C is OS
Volume Serial Number is F244-E247

Directory of C:\ADS

12/27/2017 03:03 PM <DIR> .
12/27/2017 03:03 PM <DIR> ..
12/27/2017 03:03 PM 0 Textfile.txt
1 File(s) 0 bytes
2 Dir(s) 402,725,310,464 bytes free

C:\ADS> more < Testfile.txt:ADS
"Alternative Data Here"

C:\ADS> dir /r
Volume in drive C has no label.
Volume Serial Number is F244-E247
Directory of C:\ADS

12/27/2017 03:03 PM <DIR> .
12/27/2017 03:03 PM <DIR> ..
12/27/2017 03:03 PM    0 Textfile.txt
24 Textfile.txt:ADS:$DATA
1 File(s) 0 bytes
2 Dir(s) 402,725,310,464 bytes free

C:\ADS>
- The first command places the text “Alternate Data Here” into an ADS of the file Testfile.txt called “ADS”.
- The next command, dir, shows that the file was created, but the ADS is not visible.
- The next command shows that there is data in the Testfile.txt:ADS data stream.
- The last command shows the ADS of the Testfile.txt file because the r switch was used with the dir command.
Before a storage device such as a disk can be used, it must be formatted with a file system. In turn, before a file system can be put into place on a storage device, the device needs to be partitioned. A hard drive is divided into areas called partitions. Each partition is a logical storage unit that can be formatted to store information, such as data files or applications. During the installation process, most operating systems automatically partition and format the available drive space with a file system such as NTFS.
NTFS formatting creates important structures on the disk for file storage, and tables for recording the locations of files:
- Partition Boot Sector: This is the first 16 sectors of the drive. It contains the location of the Master File Table. The last 16 sectors contain a copy of the boot sector.
- Master File Table (MFT): This table contains the locations of all the files and directories on the partition, including file attributes such as security information and timestamps.
- System Files: These are hidden files that store information about other volumes and file attributes.
- File Area: The main area of the partition where files and directories are stored.
Note
When formatting a partition, the previous data may still be recoverable because not all the data is completely removed. The free space can be examined and files can be retrieved, which can compromise security. It is recommended to perform a secure wipe on a drive that is being reused. The secure wipe will write data to the entire drive multiple times to ensure there is no remaining data.
Windows Boot Process (2.1.2.4)
Many actions occur between the time when the computer power button is pressed and Windows is fully loaded, as shown in Figure 2-5.
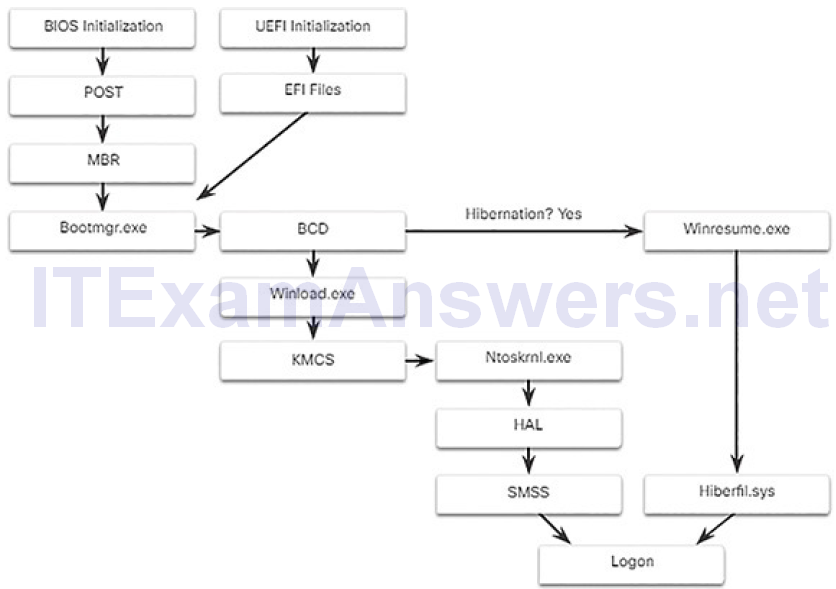
Figure 2-5 Windows Boot Process
Two types of computer firmware exist: Basic Input-Output System (BIOS) and Unified Extensible Firmware Interface (UEFI). BIOS firmware was created in the early 1980s and works in the same way it did when it was created. As computers evolved, it became difficult for BIOS firmware to support all the newfeatures requested by users. UEFI was designed to replace BIOS and support the new features.
In BIOS firmware, the process begins with the BIOS initialization phase. This is when hardware devices are initialized and a power-on self-test (POST) is performed to make sure all of these devices are communicating. When the system disk is discovered, the POST ends. The last instruction in the POST is to look for the master boot record (MBR).
The MBR contains a small program that is responsible for locating and loading the operating system. The BIOS executes this code and the operating system starts to load.
In contrast to BIOS firmware, UEFI firmware has a lot of visibility into the boot process. UEFI boots by loading EFI program files, stored as .efi files in a special disk partition, known as the EFI System Partition (ESP).
Note
A computer that uses UEFI stores boot code in the firmware. This helps to increase the security of the computer at boot time because the computer goes directly into protected mode.
Whether the firmware is BIOS or UEFI, after a valid Windows installation is located, the Bootmgr.exe file is run. Bootmgr.exe switches the system from real mode to protected mode so that all of the system memory can be used.
Bootmgr.exe reads the Boot Configuration Database (BCD). The BCD contains any additional code needed to start the computer, along with an indication of whether the computer is coming out of hibernation, or if this is a cold start. If the computer is coming out of hibernation, the boot process continues with Winresume.exe. This allows the computer to read the Hiberfil.sys file, which contains the state of the computer when it was put into hibernation.
If the computer is being booted from a cold start, then the Winload.exe file is loaded. The Winload.exe file creates a record of the hardware configuration in the registry. The registry is a record of all of the settings, options, hardware, and software the computer has. The registry will be explored in depth later in this chapter. Winload.exe also uses Kernel Mode Code Signing (KMCS) to make sure that all drivers are digitally signed. This ensures that the drivers are safe to load as the computer starts.
After the drivers have been examined, Winload.exe runs Ntoskrnl.exe, whichstarts the Windows kernel and sets up the HAL. Finally, the Session Manager Subsystem (SMSS) reads the registry to create the user environment, start the Winlogon service, and prepare each user’s desktop as they log on.
Windows Startup and Shutdown (2.1.2.5)
There are two important registry items that are used to automatically start applications and services:
- HKEY_LOCAL_MACHINE: Several aspects of Windows configuration are stored in this key, including information about services that start with each boot.
- HKEY_CURRENT_USER: Several aspects related to the logged-in user are stored in this key, including information about services that start only when the user logs on to the computer.
Different entries in these registry locations define which services and applications will start, as indicated by their entry type. These types include Run, RunOnce, RunServices, RunServicesOnce, and Userinit. These entries can be manually entered into the registry, but it is much safer to use the Msconfig.exe tool. This tool is used to view and change all of the startup options for the computer. Use the search box to find and open the Msconfig tool.
There are five tabs which contain the configuration options:
General: Three different startup types can be chosen here. Normal loads all drivers and services. Diagnostic loads only basic drivers and services. Selective allows the user to choose what to load on startup. The General tab is shown in Figure 2-6.
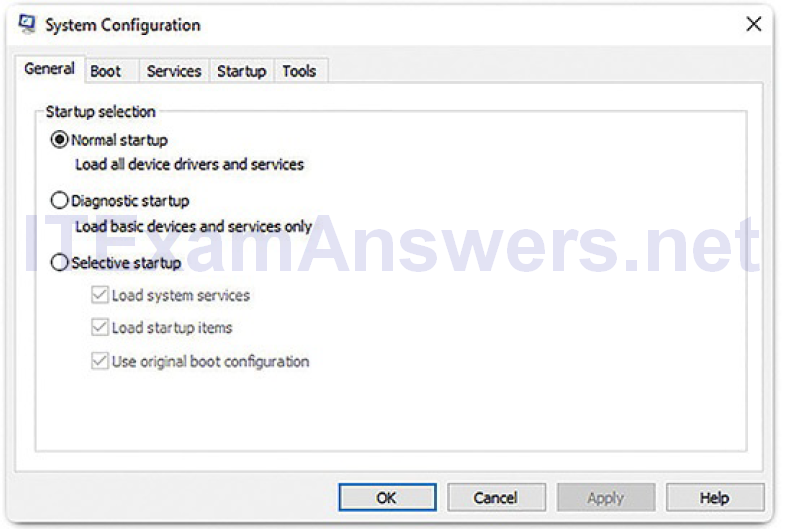
Figure 2-6 General Tab of System Configuration
Boot: Any installed operating system can be chosen here to start. There are also options for Safe boot, which is used to troubleshoot startup. The Boot tab is shown in Figure 2-7.
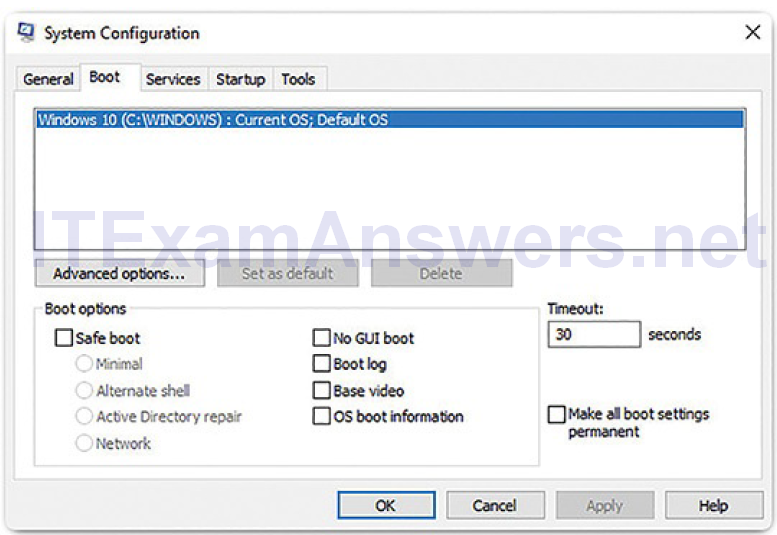
Figure 2-7 Boot Tab of System Configuration
Services: All the installed services are listed here so that they can be chosen to start at startup. The Services tab is shown in Figure 2-8.
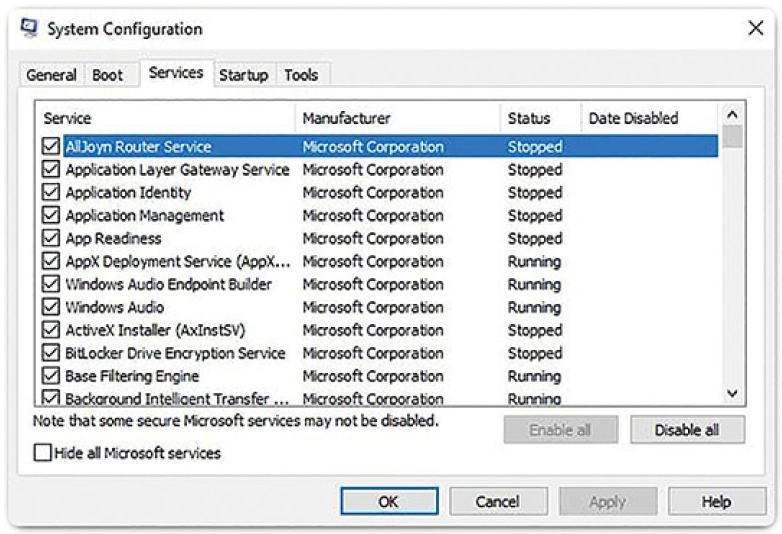
Figure 2-8 Services Tab of System Configuration
Startup: All the applications and services that are configured to automatically begin at startup can be enabled or disabled by opening Task Manager from this tab. The Startup tab is shown in Figure 2-9.
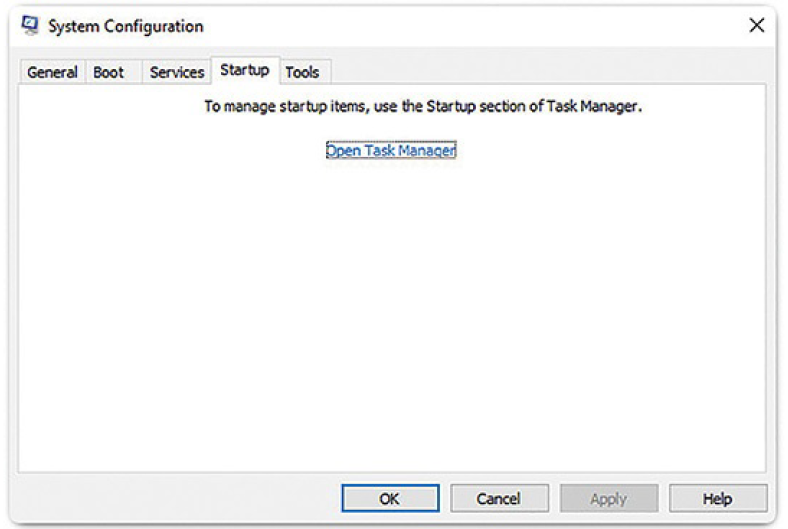
Figure 2-9 Startup Tab of System Configuration
Tools: Many common operating system tools can be launched directly from this tab. The Tools tab is shown in Figure 2-10.
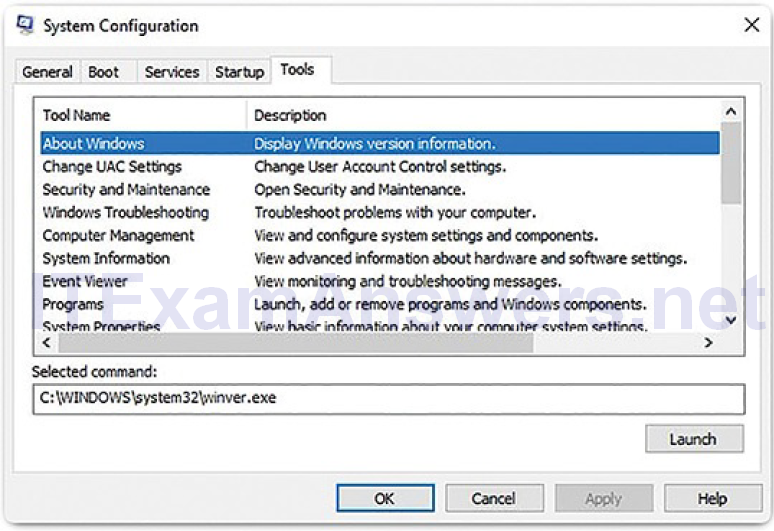
Figure 2-10 Tools Tab of System Configuration
Shutdown
It is always best to perform a proper shutdown to turn off the computer. Files that are left open, services that are closed out of order, and applications that hang can all be damaged if the power is turned off without first informing the operating system. The computer needs time to close each application, shut down each service, and record any configuration changes before power is lost.
During shutdown, the computer will close user mode applications first, followed by kernel mode processes. If a user mode process does not respond within a certain amount of time, the OS will display notification and allow the user to wait for the application to respond, or forcibly end the process. If a kernel mode process does not respond, the shutdown will appear to hang, and it may be necessary to shut down the computer with the power button.
There are several ways to shut down a Windows computer: Start menu power options, the command line command shutdown, and using Ctrl-Alt-Delete and clicking the power icon. There are three different options from which to choose when shutting down the computer: Shutdown, which turns the computer off, Restart, which reboots the computer from scratch, and Hibernate, which records the current state of the computer and user environment and stores it in a file.
Hibernation allows the user to pick up right where they left off very quickly with all their files and programs still open.
Processes, Threads, and Services (2.1.2.6)
A Windows application is made up of processes. The application can have one or many processes dedicated to it. A process is any program that is currently executing. Each process that runs is made up of at least one thread. A thread is a part of the process that can be executed. The processor performs calculations on the thread. To configure Windows processes, search for Task Manager. The Processes tab of Task Manager is shown in Figure 2-11.
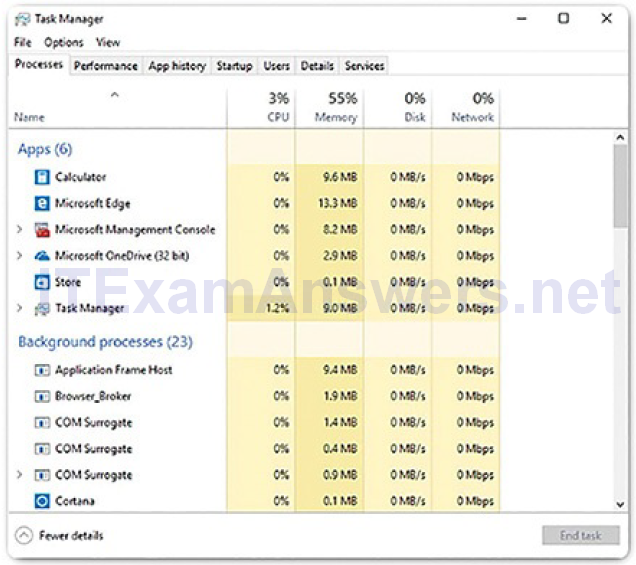
Figure 2-11 Windows Task Manager Processes Tab
All of the threads dedicated to a process are contained within the same address space. This means that these threads may not access the address space of any other process. This prevents corruption of other processes. Because Windows multitasks, multiple threads can be executed at the same time. The number of threads that can be executed at the same time is dependent on how manyprocessors the computer has.
Some of the processes that Windows runs are services. These are programs that run in the background to support the operating system and applications. They can be set to start automatically when Windows boots or they can be started manually. They can also be stopped, restarted, or disabled. Services provide long-running functionality, such as wireless or access to an FTP server. To configure Windows Services, search for services. The Windows Services control panel applet is shown in Figure 2-12. Be very careful when manipulating the setting of these services. Some programs rely on one or more services to operate properly. Shutting down a service may adversely affect applications, or other services.
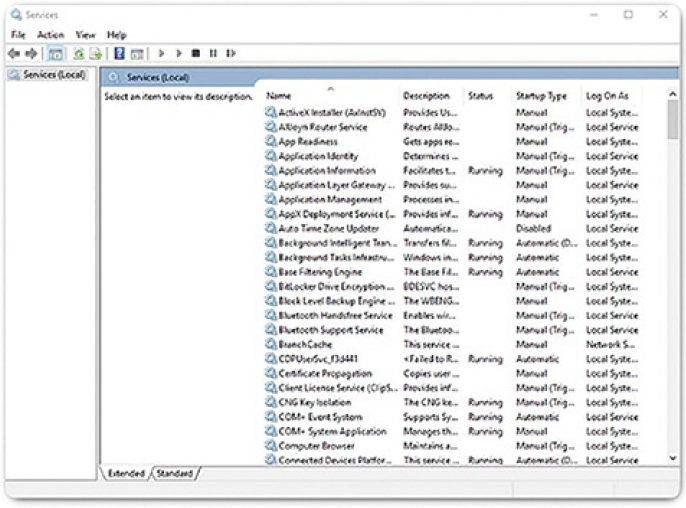
Figure 2-12 Windows Services Control Panel Applet
Memory Allocation and Handles (2.1.2.7)
A computer works by storing instructions in RAM until the CPU processes them. The virtual address space for a process is the set of virtual addresses that the process can use. The virtual address is not the actual physical location in memory, but an entry in a page table that is used to translate the virtual address into the physical address.
Each process in a 32-bit Windows computer supports a virtual address space that enables addressing up to 4 gigabytes. Each process in a 64-bit Windows computer supports a virtual address space of 8 terabytes.
Each user space process runs in a private address space, separate from other user space processes. When the user space process needs to access kernel resources, it must use a process handle. This is because the user space process is not allowed to directly access these kernel resources. The process handle provides the access needed by the user space process without a direct connection to it.
One of the more powerful tools we use to view memory allocation is Sysinternals RamMap, shown in Figure 2-13.
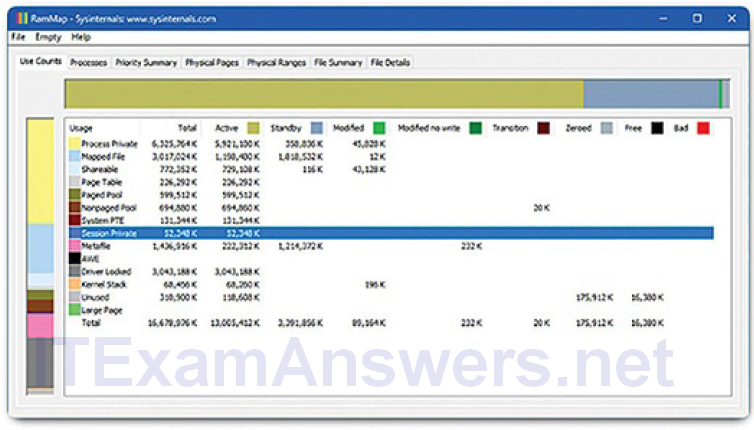
Figure 2-13 Sysinternals RamMap
The Windows Registry (2.1. 2.8)
Windows stores all of the information about hardware, applications, users, and system settings in a large database known as the registry. The ways that these objects interact are also recorded, such as what files an application opens and all of the property details of folders and applications. The registry is a hierarchical database where the highest level is known as a hive, below which are keys, followed by subkeys. Values, which store data, are stored in keys and subkeys. The registry key can be up to 512 levels deep.
These are the five hives of the Windows registry:
- HKEY_CURRENT_USER (HKCU): Holds data concerning the currently logged-in user
- HKEY_USERS (HKU): Holds data concerning all the user accounts on the host
- HKEY_CLASSES_ROOT (HKCR): Holds data about object linking and embedding (OLE) registrations
- HKEY_LOCAL_MACHINE (HKLM): Holds system-related data
- HKEY_CURRENT_CONFIG (HKCC): Holds data about the current hardware profile
New hives cannot be created. The registry keys and values in the hives can be created, modified, or deleted by an account with administrative privileges. As shown in Figure 2-14, the tool regedit.exe is used to modify the registry. Be very careful when using this tool. Minor changes to the registry can have massive or even catastrophic effects.
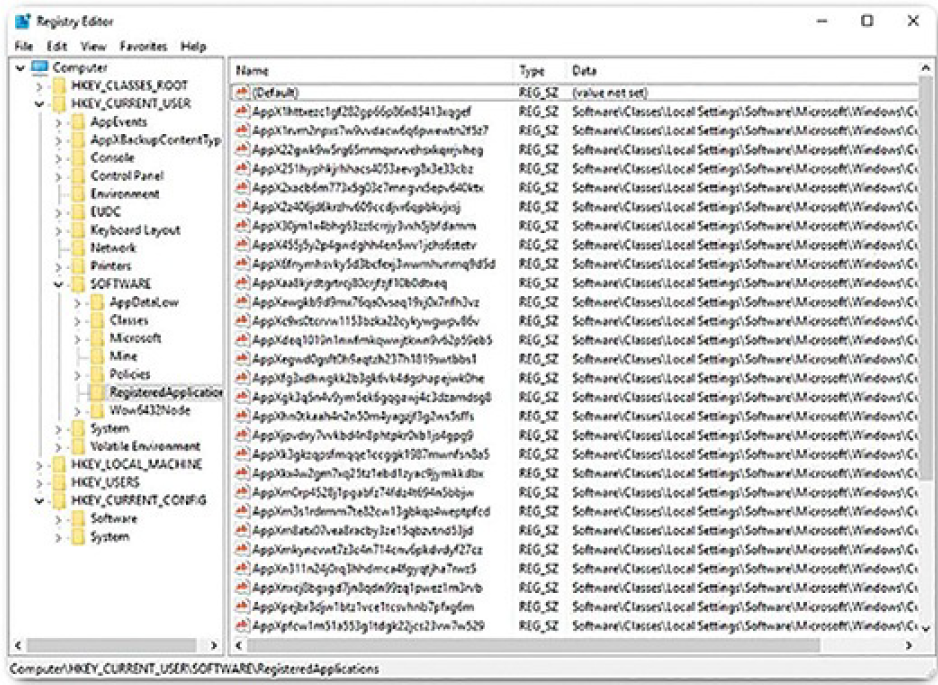
Figure 2-14 Windows Registry Editor
Navigation in the registry is very similar to navigation in Windows File Explorer. Use the left panel to navigate the hives and the structure below it, and use the right panel to see the contents of the highlighted item in the left panel. With so many keys and subkeys, the key path can become very long. The path is displayed at the bottom of the window for reference. Because each key and subkey is essentially a container, the path is represented much like a folder in a file system. The backslash (\) is used to differentiate the hierarchy of the database.
Registry keys can contain either a subkey or a value. These are the different values that keys can contain:
- REG_BINARY: Numbers or Boolean values
- REG_DWORD: Numbers greater than 32 bits or raw data
- REG_SZ: String values
Because the registry holds almost all the operating system and user information, it is critical to make sure that it does not become compromised. Potentially malicious applications can add registry keys so that they start when the computer is started. During a normal boot, the user will not see the program start because the entry is in the registry and the application displays no windows or indication of starting when the computer boots. A keylogger, for example, would be devastating to the security of a computer if it were to start at boot without the user’s knowledge or consent. When performing normal security audits, or remediating an infected system, review the application startup locations within the registry to ensure that each item is known and safe to run.
The registry also contains the activity that a user performs during normal day-to-day computer use. This includes the history of hardware devices, including all devices that have been connected to the computer, identified by name, manufacturer, and serial number. Other information, such as what documents a user and program have opened, where they are located, and when they were accessed, is stored in the registry. This is all very useful information when a forensic investigation needs to be performed.
Activity 2.1.2.9: Identify the Windows Registry Hive
Refer to the online course to complete this Activity.
Lab 2.1.2.10: Exploring Processes, Threads, Handles, and Windows Registry
In this lab, you will explore the processes, threads, and handles using Process Explorer in Sysinternals Suite. You will also use the Windows registry to change a setting.
Windows Administration (2.2)
In this section, you will learn about Windows configuration, monitoring, and security.
Windows Configuration and Monitoring (2.2.1)
In this topic, you will learn about Windows configuration management, including running applications as the Administrator, configuring local users and domains, and working with the command line interface (CLI), PowerShell, and Windows Management Instrumentation (WMI). You will also learn how to monitor Windows using the net command, Task Manager, Resource Monitor, and networking tools.
Run as Administrator (2.2.1.1)
As a security best practice, it is not advisable to log on to Windows using the Administrator account or an account with administrative privileges. This is because any program that is executed while logged on with those privileges will inherit them. Malware that has administrative privileges has full access to all the files and folders on the computer.
Sometimes, it is necessary to run or install software that requires the privileges of the Administrator. To accomplish this, there are two different ways to install it:
Run as Administrator: Right-click the command in Windows File Explorer and choose Run as administrator from the Context Menu, shown in Figure 2-15.
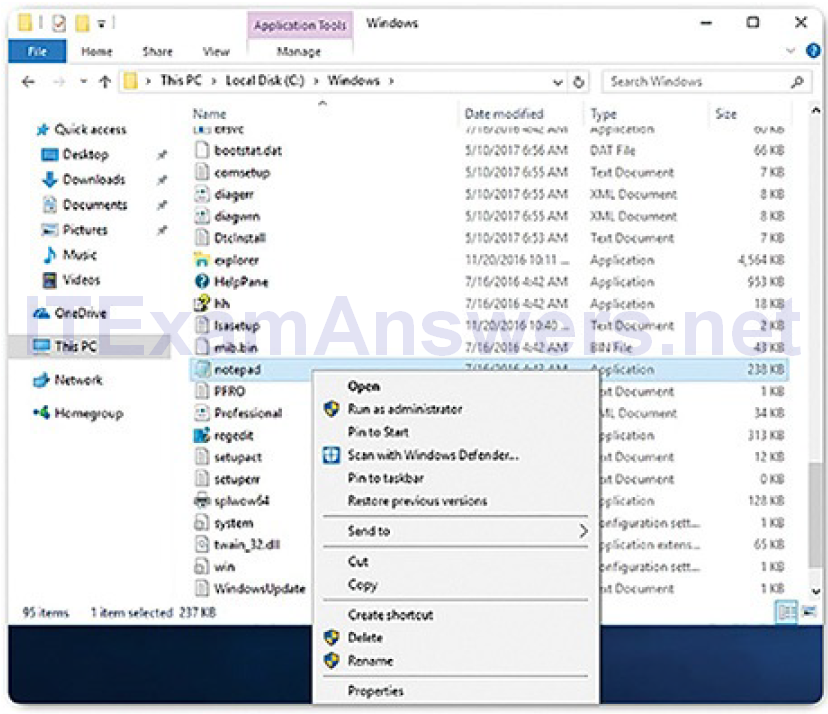
Figure 2-15 Run as Administrator from Windows File Explorer
Administrator Command Prompt: Search for command, right-click the executable file, and choose Run as administrator from the Context Menu, shown in Figure 2-16. Every command that is executed from this command line will be carried out with administrative privileges, including installation of software.
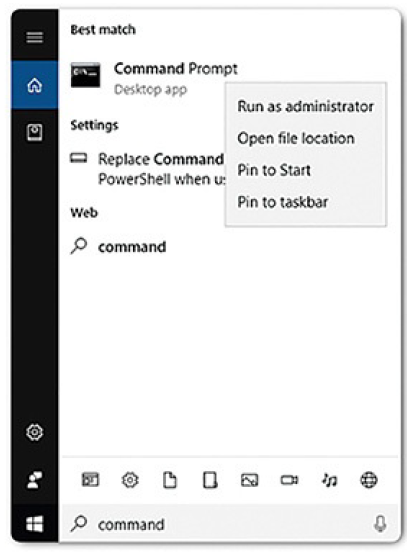
Figure 2-16 Run as Administrator Using Administrator Command Prompt
Local Users and Domains (2.2.1.2)
When you start a new computer for the first time, or you install Windows, you will be prompted to create a user account. This is known as a local user. This account will contain all of your customization settings, access permissions, file locations, and many other user-specific data. There are also two other accounts that are present: Guest and Administrator. Both of these accounts are disabled by default.
As a security best practice, do not enable the Administrator account and do not give standard users administrative privileges. If a user needs to perform any function that requires administrative privileges, the system will ask for the Administrator password and allow only that task to be performed as an administrator. By entering the Administrator password, this protects the computer by preventing any software that is not authorized from installing, executing, or accessing files.
The Guest account should not be enabled. The Guest account does not have a password associated with it because it is created when a computer is going to be used by many different people who do not have accounts on the computer. Eachtime the Guest account logs on, a default environment is provided to them with limited privileges.
To make administration of users easier, Windows uses groups. A group will have a name and a specific set of permissions associated with it. When a user is placed into a group, the permissions of that group are given to that user. A user can be placed into multiple groups to be provided with many different permissions. When the permissions overlap, certain permissions, like “explicitly deny,” will override the permission provided by a different group. There are many different user groups built in to Windows that are used for specific tasks.
For example, the Performance Log Users group allows members to schedule logging of performance counters and collect logs either locally or remotely.
Local users and groups are managed with the lusrmgr.msc control panel applet, as shown in Figure 2-17.
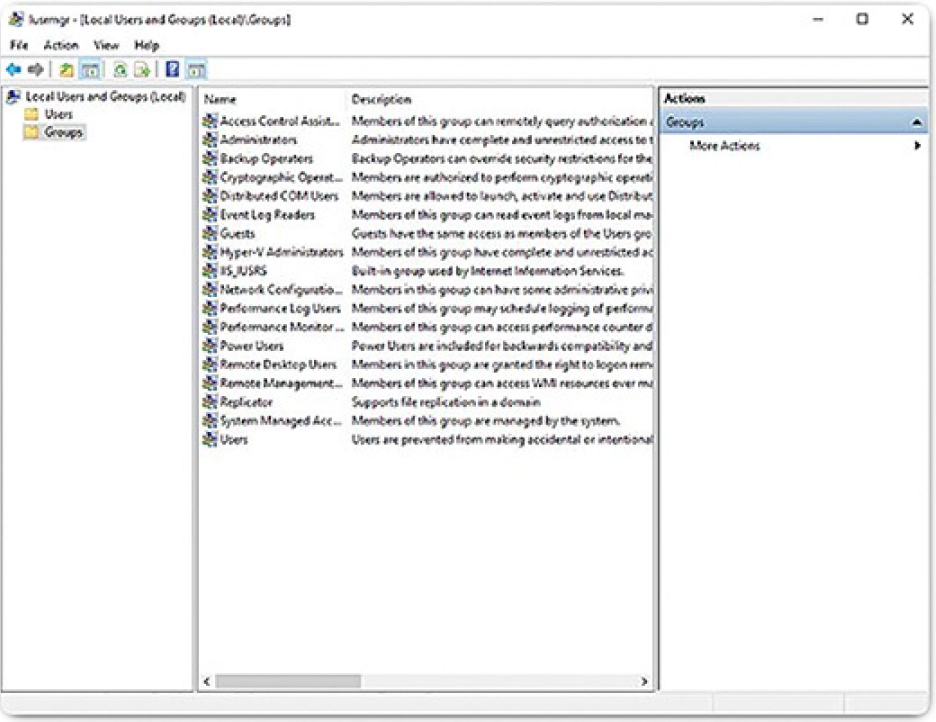
Figure 2-17 lusrmgr.msc
In addition to groups, Windows can also use domains to set permissions. A domain is a type of network service where all of the users, groups, computers,peripherals, and security settings are stored on and controlled by a database. This database is stored on special computers or groups of computers called domain controllers (DCs). Each user and computer on the domain must authenticate against the DC to log on and access network resources. The security settings for each user and each computer are set by the DC for each session. Any setting supplied by the DC defaults to the local computer or user account setting.
CLI and PowerShell (2.2.1.3)
The Windows command line interface (CLI) can be used to run programs, navigate the file system, and manage files and folders. In addition, files called batch files can be created to execute multiple commands in succession, much like a basic script. To open the Windows CLI, search for cmd.exe and click the program. Remember that right-clicking the program provides the option to Run as Administrator, giving much more power to the commands that will be used.
The prompt displays the current location within the file system. These are a few things to remember when using the CLI:
- The filenames and paths are not case sensitive, by default.
- Storage devices are assigned a letter for reference. The letter, followed by a backslash (\), indicates the root of the device. Folder and file hierarchy on the device is indicated by separating them with the backslash. For example, C:\Users\Jim\Desktop\file.txt is the file called file.txt in the Desktop folder within the Jim folder within the Users folder on the device C:.
- Commands that have optional switches use the forward slash (/) to delineate between the command and each switch.
- You can use the Tab key to auto-complete commands when directories or files are referenced.
- Windows keeps a history of the commands that were entered during a CLI session. Access historical commands by using the Up Arrow and Down Arrow keys.
- To switch between storage devices, type the letter of the device, followed by a colon, and then press Enter.
Even though the CLI has many commands and features, it cannot work together with the core of Windows or the GUI. Another environment, called the Windows PowerShell, can be used to create scripts to automate tasks that the regular CLIis unable to create. PowerShell also provides a CLI for initiating commands.
PowerShell is an integrated program within Windows and can be opened by clicking Start, searching for PowerShell, and clicking the program. Like the CLI, PowerShell can also be run with administrative privileges.
These are the types of commands that PowerShell can execute:
- Cmdlets: These commands perform an action and return an output or object to the next command that will be executed.
- PowerShell scripts: These are files with a .ps1 extension that contain PowerShell commands that are executed.
- PowerShell functions: These are pieces of code that can be referenced in a script.
To see more information about Windows PowerShell and get started using it, type help in PowerShell, as shown in Example 2-2. You will be provided with much more information and resources to start using PowerShell.
Example 2-2 Windows PowerShell Help
PS C:\Windows\System32> help

TOPIC
Windows PowerShell Help System

SHORT DESCRIPTION
Displays help about Windows PowerShell cmdlets and concepts.

LONG DESCRIPTION
Windows PowerShell Help describes Windows PowerShell cmdlets,
functions, scripts, and modules, and explains concepts, including
the elements of the Windows PowerShell language.

Windows PowerShell does not include help files, but you can read the
help topics online, or use the Update-Help cmdlet to download help
files
to your computer and then use the Get-Help cmdlet to display the help
topics at the command line.You can also use the Update-Help cmdlet to download updated help
files
as they are released so that your local help content is never
obsolete.
Without help files, Get-Help displays auto-generated help for
cmdlets,
functions, and scripts.

ONLINE HELP
You can find help for Windows PowerShell online in the TechNet
Library
beginning at http://go.microsoft.com/fwlink/?LinkID=108518.
To open online help for any cmdlet or function, type:

Get-Help <cmdlet-name> -Online

UPDATE-HELP
To download and install help files on your computer:

1. Start Windows PowerShell with the "Run as administrator" option.
2. Type:

Update-Help

After the help files are installed, you can use the Get-Help cmdlet
to
display the help topics. You can also use the Update-Help cmdlet to
download updated help files so that your local help files are always
up-to-date.

For more information about the Update-Help cmdlet, type:

Get-Help Update-Help -Online

-- More --
There are four levels of help in Windows PowerShell:
- get-help PS command: Displays basic help for a command
- get-help PS command [-examples]: Displays basic help for a command with examples
- get-help PS command [-detailed]: Displays detailed help for a command with examples
- get-help PS command [-full]: Displays all help information for a command with examples in greater depth
Windows Management Instrumentation (2.2.1.4)
Windows Management Instrumentation (WMI) is used to manage remote
computers. It can retrieve information about computer components, display hardware and software statistics, and monitor the health of remote computers.
You can open WMI control by searching for and opening Computer Management, and then right-clicking the WMI Control entry under Services and Applications and choosing Properties. The WMI Control Properties window is shown in Figure 2-18.
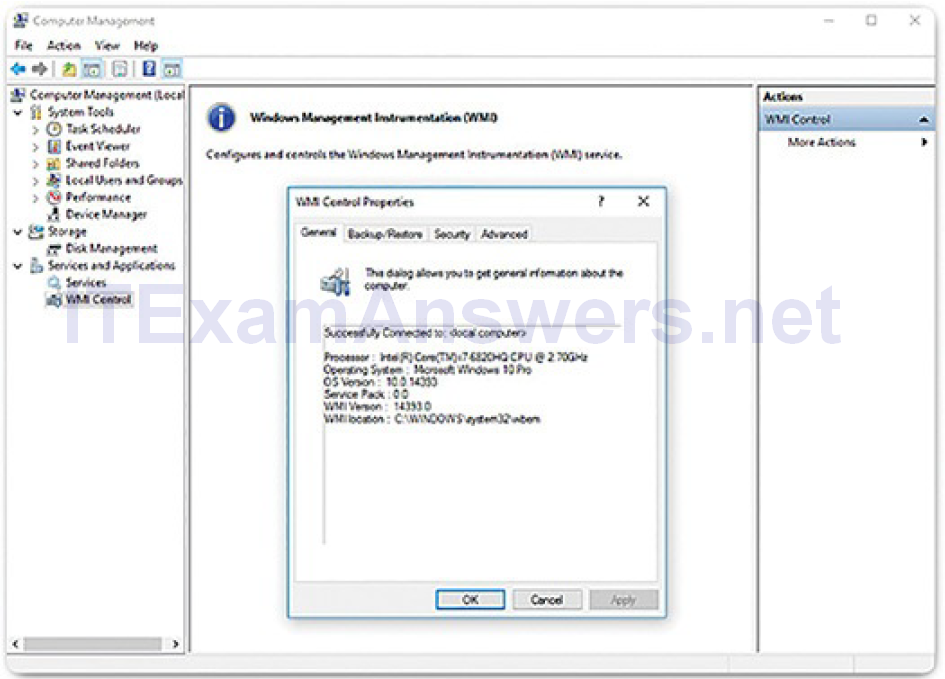
Figure 2-18 WMI Control Panel Properties Window
These are the four tabs in the WMI Control Properties window:
- General: Summary information about the local computer and WMI
- Backup/Restore: Allows manual backup of statistics gathered by WMI
- Security: Settings to configure who has access to different WMI statistics
- Advanced: Settings to configure the default namespace for WMI
Some attacks today use WMI to connect to remote systems, modify the registry, and run commands. WMI helps them to avoid detection because it is common traffic, most often trusted by the network security devices, and the remote WMI commands do not usually leave evidence on the remote host. Because of this, WMI access should be strictly limited.
The net Command (2.2.1.5)
Windows has many commands that can be entered at the command line. One important command is the net command, used in the administration and maintenance of the OS. The net command supports many other commands that follow the net command and can be combined with switches to focus on specific output.
To see a list of the many net commands, type net help at the command prompt. Example 2-3 shows the commands that the net command can use. To see verbose help about any of the net commands, type net help command.
Example 2-3 Net Commands
C:\Users> net help
The syntax of this command is:

NET HELP
command
-or
NET command /HELP

Commands available are:

NET ACCOUNTS NET HELPMSG NET STATISTICSNET COMPUTER NET LOCALGROUP NET STOP
NET CONFIG NET PAUSE NET TIME
NET CONTINUE NET SESSION NET USE
NET FILE NET SHARE NET USER
NET GROUP NET START NET VIEW
NET HELP

NET HELP NAMES explains different types of names in NET HELP syntax
lines.
NET HELP SERVICES lists some of the services you can start.
NET HELP SYNTAX explains how to read NET HELP syntax lines.
NET HELP command | MORE displays Help one screen at a time.

C:\Users>
These are some common net commands:
- net accounts: Sets password and logon requirements for users
- net session: Lists or disconnects sessions between a computer and other computers on the network
- net share: Creates, removes, or manages shared resources
- net start: Starts a network service or lists running network services
- net stop: Stops a network service
- net use: Connects, disconnects, and displays information about shared network resources
- net view: Shows a list of computers and network devices on the network
Task Manager and Resource Monitor (2.2.1.6)
There are two very important and useful tools to help an administrator to understand the many different applications, services, and processes that are running on a Windows computer. These tools also provide insight into the performance of the computer, such as CPU, memory, and network usage. These tools are especially useful when investigating a problem where malware is suspected. When a component is not performing the way that it should be, thesetools can be used to determine what the problem might be.
Task Manager
Task Manager, shown in Figure 2-19, provides a lot of information about what is running, and general performance of the computer.
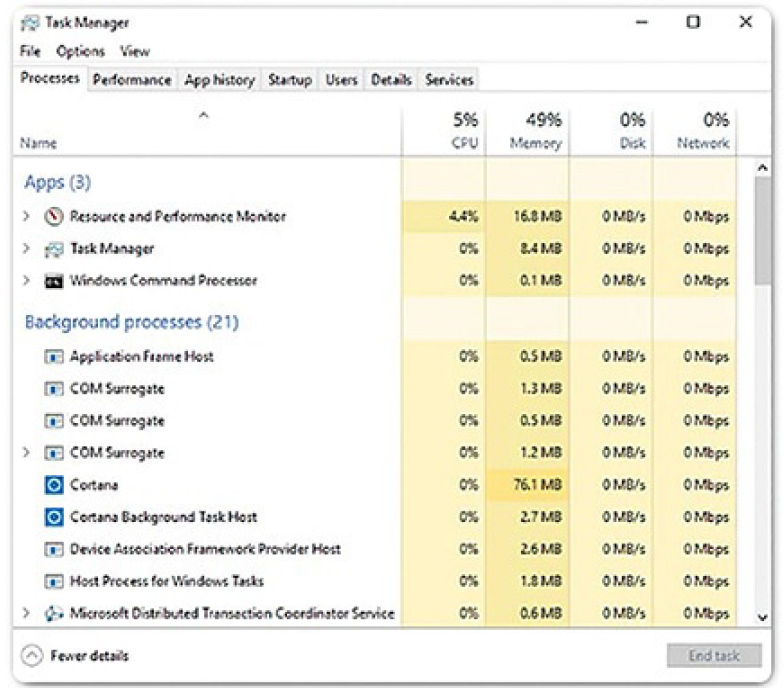
Figure 2-19 Windows 10 Task Manager
There are seven tabs in Task Manager:
- Processes: All of the programs and processes that are currently running are shown here. The CPU, memory, disk, and network utilization of each process is displayed in columns. You can examine the properties of any of these processes, or end a process that is not behaving properly or has stalled.
- Performance: A view of all the performance statistics provides a useful overview of the CPU, memory, disk, and network performance. Clicking each item in the left pane will show detailed statistics of that item in the right pane.
- App history: The use of resources by applications over time provides insight into applications that are consuming more resources than they should be. Click Options and Show history for all processes to see the history of every process that has run since the computer was started.
- Startup: All of the applications and services that start when the computer is booted are shown in this tab. To disable a program from starting at startup, right-click the item and choose Disable.
- Users: All of the users that are logged on to the computer are shown in this tab. Also shown are all the resources that each user’s applications and processes are using. From this tab, an administrator can disconnect a user from the computer.
- Details: Similar to the Processes tab, this tab provides additional management options for processes such as setting a priority to make the processor devote more or less time to a process. CPU affinity can also be set, which determines which core or CPU a program will use. Also, a useful feature called Analyze Wait Chain shows any process for which another process is waiting. This feature helps to determine if a process is simply waiting, or is stalled.
- Services: All the services that are loaded are shown in this tab. The process ID (PID) and a short description are also shown along with the status of either Running or Stopped. At the bottom, there is a button to open the Services console, which provides additional management of services.
Resource Monitor
When more detailed information about resource usage is needed, you can use Resource Monitor, shown in Figure 2-20. When searching for the reason a computer may be acting erratically, Resource Monitor can help to find the source of the problem.
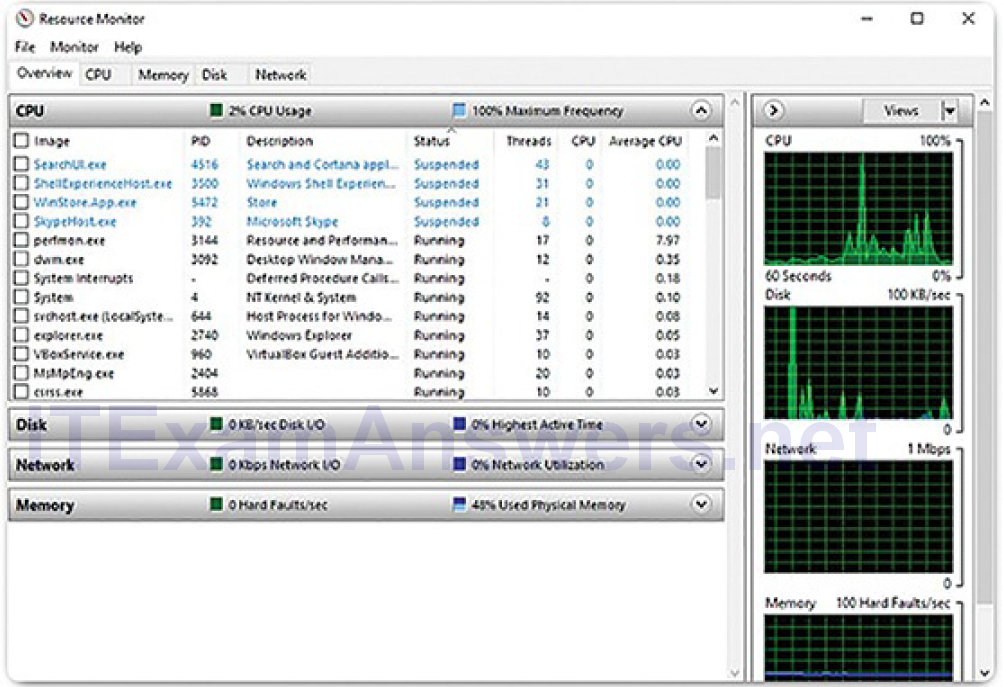
Figure 2-20 Windows 10 Resource Monitor
Resource Monitor has five tabs:
- Overview: General usage for each resource is shown in this tab. If you select a single process, it will be filtered across all of the tabs to show only that process’s statistics.
- CPU: The PID, number of threads, which CPU the process is using, and the average CPU usage of each process are shown in this tab. Additional information about any services that the process relies on, and the associated handles and modules, can be seen by expanding the lower rows.
- Memory: All of the statistical information about how each process uses memory is shown in this tab. Also, an overview of usage of all the RAM is shown below the Processes row.
- Disk: All of the processes that are using a disk are shown in this tab, with read/write statistics and an overview of each storage device.
- Network: All of the processes that are using the network are shown in this tab, with read/write statistics. Most importantly, the current TCP connections are shown, along with all of the ports that are listening. Thistab is very useful when trying to determine which applications and processes are communicating over the network. It makes it possible to tell if an unauthorized process is accessing the network, listening for a communication, and the address with which it is communicating.
Networking (2.2.1.7)
One of the most important features of any operating system is the ability for the computer to connect to a network. Without this feature, there is no access to network resources or the Internet. To configure Windows networking properties and test networking settings, the Network and Sharing Center, shown in Figure 2-21, is used. The easiest way to run this tool is to search for Network and Sharing Center and click it in the search results.
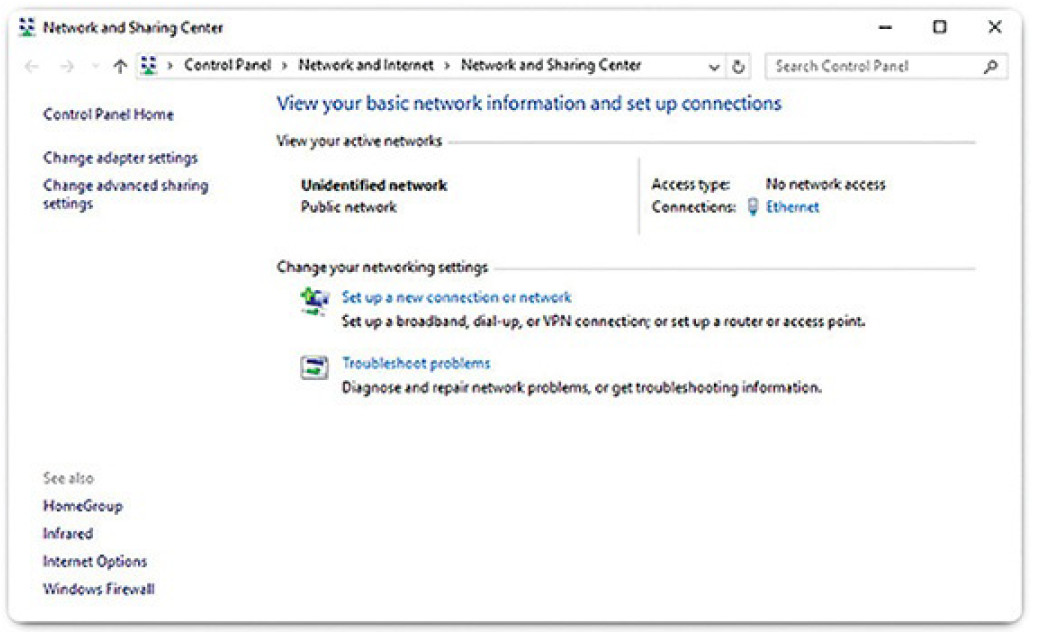
Figure 2-21 Windows 10 Network and Sharing Center
The initial view shows an overview of the active network. This view shows whether there is Internet access and if the network is private, public, or guest.
The type of network, either wired or wireless, is also shown. From this window, you can see the HomeGroup the computer belongs to, or create one if it is not already part of a HomeGroup. This tool can also be used to change adaptersettings, change advanced sharing settings, set up a new connection, or troubleshoot problems.
To configure a network adapter, choose Change adapter settings to show all of the network connections that are available. Right-click the adapter you wish to configure and choose Properties, as shown in Figure 2-22.
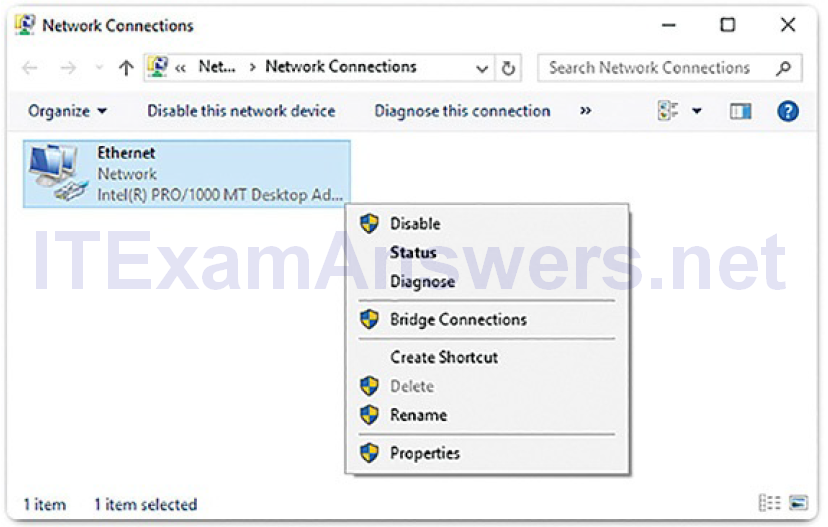
Figure 2-22 Windows 10 Network Connections
This connection uses the following items: box, highlight Internet Protocol Version 4 (TCP/IPv4) or Internet Protocol Version 6 (TCP/IPv6) depending on which version you wish to use (see Figure 2-23). Click Properties to configure the adapter.
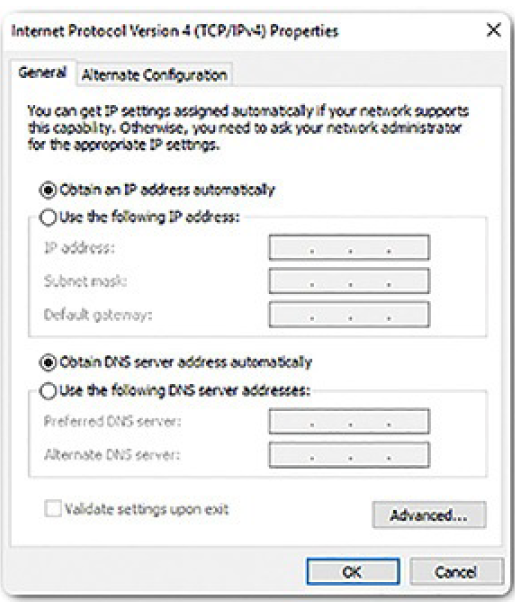
Figure 2-23 Windows 10 IPv4 Properties
In the Properties dialog box, shown in Figure 2-24, you can choose to Obtain an address automatically if there is a DHCP server available on the network. If you wish to configure addressing manually, you can fill in the address, subnet, default gateway, and DNS servers to configure the adapter. Click OK to accept the changes.
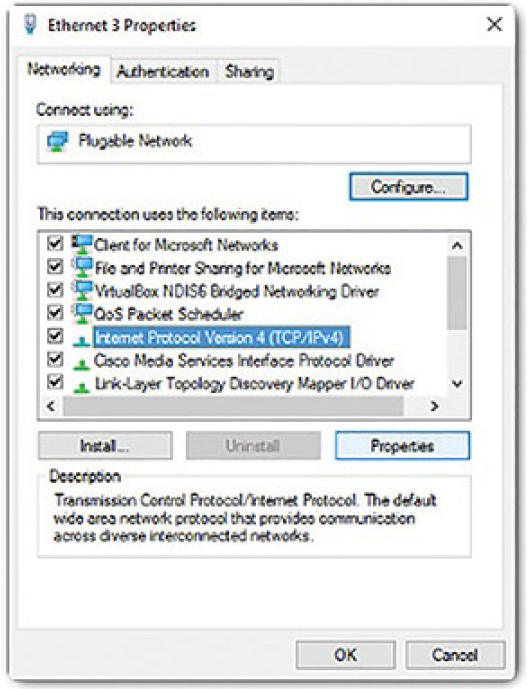
Figure 2-24 Windows 10 Ethernet Properties
You can also use the netsh.exe tool to configure networking parameters from a command prompt. This program can display and modify the network configuration. Type netsh /? at the command prompt to see a list of all the switches that can be used with this command.
After the network configuration is complete, there are some basic commands that can be used to test connectivity to the local network, and the Internet. The most basic test is performed with the ping command. To test the adapter itself, type ping 127.0.0.1 at the command prompt, as shown in Example 2-4. This will make sure that the adapter is able to send and receive data. It also confirms that the TCP/IP protocol suite is properly installed in the computer. The 127.0.0.1 address is known as the loopback address.
Example 2-4 Pinging the Loopback Address
C:\Users> ping 127.0.0.1

Pinging 127.0.0.1 with 32 bytes of data:Reply from 127.0.0.1: bytes=32 time<1ms TTL=128
Reply from 127.0.0.1: bytes=32 time<1ms TTL=128
Reply from 127.0.0.1: bytes=32 time<1ms TTL=128
Reply from 127.0.0.1: bytes=32 time<1ms TTL=128

Ping statistics for 127.0.0.1:
Packets: Sent = 4, Received = 4, Lost = 0 (0% loss),
Approximate round trip times in milli-seconds:
Minimum = 0ms, Maximum = 0ms, Average = 0ms

C:\Users>
Next, ping any host on the network. If you do not know any IP addresses of other hosts on the network, you can ping the default gateway. To find the address of the default gateway, type ipconfig at the command prompt, as shown in Example 2-5.
Example 2-5 The ipconfig Command
C:\Users> ipconfig

Windows IP Configuration

Ethernet adapter Ethernet:

Connection-specific DNS Suffix . :
Link-local IPv6 Address . . . . . : fe80::1074:d6c8:f89d:43ad%17
IPv4 Address. . . . . . . . . . . : 10.10.10.4
Subnet Mask . . . . . . . . . . . : 255.255.255.0
Default Gateway . . . . . . . . . : 10.10.10.1
Ethernet adapter VirtualBox Host-Only Network:

Connection-specific DNS Suffix . :
Link-local IPv6 Address . . . . . : fe80::1c12:a86f:b858:77ac%11
IPv4 Address. . . . . . . . . . . : 192.168.56.1
Subnet Mask . . . . . . . . . . . : 255.255.255.0
Default Gateway . . . . . . . . . :
Tunnel adapter Local Area Connection* 14:

Connection-specific DNS Suffix . . :
IPv6 Address. . . . . . . . . . . :
2001:0:4137:9e76:c5c:17ab:bd3b:e62c
Link-local IPv6 Address . . . . . : fe80::c5c:17ab:bd3b:e62c%4
Default Gateway . . . . . . . . . : ::

C:\Users>
This command will return basic network information including the IP address of the host, the subnet mask, and the default gateway. You can also ping hosts on other connected networks to make sure that you have connectivity to those networks. The ipconfig command has many switches that are helpful when troubleshooting network issues. Type ipconfig /? to see a list of all the switches that can be used with this command.
When the ping command is issued, it will send four ICMP echo request messages to the indicated IP address. If there is no reply, there may be a problem with the network configuration. It is also possible that the intended host blocks ICMP echo requests. In this case, try to ping a different host on the network.
Most often, there are four replies to the requests, showing the size of each request, the time it took to travel, and the time to live (TTL). TTL is the number of hops a packet takes along the path to its destination.
Domain Name System (DNS) should also be tested because it is used very often to find the address of hosts by translating it from a name. Use the nslookup command to test DNS. Type nslookup cisco.com at the command prompt to find the address of the Cisco web server. When the address is returned, you know that DNS is functioning correctly. You can also check to see what ports are open, where they are connected, and what their current status is. Type netstat at the command line to see details of active network connections, as shown in Example 2-6. The netstat command will be examined further later in this chapter.
Example 2-6 The netstat Command
C:\Users> netstat

Active ConnectionsProto Local Address Foreign Address State
TCP 10.10.10.4:50008 bn3sch020022361:https ESTABLISHED
TCP 10.10.10.4:56145 a23-204-181-116:https ESTABLISHED
TCP 10.10.10.4:56630 a23-0-224-158:https ESTABLISHED
TCP 10.10.10.4:57101 162.125.8.4:https CLOSE_WAIT
TCP 10.10.10.4:57102 162.125.8.4:https CLOSE_WAIT

C:\Users>
Accessing Network Resources (2.2.1.8)
Like other operating systems, Windows uses networking for many different applications such as web, email, and file services. Originally developed by IBM, Microsoft aided in the development of the Server Message Block (SMB) protocol to share network resources. SMB is mostly used for accessing files on remote hosts. The Universal Naming Convention (UNC) format is used to connect to resources, for example:
\\servername\sharename\file
In the UNC, servername is the server that is hosting the resource. This can be a DNS name, a NetBIOS name, or simply an IP address. The sharename is the root of the folder in the file system on the remote host, while the file is the resource that the local host is trying to find. The file may be deeper within the file system and this hierarchy will need to be indicated.
When sharing resources on the network, the area of the file system that will be shared will need to be identified. Access control can be applied to the folders and files to restrict users and groups to specific functions such as read, write, or deny. There are also special shares that are automatically created by Windows. These shares are called administrative shares. An administrative share is identified by the dollar sign ($) that comes after the share name. Each disk volume has an administrative share, represented by the volume letter and the $ such as C$, D$, or E$. The Windows installation folder is shared as admin$, the printers folder is shared as print$, and there are other administrative shares that can be connected. Only users with administrative privileges can access these shares.
The easiest way to connect to a share is to type the UNC of the share intoWindows File Explorer, in the box at the top of the screen which shows the breadcrumb listing of the current file system location. When Windows tries to connect to the share, you will be asked to provide credentials for accessing the resource. Remember that because the resource is on a remote computer, the credentials need to be for the remote computer, not the local computer.
Besides accessing shares on remote hosts, you can also log in to a remote host and manipulate that computer as if it were local, to make configuration changes, install software, or troubleshoot an issue with the computer. In Windows, this function is known as the Remote Desktop Protocol (RDP). When investigating security incidents, a security analyst uses RDP often to access remote computers.
To start RDP and connect to a remote computer, search for Remote Desktop and click the application. The Remote Desktop Connection window is shown in Figure 2-25.
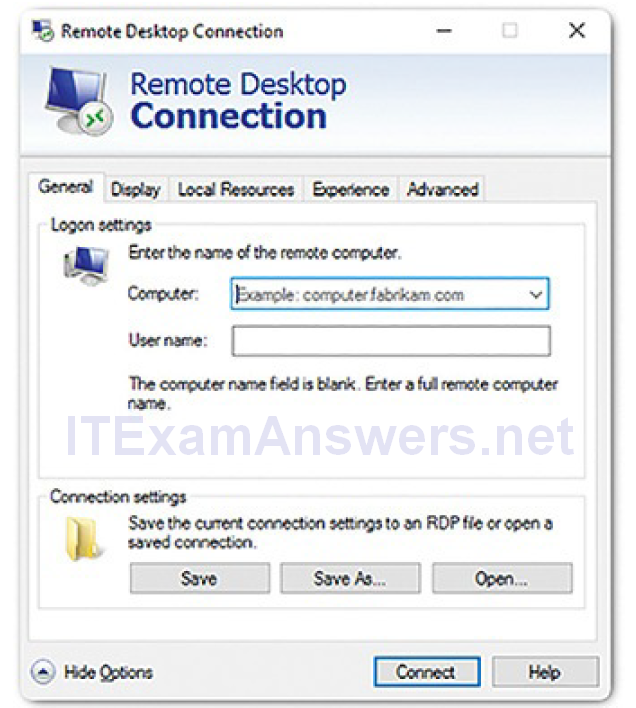
Figure 2-25 Windows Remote Desktop Connection
Windows Server (2.2.1.9)
Most Windows installations are performed as desktop installation on desktopsand laptops. There is another edition of Windows that is mainly used in data centers called Windows Server. This is a family of Microsoft products that began with Windows Server 2003. Today, the latest release is Windows Server 2016. Windows Server hosts many different services and can fulfill different roles within a company.
Note
Although there is a Windows Server 2000, it is considered a client version of Windows NT 5.0. Windows Server 2003 is a server based on NT 5.2 and begins a new family of Windows Server versions.
These are some of the services that Windows Server hosts:
- Network Services: DNS, DHCP, Terminal services, Network Controller, and Hyper-V Network virtualization
- File Services: SMB, NFS, and DFS
- Web Services: FTP, HTTP, and HTTPS
- Management: Group policy and Active Directory domain services control
Lab 2.2.1.10: Create User Accounts
In this lab, you will create and modify user accounts in Windows.
Lab 2.2.1.11: Using Windows PowerShell
The objective of this lab is to explore some of the functions of PowerShell.
Lab 2.2.1.12: Windows Task Manager
In this lab, you will explore Task Manager and manage processes from within Task Manager.
Lab 2.2.1.13: Monitor and Manage System Resources in Windows
In this lab, you will use administrative tools to monitor and manage system resources.
Windows Security (2.2.2)
In this topic, you will learn about Windows security tools, including netstat, Event Viewer, Windows Update, Local Security Policy, Windows Defender, and Windows Firewall.
The netstat Command (2.2.2.1)
When malware is present in a computer, it will often open communication ports on the host to send and receive data. The netstat command can be used to look for inbound or outbound connections that are not authorized. When used on its own, the netstat command will display all of the active TCP connections that are available.
By examining these connections, it is possible to determine which of the programs are listening for connections that are not authorized. When a program is suspected of being malware, a little research can be performed to determine its legitimacy. From there, the process can be shut down with Task Manager, and malware removal software can be used to clean the computer.
To make this process easier, you can link the connections to the running processes in Task Manager. To do this, open a command prompt with administrative privileges and use the command netstat -abno, as shown in Example 2-7.
Example 2-7 The netstat -abno Command
C:\WINDOWS\system32> netstat -abno

Active Connections

Proto Local Address Foreign Address State PID
TCP 0.0.0.0:135 0.0.0.0:0 LISTENING 1128
RpcSs
[svchost.exe]
TCP 0.0.0.0:445 0.0.0.0:0 LISTENING 4
Can not obtain ownership information
TCP 0.0.0.0:2869 0.0.0.0:0 LISTENING 4
Can not obtain ownership information
TCP 0.0.0.0:5357 0.0.0.0:0 LISTENING 4
Can not obtain ownership information
TCP 0.0.0.0:6646 0.0.0.0:0 LISTENING 5992
[MMSSHOST.EXE]
TCP 0.0.0.0:8019 0.0.0.0:0 LISTENING 4828
[QBCFMonitorService.exe]
TCP 0.0.0.0:18800 0.0.0.0:0 LISTENING 20020
[Amazon Music Helper.exe]
TCP 0.0.0.0:49664 0.0.0.0:0 LISTENING 924
Can not obtain ownership information
TCP 0.0.0.0:49665 0.0.0.0:0 LISTENING 1520
EventLog
[svchost.exe]
TCP 0.0.0.0:49666 0.0.0.0:0 LISTENING 2484
Schedule
[svchost.exe]
TCP 0.0.0.0:49689 0.0.0.0:0 LISTENING 364
[lsass.exe]
TCP 0.0.0.0:49735 0.0.0.0:0 LISTENING 4772
[spoolsv.exe]
TCP 0.0.0.0:49828 0.0.0.0:0 LISTENING 1012
Can not obtain ownership information
TCP 10.10.10.4:139 0.0.0.0:0 LISTENING 4
Can not obtain ownership information
<output omitted>

C:\WINDOWS\system32>
By examining the active TCP connections, an analyst should be able to determine if there are any suspicious programs that are listening for incoming connections on the host. You can also trace that process to Task Manager and cancel the process. There may be more than one process listed with the same name. If this is the case, use the PID to find the correct process. Each process running on the computer has a unique PID. To display the PIDs for the processes in Task Manager, open Task Manager, right-click the table heading, and select PID.
Event Viewer (2.2.2.2)
Windows Event Viewer, shown in Figure 2-26, logs the history of application, security, and system events. These log files are a valuable troubleshooting tool because they provide information necessary to identify a problem. To open Event Viewer, search for it and click the program icon.
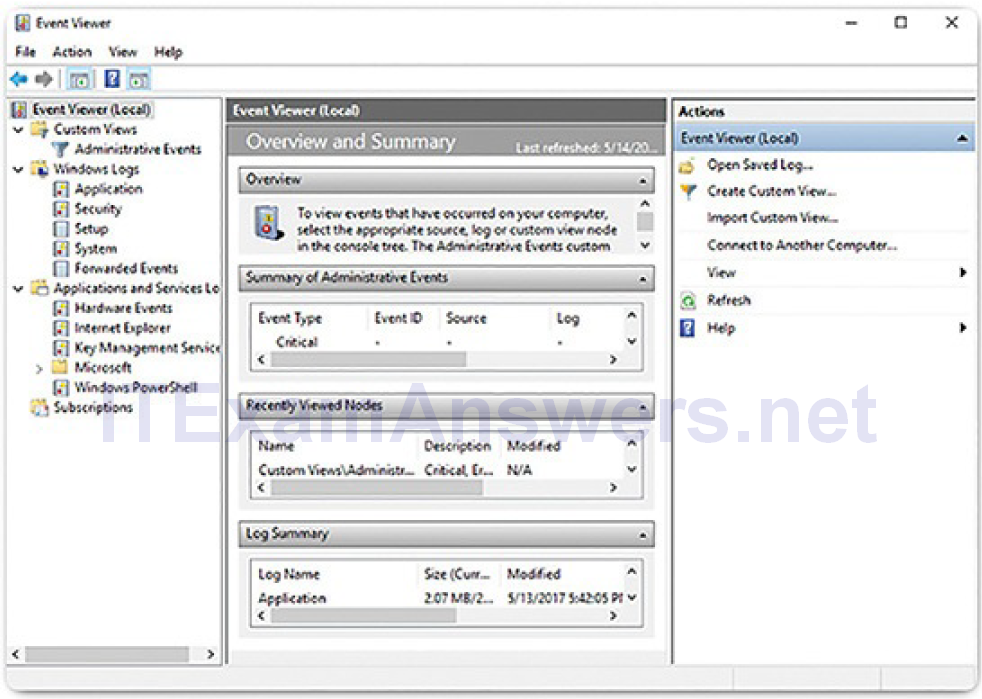
Figure 2-26 Windows Event Viewer
Windows includes two categories of event logs: Windows Logs, and Application and Services Logs. Each of these categories has multiple log types. Events that are displayed in these logs have a level: information, warning, error, or critical. They also have the date and time that the event occurred, along with the source of the event and an ID which relates to that type of event.
It is also possible to create a custom view. This is useful when looking for certain types of events, finding events that happened during a certain time period, displaying events of a certain level, and many other criteria. There is a built-in custom view called Administrative Events that shows all critical, error, and warning events from all of the administrative logs. This is a good view to start with when trying to troubleshoot a problem.
Windows Update Management (2.2.2.3)
No software is perfect, and the Windows operating system is no exception.
Attackers are constantly coming up with new ways to compromise computers and exploit bad code. Some of these attacks come so quickly that there is no defense against them. These are called zero-day exploits. Microsoft and security software developers are always trying to stay ahead of the attackers, but they are not always successful. To ensure the highest level of protection against these attacks, always make sure Windows is up to date with the latest service packs and security patches.
Patches are code updates that manufacturers provide to prevent a newly discovered virus or worm from making a successful attack. From time to time, manufacturers combine patches and upgrades into a comprehensive update application called a service pack. Many devastating virus attacks could have been much less severe if more users had downloaded and installed the latest service pack.
Windows routinely checks the Windows Update website for high-priority updates that can help protect a computer from the latest security threats. These updates include security updates, critical updates, and service packs. Depending on the setting you choose, Windows automatically downloads and installs any high-priority updates that your computer needs or notifies you as these updates become available. To configure the settings for Windows Update, search for Windows Update and click the application.
The Update status, shown in Figure 2-27, allows you to check for updates manually and see the update history of the computer. There are also settings for indicating the hours during which the computer will not automatically restart, for example during regular business hours. You can also choose when to restart the computer after an update, if necessary, with the Restart options. Advanced options are also available to choose how updates are installed and get updates for other Microsoft products.
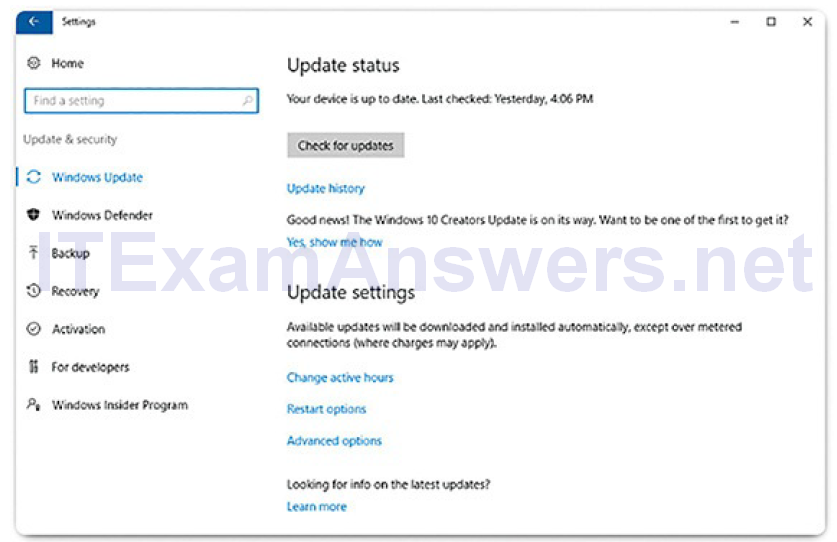
Figure 2-27 Windows Update Status
Local Security Policy (2.2.2.4)
A security policy is a set of objectives that ensures the security of a network, the data, and the computer systems in an organization. The security policy is a constantly evolving document based on changes in technology, business, and employee requirements.
In most networks that use Windows computers, Active Directory is configured with domains on a Windows Server. Windows computers join the domain. The administrator configures a Domain Security Policy that applies to all computers that join the domain. Account policies are automatically set when a user logs in to a computer that is a member of a domain. Windows Local Security Policy, shown in Figure 2-28, can be used for stand-alone computers that are not part of an Active Directory domain. To open the Local Security Policy applet, search for Local Security Policy and click the program.
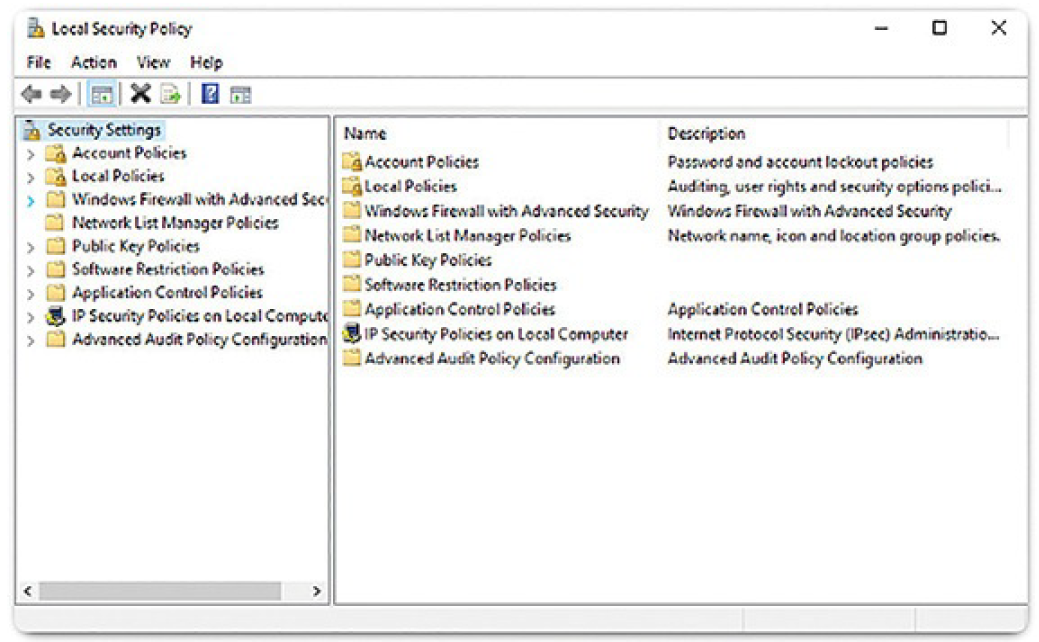
Figure 2-28 Windows Local Security Policy
Password guidelines are an important component of a security policy. Any user that must log on to a computer or connect to a network resource should be required to have a password. Passwords help prevent theft of data and malicious acts. Passwords also help to confirm that the logging of events is valid by ensuring that the user is the person they say that they are. Password Policy is found under Account Policies, and defines the criteria for the passwords for all of the users on the local computer.
Use the Account Lockout Policy in Account Policies to prevent brute-force login attempts. You can set the policy to allow the user to enter a wrong username and/or password five times. After five attempts, the account is locked out for 30 minutes. After 30 minutes, the number of attempts is reset to zero and the user can attempt to log in again.
It is important to make sure that computers are secure when users are away. A security policy should contain a rule about requiring a computer to lock when the screen saver starts. This will ensure that after a short time away from the computer, the screen saver will start and then the computer cannot be used until the user logs in.
If the Local Security Policy on every stand-alone computer is the same, then usethe Export Policy feature. Save the policy with a name, such as workstation.inf. Copy the policy file to an external media or network drive to use on other stand-alone computers. This is particularly helpful if the administrator needs to configure extensive local policies for user rights and security options.
The Local Security Policy applet contains many other security settings that apply specifically to the local computer. You can configure user rights, firewall rules, and even the ability to restrict the files that users or groups are allowed to run with AppLocker.
Windows Defender (2.2.2.5)
Malware includes viruses, worms, Trojan horses, keyloggers, spyware, and adware. These are designed to invade privacy, steal information, damage the computer, or corrupt data. It is important that you protect computers and mobile devices using reputable antimalware software. The following types of antimalware programs are available:
- Antivirus protection: This program continuously monitors for viruses. When a virus is detected, the user is warned, and the program attempts to quarantine or delete the virus.
- Adware protection: This program continuously looks for programs that display advertising on your computer.
- Phishing protection: This program blocks the IP addresses of known phishing websites and warns the user about suspicious sites.
- Spyware protection: This program scans for keyloggers and other spyware.
- Trusted/untrusted sources: This program warns you about unsafe programs about to be installed or unsafe websites before they are visited.
It may take several different programs and multiple scans to completely remove all malicious software. Run only one malware protection program at a time.
Several reputable security organizations, such as McAfee, Symantec, and Kaspersky, offer all-inclusive malware protection for computers and mobile devices. Windows has built-in virus and spyware protection called Windows Defender, shown in Figure 2-29. Windows Defender is turned on by default, providing real-time protection against infection.
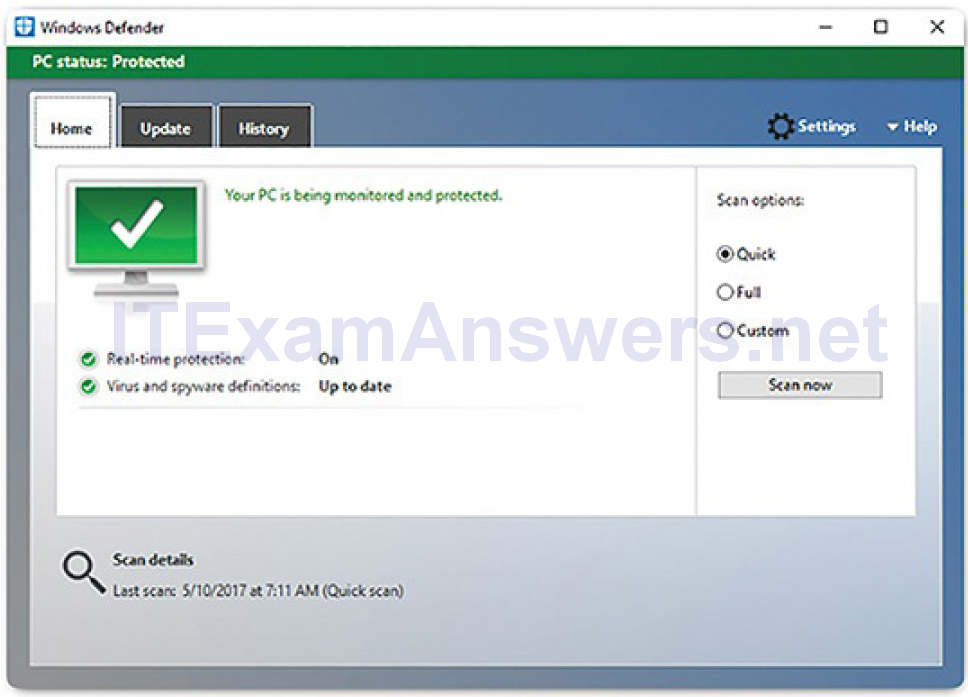
Figure 2-29 Windows Defender
To open Windows Defender, search for it and click the program. Although Windows Defender works in the background, you can perform manual scans of the computer and storage devices. You can also manually update the virus and spyware definitions in the Update tab. Also, to see all of the items that were found during previous scans, click the History tab.
Windows Firewall (2.2.2.6)
A firewall selectively denies traffic to a computer or network segment. Firewalls generally work by opening and closing the ports used by various applications.
By opening only the required ports on a firewall, you are implementing a restrictive security policy. Any packet not explicitly permitted is denied. In contrast, a permissive security policy permits access through all ports, except those explicitly denied. In the past, software and hardware were shipped with permissive settings. As users neglected to configure their equipment, the default permissive settings left many devices exposed to attackers. Most devices now ship with settings as restrictive as possible, while still allowing easy setup.
To allow program access through Windows Firewall, search for Windows Firewall, click its name to run it, and click Allow an app or feature through Windows Firewall, as shown in Figure 2-30.
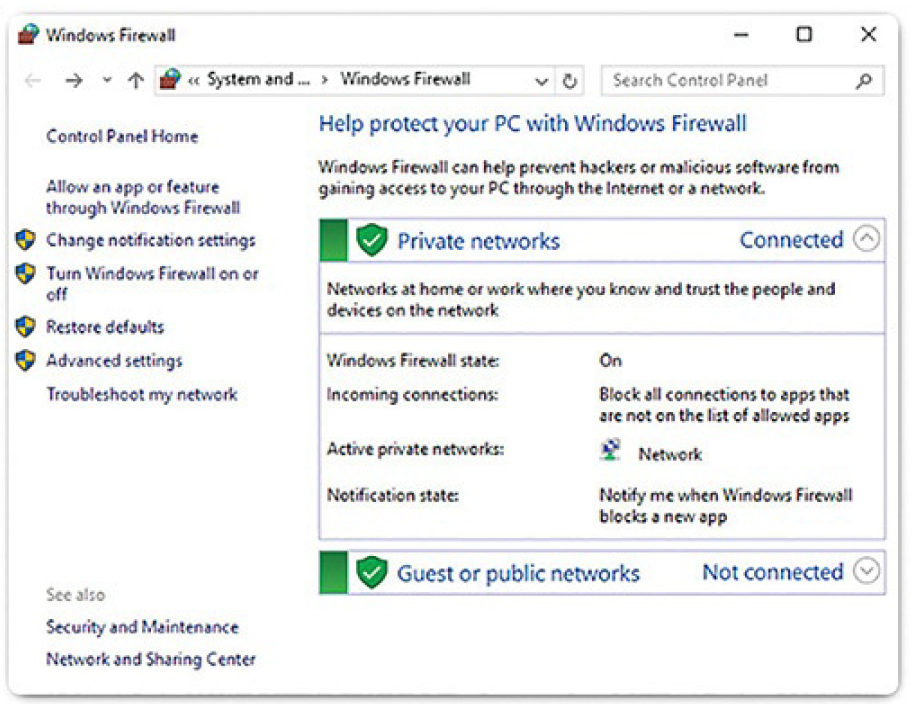
Figure 2-30 Windows Firewall
If you wish to use a different software firewall, you will need to disable Windows Firewall. To disable Windows Firewall, click Turn Windows Firewall on or off.
Many additional settings can be found under Advanced settings, as shown in Figure 2-31. Here you can create inbound or outbound traffic rules based on different criteria. You can also import and export policies or monitor different aspects of the firewall.
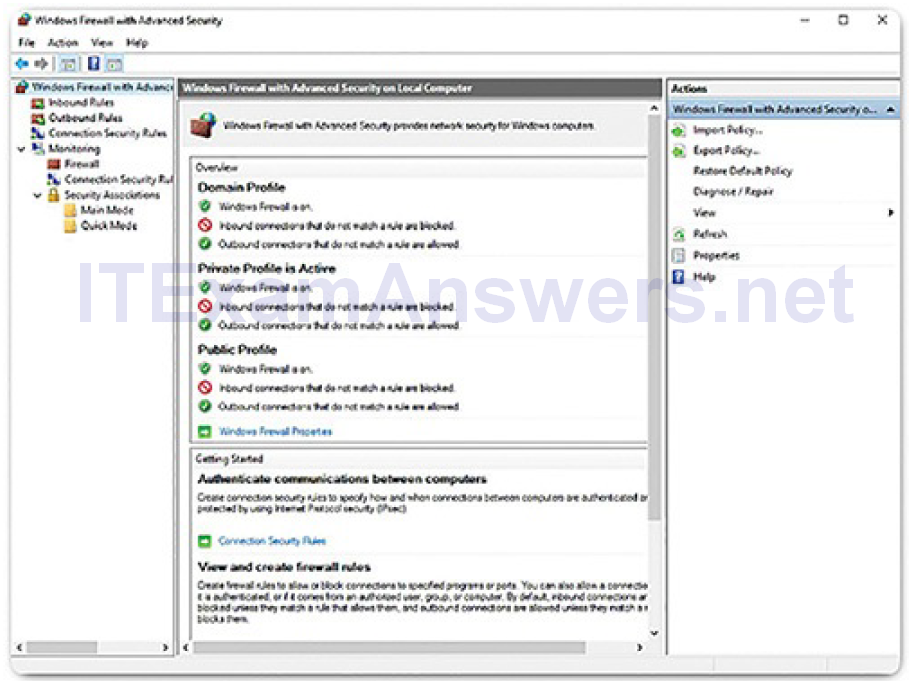
Figure 2-31 Windows Firewall Advanced Settings
Activity 2.2.2.7: Identify the Windows Command
Refer to the online course to complete this Activity.
Activity 2.2.2.8: Identify the Windows Tool
Refer to the online course to complete this Activity.
Summary (2.3)
In this chapter, you learned about the history and architecture of the Windows operating system. There have been over 40 versions of Windows desktop, Windows server, and Windows mobile operating systems.
HAL handles all the communication between the hardware and the kernel. The CPU can operate in two separate modes: kernel mode and user mode. Applications that are installed are run in user mode, and operating system coderuns in kernel mode.
NTFS formats the disk into four important data structures:
- Partition Boot Sector
- Master File Table (MFT)
- System Files
- File Area
Applications are generally made up of many processes. A process is any program that is currently executing. Each running process is made up of at least one thread. A thread is a part of the process that can be executed. Some of the processes that Windows runs are services. These are programs that run in the background to support the operating system and applications.
Each process in a 32-bit Windows computer supports a virtual address space that enables addressing up to 4 GB. Each process in a 64-bit Windows computer supports a virtual address space of up to 8 TB.
Windows stores all of the information about hardware, applications, users, and system settings in a large database known as the registry. The registry is a hierarchical database where the highest level is known as a hive. These are the five hives of the Windows registry:
- HKEY_CURRENT_USER (HKCU)
- HKEY_USERS (HKU)
- HKEY_CLASSES_ROOT (HKCR)
- HKEY_LOCAL_MACHINE (HKLM)
- HKEY_CURRENT_CONFIG (HKCC)
In this chapter, you also learned how to configure, monitor, and keep Windows secure. To do this normally requires that you run programs as Administrator. As Administrator, you can create users and groups, disable access to the Administrator and Guest accounts, and use a variety of administrator tools, including
- All commands available via the CLI and PowerShell
- Remote computer management using WMI and Remote Desktop
- Task Manager and Resource Monitor
- Networking configuration
As Administrator, you will also have the ability to use all the Windows security tools, including
- The netstat command to look for inbound and outbound connections that are not authorized
- Event Viewer for access to logs that document the history of application, security, and system events
- Windows Update configuration and scheduling
- Windows Local Security Policy to secure stand-alone computers that are not part of an Active Directory domain
- Windows Defender configuration for built-in virus and spyware protection
- Windows Firewall configuration to fine-tune the default settings
As a cybersecurity analyst, you need a basic understanding of how Windows operates and what tools are available to help keep Windows endpoints secure.
Practice
The following activities provide practice with the topics introduced in this chapter. The Labs and Class Activities are available in the companion CCNA Cybersecurity Operations Lab Manual (ISBN 9781587134388).
Class Activities
Class Activity 2.0.1.2: Identify Running Processes
Labs
Lab 2.1.2.10: Exploring Processes, Threads, Handles, and Windows Registry
Lab 2.2.1.10: Create User Accounts
Lab 2.2.1.11: Using Windows PowerShell
Lab 2.2.1.12: Windows Task Manager
Lab 2.2.1.13: Monitor and Manage System Resources in Windows
