1.3.3 Packet Tracer – Static Routing Answers
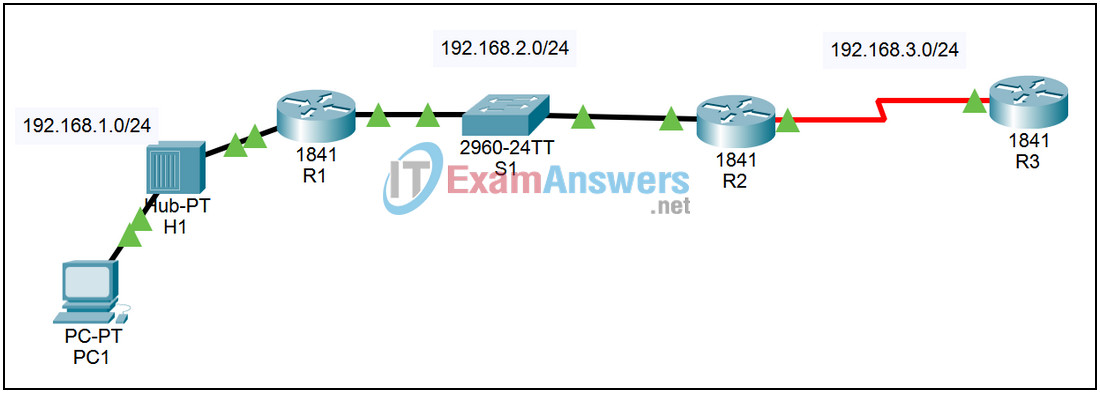
Topology

Introduction
Routers can learn of remote networks via static or dynamic routing. This activity focuses on how remote networks are added to the routing table using static routes. This is one of two ways that a remote network can be added to the routing table. Static routes are configured by the network administrator and include the network address and subnet mask of the remote network, along with the IP address of the next-hop router or the exit interface of the local router.
Learning Objectives:
- Describe the function of the routing table.
- Describe how a routing table can contain and use static routes.
Task 1:
Enter a static route on R3 to reach R1’s LAN. All of the interfaces on the router are configured and are functional. However, it is not possible to reach R1’s LAN from R3. Follow the steps below to enter a static route on R3 to reach R1’s LAN:
Step 1 – Configuring a static route on R3
Click R3 in the workspace.
Select the CLI tab.
From the CLI (command line interface) type the following commands:
Password:cisco
R3>enable
Password: class
R3# show ip route
(Note: The routing table shows directly connected routes, but there are no static routes to remote networks in the routing table.)
R3# configure terminal
R3(config)# ip route 192.168.1.0 255.255.255.0 192.168.3.1
R3(config)# end
Step 2 – Examine the routing table on R3
From the CLI type the following commands:
R3# show ip route
Are there any static routes in the routing table? If so, list the route(s) below:
_____________________________________________________
If there are no routes in the routing table, retrace your steps and troubleshoot the problem.
Step 3 – Ping from R3 to PC1
Click R3 in the workspace.
Select the CLI tab.
From the CLI type the following commands:
R3#ping 192.168.1.10
Was the ping successful? (If the ping is not successful, it is because there is no route on R1 to reach R3.)
Task 2:
Enter a static route on R1 to reach R3
Follow the steps below to enter a static route on R1 to reach R3:
Step 1 – Configuring a static route on R1
Click R1 in the workspace.
Select the CLI tab.
From the CLI type the following commands:
Password:cisco
R1>enable
Password: class
R1# show ip route
(Note: The routing table shows directly connected routes, but there are no static routes to remote networks in the routing table.)
R1# configure terminal
R1(config)# ip route 192.168.3.0 255.255.255.0 FastEthernet 0/1
R1(config)# end
Step 2 – Examine the routing table on R1
From the CLI type the following commands:
R1# show ip route
Are there any static routes in the routing table? If so, list the route(s) below:
_____________________________________________________
If there are no routes in the routing table, retrace your steps and troubleshoot the problem.
Step 3 – Ping from R3 to PC1
Click R3 in the workspace.
Select the CLI tab.
From the CLI type the following commands:
R3# ping 192.168.1.10
Was the ping successful? (Hint: If the ping is not successful, check the routing tables on all three routers to determine the problem.)
Task 3:
Enter a static route on R2 to reach R1’s LAN
Follow the steps below to enter a static route on R2 to reach R1’s LAN:
Step 1 – Configuring a static route on R2
Click R2 in the workspace.
Select the CLI tab.
From the CLI type the following commands:
Password: cisco
R2>enable
Password: class
R2# show ip route
(Note: The routing table shows directly connected routes, but there are no static routes to remote networks in the routing table.)
R2# configure terminal
R2(config)# ip route 192.168.1.0 255.255.255.0 FastEthernet 0/0
R2(config)# end
Step 2 – Examine the routing table on R2
From the CLI type the following commands:
R2# show ip route
Are there any static routes in the routing table? If so, list the route(s) below:
_____________________________________________________
If there are no routes in the routing table, retrace your steps and troubleshoot the problem.
Step 3 – Ping from R3 to PC1
Click R3 in the workspace.
Select the CLI tab.
From the CLI type the following commands:
R3# ping 192.168.1.10
Was the ping successful? (Hint: This ping should be successful. If the ping is not successful, check the routing tables on all three routers to determine the problem.)
