11.4.3 Packet Tracer – Determining the DR and BDR Answers
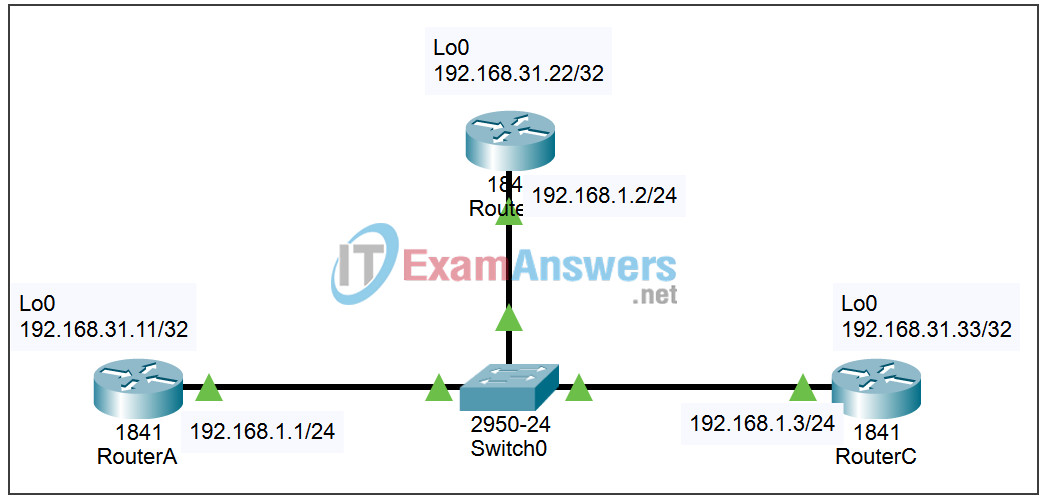
Topology

| Device | Interface | IP Address | Subnet Mask |
|---|---|---|---|
| RouterA | Fa0/0 | 192.168.1.1 | 255.255.255.0 |
| Lo0 | 192.168.31.11 | 255.255.255.255 | |
| RouterB | Fa0/0 | 192.168.1.2 | 255.255.255.0 |
| Lo0 | 192.168.31.22 | 255.255.255.255 | |
| RouterC | Fa0/0 | 192.168.1.3 | 255.255.255.0 |
| Lo0 | 192.168.31.33 | 255.255.255.255 |
Objectives:
- Examine current DR and BDR roles.
- Examine DR and BDR roles changing.
- Modify the OSPF interface priority.
- Force a new election.
- Verify new DR and BDR roles.
Task 1: Examine current DR and BDR roles
Step 1 – Wait for convergence.
When you first open the file in Packet Tracer, you may notice that the link lights for the switch are amber. All routers are attached to the switch in the middle. These link lights will stay amber for 50 seconds while the switch makes sure that one of the routers is not another switch. You will learn more about this loop avoidance technique in another course. For now, just know that it will take a few minutes for OSPF to converge. Wait for the console messages before proceeding with Step 2. The following messages are from RouterC:
00:00:50: %OSPF-5-ADJCHG: Process 1, Nbr 192.168.31.22 on FastEthernet0/0 from LOADING to FULL, Loading Done
00:00:50: %OSPF-5-ADJCHG: Process 1, Nbr 192.168.31.11 on FastEthernet0/0 from LOADING to FULL, Loading Done
Step 2 – Enter the show ip ospf neighbor command.
- Use the show ip ospf neighbor command on each router to examine the current DR and BDR
- Which router is the DR?
- Which router is the BDR?
Task 2: Examine DR and BDR changing roles
Step 1 – Turn on Debugging.
Although not covered in this chapter, you can monitor the DR and BDR election process with a debug command. On RouterA and RouterB, enter the debug ip ospf adj command.
Step 2 – Disable the Fast Ethernet interface on RouterC.
- Since RouterC is the current DR, remove the link between RouterC and the switch to cause roles to change.
- Wait for the holddown timer to expire. According to the debug output, which router is now DR and which router is now BDR?
Step 3 – Restore the Fast Ethernet interface on RouterC.
- Reconnect RouterC to the switch.
- Wait for the new DR/BDR elections to occur. According to the debug output, which router is now DR and which router is now BDR?
Step 4 – Disable the Fast Ethernet interface on RouterB.
- Since RouterB is the current DR, remove the link between RouterB and the switch to cause roles to change.
- Wait for the holddown timer to expire. According to the debug output, which router is now DR and which router is now BDR?
Step 5 – Restore the Fast Ethernet interface on RouterB.
- Reconnect RouterB to the switch.
- Wait for the new DR/BDR elections to occur. According to the debug output, which router is now DR and which router is now BDR?
Step 6 – Turn off Debugging.
Enter the command undebug all on RouterA and RouterB to disable debugging.
Task 3: Modify the OSPF interface priority
To change the DR and BDR, configure each router with the following OSPF interface priorities:
- RouterA: 200
- RouterB: 100
- RouterC: 1 (This is the default priority)
Task 4: Force a new election
DR and BDR roles will not change to the new roles until the current DR and BDR fails. To force an election:
- save the current running configuration and
- reload the routers
Task 5: Verify new DR and BDR roles
Wait long enough for OSPF to converge and for the DR/BDR election to occur. This should take a few minutes. Use the show ip ospf neighbor command to view current DR and BDR. According to the output, which router is now DR and which router is now BDR?
