9.7.1 Packet Tracer – Skills Integration Challenge Answers
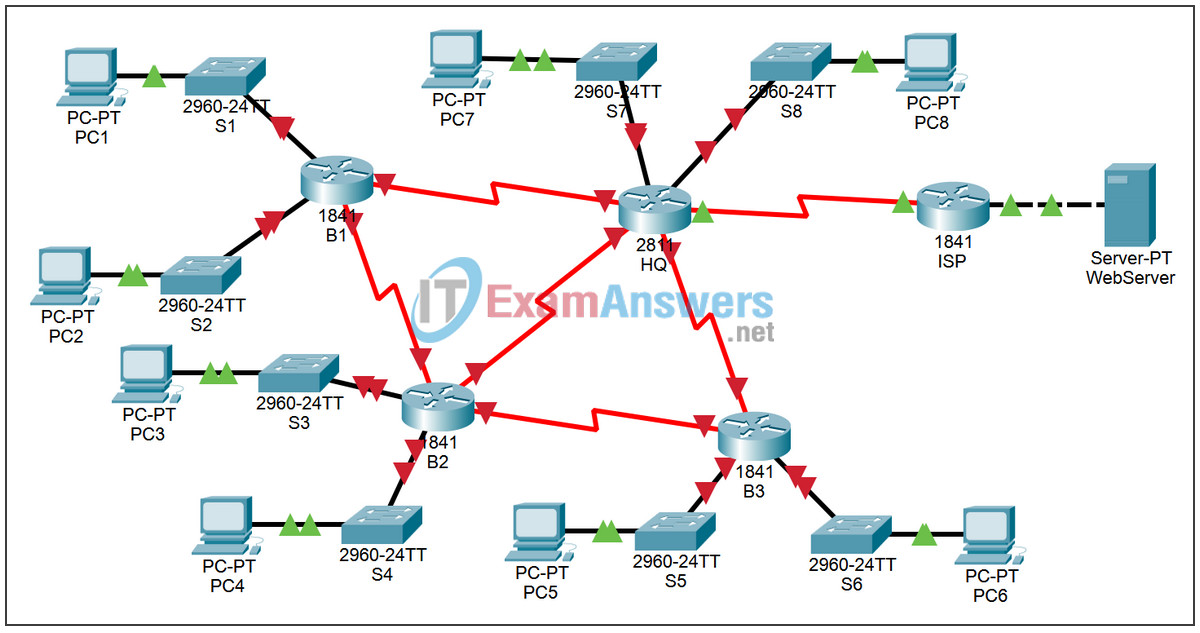
Topology

Introduction:
This Packet Tracer Skills Integration Challenge Activity is similar to the activities you created for Chapter 7, RIPv2. The scenario is slightly different, to provide more practice. In this activity, you build a network from the ground up. Starting with a given address space and network requirements, you must implement a network design that satisfies the specifications. Then implement an effective EIGRP routing configuration, manually summarize routes, fine-tune EIGRP metrics and timers, and configure static and default routing for Internet access.
Addressing table
| Device | Interface | IP address | Subnet mask | Default gateway |
|---|---|---|---|---|
| HQ | Fa0/0 | 10.1.35.129 | 255.255.255.224 | N/A |
| Fa0/1 | 10.1.35.161 | 255.255.255.224 | N/A | |
| S0/0/0 | 209.165.201.2 | 255.255.255.252 | N/A | |
| S0/0/1 | 172.20.0.1 | 255.255.255.252 | N/A | |
| S0/1/0 | 172.20.0.5 | 255.255.255.252 | N/A | |
| S0/1/1 | 172.20.0.9 | 255.255.255.252 | N/A | |
| B1 | Fa0/0 | 10.1.32.1 | 255.255.255.0 | N/A |
| Fa0/1 | 10.1.33.1 | 255.255.255.0 | N/A | |
| S0/0/0 | 172.20.0.2 | 255.255.255.252 | N/A | |
| S0/0/1 | 172.20.0.13 | 255.255.255.252 | N/A | |
| B2 | Fa0/0 | 10.1.34.1 | 255.255.255.128 | N/A |
| Fa0/1 | 10.1.34.129 | 255.255.255.128 | N/A | |
| S0/0/0 | 172.20.0.6 | 255.255.255.252 | N/A | |
| S0/0/1 | 172.20.0.14 | 255.255.255.252 | N/A | |
| S0/1/0 | 172.20.0.17 | 255.255.255.252 | N/A | |
| B3 | Fa0/0 | 10.1.35.1 | 255.255.255.192 | N/A |
| Fa0/1 | 10.1.35.65 | 255.255.255.192 | N/A | |
| S0/0/0 | 172.20.0.10 | 255.255.255.252 | N/A | |
| S0/0/1 | 172.20.0.18 | 255.255.255.252 | N/A | |
| ISP | Fa0/0 | 209.165.202.129 | 255.255.255.252 | N/A |
| S0/0/0 | 209.165.201.1 | 255.255.255.252 | N/A | |
| Web server | NIC | 209.165.202.130 | 255.255.255.252 | 209.165.202.129 |
| PC1 | NIC | 10.1.32.254 | 255.255.255.0 | 10.1.32.1 |
| PC2 | NIC | 10.1.33.254 | 255.255.255.0 | 10.1.33.1 |
| PC3 | NIC | 10.1.34.126 | 255.255.255.128 | 10.1.34.1 |
| PC4 | NIC | 10.1.34.254 | 255.255.255.128 | 10.1.34.129 |
| PC5 | NIC | 10.1.35.62 | 255.255.255.192 | 10.1.35.1 |
| PC6 | NIC | 10.1.35.126 | 255.255.255.192 | 10.1.35.65 |
| PC7 | NIC | 10.1.35.158 | 255.255.255.224 | 10.1.35.129 |
| PC8 | NIC | 10.1.35.190 | 255.255.255.224 | 10.1.35.161 |
Objectives:
- Design and document an addressing scheme based on requirements.
- Apply a basic configuration to the devices.
- Test connectivity between directly connected devices.
- Configure and verify EIGRP routing.
- Fine-tune EIGRP.
- Configure static and default routing for Internet access.
- Verify full connectivity between all devices in the topology.
Task 1: Design and document an addressing scheme.
Step 1 – Design an addressing scheme.
Based on the network requirements shown in the topology, design an appropriate addressing scheme.
For the LANs, use the address space 10.1.32.0/22. Starting with the largest subnets requirements on B1, assign subnets in order throughout the topology.
For the WANs, use the address space 172.20.0.0/27. Assign WAN subnets according to the following specifications:
- Subnet 0 to the WAN link between HQ and B1
- Subnet 1 to the WAN link between HQ and B2
- Subnet 2 to the WAN link between HQ and B3
- Subnet 3 to the WAN link between B1 and B2
- Subnet 4 to the WAN link between B2 and B3
Step 2 – Document the addressing scheme.
Use the blank spaces on the topology to record the network addresses in dotted-decimal/slash format.
Use the table provided in the printed instructions to document the IP addresses, subnet masks and default gateway addresses.
- For LANs, assign the first address to the router interface. Assign the last address to the PC.
- For WAN links to HQ, assign the first address to the HQ router.
- For WAN links between branch routers:
- Assign the first address to B1 for the link between B1 and B2.
- Assign the first address to B2 for the link between B2 and B3.
Task 2: Apply a basic configuration.
Step 1 – Configure the routers.
Using your documentation, configure the routers with basic configurations
Step 2 – Configure the PCs.
Using your documentation, configure the PCs with an IP address, subnet mask, and default gateway.
Task 3: Test connectivity.
Before continuing, make sure that each device can ping its directly connected neighbor.
Task 4: Configure and verify EIGRP routing.
Step 1 – Configure EIGRP.
Configure all devices with EIGRP routing. In your configuration, make sure you include the following:
- Disable automatic summarization.
- Stop routing updates on interfaces that are not connected to EIGRP neighbors.
Step 2 – Verify EIGRP.
Use verification commands to check your configuration. All routers should be converged on all the 10.1.32.0/22 and 172.20.0.0/27 subnets
Task 5: Fine-tune EIGRP.
Step 1 – Adjust bandwidth values used to calculate metrics.
The links between the branch routers (B1 to B2 and B2 to B3) are for back up purposes only. Configure the bandwidth values to match the actual bandwidth so that EIGRP does not equal-cost load across the T1 links to HQ and the backup links to the neighboring branch router.
Step 2 – Adjust hello intervals for the slower links.
Change the hello intervals for the 64 kbps links to 60 seconds.
Task 6: Configure static and default routing.
Since Packet Tracer does not support redistribution of default routes, all routers except ISP will need a default route.
Task 7: Test connectivity and examine the configuration.
Test connectivity and examine the configuration.
